

Instruction Manual
Page 4
... the power 4 Turning off the power/turning off the AV source.......4 Putting the unit in this manual The displays and panels shown in standby 4 Turning off the screen 4 Adjusting the volume 5 Attenuating the sound 5 Monitor panel operations 5 Getting Started 6 Initial settings 6 Setting the security function 6 Calendar/clock settings 7 Various Screens and Operations 7 Touch screen operations 7 Home screen 8 Source control screen 9 List/setting screen 11 Disc 12 Video 14 USB 15 iPod/iPhone 17 Apps-WebLink 18 Radio 19 Spotify 22 Other External Components 23 View camera...
... the power 4 Turning off the power/turning off the AV source.......4 Putting the unit in this manual The displays and panels shown in standby 4 Turning off the screen 4 Adjusting the volume 5 Attenuating the sound 5 Monitor panel operations 5 Getting Started 6 Initial settings 6 Setting the security function 6 Calendar/clock settings 7 Various Screens and Operations 7 Touch screen operations 7 Home screen 8 Source control screen 9 List/setting screen 11 Disc 12 Video 14 USB 15 iPod/iPhone 17 Apps-WebLink 18 Radio 19 Spotify 22 Other External Components 23 View camera...
Instruction Manual
Page 8
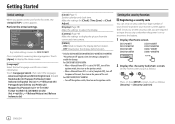
... power of the unit, then turn on the power of your receiver system against theft. DDX7018BT DDX7018BTM DMX7018BT DMX7018BTM DDX718WBT DDX718WBTM DMX718WBT DMX718WBTM 2 Display the screen. Getting Started Initial settings When you are required to input the security code when the power is changed. Make the settings for [Clock], [Time Zone] or [Clock Adjust]. [Display] (Page 38) Make the settings to adjust the display. [Camera] (Page 40) Make the settings to display the picture from the connected view camera. [DEMO...
... power of the unit, then turn on the power of your receiver system against theft. DDX7018BT DDX7018BTM DMX7018BT DMX7018BTM DDX718WBT DDX718WBTM DMX718WBT DMX718WBTM 2 Display the screen. Getting Started Initial settings When you are required to input the security code when the power is changed. Make the settings for [Clock], [Time Zone] or [Clock Adjust]. [Display] (Page 38) Make the settings to adjust the display. [Camera] (Page 40) Make the settings to display the picture from the connected view camera. [DEMO...
Instruction Manual
Page 9
... swipe to select an item, display setting menu screen or to [Manual]. Calendar/clock settings 1 Display the Home screen. For Indonesian models, [Manual] is selected initially. [Time Zone]* Select the time zone for your security code. To clear the security code: Touch [Security Code Cancellation] on the screen on the screen. On the Home screen, touch as follows: Then, on the screen to confirm your area. [Clock Adjust]* Set the date and clock manually when [Clock] is displayed. DDX7018BT DDX7018BTM DMX7018BT...
... swipe to select an item, display setting menu screen or to [Manual]. Calendar/clock settings 1 Display the Home screen. For Indonesian models, [Manual] is selected initially. [Time Zone]* Select the time zone for your security code. To clear the security code: Touch [Security Code Cancellation] on the screen on the screen. On the Home screen, touch as follows: Then, on the screen to confirm your area. [Clock Adjust]* Set the date and clock manually when [Clock] is displayed. DDX7018BT DDX7018BTM DMX7018BT...

Instruction Manual
Page 10
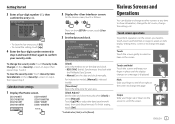
... phone control screen Available playback sources and options Touch 4 to the AV-IN input terminal. [Audio] [STANDBY] [NAV] [ ] Displays the sound adjustment screen. To change the page: Touch [ ]/[ ]. E.g. Puts the unit in standby. Radio iPod DISC USB E.g. Source/option selection screen for DDX7018BT Touching the operation keys performs the following actions: [WebLink] Switches to the WebLink™ application. [Bluetooth] Plays a Bluetooth audio player. [Radio] Switches to the radio broadcast. [Spotify] Switches to the Spotify application. [iPod] Plays an iPod/iPhone...
... phone control screen Available playback sources and options Touch 4 to the AV-IN input terminal. [Audio] [STANDBY] [NAV] [ ] Displays the sound adjustment screen. To change the page: Touch [ ]/[ ]. E.g. Puts the unit in standby. Radio iPod DISC USB E.g. Source/option selection screen for DDX7018BT Touching the operation keys performs the following actions: [WebLink] Switches to the WebLink™ application. [Bluetooth] Plays a Bluetooth audio player. [Radio] Switches to the radio broadcast. [Spotify] Switches to the Spotify application. [iPod] Plays an iPod/iPhone...

Instruction Manual
Page 12
.../restores the sound. Available playback mode differs depending on the selected source or connected device. Displays the folder list/track list/audio menu/video menu. • (Touch) Selects an item (chapter/ folder/track/audio file/video file). • (Hold) Reverses/forwards search. • (Hold) Plays in slow-motion. [o] Stops playback. [SETUP] Displays the setting screen of the current playback source. [MENU CTRL] Displays the video menu control screen. (Page 14) [ ][ ] Selects a folder. [Audio] Changes the audio output channel of the operation keys may...
.../restores the sound. Available playback mode differs depending on the selected source or connected device. Displays the folder list/track list/audio menu/video menu. • (Touch) Selects an item (chapter/ folder/track/audio file/video file). • (Hold) Reverses/forwards search. • (Hold) Plays in slow-motion. [o] Stops playback. [SETUP] Displays the setting screen of the current playback source. [MENU CTRL] Displays the video menu control screen. (Page 14) [ ][ ] Selects a folder. [Audio] Changes the audio output channel of the operation keys may...

Instruction Manual
Page 23
... time the unit switches to Traffic Information, the volume is set to the previous level. *2 The RDS indicator lights up when the Network-Tracking Reception is not being received. - Lights in orange: Radio Data System station is activated. - Radio Settings for another station that can tune in FM stations only with strong signals-Local Seek. • ON: Tunes in only to FM stations with sufficient signal strength. On the source control screen...
... time the unit switches to Traffic Information, the volume is set to the previous level. *2 The RDS indicator lights up when the Network-Tracking Reception is not being received. - Lights in orange: Radio Data System station is activated. - Radio Settings for another station that can tune in FM stations only with strong signals-Local Seek. • ON: Tunes in only to FM stations with sufficient signal strength. On the source control screen...

Instruction Manual
Page 24
... services may become unavailable. • Some functions of the Spotify application on Spotify-from this unit via Bluetooth. (Page 26) For iPhone/iPod touch • Via USB input terminal: Connect iPhone/iPod touch with the cable KCA-iP103 (optional accessory). (Page 17) • Via Bluetooth: Pair the iPhone/iPod touch with the remote controller. 1 Playing time 2 Picture data 3 Thumb up/down and repeat/shuffle playback mode keys*2 4 Track information • Touching [ Working...
... services may become unavailable. • Some functions of the Spotify application on Spotify-from this unit via Bluetooth. (Page 26) For iPhone/iPod touch • Via USB input terminal: Connect iPhone/iPod touch with the cable KCA-iP103 (optional accessory). (Page 17) • Via Bluetooth: Pair the iPhone/iPod touch with the remote controller. 1 Playing time 2 Picture data 3 Thumb up/down and repeat/shuffle playback mode keys*2 4 Track information • Touching [ Working...

Instruction Manual
Page 28
... work for Bluetooth audio can also connect an external microphone to this unit. Auto pairing When is equipped with this unit depending on the device and the unit for mobile devices such as mobile phones, portable PCs and other devices. For devices with each other . You can be connected without cables and communicate with Bluetooth 2.1: You can display the following items on the Bluetooth function of the device. Bluetooth devices can be connected at a time...
... work for Bluetooth audio can also connect an external microphone to this unit. Auto pairing When is equipped with this unit depending on the device and the unit for mobile devices such as mobile phones, portable PCs and other devices. For devices with each other . You can be connected without cables and communicate with Bluetooth 2.1: You can display the following items on the Bluetooth function of the device. Bluetooth devices can be connected at a time...

Instruction Manual
Page 35
... device (such as iPhone) connected via USB. (Auto pairing may not work for some devices depending on the source/option selection screen, touch [STANDBY]. 2 Display the Audio settings screen for Bluetooth mobile phones. • Front: Front speakers only. • All (Initial): All speakers. • 1 - 30 (in standby. On the Home screen, touch as follows: 2 Select a setting to change the screen in the following situations: • When the AV source is turned off • When the Bluetooth phone is used...
... device (such as iPhone) connected via USB. (Auto pairing may not work for some devices depending on the source/option selection screen, touch [STANDBY]. 2 Display the Audio settings screen for Bluetooth mobile phones. • Front: Front speakers only. • All (Initial): All speakers. • 1 - 30 (in standby. On the Home screen, touch as follows: 2 Select a setting to change the screen in the following situations: • When the AV source is turned off • When the Bluetooth phone is used...

Instruction Manual
Page 40
... advance. Touch [Adjust] to display the illumination color adjustment screen, then adjust the color. User Background Select *1 *2 38 ENGLISH You can change the illumination color of the external navigation unit. • ON (Initial): Displays the clock while a video source is playing. • OFF: Cancels. * Only for the background. • Connect the USB device on which the image is saved in as follows: Then, on the screen, touch [Display]. • ON: Activates dimmer. • OFF...
... advance. Touch [Adjust] to display the illumination color adjustment screen, then adjust the color. User Background Select *1 *2 38 ENGLISH You can change the illumination color of the external navigation unit. • ON (Initial): Displays the clock while a video source is playing. • OFF: Cancels. * Only for the background. • Connect the USB device on which the image is saved in as follows: Then, on the screen, touch [Display]. • ON: Activates dimmer. • OFF...

Instruction Manual
Page 43
... the car from the front view camera as follows: • Fader/Balance • Speaker/X'over • Equalizer (Adjustment on . Touch one of the marks (1), then adjust the position of the HOME on the screen, touch [Special]. • ON (Initial): Activates the display demonstration. • OFF: Deactivates the display demonstration. * Recall the settings memorized by . Touch [Yes]. When adjusting the parking guidelines, make sure to use...
... the car from the front view camera as follows: • Fader/Balance • Speaker/X'over • Equalizer (Adjustment on . Touch one of the marks (1), then adjust the position of the HOME on the screen, touch [Special]. • ON (Initial): Activates the display demonstration. • OFF: Deactivates the display demonstration. * Recall the settings memorized by . Touch [Yes]. When adjusting the parking guidelines, make sure to use...
Instruction Manual
Page 44
... Indonesian models) Select the microphone to use for the unit. (Page 6) Clear the security code. (Page 7) Change the security code. (Page 7) Navigation settings Display the screen. On the Home screen, touch as follows: Then, on the screen, touch [Security]. Connect or disconnect the paired device. (Page 28) Display/change the device name to be shown on the screen, touch [Bluetooth]. • ON (Initial): Activates the Bluetooth function of the unit. • OFF: Deactivates the Bluetooth function...
... Indonesian models) Select the microphone to use for the unit. (Page 6) Clear the security code. (Page 7) Change the security code. (Page 7) Navigation settings Display the screen. On the Home screen, touch as follows: Then, on the screen, touch [Security]. Connect or disconnect the paired device. (Page 28) Display/change the device name to be shown on the screen, touch [Bluetooth]. • ON (Initial): Activates the Bluetooth function of the unit. • OFF: Deactivates the Bluetooth function...

Instruction Manual
Page 46
... ENGLISH Radio (AUD mode) AM -/FM + S/T I /W 0 - 9 DIRECT Selects a folder. Enters options. Switches the control screen. Selects a track. Shows the disc top menu. Changes the picture angle. • The picture angle changes each time you press this key. Enters direct search mode. Deletes a character while in direct search mode. * Only for in direct search. Adjusts the volume level. Starts/pauses playback. Searches for stations.* Changes the seek mode (AUTO1, AUTO2, MANUAL). • Specifies preset number. • Specifies the frequency...
... ENGLISH Radio (AUD mode) AM -/FM + S/T I /W 0 - 9 DIRECT Selects a folder. Enters options. Switches the control screen. Selects a track. Shows the disc top menu. Changes the picture angle. • The picture angle changes each time you press this key. Enters direct search mode. Deletes a character while in direct search mode. * Only for in direct search. Adjusts the volume level. Starts/pauses playback. Searches for stations.* Changes the seek mode (AUTO1, AUTO2, MANUAL). • Specifies preset number. • Specifies the frequency...

Instruction Manual
Page 48
... antenna control wire (ANT. The power supply must be connected to the wires via the fuse. • Always connect the ignition wire (red) and the battery wire (yellow) to the selected seek mode. the radio antenna extends automatically when you turn on installation and connection • Mounting and wiring this unit during disc playback, you can search for a station frequency/chapter/title/ folder/file/track directly using the number buttons. 1 Press # BS/DIRECT to enter the search mode. • Each time...
... antenna control wire (ANT. The power supply must be connected to the wires via the fuse. • Always connect the ignition wire (red) and the battery wire (yellow) to the selected seek mode. the radio antenna extends automatically when you turn on installation and connection • Mounting and wiring this unit during disc playback, you can search for a station frequency/chapter/title/ folder/file/track directly using the number buttons. 1 Press # BS/DIRECT to enter the search mode. • Each time...

Instruction Manual
Page 49
...; connector to install the unit so that the unit is unstable, it may malfunction (e.g., the sound may be turned on the car are not touching to direct sunlight or excessive heat or humidity. Parts list for installation Note: This parts list does not include all cables away from the ignition and disconnect the · battery. 2 Make the proper input and output wire connections for each unit. 3 Connect the speaker wires of the wiring harness. 4 Connect...
...; connector to install the unit so that the unit is unstable, it may malfunction (e.g., the sound may be turned on the car are not touching to direct sunlight or excessive heat or humidity. Parts list for installation Note: This parts list does not include all cables away from the ignition and disconnect the · battery. 2 Make the proper input and output wire connections for each unit. 3 Connect the speaker wires of the wiring harness. 4 Connect...

Instruction Manual
Page 50
... VIEW CAMERA 1 Navigation input (NAV) 2 TV tuner remote control output (REMO OUT) 3 Steering wheel remote controller input (REMO-IN) • Connect to the car's steering remote harness using the mounting bracket removed from the car π /"* π /"* Car bracket Note: Select the appropriate screws (supplied) for the mounting bracket. * Only for details. 4 Audio video input (AV-IN) 5 Video output (V-OUT) 6 Rear view camera input (R-CAM) 7 Output terminals*1 • Left output (White) • Right output (Red) REAR: Rear speaker preouts FRONT: Front speaker preouts SW: Subwoofer...
... VIEW CAMERA 1 Navigation input (NAV) 2 TV tuner remote control output (REMO OUT) 3 Steering wheel remote controller input (REMO-IN) • Connect to the car's steering remote harness using the mounting bracket removed from the car π /"* π /"* Car bracket Note: Select the appropriate screws (supplied) for the mounting bracket. * Only for details. 4 Audio video input (AV-IN) 5 Video output (V-OUT) 6 Rear view camera input (R-CAM) 7 Output terminals*1 • Left output (White) • Right output (Red) REAR: Rear speaker preouts FRONT: Front speaker preouts SW: Subwoofer...

Instruction Manual
Page 57
Playable files on the screen. • Operation and power supply may not work as data security functions cannot be used with the unit. • Do not use a USB device with 2 or more partitions. • Depending on using a USB device • Avoid using the USB device if it might be attached properly or the connection might affect driving safety. • When connecting with special functions such as intended for any loss of...
Playable files on the screen. • Operation and power supply may not work as data security functions cannot be used with the unit. • Do not use a USB device with 2 or more partitions. • Depending on using a USB device • Avoid using the USB device if it might be attached properly or the connection might affect driving safety. • When connecting with special functions such as intended for any loss of...

Instruction Manual
Page 58
... Error" appears. → A speaker cord has shorted or it has come into contact with the adapters used for - Playback does not start. → The format of the speakers. → Adjust the volume to the instructions supplied with the car chassis. iPhone 5S - Turn off " appears. → No playback picture is shown when the parking brake is displayed on the screen. → Turn on the unit. References Troubleshooting iPod/iPhone...
... Error" appears. → A speaker cord has shorted or it has come into contact with the adapters used for - Playback does not start. → The format of the speakers. → Adjust the volume to the instructions supplied with the car chassis. iPhone 5S - Turn off " appears. → No playback picture is shown when the parking brake is displayed on the screen. → Turn on the unit. References Troubleshooting iPod/iPhone...

Instruction Manual
Page 59
... one played back using other players. The source does not change to "USB" when you connect a USB device while listening to the radio. Connect the antenna firmly. The iPod/iPhone does not turn the power off (uncheck) "VoiceOver" on the iPod/ iPhone. "Authorization Error" appears. Check whether the connected iPod/iPhone is compatible with another source, then reselect "iPod". Troubleshooting Tracks on the recordable/rewritable discs are not played back as you have inserted a DVD Video disc of the speakers...
... one played back using other players. The source does not change to "USB" when you connect a USB device while listening to the radio. Connect the antenna firmly. The iPod/iPhone does not turn the power off (uncheck) "VoiceOver" on the iPod/ iPhone. "Authorization Error" appears. Check whether the connected iPod/iPhone is compatible with another source, then reselect "iPod". Troubleshooting Tracks on the recordable/rewritable discs are not played back as you have inserted a DVD Video disc of the speakers...

Instruction Manual
Page 60
... the connected audio player supports AVRCP (Audio/Video Remote Control Profile). "Please update the Spotify app on the unit, then connect the device again (or reset the unit). Update the application. Connect the registered device. (Page 28) "Please Wait..." "Dial Error" appears. → Dialing has failed. The unit does not pair with the Bluetooth device. → For devices compatible with Bluetooth 2.1: Register the device using a Bluetooth audio player. → Reduce the distance between the unit and the Bluetooth mobile phone. → Move the car...
... the connected audio player supports AVRCP (Audio/Video Remote Control Profile). "Please update the Spotify app on the unit, then connect the device again (or reset the unit). Update the application. Connect the registered device. (Page 28) "Please Wait..." "Dial Error" appears. → Dialing has failed. The unit does not pair with the Bluetooth device. → For devices compatible with Bluetooth 2.1: Register the device using a Bluetooth audio player. → Reduce the distance between the unit and the Bluetooth mobile phone. → Move the car...


