
Operation Manual
Page 2
... 38 Using the external navigation unit 39 BLUETOOTH 40 SETTINGS 51 Settings for using applications of iPod/iPhone/ Android/BlackBerry 51 Selecting different sources for the front and rear monitors-Zone Control 52 Sound adjustment-Audio 53 Adjustment for video playback 58 Changing the display design 59 Customizing the system settings 61 Setting menu items-SETUP 62 REMOTE CONTROLLER 65 CONNECTION/INSTALLATION 68 REFERENCES 79 Maintenance 79 More information 79 Error message list 82 Troubleshooting 83 Specifications 86 BEFORE USE IMPORTANT...
... 38 Using the external navigation unit 39 BLUETOOTH 40 SETTINGS 51 Settings for using applications of iPod/iPhone/ Android/BlackBerry 51 Selecting different sources for the front and rear monitors-Zone Control 52 Sound adjustment-Audio 53 Adjustment for video playback 58 Changing the display design 59 Customizing the system settings 61 Setting menu items-SETUP 62 REMOTE CONTROLLER 65 CONNECTION/INSTALLATION 68 REFERENCES 79 Maintenance 79 More information 79 Error message list 82 Troubleshooting 83 Specifications 86 BEFORE USE IMPORTANT...
Operation Manual
Page 4
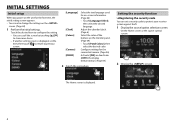
... displayed. 4 Setting the security function ❏❏Registering the security code You can also change the settings on the screen. (Page 62) 1 Perform the initial settings. On the Home screen or the source control screen: 2 Display the screen. INITIAL SETTINGS Initial setup When you power on the unit for the first time, the initial setting screen appears. • You can set the item, then touch [ ] to return to previous screen. [Language] [Clock] [Colour] [Camera] [DEMO] Select...
... displayed. 4 Setting the security function ❏❏Registering the security code You can also change the settings on the screen. (Page 62) 1 Perform the initial settings. On the Home screen or the source control screen: 2 Display the screen. INITIAL SETTINGS Initial setup When you power on the unit for the first time, the initial setting screen appears. • You can set the item, then touch [ ] to return to previous screen. [Language] [Clock] [Colour] [Camera] [DEMO] Select...
Operation Manual
Page 7
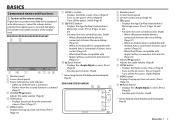
... -- DDX9016S/DDX9016SM/DDX9016DABS 1 Monitor panel* 2 Screen (touch panel) 3 Power indicator/Security indicator • Lights up while the unit is turned on. • Flashes when the security function is connected: Activates Siri. (Page 25) 9 M (Eject) button • Displays the screen. (Press) (Page 8) • Forcibly ejects the disc. (Hold) * You can change the color of the output level. When an Android device compatible with other sources. When iPod/iPhone compatible with Apple CarPlay is activated. (Page 5) 4 VOLUME K/J button Adjusts the audio volume. (Page 8) 5 CAM button...
... -- DDX9016S/DDX9016SM/DDX9016DABS 1 Monitor panel* 2 Screen (touch panel) 3 Power indicator/Security indicator • Lights up while the unit is turned on. • Flashes when the security function is connected: Activates Siri. (Page 25) 9 M (Eject) button • Displays the screen. (Press) (Page 8) • Forcibly ejects the disc. (Hold) * You can change the color of the output level. When an Android device compatible with other sources. When iPod/iPhone compatible with Apple CarPlay is activated. (Page 5) 4 VOLUME K/J button Adjusts the audio volume. (Page 8) 5 CAM button...
Operation Manual
Page 12
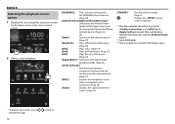
On the Home screen or the source control screen: 2 Select a source/option. [HDMI/MHL] Plays a device connected to the HDMI/MHL input terminal. (Page 38) [Android Auto]/[Apple CarPlay]/[Mirroring]*1 Switches to the Android Auto/ Apple CarPlay/App screen from the connected iPod touch/iPhone/ Android device. (Pages 24 - 26) [Radio] Switches to the radio broadcast. (Page 27) [Bluetooth] Plays a Bluetooth audio player. (Page 49) [DISC] Plays a disc. (Page 14) [iPod] Plays an iPod/iPhone. (Page 21) [USB] Plays files on a USB device. (Page 18) [Digital Radio]*2 Switches to the...
On the Home screen or the source control screen: 2 Select a source/option. [HDMI/MHL] Plays a device connected to the HDMI/MHL input terminal. (Page 38) [Android Auto]/[Apple CarPlay]/[Mirroring]*1 Switches to the Android Auto/ Apple CarPlay/App screen from the connected iPod touch/iPhone/ Android device. (Pages 24 - 26) [Radio] Switches to the radio broadcast. (Page 27) [Bluetooth] Plays a Bluetooth audio player. (Page 49) [DISC] Plays a disc. (Page 14) [iPod] Plays an iPod/iPhone. (Page 21) [USB] Plays files on a USB device. (Page 18) [Digital Radio]*2 Switches to the...
Operation Manual
Page 21
... playable iPod/iPhone types, see page 81. For 30-pin connector models: Use USB Audio cable for iPod/iPhone-KCA-iP102 (optional accessory). • To watch video with a Bluetooth connection. ❏❏Selecting the connection method 1 Display the source/option selection screen. On the Home screen or the source control screen: 2 Display the screen. 3 Display the screen. 4 Set [Automotive Mirroring] to the HDMI/MHL input terminal and via Bluetooth. 7 Finish the procedure. Wired connection • To listen to music: -- For Lightning connector models: Use the HDMI cable KCA...
... playable iPod/iPhone types, see page 81. For 30-pin connector models: Use USB Audio cable for iPod/iPhone-KCA-iP102 (optional accessory). • To watch video with a Bluetooth connection. ❏❏Selecting the connection method 1 Display the source/option selection screen. On the Home screen or the source control screen: 2 Display the screen. 3 Display the screen. 4 Set [Automotive Mirroring] to the HDMI/MHL input terminal and via Bluetooth. 7 Finish the procedure. Wired connection • To listen to music: -- For Lightning connector models: Use the HDMI cable KCA...
Operation Manual
Page 25
...; When iPhone compatible with iPhone while driving and displays them on the screen of the unit. To deactivate, press /VOICE on the monitor panel. On the Home screen or the source control screen: Compatible iPhone devices You can use Apple Mirroring] CarPlay. [CarPlay Sidebar] Select the position of the control bar (left or right) shown on the touch panel. (Hold) 2 Talk to the USB input terminal, the Bluetooth mobile phone currently connected is disconnected...
...; When iPhone compatible with iPhone while driving and displays them on the screen of the unit. To deactivate, press /VOICE on the monitor panel. On the Home screen or the source control screen: Compatible iPhone devices You can use Apple Mirroring] CarPlay. [CarPlay Sidebar] Select the position of the control bar (left or right) shown on the touch panel. (Hold) 2 Talk to the USB input terminal, the Bluetooth mobile phone currently connected is disconnected...
Operation Manual
Page 26
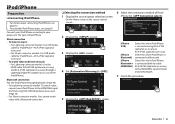
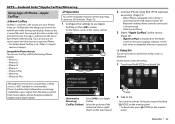
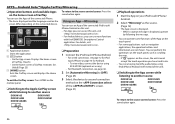
... view video, connect the device using iPod/iPhone/Android itself instead of the unit. ❏❏Switching to the App screen while listening to another source DDX9016S DDX9016SM DDX916WS DDX916WSM DDX9016DABS ❏❏Preparation 1 Connect the iPod touch/iPhone/Android. • For wired connection, see page 40. 2 Set [Automotive Mirroring] to [OFF]. (Page 25) 3 Select the device to another source DDX9016S DDX916WS DDX9016SM DDX916WSM DDX9016DABS To return to the source control screen: Press the same button...
... view video, connect the device using iPod/iPhone/Android itself instead of the unit. ❏❏Switching to the App screen while listening to another source DDX9016S DDX9016SM DDX916WS DDX916WSM DDX9016DABS ❏❏Preparation 1 Connect the iPod touch/iPhone/Android. • For wired connection, see page 40. 2 Set [Automotive Mirroring] to [OFF]. (Page 25) 3 Select the device to another source DDX9016S DDX916WS DDX9016SM DDX916WSM DDX9016DABS To return to the source control screen: Press the same button...
Operation Manual
Page 35
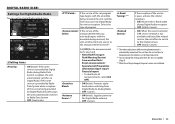
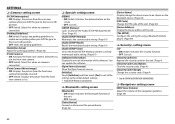
... the setting is changed, the preset services are initialized. Select the type of the service is poor, activate the L-Band reception. • ON: Receives the L-Band width during Radio Data System reception, the unit automatically switches to the Digital Radio antenna. • OFF: Cancels. *2*3 If the reception of program. To deactivate all announcements, select [All OFF]. • ON (Initial): Prevents audio break when switching from any source to Radio...
... the setting is changed, the preset services are initialized. Select the type of the service is poor, activate the L-Band reception. • ON: Receives the L-Band width during Radio Data System reception, the unit automatically switches to the Digital Radio antenna. • OFF: Cancels. *2*3 If the reception of program. To deactivate all announcements, select [All OFF]. • ON (Initial): Prevents audio break when switching from any source to Radio...
Operation Manual
Page 37
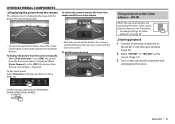
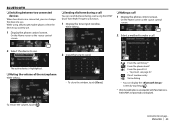
... rear view camera is displayed. To exit the camera screen Using external audio/video players-AV‑IN When the operation buttons are not displayed on the screen, touch the area shown on the illustration. • To change settings for DDX9016S/ DDX9016SM/DDX9016DABS): ENGLISH 37 When [Front Camera] is set to the reverse (R) position. To switch the screen between the rear view screen and the front view screen. OTHER EXTERNAL COMPONENTS ❏❏Displaying...
... rear view camera is displayed. To exit the camera screen Using external audio/video players-AV‑IN When the operation buttons are not displayed on the screen, touch the area shown on the illustration. • To change settings for DDX9016S/ DDX9016SM/DDX9016DABS): ENGLISH 37 When [Front Camera] is set to the reverse (R) position. To switch the screen between the rear view screen and the front view screen. OTHER EXTERNAL COMPONENTS ❏❏Displaying...
Operation Manual
Page 38
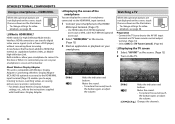
... button again, or adjust the volume. [CH K]/[CH J] Changes the channels. 38 About Wireless Display Adapter This unit is MHL, or Mobile High-definition Link. Preparation • Connect the TV tuner box to the HDMI/ MHL input terminal. (Page 73) • Use HDMI cable KCA-HD100 (optional accessory) or MHL cable KCA-MH100 (optional accessory). 2 Select "HDMI/MHL" as from a DVD player) without converting them to the instructions...
... button again, or adjust the volume. [CH K]/[CH J] Changes the channels. 38 About Wireless Display Adapter This unit is MHL, or Mobile High-definition Link. Preparation • Connect the TV tuner box to the HDMI/ MHL input terminal. (Page 73) • Use HDMI cable KCA-HD100 (optional accessory) or MHL cable KCA-MH100 (optional accessory). 2 Select "HDMI/MHL" as from a DVD player) without converting them to the instructions...
Operation Manual
Page 40
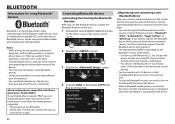
... source control screen: 2 Display the screen. 3 Display the screen. 4 Activate ([ON]) or deactivate ([OFF]) the Bluetooth function. ❏❏Registering and connecting a new Bluetooth device When you use the Bluetooth function, you can pair the device and the unit using SSP (Secure Simple Pairing) which only requires confirmation. -- Notes • While driving, do not perform complicated operations such as mobile phones, portable PCs, and other . Bluetooth devices can be connected at a time. • To use the Bluetooth device, activate the Bluetooth function on your car...
... source control screen: 2 Display the screen. 3 Display the screen. 4 Activate ([ON]) or deactivate ([OFF]) the Bluetooth function. ❏❏Registering and connecting a new Bluetooth device When you use the Bluetooth function, you can pair the device and the unit using SSP (Secure Simple Pairing) which only requires confirmation. -- Notes • While driving, do not perform complicated operations such as mobile phones, portable PCs, and other . Bluetooth devices can be connected at a time. • To use the Bluetooth device, activate the Bluetooth function on your car...
Operation Manual
Page 43
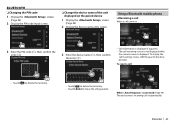
... displayed if acquired. • The call incoming screen is not displayed while the camera screen is activated (Page 49) The unit answers incoming calls automatically. To reject a call incoming screen, shift the gear to move the entry position. BLUETOOTH ❏❏Changing the PIN code 1 Display the screen. (Page 42) 2 Display the PIN code input screen. ❏❏Change the device name of the unit displayed on the paired device 1 Display the screen. (Page 42) 2 Display the device...
... displayed if acquired. • The call incoming screen is not displayed while the camera screen is activated (Page 49) The unit answers incoming calls automatically. To reject a call incoming screen, shift the gear to move the entry position. BLUETOOTH ❏❏Changing the PIN code 1 Display the screen. (Page 42) 2 Display the PIN code input screen. ❏❏Change the device name of the unit displayed on the paired device 1 Display the screen. (Page 42) 2 Display the device...
Operation Manual
Page 45
... 45 BLUETOOTH ❏❏Switching between two connected devices When two devices are connected, you want to use. 1 Display the phone control screen. On the Home screen or the source control screen: 2 Select a method to make a call. 2 Select the device to send. To restore the volume, touch [ ]. The active device is not displayed. While talking... ❏❏Making a call using a Bluetooth mobile phone, select the device you can change the device to use . 2 Input the tone to use . On the Home screen or the source control screen: ❏...
... 45 BLUETOOTH ❏❏Switching between two connected devices When two devices are connected, you want to use. 1 Display the phone control screen. On the Home screen or the source control screen: 2 Select a method to make a call. 2 Select the device to send. To restore the volume, touch [ ]. The active device is not displayed. While talking... ❏❏Making a call using a Bluetooth mobile phone, select the device you can change the device to use . 2 Input the tone to use . On the Home screen or the source control screen: ❏...
Operation Manual
Page 64
...; setting screen [NAV Voice Volume] Adjust the volume of the software. SETTINGS ❏❏ setting screen [R-CAM Interruption] • ON: Displays the picture from the front view camera as it is not initialized. ❏❏ setting screen [Bluetooth] • ON (Initial): Activates the Bluetooth function of the unit. • OFF: Cancels. [Select Device] Connect or disconnect the paired device. (Page 42) [Device Name] Display/change the device name to be shown on the screen. • OFF: Cancels. [SETUP Memory...
...; setting screen [NAV Voice Volume] Adjust the volume of the software. SETTINGS ❏❏ setting screen [R-CAM Interruption] • ON: Displays the picture from the front view camera as it is not initialized. ❏❏ setting screen [Bluetooth] • ON (Initial): Activates the Bluetooth function of the unit. • OFF: Cancels. [Select Device] Connect or disconnect the paired device. (Page 42) [Device Name] Display/change the device name to be shown on the screen. • OFF: Cancels. [SETUP Memory...
Operation Manual
Page 65
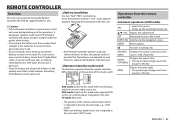
... Switches to this mode when controlling a selected source or radio source, etc. ENTER Enters options. ATT Attenuates/restores the sound. FNC/PBC/ Displays the control screen of the mode switch. Answers incoming calls. DVD mode: Switch to the navigation screen. AUD• DVD• T V• Operations from the remote controller differ depending on the position of current MENU source. (USB, iPod, DISC) MODE/ TOP MENU Changes the aspect ratio. • The aspect ratio changes each time you press this key. OPEN Adjusts the panel...
... Switches to this mode when controlling a selected source or radio source, etc. ENTER Enters options. ATT Attenuates/restores the sound. FNC/PBC/ Displays the control screen of the mode switch. Answers incoming calls. DVD mode: Switch to the navigation screen. AUD• DVD• T V• Operations from the remote controller differ depending on the position of current MENU source. (USB, iPod, DISC) MODE/ TOP MENU Changes the aspect ratio. • The aspect ratio changes each time you press this key. OPEN Adjusts the panel...
Operation Manual
Page 68
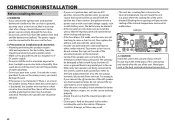
... the console has a lid, make sure the wires are working properly. • Mount the unit so that in the console of the left speaker to a front output terminal, do not connect the " connector to which they correspond. For example, if you connect the ' connector of your car's ignition does not have been activated. on the car are not touching to direct sunlight or excessive heat...
... the console has a lid, make sure the wires are working properly. • Mount the unit so that in the console of the left speaker to a front output terminal, do not connect the " connector to which they correspond. For example, if you connect the ' connector of your car's ignition does not have been activated. on the car are not touching to direct sunlight or excessive heat...
Operation Manual
Page 74
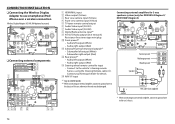
...CONNECTION/INSTALLATION ❏❏Connecting the Wireless Display Adapter to use smartphone/iPod/ iPhone over a wireless connection Wireless Display Adapter: KCA‑WL100 (optional accessory) ❏❏Connecting external components VIDEO OUT REAR VIEW CAMERA FRONT VIEW CAMERA AV-IN 1 HDMI/MHL input 2 Video output (Yellow) 3 Rear view camera input (Yellow) 4 Front view camera input (Yellow) 5 TV tuner remote control output 6 Audio Video input (AV-IN1) 7 Audio Video input (AV-IN2) 8 Digital Radio antenna input*1 9 AV-OUT/Audio output (ø3.5 mini jack) Resistance-free stereo...
...CONNECTION/INSTALLATION ❏❏Connecting the Wireless Display Adapter to use smartphone/iPod/ iPhone over a wireless connection Wireless Display Adapter: KCA‑WL100 (optional accessory) ❏❏Connecting external components VIDEO OUT REAR VIEW CAMERA FRONT VIEW CAMERA AV-IN 1 HDMI/MHL input 2 Video output (Yellow) 3 Rear view camera input (Yellow) 4 Front view camera input (Yellow) 5 TV tuner remote control output 6 Audio Video input (AV-IN1) 7 Audio Video input (AV-IN2) 8 Digital Radio antenna input*1 9 AV-OUT/Audio output (ø3.5 mini jack) Resistance-free stereo...
Operation Manual
Page 81
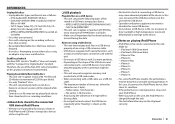
... the USB device then reset this unit: Made for -- iPhone 6s Plus -- iPhone 6 -- DVD-Audio/DVD-ROM/DVD-VR discs -- SVCD (Super Video CD), CD Text (CD-DA), CD- Playing Recordable/Rewritable discs • This unit can recognize a total of 64 770 files and 254 folders (a maximum of 255 files per folder). • Use only "finalized" discs. • This unit can be connected to this unit and the USB device. • Operation and power...
... the USB device then reset this unit: Made for -- iPhone 6s Plus -- iPhone 6 -- DVD-Audio/DVD-ROM/DVD-VR discs -- SVCD (Super Video CD), CD Text (CD-DA), CD- Playing Recordable/Rewritable discs • This unit can recognize a total of 64 770 files and 254 folders (a maximum of 255 files per folder). • Use only "finalized" discs. • This unit can be connected to this unit and the USB device. • Operation and power...
Operation Manual
Page 83
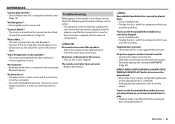
...; Select the appropriate setting for recording. "Antenna Error": • The antenna has a short-circuit and the protective circuit has activated. • Check the Digital Radio antenna. No picture is not always serious. Playback does not start. • The format of the speakers. • Adjust the volume to the file names. Tracks on the screen. (Page 8) The remote controller does not work. • Replace the battery. ❏❏Discs Recordable...
...; Select the appropriate setting for recording. "Antenna Error": • The antenna has a short-circuit and the protective circuit has activated. • Check the Digital Radio antenna. No picture is not always serious. Playback does not start. • The format of the speakers. • Adjust the volume to the file names. Tracks on the screen. (Page 8) The remote controller does not work. • Replace the battery. ❏❏Discs Recordable...
Operation Manual
Page 85
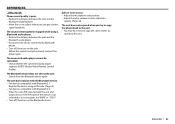
... microphone unit position. • Adjust the echo volume or noise reduction volume. (Page 44) The unit does not respond when you can get a better signal reception. The unit does not pair with the Bluetooth device. • For devices compatible with Bluetooth 2.0: Enter the same PIN code for Bluetooth phone. • Turn off , then turn on the Bluetooth device. ENGLISH 85 The connected audio player cannot be controlled. • Check whether the connected audio player supports AVRCP (Audio/Video Remote Control Profile). The Bluetooth device...
... microphone unit position. • Adjust the echo volume or noise reduction volume. (Page 44) The unit does not respond when you can get a better signal reception. The unit does not pair with the Bluetooth device. • For devices compatible with Bluetooth 2.0: Enter the same PIN code for Bluetooth phone. • Turn off , then turn on the Bluetooth device. ENGLISH 85 The connected audio player cannot be controlled. • Check whether the connected audio player supports AVRCP (Audio/Video Remote Control Profile). The Bluetooth device...


