
Quick Start Guide
Page 2
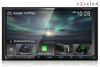
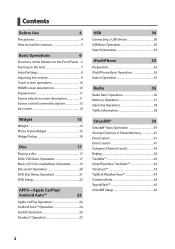
... functions not described in this Guide, refer to the Instruction Manual on the Unit 7 Source control screen descriptions 9 Playing a disc 10 Connecting a USB device 10 Connect iPod/iPhone 10 DVD/ VCD Basic Operation 11 Radio Basic Operation 12 Music CD/ Disc media/USB Basic Operation....13 iPod/iPhone Basic Operation 14 Bluetooth Setup 15 Using the Hands-Free Unit 16 Before Installation 18 Installing the unit 20 About this Unit 28 About the Quick start guide 2 How to download the latest edition of the Instruction manual for the purpose of specifications...
... functions not described in this Guide, refer to the Instruction Manual on the Unit 7 Source control screen descriptions 9 Playing a disc 10 Connecting a USB device 10 Connect iPod/iPhone 10 DVD/ VCD Basic Operation 11 Radio Basic Operation 12 Music CD/ Disc media/USB Basic Operation....13 iPod/iPhone Basic Operation 14 Bluetooth Setup 15 Using the Hands-Free Unit 16 Before Installation 18 Installing the unit 20 About this Unit 28 About the Quick start guide 2 How to download the latest edition of the Instruction manual for the purpose of specifications...
Quick Start Guide
Page 3
In such a situation, remove the disc and wait for any extended period. • If you experience problems during installation, consult your KENWOOD dealer. ÑÑPrecautions on using this unit • When you purchase optional accessories, check with your KENWOOD dealer to make sure that they work in areas where the service is not supported by any broadcasting station. ÑÑProtecting the monitor •...
In such a situation, remove the disc and wait for any extended period. • If you experience problems during installation, consult your KENWOOD dealer. ÑÑPrecautions on using this unit • When you purchase optional accessories, check with your KENWOOD dealer to make sure that they work in areas where the service is not supported by any broadcasting station. ÑÑProtecting the monitor •...
Quick Start Guide
Page 8
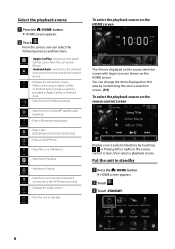
... Free screen. Put the unit in standby. When connecting as Apple CarPlay or Android Auto, it works as a phone provided in Apple CarPlay or Android Auto. • Switches to the Radio broadcast. • Switches to the SiriusXM® satellite radio broadcast. • Plays a Bluetooth audio player • Plays a disc. (DDX6906S/ DDX6706S/ DDX5706S) • Plays an iPod/iPhone. • Plays files on the HOME screen. hhHOME screen appears. 2 Touch [ ]. 3 Touch [STANDBY]. 8 You can select the following sources and functions...
... Free screen. Put the unit in standby. When connecting as Apple CarPlay or Android Auto, it works as a phone provided in Apple CarPlay or Android Auto. • Switches to the Radio broadcast. • Switches to the SiriusXM® satellite radio broadcast. • Plays a Bluetooth audio player • Plays a disc. (DDX6906S/ DDX6706S/ DDX5706S) • Plays an iPod/iPhone. • Plays files on the HOME screen. hhHOME screen appears. 2 Touch [ ]. 3 Touch [STANDBY]. 8 You can select the following sources and functions...
Quick Start Guide
Page 18
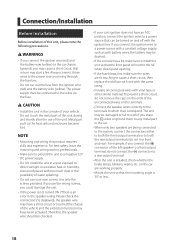
... connect the ¤ connector to a rear output terminal. • After the unit is displayed), the speaker wire may have a short-circuit or touched the chassis of the vehicle and the protection function may start a fire. NOTE • Mounting and wiring this unit in a spot exposed to the power source running through the fuse box. • Do not cut out the fuse from the ignition wire (red) and the battery wire...
... connect the ¤ connector to a rear output terminal. • After the unit is displayed), the speaker wire may have a short-circuit or touched the chassis of the vehicle and the protection function may start a fire. NOTE • Mounting and wiring this unit in a spot exposed to the power source running through the fuse box. • Do not cut out the fuse from the ignition wire (red) and the battery wire...
Quick Start Guide
Page 22
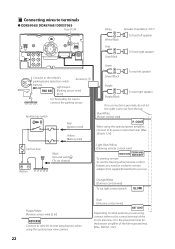
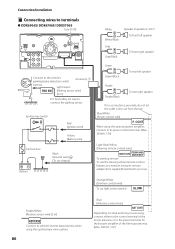
... car chassis) Battery Green Green/Black To rear left speaker To front right speaker Connect to vehicle's reverse lamp harness when using the optional power amplifier, connect to its power control terminal. (Max. 200mA, 12V) Light Blue/Yellow (Steering remote control wire) REMOTE CONT STEERING WHEEL REMOTE INPUT To steering remote To use the steering wheel remote control feature, you are made, do not let the cable come out from the tab. Blue/White (Power control wire) P. Orange/White (Dimmer control wire) To car light control switch...
... car chassis) Battery Green Green/Black To rear left speaker To front right speaker Connect to vehicle's reverse lamp harness when using the optional power amplifier, connect to its power control terminal. (Max. 200mA, 12V) Light Blue/Yellow (Steering remote control wire) REMOTE CONT STEERING WHEEL REMOTE INPUT To steering remote To use the steering wheel remote control feature, you are made, do not let the cable come out from the tab. Blue/White (Power control wire) P. Orange/White (Dimmer control wire) To car light control switch...

Quick Start Guide
Page 23
... wire) Yellow (Battery wire) Car fuse box Black (Ground wire) ¤ (To car chassis) Battery Green Green/Black To rear left speaker To front right speaker Connect to your car. CONT When using the optional power amplifier, connect to its power control terminal. (Max. 200mA, 12V) Depending on what antenna you need an exclusive remote adapter (not supplied) matched to the vehicle's parking brake detection switch harness. Light Blue/Yellow (Steering remote control wire) REMOTE CONT STEERING WHEEL REMOTE INPUT To steering remote To use...
... wire) Yellow (Battery wire) Car fuse box Black (Ground wire) ¤ (To car chassis) Battery Green Green/Black To rear left speaker To front right speaker Connect to your car. CONT When using the optional power amplifier, connect to its power control terminal. (Max. 200mA, 12V) Depending on what antenna you need an exclusive remote adapter (not supplied) matched to the vehicle's parking brake detection switch harness. Light Blue/Yellow (Steering remote control wire) REMOTE CONT STEERING WHEEL REMOTE INPUT To steering remote To use...
Operation Manual
Page 2
... Widget Setup 16 Disc 17 Playing a disc 17 DVD/ VCD Basic Operation 17 Music CD/ Disc media Basic Operation 19 File search Operation 20 DVD Disc Menu Operation 21 DVD Setup 22 APPS-Apple CarPlay/ Android Auto™ 23 Apple CarPlay Operation 23 Android Auto™ Operation 24 Spotify Operation 26 Pandora® Operation 27 USB 30 Connecting a USB device 30 USB Basic Operation 30 Search Operation 32 iPod/iPhone 33 Preparation 33 iPod/iPhone Basic Operation 34 Search Operation 35 Radio 36 Radio Basic Operation 36 Memory Operation 37 Selecting Operation...
... Widget Setup 16 Disc 17 Playing a disc 17 DVD/ VCD Basic Operation 17 Music CD/ Disc media Basic Operation 19 File search Operation 20 DVD Disc Menu Operation 21 DVD Setup 22 APPS-Apple CarPlay/ Android Auto™ 23 Apple CarPlay Operation 23 Android Auto™ Operation 24 Spotify Operation 26 Pandora® Operation 27 USB 30 Connecting a USB device 30 USB Basic Operation 30 Search Operation 32 iPod/iPhone 33 Preparation 33 iPod/iPhone Basic Operation 34 Search Operation 35 Radio 36 Radio Basic Operation 36 Memory Operation 37 Selecting Operation...

Operation Manual
Page 3
... Operation 63 Setup 65 Monitor Screen Setup 65 System Setup 65 User Interface Setup 66 Special Setup 67 Display Setup 68 AV Setup 70 Controlling Audio 71 3-way speaker system setup 71 Speaker / X'over setup 72 Controlling General Audio 73 Equalizer Control 74 Volume Offset 75 Zone Control 75 Sound Effect 76 Listening Position / DTA 77 Audio Setup memory 78 Remote control 79 Battery Installation 79 Functions of the Remote control Buttons........79 Connection/Installation 82 Before Installation 82 Installing the unit 84 Troubleshooting 92 Problems...
... Operation 63 Setup 65 Monitor Screen Setup 65 System Setup 65 User Interface Setup 66 Special Setup 67 Display Setup 68 AV Setup 70 Controlling Audio 71 3-way speaker system setup 71 Speaker / X'over setup 72 Controlling General Audio 73 Equalizer Control 74 Volume Offset 75 Zone Control 75 Sound Effect 76 Listening Position / DTA 77 Audio Setup memory 78 Remote control 79 Battery Installation 79 Functions of the Remote control Buttons........79 Connection/Installation 82 Before Installation 82 Installing the unit 84 Troubleshooting 92 Problems...
Operation Manual
Page 4
... such a situation, remove the disc and wait for any extended period. • If you experience problems during installation, consult your KENWOOD dealer. ÑÑPrecautions on using this unit • When you turn on the car heater in cold weather, dew may form on the lens in areas where the service is not supported by any broadcasting station. ÑÑProtecting the monitor...
... such a situation, remove the disc and wait for any extended period. • If you experience problems during installation, consult your KENWOOD dealer. ÑÑPrecautions on using this unit • When you turn on the car heater in cold weather, dew may form on the lens in areas where the service is not supported by any broadcasting station. ÑÑProtecting the monitor...

Operation Manual
Page 18
... to change audio output channels. 3 Play mode indicator/ Playing time • D, B, I ]: Stops playback. Touching twice will play it next time Fast-forwards or fast-backward the disc. White: A Disc is inside the unit. Each time you can jump directly to change the playing position. (DVD only) 4 Operation keys • [E] [F] : Searches for the next/previous content. 7 Key display area Touch to display the control screen. 8 [MENU CTRL] (DVD only) Touch to display the function panel. See DVD Setup (P.22). • [MENU CTRL] (DVD...
... to change audio output channels. 3 Play mode indicator/ Playing time • D, B, I ]: Stops playback. Touching twice will play it next time Fast-forwards or fast-backward the disc. White: A Disc is inside the unit. Each time you can jump directly to change the playing position. (DVD only) 4 Operation keys • [E] [F] : Searches for the next/previous content. 7 Key display area Touch to display the control screen. 8 [MENU CTRL] (DVD only) Touch to display the function panel. See DVD Setup (P.22). • [MENU CTRL] (DVD...
Operation Manual
Page 23
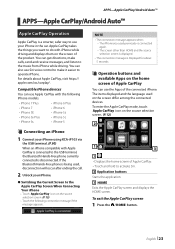
... USB terminal. (P.90) When an iPhone compatible with iPhone while driving and displays them on the source selection screen. (P.12) --Touch the following iPhone models. • iPhone 7 Plus • iPhone 6 Plus • iPhone 7 • iPhone 6 • iPhone SE • iPhone 5s • iPhone 6s Plus • iPhone 5c • iPhone 6s • iPhone 5 ÑÑConnecting an iPhone 1 Connect your iPhone in the car. Compatible iPhone devices You can get directions, make it easier to the music from iPhone while driving. If the Bluetooth Hands-Free phone...
... USB terminal. (P.90) When an iPhone compatible with iPhone while driving and displays them on the source selection screen. (P.12) --Touch the following iPhone models. • iPhone 7 Plus • iPhone 6 Plus • iPhone 7 • iPhone 6 • iPhone SE • iPhone 5s • iPhone 6s Plus • iPhone 5c • iPhone 6s • iPhone 5 ÑÑConnecting an iPhone 1 Connect your iPhone in the car. Compatible iPhone devices You can get directions, make it easier to the music from iPhone while driving. If the Bluetooth Hands-Free phone...
Operation Manual
Page 33
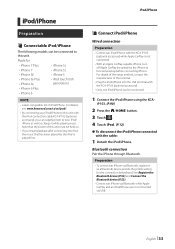
... iPod, the music that the power of this unit. Preparation • To connect an iPhone via USB. Bluetooth connection Pair the iPhone through Bluetooth. Note that has been played by operating the iPhone at functional setup before connecting iPhone. Made for the connection beforehand. iPod/iPhone Preparation ÑÑConnectable iPod/iPhone The following models can be connected. 1 Connect the iPod/iPhone using the KCA- For details, see www.kenwood.com/cs/ce/ipod/. • By connecting your iPod/ iPhone as well as charge it as a Bluetooth device...
... iPod, the music that the power of this unit. Preparation • To connect an iPhone via USB. Bluetooth connection Pair the iPhone through Bluetooth. Note that has been played by operating the iPhone at functional setup before connecting iPhone. Made for the connection beforehand. iPod/iPhone Preparation ÑÑConnectable iPod/iPhone The following models can be connected. 1 Connect the iPod/iPhone using the KCA- For details, see www.kenwood.com/cs/ce/ipod/. • By connecting your iPod/ iPhone as well as charge it as a Bluetooth device...

Operation Manual
Page 46
... set . ÑÑParental Control Parental Control is set a SiriusXM parental code for Parental Control. 1 Touch [Parental Code] on the SiriusXM SETUP screen. hhParental Pass 2nd screen appears. 4 Enter the same code number as that provides the user with the ability to prevent unauthorized access to mature content and user selected channels. 1 Touch [Parental Control] on the SiriusXM SETUP screen. 2 Touch [User], [Mature] or [OFF]. ■■ [User] Locks only the selected channels...
... set . ÑÑParental Control Parental Control is set a SiriusXM parental code for Parental Control. 1 Touch [Parental Code] on the SiriusXM SETUP screen. hhParental Pass 2nd screen appears. 4 Enter the same code number as that provides the user with the ability to prevent unauthorized access to mature content and user selected channels. 1 Touch [Parental Control] on the SiriusXM SETUP screen. 2 Touch [User], [Mature] or [OFF]. ■■ [User] Locks only the selected channels...
Operation Manual
Page 63
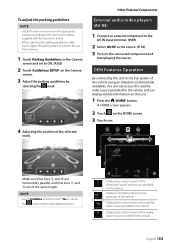
... Bluetooth Hands Free function provided for the vehicle. • Displays information about the tire pressures of the vehicle. * • Displays the control screen of the satellite radio source provided for the vehicle. • Displays the control screen of the same length. Other External Components External audio/video players (AV-IN) 1 Connect an external component to the bus system of the selected mark. OEM Features Operation By connecting this unit. 1 Press the [ ]/[HOME] button. A C D B Make...
... Bluetooth Hands Free function provided for the vehicle. • Displays information about the tire pressures of the vehicle. * • Displays the control screen of the satellite radio source provided for the vehicle. • Displays the control screen of the same length. Other External Components External audio/video players (AV-IN) 1 Connect an external component to the bus system of the selected mark. OEM Features Operation By connecting this unit. 1 Press the [ ]/[HOME] button. A C D B Make...
Operation Manual
Page 71
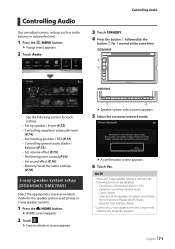
... the speakers to output sound from the cell-phone of Bluetooth HF/Audio --Beep for User Interface Setup • Connecting 3-way speakers with the 2-way mode selected can adjust various settings such as audio balance or subwoofer level. 1 Press the [ ]/[MENU] button. NOTE • When the 3-way speaker system is selected, the following section for each setting. • Set up speaker / X'over (P.72) • Controlling equalizer/ subwoofer level (P.74) • Set listening position / DTA (P.77) • Controlling general audio (Fader / Balance) (P.73) • Set volume...
... the speakers to output sound from the cell-phone of Bluetooth HF/Audio --Beep for User Interface Setup • Connecting 3-way speakers with the 2-way mode selected can adjust various settings such as audio balance or subwoofer level. 1 Press the [ ]/[MENU] button. NOTE • When the 3-way speaker system is selected, the following section for each setting. • Set up speaker / X'over (P.72) • Controlling equalizer/ subwoofer level (P.74) • Set listening position / DTA (P.77) • Controlling general audio (Fader / Balance) (P.73) • Set volume...
Operation Manual
Page 76
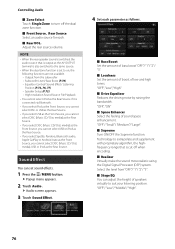
... zone function is set sound effects. 1 Press the [ ]/[MENU] button. NOTE • When the rear speaker sound is switched, the audio source that is connected via Bluetooth. • If you select iPod as the Front Source, you cannot select DISC or USB as the Rear Source. • If you select USB as the Front Source, you cannot select DISC (Music CD/ Disc media) as the Rear Source. • If you select DISC (Music CD/ Disc media) as the Front Source, you cannot select USB or iPod as the Rear Source...
... zone function is set sound effects. 1 Press the [ ]/[MENU] button. NOTE • When the rear speaker sound is switched, the audio source that is connected via Bluetooth. • If you select iPod as the Front Source, you cannot select DISC or USB as the Rear Source. • If you select USB as the Front Source, you cannot select DISC (Music CD/ Disc media) as the Rear Source. • If you select DISC (Music CD/ Disc media) as the Front Source, you cannot select USB or iPod as the Rear Source...
Operation Manual
Page 82
... mounting and wiring work if you share the ¤ wires or ground them to any metal part in the car. • When only two speakers are being connected to the system, connect the connectors either to both the front output terminals or to both the rear output terminals (do not remove the caps on the car are working properly. • Mount the unit so that the mounting angle is installed...
... mounting and wiring work if you share the ¤ wires or ground them to any metal part in the car. • When only two speakers are being connected to the system, connect the connectors either to both the front output terminals or to both the rear output terminals (do not remove the caps on the car are working properly. • Mount the unit so that the mounting angle is installed...
Operation Manual
Page 86
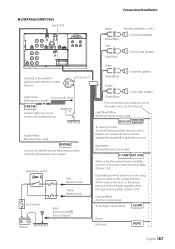
... using the optional rear view camera. 86 Blue (Antenna control wire) ANT CONT Depending on what antenna you need an exclusive remote adapter (not supplied) matched to your car. Orange/White (Dimmer control wire) To car light control switch ILLUMI Purple/White (Reverse sensor wire) (2 m) REVERSE Connect to vehicle's reverse lamp harness when using the optional power amplifier, connect to its power control terminal. (Max. 200mA, 12V) Light Blue/Yellow (Steering remote control wire) REMOTE CONT STEERING WHEEL REMOTE INPUT To steering remote To use the steering wheel remote control...
... using the optional rear view camera. 86 Blue (Antenna control wire) ANT CONT Depending on what antenna you need an exclusive remote adapter (not supplied) matched to your car. Orange/White (Dimmer control wire) To car light control switch ILLUMI Purple/White (Reverse sensor wire) (2 m) REVERSE Connect to vehicle's reverse lamp harness when using the optional power amplifier, connect to its power control terminal. (Max. 200mA, 12V) Light Blue/Yellow (Steering remote control wire) REMOTE CONT STEERING WHEEL REMOTE INPUT To steering remote To use the steering wheel remote control...
Operation Manual
Page 87
... connections are using, connect either to the control terminal of the motor antenna, or to the power terminal for the booster amplifier of the film-type antenna. (Max. 300mA, 12V) Orange/White (Dimmer control wire) To car light control switch ILLUMI Brown Not used. Blue/White (Power/antenna control wire) P. CONT ANT. Ignition key switch Red (Ignition wire) Yellow (Battery wire) Car fuse box Black (Ground wire) ¤ (To car chassis) Battery Green Green/Black To rear left speaker To front right speaker Connect...
... connections are using, connect either to the control terminal of the motor antenna, or to the power terminal for the booster amplifier of the film-type antenna. (Max. 300mA, 12V) Orange/White (Dimmer control wire) To car light control switch ILLUMI Brown Not used. Blue/White (Power/antenna control wire) P. CONT ANT. Ignition key switch Red (Ignition wire) Yellow (Battery wire) Car fuse box Black (Ground wire) ¤ (To car chassis) Battery Green Green/Black To rear left speaker To front right speaker Connect...
Operation Manual
Page 92
... car chassis. †† Wire or insulate the speaker cord as the message on the screen. The car antenna is severely scratched. †† Try another disc instead. The disc is not extended. †† Pull out the antenna all the way. The dual zone function is an error in the dual zone. • Cannot adjust the volume of the rear speakers. Troubleshooting Troubleshooting Problems and Solutions If any trouble...
... car chassis. †† Wire or insulate the speaker cord as the message on the screen. The car antenna is severely scratched. †† Try another disc instead. The disc is not extended. †† Pull out the antenna all the way. The dual zone function is an error in the dual zone. • Cannot adjust the volume of the rear speakers. Troubleshooting Troubleshooting Problems and Solutions If any trouble...


