
Instruction Manual
Page 2
... Panel 24 Functions While Displaying the Control Screen 24 Picture Control 25 Radio Listening 26 Functions While Displaying the Control Screen 26 Seek Mode 27 Auto Memory 28 Manual Memory 28 Radio Text 29 Set Station Name 29 Traffic Information 30 Search for Program Type 30 iPod Control 31 Connecting an iPod 31 Functions When Displaying the Easy Control Panel 31 Functions While Displaying the Control Screen 32 USB Device Control 34 Functions When Displaying the Easy Control Panel 34 Functions While displaying the Control Screen 34 Folder Select 36 Sirius...
... Panel 24 Functions While Displaying the Control Screen 24 Picture Control 25 Radio Listening 26 Functions While Displaying the Control Screen 26 Seek Mode 27 Auto Memory 28 Manual Memory 28 Radio Text 29 Set Station Name 29 Traffic Information 30 Search for Program Type 30 iPod Control 31 Connecting an iPod 31 Functions When Displaying the Easy Control Panel 31 Functions While Displaying the Control Screen 32 USB Device Control 34 Functions When Displaying the Easy Control Panel 34 Functions While displaying the Control Screen 34 Folder Select 36 Sirius...

Instruction Manual
Page 3
... Lock Channel Select 78 Bluetooth Setup 79 Registering Bluetooth Unit 80 Registering Bluetooth Unit PIN Code 81 Registering Special Bluetooth Unit 81 Bluetooth Unit Connection 82 Deleting Bluetooth Unit 82 Software Information 83 Setup Memory 84 Audio Control 86 Audio Control Menu 86 Audio Control 86 Equalizer Control 87 Tone Setup 88 Zone Control 88 Remote Controller 90 Battery installation 90 Remote Controller mode switch 90 Common operations (AUD mode) 91 DVD/VCD/CD/Audio files (DVD mode) 92 Radio (AUD mode) 93 DVD Language Codes 94 Help? Error...
... Lock Channel Select 78 Bluetooth Setup 79 Registering Bluetooth Unit 80 Registering Bluetooth Unit PIN Code 81 Registering Special Bluetooth Unit 81 Bluetooth Unit Connection 82 Deleting Bluetooth Unit 82 Software Information 83 Setup Memory 84 Audio Control 86 Audio Control Menu 86 Audio Control 86 Equalizer Control 87 Tone Setup 88 Zone Control 88 Remote Controller 90 Battery installation 90 Remote Controller mode switch 90 Common operations (AUD mode) 91 DVD/VCD/CD/Audio files (DVD mode) 92 Radio (AUD mode) 93 DVD Language Codes 94 Help? Error...

Instruction Manual
Page 6
... characters. Pressing the Reset button with the USB device installed can be displayed. • The RDS or RBDS feature won't work with its mechanical parts. Wiping the faceplate with a ballpoint pen etc. Discs that cannot be used • Discs that contains trace amounts of the unit. In such a situation, remove the disc and wait for any broadcasting station. on the disc, or use a disc with tape stuck on it again...
... characters. Pressing the Reset button with the USB device installed can be displayed. • The RDS or RBDS feature won't work with its mechanical parts. Wiping the faceplate with a ballpoint pen etc. Discs that cannot be used • Discs that contains trace amounts of the unit. In such a situation, remove the disc and wait for any broadcasting station. on the disc, or use a disc with tape stuck on it again...

Instruction Manual
Page 7
... iPod connection cable (KCAiP301V), you can supply power to your iPod/iPhone to use the similar functions of Satellite radio tuner. For how to update the software, refer to the instruction manual of Tuner features. Refer to Tuner features for how to this unit Made for connection. MP3/WMA/AAC/JPEG playback Multisession supported Packet write not supported. Only music CD session can be on authoring conditions) Compatible with 8-cm (3 ‡ inch) discs DVD...
... iPod connection cable (KCAiP301V), you can supply power to your iPod/iPhone to use the similar functions of Satellite radio tuner. For how to update the software, refer to the instruction manual of Tuner features. Refer to Tuner features for how to this unit Made for connection. MP3/WMA/AAC/JPEG playback Multisession supported Packet write not supported. Only music CD session can be on authoring conditions) Compatible with 8-cm (3 ‡ inch) discs DVD...

Instruction Manual
Page 8
... disc media CD-R/RW/ROM, DVD±R/RW • Playable disc file format ISO 9660 Level 1/2, Joliet, Romeo, Long file name. • Playable USB device USB mass storage class, iPod with the standards listed above, the play maybe impossible depending on this unit, the surface of the disc that is not played may be scratched while the disc is inserted or ejected. Since the music...
... disc media CD-R/RW/ROM, DVD±R/RW • Playable disc file format ISO 9660 Level 1/2, Joliet, Romeo, Long file name. • Playable USB device USB mass storage class, iPod with the standards listed above, the play maybe impossible depending on this unit, the surface of the disc that is not played may be scratched while the disc is inserted or ejected. Since the music...

Instruction Manual
Page 9
... select a favorite language. 32 Indicates the number of use Do not leave discs with any DVD player. The discs with this mark can be played with a limited period of subtitled languages recorded. Up to 32 languages can be recorded in a movie. The left mark 16:9 LB indicates that a wide image picture (16:9) is playing. Operation regulatory marks With this DVD, some functions of...
... select a favorite language. 32 Indicates the number of use Do not leave discs with any DVD player. The discs with this mark can be played with a limited period of subtitled languages recorded. Up to 32 languages can be recorded in a movie. The left mark 16:9 LB indicates that a wide image picture (16:9) is playing. Operation regulatory marks With this DVD, some functions of...

Instruction Manual
Page 10
... the USB control screen to turn on the power. E Adjusts the volume Turn it to the navigation system screen. Press it was stopped at the last time. See (page 34). ¤ • Removing the USB device before entering the USB suspend mode may result in damaging the data in the USB device is changed. • Make sure that the USB device is connected firmly. B Switches to the Navigation system Press the button to switch the display...
... the USB control screen to turn on the power. E Adjusts the volume Turn it to the navigation system screen. Press it was stopped at the last time. See (page 34). ¤ • Removing the USB device before entering the USB suspend mode may result in damaging the data in the USB device is changed. • Make sure that the USB device is connected firmly. B Switches to the Navigation system Press the button to switch the display...

Instruction Manual
Page 11
...switches between Favorite Source Select screen and Full Source Select screen by touching the button. 5 Displays Source Control screen. 6 Displays the Audio Control Menu screen. (page 86) 7 Displays the Setup Menu screen. (page 60) 8 Clock display 9 ⁄ • If a Bluetooth Unit is not connected, [TEL] will not appear. 9 Displays the Full Source Select screen. ⁄ • For how to register the frequently used source buttons to display the source select screen. Removing a disc Press [0] (Eject) button. A Playing a disc When you cannot press the button of device connected...
...switches between Favorite Source Select screen and Full Source Select screen by touching the button. 5 Displays Source Control screen. 6 Displays the Audio Control Menu screen. (page 86) 7 Displays the Setup Menu screen. (page 60) 8 Clock display 9 ⁄ • If a Bluetooth Unit is not connected, [TEL] will not appear. 9 Displays the Full Source Select screen. ⁄ • For how to register the frequently used source buttons to display the source select screen. Removing a disc Press [0] (Eject) button. A Playing a disc When you cannot press the button of device connected...

Instruction Manual
Page 14
... connected. If anything else, such as guide point. When touched this area, the navigation screen appears. 2 Setting the navigation system function Touch the navigation system button displayed on the bottom of Other Sources (DNX6140/DNX6000EX/DNX5140 only) Interrupts other source screen and displays information such as Easy control panel is displayed on the Screen of the screen. 1 1 Displays the Navigation information. Using the Navigation System Displays the navigation system screen and makes...
... connected. If anything else, such as guide point. When touched this area, the navigation screen appears. 2 Setting the navigation system function Touch the navigation system button displayed on the bottom of Other Sources (DNX6140/DNX6000EX/DNX5140 only) Interrupts other source screen and displays information such as Easy control panel is displayed on the Screen of the screen. 1 1 Displays the Navigation information. Using the Navigation System Displays the navigation system screen and makes...
Instruction Manual
Page 26
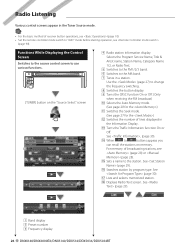
... Various control screens appear in the Tuner Source mode. • For the basic method of receiver button operations, see (page 10). • Set the remote controller mode switch to change the frequency switching. 8 Switches the button display. 9 Turns the CRSC function On or Off. (Only when receiving the FM broadcast) p Selects the Auto Memory mode. (See page 28 for the ) q Switches the Seek mode. (See page 27 for the ) w Switches the number of broadcasting stations, see (page 90). y Searches station by program type. Use...
... Various control screens appear in the Tuner Source mode. • For the basic method of receiver button operations, see (page 10). • Set the remote controller mode switch to change the frequency switching. 8 Switches the button display. 9 Turns the CRSC function On or Off. (Only when receiving the FM broadcast) p Selects the Auto Memory mode. (See page 28 for the ) q Switches the Seek mode. (See page 27 for the ) w Switches the number of broadcasting stations, see (page 90). y Searches station by program type. Use...

Instruction Manual
Page 37
... connect the XM tuner, an XM interface Box KCA-XM100V (optional accessory) is necessary.) • This document uses the SIRIUS display as an example. t Displays the program information screen. 13 14 15 1 Band display 2 Preset number 3 Channel display 4 Displays information concerning music being played. SEEK 1: Tunes channels one after the other). 9 Switches the Seek mode. For memory of lines displayed in the Satellite radio source mode. (with the optional accessory Satellite radio connected only. See (page 38). Displays the ID number...
... connect the XM tuner, an XM interface Box KCA-XM100V (optional accessory) is necessary.) • This document uses the SIRIUS display as an example. t Displays the program information screen. 13 14 15 1 Band display 2 Preset number 3 Channel display 4 Displays information concerning music being played. SEEK 1: Tunes channels one after the other). 9 Switches the Seek mode. For memory of lines displayed in the Satellite radio source mode. (with the optional accessory Satellite radio connected only. See (page 38). Displays the ID number...

Instruction Manual
Page 49
... which supports SMS function is not connected, this mark does not appear. : There is unread short message. : There is no unread short message. : Downloading Phonebook. : Indicates there is displayed. 3 Calls the displayed preset phone number. 4 Displays the SMS Select screen. See (page 51). 6 Displays the Outgoing Calls screen. See (page 55). w Returns to preset a phone number, see (page 58). 9 Displays the Hands-Free Set Up screen. When Received a Call When you receive a call...
... which supports SMS function is not connected, this mark does not appear. : There is unread short message. : There is no unread short message. : Downloading Phonebook. : Indicates there is displayed. 3 Calls the displayed preset phone number. 4 Displays the SMS Select screen. See (page 51). 6 Displays the Outgoing Calls screen. See (page 55). w Returns to preset a phone number, see (page 58). 9 Displays the Hands-Free Set Up screen. When Received a Call When you receive a call...

Instruction Manual
Page 61
... the play . 1 Display the DVD Setup screen Touch Menu" screen (page 60). "Dialog" makes the total sound volume becomes larger as compared with "Wide" and "Normal", allowing you are using a Dolby Digital software. Next page 3 English 61 Crossover Network Setup You can set up the DVD play stop mode. When front speaker or rear speaker is selected in step 1: High Pass Filter adjustment When Subwoofer is selected in step 1 : Low Pass Filter adjustment 6 Sets the sub woofer...
... the play . 1 Display the DVD Setup screen Touch Menu" screen (page 60). "Dialog" makes the total sound volume becomes larger as compared with "Wide" and "Normal", allowing you are using a Dolby Digital software. Next page 3 English 61 Crossover Network Setup You can set up the DVD play stop mode. When front speaker or rear speaker is selected in step 1: High Pass Filter adjustment When Subwoofer is selected in step 1 : Low Pass Filter adjustment 6 Sets the sub woofer...

Instruction Manual
Page 63
... lock level. 4 Determines the code number and displays the Parental Level setup screen. 5 Clears the code number. ⁄ • The number you enter first is set as your code number. • You can clear the code number by pressing the Reset button. 3 Display the Parental Level SETUP screen 4 Select a parental level and complete the setup 6 6 7 6 Selects a parental level. 7 Complete the parental level setup and returns to the "DVD Setup 2" screen. ⁄ • If a disc has higher parental lock level, you need to enter the code number...
... lock level. 4 Determines the code number and displays the Parental Level setup screen. 5 Clears the code number. ⁄ • The number you enter first is set as your code number. • You can clear the code number by pressing the Reset button. 3 Display the Parental Level SETUP screen 4 Select a parental level and complete the setup 6 6 7 6 Selects a parental level. 7 Complete the parental level setup and returns to the "DVD Setup 2" screen. ⁄ • If a disc has higher parental lock level, you need to enter the code number...

Instruction Manual
Page 64
... mode) "Rear" : Rear sound is output. "2": Forcibly plays back a disc as a music CD. "Subwoofer" : Subwoofer sound is output. in the "2" position. "V. Also, you may not play an Audio file/VCD disc in the "Setup 2 Setup each item 1 2 3 4 5 1 Moves to the "System Setup 4" screen. q Moves to the "System Setup 2" screen. 2 Turns the key touch tone On or Off. ( "ON") 3 Allows scrolling of text display on the Source Control screen. ( "Auto") "Auto": Scrolls the screen automatically. e Sets the function of the [NAV] button. Setup Menu System Setup...
... mode) "Rear" : Rear sound is output. "2": Forcibly plays back a disc as a music CD. "Subwoofer" : Subwoofer sound is output. in the "2" position. "V. Also, you may not play an Audio file/VCD disc in the "Setup 2 Setup each item 1 2 3 4 5 1 Moves to the "System Setup 4" screen. q Moves to the "System Setup 2" screen. 2 Turns the key touch tone On or Off. ( "ON") 3 Allows scrolling of text display on the Source Control screen. ( "Auto") "Auto": Scrolls the screen automatically. e Sets the function of the [NAV] button. Setup Menu System Setup...
Instruction Manual
Page 86
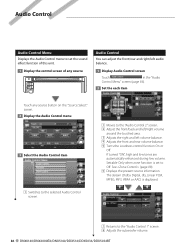
..."Audio Control Menu" screen (page 86). 2 Set the each item 4 1 2 5 6 3 3 4 1 Moves to the "Audio Control 1" screen. 8 Adjusts the subwoofer volume. 86 DNX6140/DNX6000EX/DNX5140/DDX514/DDX5034/DDX5034BT See (page 88). 6 Displays the present source information. Settable Only when zone function is displayed. 1 Switches to the selected Audio Control screen. 7 8 9 7 Returns to the "Audio Control 2" screen. 2 Adjust the front/back and left/right volume around the touched area. 3 Adjusts the right and left volume balance. 4 Adjusts the front and rear volume balance. 5 Turns...
..."Audio Control Menu" screen (page 86). 2 Set the each item 4 1 2 5 6 3 3 4 1 Moves to the "Audio Control 1" screen. 8 Adjusts the subwoofer volume. 86 DNX6140/DNX6000EX/DNX5140/DDX514/DDX5034/DDX5034BT See (page 88). 6 Displays the present source information. Settable Only when zone function is displayed. 1 Switches to the selected Audio Control screen. 7 8 9 7 Returns to the "Audio Control 2" screen. 2 Adjust the front/back and left/right volume around the touched area. 3 Adjusts the right and left volume balance. 4 Adjusts the front and rear volume balance. 5 Turns...

Instruction Manual
Page 88
... output from "Front" (same source as front), "iPod" or "VIDEO", etc. When "DVD" or "USB" is 88 DNX6140/DNX6000EX/DNX5140/DDX514/DDX5034/DDX5034BT There is set ) 8 Bass DC Extend settings (Only when Bass is selected) If turned "ON", it extends the bass center frequency to the low register by approximately 20%. 9 Returns to the "Equalizer" screen. 1 Displays the current source. 2 Set the Zone Control 2 3 3 4 2 Turns the Zone Function (that sets different source sounds for front and rear speakers...
... output from "Front" (same source as front), "iPod" or "VIDEO", etc. When "DVD" or "USB" is 88 DNX6140/DNX6000EX/DNX5140/DDX514/DDX5034/DDX5034BT There is set ) 8 Bass DC Extend settings (Only when Bass is selected) If turned "ON", it extends the bass center frequency to the low register by approximately 20%. 9 Returns to the "Equalizer" screen. 1 Displays the current source. 2 Set the Zone Control 2 3 3 4 2 Turns the Zone Function (that sets different source sounds for front and rear speakers...

Instruction Manual
Page 96
... be output from the subwoofer. • Cannot set up the low pass filter. • Cannot set to "Rear". ☞ (page 64) ▲ The Dual zone function is enabled. ☞ (page 88) ! Tuner source ? The specified disc does not play . ▲ The PBC function is enabled. ! • Cannot set up the equalizer. • Cannot set up the high pass filter. ▲ Subwoofer is not set to the instruction manual...
... be output from the subwoofer. • Cannot set up the low pass filter. • Cannot set to "Rear". ☞ (page 64) ▲ The Dual zone function is enabled. ☞ (page 88) ! Tuner source ? The specified disc does not play . ▲ The PBC function is enabled. ! • Cannot set up the equalizer. • Cannot set up the high pass filter. ▲ Subwoofer is not set to the instruction manual...

Instruction Manual
Page 98
... the car chassis. ➡ Wire or insulate the speaker cord as a source although no playable audio file. No Music: The connected USB device contains no USB device/iPod is higher than the allowable limit. ➡ Check the USB device. Media was played that doesn't have occurred to the connected USB device. ➡ Change the source to operate the unit. Update your nearest Kenwood dealer. Error When the unit fails to any source other . ➡ Push the unit's Reset button. At such times...
... the car chassis. ➡ Wire or insulate the speaker cord as a source although no playable audio file. No Music: The connected USB device contains no USB device/iPod is higher than the allowable limit. ➡ Check the USB device. Media was played that doesn't have occurred to the connected USB device. ➡ Change the source to operate the unit. Update your nearest Kenwood dealer. Error When the unit fails to any source other . ➡ Push the unit's Reset button. At such times...

Instruction Manual
Page 101
... GHz Output Power : +4 dBm (MAX), 0 dBm (AVE), Power Class 2 Profile : HFP (Hands Free Profile), SPP (Serial Port Profile), HSP (Headset Profile), A2DP (Advanced Audio Distribution Profile), AVRCP (Audio/Video Remote Control Profile), OPP (Object Push Profile), PBAP (Phonebook Access Profile), SYNC (Synchronization Profile) Navigation section (DNX6140/DNX6000EX/DNX5140 only) Receiver : High-sensitivity GPS receiver Reception Frequency : 1575.42 MHz (C/A code) Acquisition Times Cold : < 38 seconds Factory Reset...
... GHz Output Power : +4 dBm (MAX), 0 dBm (AVE), Power Class 2 Profile : HFP (Hands Free Profile), SPP (Serial Port Profile), HSP (Headset Profile), A2DP (Advanced Audio Distribution Profile), AVRCP (Audio/Video Remote Control Profile), OPP (Object Push Profile), PBAP (Phonebook Access Profile), SYNC (Synchronization Profile) Navigation section (DNX6140/DNX6000EX/DNX5140 only) Receiver : High-sensitivity GPS receiver Reception Frequency : 1575.42 MHz (C/A code) Acquisition Times Cold : < 38 seconds Factory Reset...


