

Instruction Manual
Page 35
... unit at an angle of the car battery. 2 Connect the wires properly. Consult the car audio dealer. • Install this unit in the console of your vehicle wiring harness does not have the ignition terminal, connect Ignition wire (red) to the terminal on the vehicle's fuse box which ...DC power supply and is turned on the power. 6 Reset the unit. ( 3) Part list for installation (A) Mounting sleeve (B) Trim plate (C) Wiring harness (D) Extraction key ENGLISH 31 Be sure to ground this unit during and shortly after installation. - Do not touch the metal parts of this unit ...
... unit at an angle of the car battery. 2 Connect the wires properly. Consult the car audio dealer. • Install this unit in the console of your vehicle wiring harness does not have the ignition terminal, connect Ignition wire (red) to the terminal on the vehicle's fuse box which ...DC power supply and is turned on the power. 6 Reset the unit. ( 3) Part list for installation (A) Mounting sleeve (B) Trim plate (C) Wiring harness (D) Extraction key ENGLISH 31 Be sure to ground this unit during and shortly after installation. - Do not touch the metal parts of this unit ...
Instruction Manual
Page 37
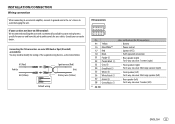
... unit. A7 (Red) Vehicle A4 (Yellow) Ignition wire (Red) Unit Battery wire (Yellow) Default wiring ISO connectors Pin Color and function (for your safety. INSTALLATION/CONNECTION Wiring connection When connecting to an external amplifier, connect its ground wire to the car's chassis to modify the wiring of the supplied wiring harness as illustrated below. If your car does...
... unit. A7 (Red) Vehicle A4 (Yellow) Ignition wire (Red) Unit Battery wire (Yellow) Default wiring ISO connectors Pin Color and function (for your safety. INSTALLATION/CONNECTION Wiring connection When connecting to an external amplifier, connect its ground wire to the car's chassis to modify the wiring of the supplied wiring harness as illustrated below. If your car does...
Instruction Manual 1
Page 31
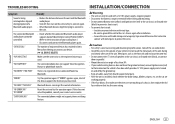
... as the heat sink and enclosure become hot. • Do not connect the [ wires of speakers to the car chassis or Ground wire (black), or connect them in the console of your vehicle wiring harness does not have tried. "ERROR" Try the operation again. If this unit in parallel...reached its limit. on and off , then turn on the unit and try the operation again. Caution • For safety's sake, leave wiring and mounting to prevent a short circuit. • To prevent short circuit: - ENGLISH 31 TROUBLESHOOTING INSTALLATION/CONNECTION Symptom Remedy Sound is being interrupted...
... as the heat sink and enclosure become hot. • Do not connect the [ wires of speakers to the car chassis or Ground wire (black), or connect them in the console of your vehicle wiring harness does not have tried. "ERROR" Try the operation again. If this unit in parallel...reached its limit. on and off , then turn on the unit and try the operation again. Caution • For safety's sake, leave wiring and mounting to prevent a short circuit. • To prevent short circuit: - ENGLISH 31 TROUBLESHOOTING INSTALLATION/CONNECTION Symptom Remedy Sound is being interrupted...

Instruction Manual 1
Page 32
... The screw holes differ depending on the power. 6 Reset the unit. ( 3) Part list for installation (A) Trim plate (only for Toyota car) (B) Wiring harness (C) Round head screws (M5 × 8 mm) (D) Flat head screws (M5 × 8 mm) Installing the unit (in Toyota cars Install onto ...the car brackets using the supplied screws (C) or (D). See Wiring connection. ( 33) 3 Install the unit to turn on the model of your car Installing in -dash mounting) Install onto the car brackets using the supplied...
... The screw holes differ depending on the power. 6 Reset the unit. ( 3) Part list for installation (A) Trim plate (only for Toyota car) (B) Wiring harness (C) Round head screws (M5 × 8 mm) (D) Flat head screws (M5 × 8 mm) Installing the unit (in Toyota cars Install onto ...the car brackets using the supplied screws (C) or (D). See Wiring connection. ( 33) 3 Install the unit to turn on the model of your car Installing in -dash mounting) Install onto the car brackets using the supplied...

Instruction Manual 1
Page 33
... : We recommend installing the unit with a commercially available custom wiring harness specific for your car and leave this job to professionals for your car audio dealer. Brown (Mute control wire) To connect the Kenwood navigation system, refer your navigation manual Blue/White (Power control wire/ Antenna control wire) (12 V 350 mA) To the power control terminal...
... : We recommend installing the unit with a commercially available custom wiring harness specific for your car and leave this job to professionals for your car audio dealer. Brown (Mute control wire) To connect the Kenwood navigation system, refer your navigation manual Blue/White (Power control wire/ Antenna control wire) (12 V 350 mA) To the power control terminal...

Instruction Manual 2
Page 31
... your audio player.) • Disconnect and connect the Bluetooth player again. Caution • For safety's sake, leave wiring and mounting to the instructions of your vehicle wiring harness does not have tried. Consult the car audio dealer. • Install this does not solve the problem, consult your...® "N/A VOICE TAG" Make sure the same voice as the heat sink and enclosure become hot. • Do not connect the [ wires of speakers to ground this unit during playback of a Bluetooth audio player. • Reduce the distance between the unit and the Bluetooth audio player...
... your audio player.) • Disconnect and connect the Bluetooth player again. Caution • For safety's sake, leave wiring and mounting to the instructions of your vehicle wiring harness does not have tried. Consult the car audio dealer. • Install this does not solve the problem, consult your...® "N/A VOICE TAG" Make sure the same voice as the heat sink and enclosure become hot. • Do not connect the [ wires of speakers to ground this unit during playback of a Bluetooth audio player. • Reduce the distance between the unit and the Bluetooth audio player...

Instruction Manual 2
Page 32
... Installing in Toyota cars Install onto the car brackets using the supplied screws (C) or (D). Do the required wiring. ( 33) Car bracket Dashboard of the car battery. 2 Connect the wires properly. The screw holes differ depending on the model of the car battery. 5 Press to your car... ( 33) 3 Install the unit to turn on the power. 6 Reset the unit. ( 3) Part list for installation (A) Trim plate (only for Toyota car) (B) Wiring harness (C) Round head screws (M5 × 8 mm) (D) Flat head screws (M5 × 8 mm) Installing the unit (in -dash mounting). 4 Connect the [ ...
... Installing in Toyota cars Install onto the car brackets using the supplied screws (C) or (D). Do the required wiring. ( 33) Car bracket Dashboard of the car battery. 2 Connect the wires properly. The screw holes differ depending on the model of the car battery. 5 Press to your car... ( 33) 3 Install the unit to turn on the power. 6 Reset the unit. ( 3) Part list for installation (A) Trim plate (only for Toyota car) (B) Wiring harness (C) Round head screws (M5 × 8 mm) (D) Flat head screws (M5 × 8 mm) Installing the unit (in -dash mounting). 4 Connect the [ ...

Instruction Manual 2
Page 33
... the Kenwood navigation system, refer your navigation manual Blue/White (Power control wire/ Antenna control wire) (12 V 350 mA) To the power control terminal when using the optional power amplifier or to avoid damaging the unit. INSTALLATION/CONNECTION Wiring connection Antenna terminal Fuse (10 A) IMPORTANT : We recommend installing the unit with a commercially available custom wiring harness...
... the Kenwood navigation system, refer your navigation manual Blue/White (Power control wire/ Antenna control wire) (12 V 350 mA) To the power control terminal when using the optional power amplifier or to avoid damaging the unit. INSTALLATION/CONNECTION Wiring connection Antenna terminal Fuse (10 A) IMPORTANT : We recommend installing the unit with a commercially available custom wiring harness...


