

Operation Manual
Page 1
DPX405BT/DPX305U Before reading this manual, click the button below to check the latest edition and the modified pages. Check the latest edition
DPX405BT/DPX305U Before reading this manual, click the button below to check the latest edition and the modified pages. Check the latest edition

Operation Manual
Page 2
... high may result in damage to the monitor or unit. Before use 1-1. CAUTION Adjust the volume so that you experience problems during installation, consult your Kenwood dealer. If you can hear the sound outside the car. To prevent a short circuit, never put or leave any metallic objects (such as coins or... this precaution may cause an accident. Safety precaution WARNING To prevent injuries or a fire, take the following precautions: Stop the car before operating the unit. DPX405BT/DPX305U 1. Driving with a dry silicon or soft cloth.
... high may result in damage to the monitor or unit. Before use 1-1. CAUTION Adjust the volume so that you experience problems during installation, consult your Kenwood dealer. If you can hear the sound outside the car. To prevent a short circuit, never put or leave any metallic objects (such as coins or... this precaution may cause an accident. Safety precaution WARNING To prevent injuries or a fire, take the following precautions: Stop the car before operating the unit. DPX405BT/DPX305U 1. Driving with a dry silicon or soft cloth.

Operation Manual
Page 3
Important information Condensation When the car is pressed. DPX405BT/DPX305U 1. Therefore, what appears on the display in the illustrations may differ from what appears on the display on the actual equipment, and some of . Notes ... make sure that conform to ISO 8859-5 or ISO 8859-1 can work with your area. The illustrations of the display and panel appearing in your Kenwood dealer to operate properly, press the Reset button. Refer to explain more clearly how the controls are examples used . In this manual are used to...
Important information Condensation When the car is pressed. DPX405BT/DPX305U 1. Therefore, what appears on the display in the illustrations may differ from what appears on the display on the actual equipment, and some of . Notes ... make sure that conform to ISO 8859-5 or ISO 8859-1 can work with your area. The illustrations of the display and panel appearing in your Kenwood dealer to operate properly, press the Reset button. Refer to explain more clearly how the controls are examples used . In this manual are used to...
Operation Manual
Page 4
...;n İmha Edilmesi Hakkında Bilgi (ayrı at ıklarını geri dönüştürebilecek bir tesiste değerlendirilmelidir. DPX405BT/DPX305U 1. Before use 1-3. Proper recycling and waste disposal will help conserve resources whilst preventing detrimental effects on Disposal of products using lasers The label is attached...
...;n İmha Edilmesi Hakkında Bilgi (ayrı at ıklarını geri dönüştürebilecek bir tesiste değerlendirilmelidir. DPX405BT/DPX305U 1. Before use 1-3. Proper recycling and waste disposal will help conserve resources whilst preventing detrimental effects on Disposal of products using lasers The label is attached...
Operation Manual
Page 8
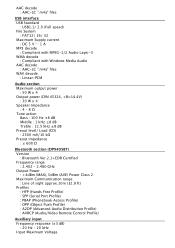
...;8 dB Middle : 1 kHz ±8 dB Treble : 12.5 kHz ±8 dB Preout level/ Load (CD) : 2500 mV/10 kΩ Preout impedance : ≤ 600 Ω Bluetooth section (DPX405BT) Version : Bluetooth Ver.2.1+EDR Certified Frequency range : 2.402 - 2.480 GHz Output Power : +4dBm (MAX), 0dBm (AVE) Power Class 2 Maximum Communication range : Line of sight approx...
...;8 dB Middle : 1 kHz ±8 dB Treble : 12.5 kHz ±8 dB Preout level/ Load (CD) : 2500 mV/10 kΩ Preout impedance : ≤ 600 Ω Bluetooth section (DPX405BT) Version : Bluetooth Ver.2.1+EDR Certified Frequency range : 2.402 - 2.480 GHz Output Power : +4dBm (MAX), 0dBm (AVE) Power Class 2 Maximum Communication range : Line of sight approx...

Operation Manual
Page 9
: 1200 mV Input Impedance : 10 kΩ General Operating voltage DPX405BT : 14.4 V (10.5 - 16V allowable) DPX305U : 14.4 V (11 - 16V allowable) Maximum Current consumption : 10 A Installation Size (W x H x D) : 182 x 111 x 157 mm Weight : 1.5 kg Specifications subject to change without notice.
: 1200 mV Input Impedance : 10 kΩ General Operating voltage DPX405BT : 14.4 V (10.5 - 16V allowable) DPX305U : 14.4 V (11 - 16V allowable) Maximum Current consumption : 10 A Installation Size (W x H x D) : 182 x 111 x 157 mm Weight : 1.5 kg Specifications subject to change without notice.
Operation Manual
Page 10
iTunes is a trademark of their respective owners. DPX405BT/DPX305U 2. Appendix 2-2. Apple is a trademark of HARMAN International Industries, used with permission. Microsoft and Windows Media are either registered trademarks or trademarks of such marks by ... device or its compliance with iPod or iPhone may affect wireless performance. iPhone, iPod, iPod classic, iPod nano, and iPod touch are owned by JVC KENWOOD Corporation is a trademark of Apple Inc., registered in the United States and/or other countries.
iTunes is a trademark of their respective owners. DPX405BT/DPX305U 2. Appendix 2-2. Apple is a trademark of HARMAN International Industries, used with permission. Microsoft and Windows Media are either registered trademarks or trademarks of such marks by ... device or its compliance with iPod or iPhone may affect wireless performance. iPhone, iPod, iPod classic, iPod nano, and iPod touch are owned by JVC KENWOOD Corporation is a trademark of Apple Inc., registered in the United States and/or other countries.
Operation Manual
Page 11
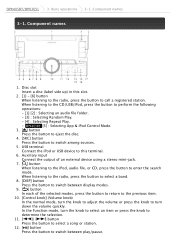
DPX405BT/DPX305U 3. Disc slot Insert a disc (label side up) in this slot. 2. [1] - [6] button When listening to the radio, press the button to this terminal. 6. USB terminal Connect ... an external device using a stereo mini-jack. 7. [ ] button When listening to the iPod, audio file, or CD, press the button to switch between play/pause. DPX405BT [5] : Selecting App & iPod Control Mode. 3. [ ] button Press the button to eject the disc. 4. [SRC] button Press the button to perform the following operations: - [1] [2] : Selecting an...
DPX405BT/DPX305U 3. Disc slot Insert a disc (label side up) in this slot. 2. [1] - [6] button When listening to the radio, press the button to this terminal. 6. USB terminal Connect ... an external device using a stereo mini-jack. 7. [ ] button When listening to the iPod, audio file, or CD, press the button to switch between play/pause. DPX405BT [5] : Selecting App & iPod Control Mode. 3. [ ] button Press the button to eject the disc. 4. [SRC] button Press the button to perform the following operations: - [1] [2] : Selecting an...
Operation Manual
Page 12
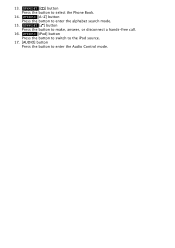
DPX305U [A~Z] button Press the button to enter the Audio Control mode. DPX305U [iPod] button Press the button to switch to the iPod source. 17. [AUDIO] button Press the button to enter the alphabet search mode. 15. DPX405BT [Ú] button Press the button to select the Phone Book. 14. DPX405BT [7] button Press the button to make, answer, or disconnect a hands-free call. 16. 13.
DPX305U [A~Z] button Press the button to enter the Audio Control mode. DPX305U [iPod] button Press the button to switch to the iPod source. 17. [AUDIO] button Press the button to enter the alphabet search mode. 15. DPX405BT [Ú] button Press the button to select the Phone Book. 14. DPX405BT [7] button Press the button to make, answer, or disconnect a hands-free call. 16. 13.
Operation Manual
Page 13
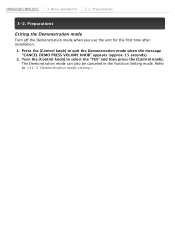
DPX405BT/DPX305U 3. Basic operations 3-2. Press the [Control knob] to select the "YES" and then press the [Control knob]. Turn the [Control knob] to quit the Demonstration mode when the message "CANCEL DEMO PRESS VOLUME KNOB" appears (approx. 15 seconds). 2. Preparations 3-2. The Demonstration mode can also be canceled in the Function Setting mode. Refer to . Preparations Exiting the Demonstration mode Turn off the Demonstration mode when you use the unit for the first time after installation. 1.
DPX405BT/DPX305U 3. Basic operations 3-2. Press the [Control knob] to select the "YES" and then press the [Control knob]. Turn the [Control knob] to quit the Demonstration mode when the message "CANCEL DEMO PRESS VOLUME KNOB" appears (approx. 15 seconds). 2. Preparations 3-2. The Demonstration mode can also be canceled in the Function Setting mode. Refer to . Preparations Exiting the Demonstration mode Turn off the Demonstration mode when you use the unit for the first time after installation. 1.
Operation Manual
Page 14
DPX405BT/DPX305U 3. "Function" appears and enters the Function setting mode. 2. About the description in this manual "Function" appears and enters the Function setting mode. 2 Use the [Control ...
DPX405BT/DPX305U 3. "Function" appears and enters the Function setting mode. 2. About the description in this manual "Function" appears and enters the Function setting mode. 2 Use the [Control ...

Operation Manual
Page 15
Adjusting the clock 1. Turn the [Control knob] to adjust the minute, and then press the [Control knob]. Adjusting the clock 3-4. Turn the [Control knob] to adjust the hour, and then press the [Control knob]. Press and hold the [Control knob]. The minute display blinks. 3. Basic operations 3-4. DPX405BT/DPX305U 3. The hour display blinks. 2.
Adjusting the clock 1. Turn the [Control knob] to adjust the minute, and then press the [Control knob]. Adjusting the clock 3-4. Turn the [Control knob] to adjust the hour, and then press the [Control knob]. Press and hold the [Control knob]. The minute display blinks. 3. Basic operations 3-4. DPX405BT/DPX305U 3. The hour display blinks. 2.

Operation Manual
Page 16
... to connect a USB device or iPod. For more details, see . General operations 3-5. Source selection Press the [SRC]. DPX405BT/DPX305U 3. Pressing the button switches among sources. Volume Turn the [Control knob]. General operations Power Turn the power on by pressing... the [SRC] button. Auxiliary input A portable audio device can be played. [2] Function of DPX405BT. Source Display Standby "STANDBY" Tuner "TUNER" USB "USB" iPod[1] "iPod" aha™[1][2] "AHA" Bluetooth audio[2] "BT AUDIO" CD[1]...
... to connect a USB device or iPod. For more details, see . General operations 3-5. Source selection Press the [SRC]. DPX405BT/DPX305U 3. Pressing the button switches among sources. Volume Turn the [Control knob]. General operations Power Turn the power on by pressing... the [SRC] button. Auxiliary input A portable audio device can be played. [2] Function of DPX405BT. Source Display Standby "STANDBY" Tuner "TUNER" USB "USB" iPod[1] "iPod" aha™[1][2] "AHA" Bluetooth audio[2] "BT AUDIO" CD[1]...

Operation Manual
Page 17
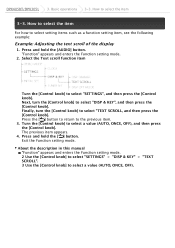
... -8 - +8 (dB) (0) Preset Equalizer "ROCK"/ "POPS"/ "EASY"/ "TOP40"/ "JAZZ"/ curve "POWERFUL"/ "NATURAL"/ "USER"[1] Bass Boost "OFF"/ "LV1"/ "LV2"/ "LV3" Loudness "OFF"/ "LV1"/ "LV2" Balance Left 15 - DPX405BT/DPX305U 4. Front 15 (0) Subwoofer output OFF/ ON Use the [Control knob] to . For how to use the [Control knob], refer to select an audio item. Refer...
... -8 - +8 (dB) (0) Preset Equalizer "ROCK"/ "POPS"/ "EASY"/ "TOP40"/ "JAZZ"/ curve "POWERFUL"/ "NATURAL"/ "USER"[1] Bass Boost "OFF"/ "LV1"/ "LV2"/ "LV3" Loudness "OFF"/ "LV1"/ "LV2" Balance Left 15 - DPX405BT/DPX305U 4. Front 15 (0) Subwoofer output OFF/ ON Use the [Control knob] to . For how to use the [Control knob], refer to select an audio item. Refer...

Operation Manual
Page 19
... 3G iPhone For information on the compatibility with the iPod connection cable (optional accessory). Visit www .kenwood.com/cs/ce/ipod/ for connectable iPods and iPod connection cables. You cannot operate the iPod if "KENWOOD" or " " appears on the iPod is played first. Models of iPods/iPhones that can be... name, etc. In this manual indicates the iPod or the iPhone connected with iPod/iPhone software, visit www.kenwoo d.com/cs/ce/ipod/. www.kenwood.com/cs/ce/ipod/ Notes If you start playback after connecting the iPod, the music that can be connected to the web site for further...
... 3G iPhone For information on the compatibility with the iPod connection cable (optional accessory). Visit www .kenwood.com/cs/ce/ipod/ for connectable iPods and iPod connection cables. You cannot operate the iPod if "KENWOOD" or " " appears on the iPod is played first. Models of iPods/iPhones that can be... name, etc. In this manual indicates the iPod or the iPhone connected with iPod/iPhone software, visit www.kenwoo d.com/cs/ce/ipod/. www.kenwood.com/cs/ce/ipod/ Notes If you start playback after connecting the iPod, the music that can be connected to the web site for further...
Operation Manual
Page 20
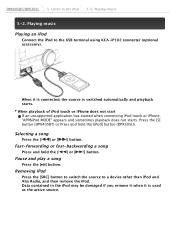
Playing music Playing an iPod Connect the iPod to a device other than iPod and Aha Radio, and then remove the iPod. Press the [5] button (DPX405BT) or Press and hold the [ ] or [ ] button. Data contained in the iPod may be damaged if you remove it when it is connected...does not start If an unsupported application has started when connecting iPod touch or iPhone, "APP&iPod MODE" appears and sometimes playback does not starts. DPX405BT/DPX305U 5. Pause and play a song Press the [L] button. Removing iPod Press the [SRC] button to switch the source to the USB terminal using ...
Playing music Playing an iPod Connect the iPod to a device other than iPod and Aha Radio, and then remove the iPod. Press the [5] button (DPX405BT) or Press and hold the [ ] or [ ] button. Data contained in the iPod may be damaged if you remove it when it is connected...does not start If an unsupported application has started when connecting iPod touch or iPhone, "APP&iPod MODE" appears and sometimes playback does not starts. DPX405BT/DPX305U 5. Pause and play a song Press the [L] button. Removing iPod Press the [SRC] button to switch the source to the USB terminal using ...

Operation Manual
Page 21
... for some reason, browse item name and digits are displayed(ex. Press the [Control knob]. Canceling the Music search mode Press and hold the [ ] or [ ]. DPX405BT/DPX305U 5. Listen to Top menu indicator: Audio file indicator: Artist indicator: Album indicator: Folder Operation Turn the [Control knob]. Items Playlists Artists Albums Songs Podcasts Genres...
... for some reason, browse item name and digits are displayed(ex. Press the [Control knob]. Canceling the Music search mode Press and hold the [ ] or [ ]. DPX405BT/DPX305U 5. Listen to Top menu indicator: Audio file indicator: Artist indicator: Album indicator: Folder Operation Turn the [Control knob]. Items Playlists Artists Albums Songs Podcasts Genres...
Operation Manual
Page 22
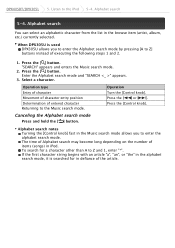
... searched for a character other than A to the iPod 5-4. To search for in the alphabet search mode, it is used DPX305U allows you to the Music search mode. DPX405BT/DPX305U 5. Select a character. Operation type Entry of character Movement of character entry position Determination of items (songs) in the browse item (artist, album, etc.) currently...
... searched for a character other than A to the iPod 5-4. To search for in the alphabet search mode, it is used DPX305U allows you to the Music search mode. DPX405BT/DPX305U 5. Select a character. Operation type Entry of character Movement of character entry position Determination of items (songs) in the browse item (artist, album, etc.) currently...
Operation Manual
Page 23
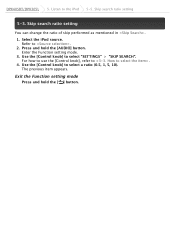
Listen to . 2. Refer to the iPod 5-5. DPX405BT/DPX305U 5. Use the [Control knob] to select "SETTINGS" > "SKIP SEARCH". Skip search ratio setting You can change the ratio of skip performed as mentioned in . 1. Press and hold the [ ] button. Select the iPod source. Use the [Control knob] to select a ratio (0.5, 1, 5, 10). Exit the Function setting mode Press and hold the [AUDIO] button. Enter the Function setting mode. 3. The previous item appears. For how to use the [Control knob], refer to . 4. Skip search ratio setting 5-5.
Listen to . 2. Refer to the iPod 5-5. DPX405BT/DPX305U 5. Use the [Control knob] to select "SETTINGS" > "SKIP SEARCH". Skip search ratio setting You can change the ratio of skip performed as mentioned in . 1. Press and hold the [ ] button. Select the iPod source. Use the [Control knob] to select a ratio (0.5, 1, 5, 10). Exit the Function setting mode Press and hold the [AUDIO] button. Enter the Function setting mode. 3. The previous item appears. For how to use the [Control knob], refer to . 4. Skip search ratio setting 5-5.
Operation Manual
Page 24
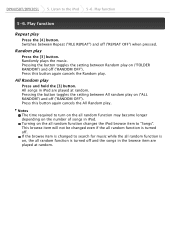
... function Repeat play on , the all random function is turned off ("RANDOM OFF"). Pressing the button toggles the setting between Repeat ("FILE REPEAT") and off . DPX405BT/DPX305U 5.
... function Repeat play on , the all random function is turned off ("RANDOM OFF"). Pressing the button toggles the setting between Repeat ("FILE REPEAT") and off . DPX405BT/DPX305U 5.
