
Operation Manual
Page 11
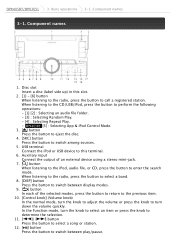
Disc slot Insert a disc (label side up) in this terminal. 6. DPX405BT/DPX305U 3. When listening to the CD/USB/iPod, press the button to call a registered station. When listening to the radio, press the button to select a band. 8. [DISP] button Press the button to ... [ ] button Press the button to select a song or station. 12. [L] button Press the button to this slot. 2. [1] - [6] button When listening to the radio, press the button to perform the following operations: - [1] [2] : Selecting an audio file folder. - [3] : Selecting Random Play. - [4] : Selecting Repeat Play. ...
Disc slot Insert a disc (label side up) in this terminal. 6. DPX405BT/DPX305U 3. When listening to the CD/USB/iPod, press the button to call a registered station. When listening to the radio, press the button to select a band. 8. [DISP] button Press the button to ... [ ] button Press the button to select a song or station. 12. [L] button Press the button to this slot. 2. [1] - [6] button When listening to the radio, press the button to perform the following operations: - [1] [2] : Selecting an audio file folder. - [3] : Selecting Random Play. - [4] : Selecting Repeat Play. ...
Operation Manual
Page 20
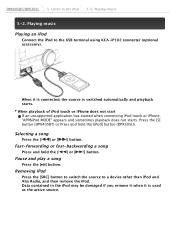
... iPod Connect the iPod to a device other than iPod and Aha Radio, and then remove the iPod. Selecting a song Press the [ ] or [ ] button. Fast-forwarding or fast-backwarding a song Press and hold the [iPod] button (DPX305U). Pause and play a song Press the [L] button. Removing iPod ... it is switched automatically and playback starts. Press the [5] button (DPX405BT) or Press and hold the [ ] or [ ] button. DPX405BT/DPX305U 5. Playing music 5-2. Listen to the iPod 5-2. When playback of iPod touch or iPhone does not start If an unsupported application has started when ...
... iPod Connect the iPod to a device other than iPod and Aha Radio, and then remove the iPod. Selecting a song Press the [ ] or [ ] button. Fast-forwarding or fast-backwarding a song Press and hold the [iPod] button (DPX305U). Pause and play a song Press the [L] button. Removing iPod ... it is switched automatically and playback starts. Press the [5] button (DPX405BT) or Press and hold the [ ] or [ ] button. DPX405BT/DPX305U 5. Playing music 5-2. Listen to the iPod 5-2. When playback of iPod touch or iPhone does not start If an unsupported application has started when ...

Operation Manual
Page 26
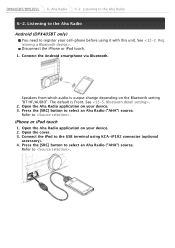
... Apple iPhone or iPod touch running iOS4 or later. Bluetooth must be built in and the following profiles must be supported. Requirements Aha™ 6-1. Aha Radio 6-1. DPX405BT/DPX305U 6.
... Apple iPhone or iPod touch running iOS4 or later. Bluetooth must be built in and the following profiles must be supported. Requirements Aha™ 6-1. Aha Radio 6-1. DPX405BT/DPX305U 6.
Operation Manual
Page 27
.... iPhone or iPod touch 1. Connect the iPod to the Aha Radio 6-2. Refer to select an Aha Radio ("AHA") source. Open the Aha Radio application on the Bluetooth setting "BT HF/AUDIO". DPX405BT/DPX305U 6. Aha Radio 6-2. See . See . 2. Press the [SRC] button to . Open the Aha Radio application on your device. 3. Connect the Android smartphone via Bluetooth...
.... iPhone or iPod touch 1. Connect the iPod to the Aha Radio 6-2. Refer to select an Aha Radio ("AHA") source. Open the Aha Radio application on the Bluetooth setting "BT HF/AUDIO". DPX405BT/DPX305U 6. Aha Radio 6-2. See . See . 2. Press the [SRC] button to . Open the Aha Radio application on your device. 3. Connect the Android smartphone via Bluetooth...
Operation Manual
Page 28
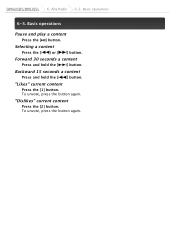
Backward 15 seconds a content Press and hold the [ ] button. "Dislikes" current content Press the [2] button. Selecting a content Press the [ ] or [ ] button. To unvote, press the button again. Forward 30 seconds a content Press and hold the [ ] button. "Likes" current content Press the [1] button. To unvote, press the button again. DPX405BT/DPX305U 6. Basic operations 6-3. Basic operations Pause and play a content Press the [L] button. Aha Radio 6-3.
Backward 15 seconds a content Press and hold the [ ] button. "Dislikes" current content Press the [2] button. Selecting a content Press the [ ] or [ ] button. To unvote, press the button again. Forward 30 seconds a content Press and hold the [ ] button. "Likes" current content Press the [1] button. To unvote, press the button again. DPX405BT/DPX305U 6. Basic operations 6-3. Basic operations Pause and play a content Press the [L] button. Aha Radio 6-3.
Operation Manual
Page 29
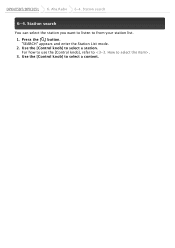
Use the [Control knob] to from your station list. 1. Aha Radio 6-4. Station search You can select the station you want to listen to select a content. Press the [ ] button. Use the [Control knob] to . 3. DPX405BT/DPX305U 6. "SEARCH" appears and enter the Station List mode. 2. Station search 6-4. For how to use the [Control knob], refer to select a station.
Use the [Control knob] to from your station list. 1. Aha Radio 6-4. Station search You can select the station you want to listen to select a content. Press the [ ] button. Use the [Control knob] to . 3. DPX405BT/DPX305U 6. "SEARCH" appears and enter the Station List mode. 2. Station search 6-4. For how to use the [Control knob], refer to select a station.
Operation Manual
Page 30
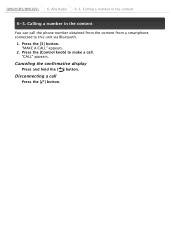
Aha Radio 6-5. Press the [Control knob] to this unit via Bluetooth. 1. Press the [3] button. "MAKE A CALL" appears. 2. DPX405BT/DPX305U 6. Calling a number in the content You can call the phone number obtained from the content from a smartphone connected to make a call Press the [Ú] button. Canceling the confirmative display Press and hold the [ ] button. Disconnecting a call . Calling a number in the content 6-5. "CALL" appears.
Aha Radio 6-5. Press the [Control knob] to this unit via Bluetooth. 1. Press the [3] button. "MAKE A CALL" appears. 2. DPX405BT/DPX305U 6. Calling a number in the content You can call the phone number obtained from the content from a smartphone connected to make a call Press the [Ú] button. Canceling the confirmative display Press and hold the [ ] button. Disconnecting a call . Calling a number in the content 6-5. "CALL" appears.

Operation Manual
Page 41
DPX405BT/DPX305U 8. Selecting a band Press the [ ] button. Pressing the button switches the receiving band (FM1, FM2, FM3, LW/MW). Listening to the radio Selecting a tuner source Press the [SRC] button to the tuner 8-1. The tuning mode can be changed. Selecting a station Press the [ ] or [ ] button. Listen to select "TUNER". Refer to the radio 8-1. Listening to .
DPX405BT/DPX305U 8. Selecting a band Press the [ ] button. Pressing the button switches the receiving band (FM1, FM2, FM3, LW/MW). Listening to the radio Selecting a tuner source Press the [SRC] button to the tuner 8-1. The tuning mode can be changed. Selecting a station Press the [ ] or [ ] button. Listen to select "TUNER". Refer to the radio 8-1. Listening to .

Operation Manual
Page 47
.... Use the [Control knob] to select a Tuner setting item Display Description "LOCAL SEEK" Only stations whose reception is broadcasting the same program over the same Radio Data System network. (AF: Alternative Frequency) "ON" / "OFF" Sets whether to switch to the station that can be received better. Refer to the traffic information... search for a station that is good are received as monaural. "MONO SET" You can set up the tuner. 1. "ON" / "OFF" Switches to . 2. Tuner setting 8-6. DPX405BT/DPX305U 8.
.... Use the [Control knob] to select a Tuner setting item Display Description "LOCAL SEEK" Only stations whose reception is broadcasting the same program over the same Radio Data System network. (AF: Alternative Frequency) "ON" / "OFF" Sets whether to switch to the station that can be received better. Refer to the traffic information... search for a station that is good are received as monaural. "MONO SET" You can set up the tuner. 1. "ON" / "OFF" Switches to . 2. Tuner setting 8-6. DPX405BT/DPX305U 8.

Operation Manual
Page 54
DPX405BT/DPX305U 10. Press the [DISP]. Display settings 10-4. Text Display Selection You can change the information displayed on each of the following sources: 1. On Audio file/ ... name Folder name File name Play time Display off Display "TITLE/ARTIST" "ALBUM/ARTIST" "FOLDER NAME" "FILE NAME" "P-TIME" "DISP OFF MODE" DPX405BT On Aha Radio source Information Content Provider Content information 1 Content information 2 Content rating information Station name Display off Display "PROVIDER" "CONTENT INFO1" "CONTENT INFO2" "CONTENT RATE" "STATION NAME...
DPX405BT/DPX305U 10. Press the [DISP]. Display settings 10-4. Text Display Selection You can change the information displayed on each of the following sources: 1. On Audio file/ ... name Folder name File name Play time Display off Display "TITLE/ARTIST" "ALBUM/ARTIST" "FOLDER NAME" "FILE NAME" "P-TIME" "DISP OFF MODE" DPX405BT On Aha Radio source Information Content Provider Content information 1 Content information 2 Content rating information Station name Display off Display "PROVIDER" "CONTENT INFO1" "CONTENT INFO2" "CONTENT RATE" "STATION NAME...

Operation Manual
Page 57
...". The previous item appears. Enter the Function setting mode. 2. "ON" / "OFF" (Colored text: Factory setting) 4. Display Description "TIME SYNC" Synchronizes this unit's clock with the radio data system station's time data. Use the [Control knob] to select a Clock setting item. DPX405BT...
...". The previous item appears. Enter the Function setting mode. 2. "ON" / "OFF" (Colored text: Factory setting) 4. Display Description "TIME SYNC" Synchronizes this unit's clock with the radio data system station's time data. Use the [Control knob] to select a Clock setting item. DPX405BT...
Operation Manual
Page 93
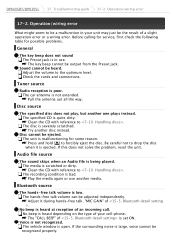
... one plays instead. Press and hold [ ] to the optimum level. The media is not extended. The "CALL BEEP" of an incoming call. DPX405BT/DPX305U 17. Troubleshooting guide 17-2. The key beep cannot be ejected. Adjust the volume to forcibly eject the disc. Clean the CD with reference to be... media. The recording condition is not recognized. Adjust it is in your cell-phone. Voice is bad. Operation/wiring error 17-2. Tuner source Radio reception is low. Pull the antenna out all the way. Disc cannot be output from the Preout jack. Bluetooth source The hands-free talk ...
... one plays instead. Press and hold [ ] to the optimum level. The media is not extended. The "CALL BEEP" of an incoming call. DPX405BT/DPX305U 17. Troubleshooting guide 17-2. The key beep cannot be ejected. Adjust the volume to forcibly eject the disc. Clean the CD with reference to be... media. The recording condition is not recognized. Adjust it is in your cell-phone. Voice is bad. Operation/wiring error 17-2. Tuner source Radio reception is low. Pull the antenna out all the way. Disc cannot be output from the Preout jack. Bluetooth source The hands-free talk ...

Operation Manual
Page 96
..." Your smartphone cannot be connected to aha has failed. "NO NUMBER" The calling party does not notify a caller ID. "LOGIN FAILED" Logging in to Aha Radio server. "NO DATA" There is no incoming call list. Bluetooth Messages "AUD DISCONCT" The unit cannot communicate with the Bluetooth audio player. There is no...
..." Your smartphone cannot be connected to aha has failed. "NO NUMBER" The calling party does not notify a caller ID. "LOGIN FAILED" Logging in to Aha Radio server. "NO DATA" There is no incoming call list. Bluetooth Messages "AUD DISCONCT" The unit cannot communicate with the Bluetooth audio player. There is no...
Quick Start Guide
Page 2
... battery out of reach of children and in original package until ready to use 3 Preparations/ Basic Operations 4 Playing Music (CD/USB/iPod 5 Listening to the Radio 6 Hands-free phoning 7 Installation accessories 8 Installation Procedure 8 Before Installation 8 Connecting Wires to the Instruction Manual stored in this unit. Therefore, what appears on the display...
... battery out of reach of children and in original package until ready to use 3 Preparations/ Basic Operations 4 Playing Music (CD/USB/iPod 5 Listening to the Radio 6 Hands-free phoning 7 Installation accessories 8 Installation Procedure 8 Before Installation 8 Connecting Wires to the Instruction Manual stored in this unit. Therefore, what appears on the display...

Quick Start Guide
Page 3
...8859-5 or ISO 8859-1 can hear sounds outside the car. Handling discs • Do not touch the recording surface of (Instruction Manual). • The Radio Data System feature won't work with a dry silicon or soft cloth. The unit returns to evaporate. Refer to "RUSSIAN SET" of the disc. •...on it. • Do not use any accessories for the moisture to factory settings. Notes • If you experience problems during installation, consult your Kenwood dealer. • When you can be used with this case, remove the disc and wait for the disc. • Do not use any ...
...8859-5 or ISO 8859-1 can hear sounds outside the car. Handling discs • Do not touch the recording surface of (Instruction Manual). • The Radio Data System feature won't work with a dry silicon or soft cloth. The unit returns to evaporate. Refer to "RUSSIAN SET" of the disc. •...on it. • Do not use any accessories for the moisture to factory settings. Notes • If you experience problems during installation, consult your Kenwood dealer. • When you can be used with this case, remove the disc and wait for the disc. • Do not use any ...
Quick Start Guide
Page 6
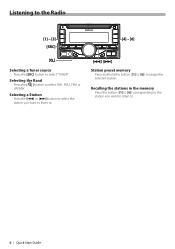
Recalling the stations in the memory Press the button ([1] to [6]) corresponding to the station you want to listen to select "TUNER". Listening to the Radio [1] - [3] [SRC] [4] - [6] [ ] Selecting a Tuner source Press the [SRC] button to . 6 | Quick Start Guide Selecting a Station Press the [4] or [¢] button to select the station you want to listen to. [4] [¢] Station preset memory Press and hold the button ([1] to [6]) to select FM1, FM2, FM3 or LW/MW. Selecting the Band Press the [ ] button to assign the selected station.
Recalling the stations in the memory Press the button ([1] to [6]) corresponding to the station you want to listen to select "TUNER". Listening to the Radio [1] - [3] [SRC] [4] - [6] [ ] Selecting a Tuner source Press the [SRC] button to . 6 | Quick Start Guide Selecting a Station Press the [4] or [¢] button to select the station you want to listen to. [4] [¢] Station preset memory Press and hold the button ([1] to [6]) to select FM1, FM2, FM3 or LW/MW. Selecting the Band Press the [ ] button to assign the selected station.


