
User Manual
Page 2
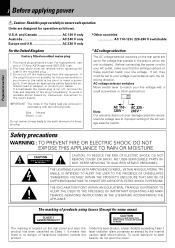
... TO ALERT THE USER TO THE PRESENCE OF IMPORTANT OPERATING AND MAINTENANCE (SERVICING) INSTRUCTIONS IN THE LITERATURE ACCOMPANYING THE APPLIANCE. The marking of these switches match your home or the cable is located on the rear panel are contained as alerted by the internal caution label shown above. It means that the setting positions of products using lasers (Except for operation as Class...
... TO ALERT THE USER TO THE PRESENCE OF IMPORTANT OPERATING AND MAINTENANCE (SERVICING) INSTRUCTIONS IN THE LITERATURE ACCOMPANYING THE APPLIANCE. The marking of these switches match your home or the cable is located on the rear panel are contained as alerted by the internal caution label shown above. It means that the setting positions of products using lasers (Except for operation as Class...
User Manual
Page 3
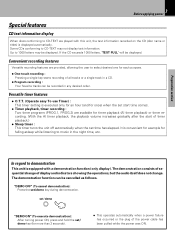
... timer recording. (With the AI timer playback, the playback volume increases gradually after the start of display and indicators showing the operations, but the audio itself does not change. The demonstration function can be cancelled as follows. Preparation section In regard to demonstration This unit is displayed automatically. 3 Before applying power Special features CD text information display When discs conforming to CD-TEXT are played...
... timer recording. (With the AI timer playback, the playback volume increases gradually after the start of display and indicators showing the operations, but the audio itself does not change. The demonstration function can be cancelled as follows. Preparation section In regard to demonstration This unit is displayed automatically. 3 Before applying power Special features CD text information display When discs conforming to CD-TEXT are played...
User Manual
Page 4
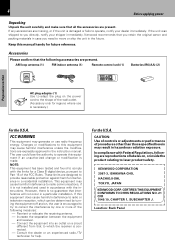
... the unit is damaged or fails to operate, notify your shipper immediately. Changes or modifications to this equipment does cause harmful interference to radio or television reception, which the receiver is not installed and used in the instruction manual. The user could lose the authority to operate this manual handy for a Class B digital device, pursuant to Part 15 of procedures other than those specified...
... the unit is damaged or fails to operate, notify your shipper immediately. Changes or modifications to this equipment does cause harmful interference to radio or television reception, which the receiver is not installed and used in the instruction manual. The user could lose the authority to operate this manual handy for a Class B digital device, pursuant to Part 15 of procedures other than those specified...
User Manual
Page 5
... Available Parts 8 Controls and indicators 9 Display 9 Main unit 10 Operation of remote control unit 12 Basic section Basic use method 14 Playback of CD 16 Playback of tape 20 Receiving broadcast station 22 Collective presetting of difficulty 49 Specifications 52 Basic section Application section Knowledge sections TIMER 44 Knowledge sections Important Items 47 Maintenance 47 Reference 47 In case of stations 23 Channel space setting 23 Tuning a non-preset radio station (Auto tuning, Manual tuning...
... Available Parts 8 Controls and indicators 9 Display 9 Main unit 10 Operation of remote control unit 12 Basic section Basic use method 14 Playback of CD 16 Playback of tape 20 Receiving broadcast station 22 Collective presetting of difficulty 49 Specifications 52 Basic section Application section Knowledge sections TIMER 44 Knowledge sections Important Items 47 Maintenance 47 Reference 47 In case of stations 23 Channel space setting 23 Tuning a non-preset radio station (Auto tuning, Manual tuning...
User Manual
Page 6
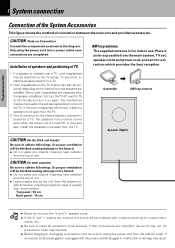
... may result. In this , install the speakers apart from the TV. AM loop antenna The supplied antenna is turned off , wait for indoor use. CAUTION (For other countries) Be sure to insert all connection cords securely. Top panel : 50 cm Back panel : 10 cm Notes ÷ Never short-circuit the "+" and "-" speaker cords. ÷ If the "+" and "-" polarity are plugged or unplugged with unclear...
... may result. In this , install the speakers apart from the TV. AM loop antenna The supplied antenna is turned off , wait for indoor use. CAUTION (For other countries) Be sure to insert all connection cords securely. Top panel : 50 cm Back panel : 10 cm Notes ÷ Never short-circuit the "+" and "-" speaker cords. ÷ If the "+" and "-" polarity are plugged or unplugged with unclear...
User Manual
Page 8
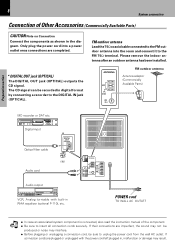
... or DAT etc. Please remove the indoor antenna after an outdoor antenna has been installed. Digital input Optical fiber cable Audio cord * DIGITAL OUT OPTICAL cap Audio output VCR, Analog turntable with the power cord left plugged in RIAA equalizer (optional P-110), etc. Preparation section 8 System connection Connection of the component. ÷ Be sure to insert all connection cords securely. The CD signal can be recorded in the diagram. FRONT SPEAKERS - (6-16 W) R + POWER cord TO WALL AC OUTLET...
... or DAT etc. Please remove the indoor antenna after an outdoor antenna has been installed. Digital input Optical fiber cable Audio cord * DIGITAL OUT OPTICAL cap Audio output VCR, Analog turntable with the power cord left plugged in RIAA equalizer (optional P-110), etc. Preparation section 8 System connection Connection of the component. ÷ Be sure to insert all connection cords securely. The CD signal can be recorded in the diagram. FRONT SPEAKERS - (6-16 W) R + POWER cord TO WALL AC OUTLET...
User Manual
Page 9
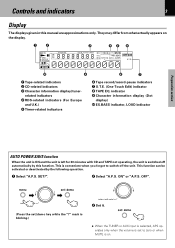
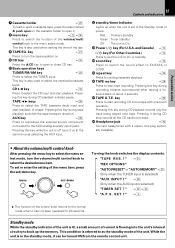
... . indicator 9 Character information display (Dot display) 0 EX.BASS indicator, LOUD indicator Preparation section AUTO POWER SAVE function When the unit is ON and the unit is left for 30 minutes with CD and TAPE not operating, the unit is blinking.) volume / multi control 3 Set it. menu \ volume / multi control set / demo \ (Press the set to switch off automatically by the following operation. 1 Select "A.P.S. SET?". 2 Select "A.P.S. Controls and indicators 9 System connection Display T he displays given in this...
... . indicator 9 Character information display (Dot display) 0 EX.BASS indicator, LOUD indicator Preparation section AUTO POWER SAVE function When the unit is ON and the unit is left for 30 minutes with CD and TAPE not operating, the unit is blinking.) volume / multi control 3 Set it. menu \ volume / multi control set / demo \ (Press the set to switch off automatically by the following operation. 1 Select "A.P.S. SET?". 2 Select "A.P.S. Controls and indicators 9 System connection Display T he displays given in this...
User Manual
Page 10
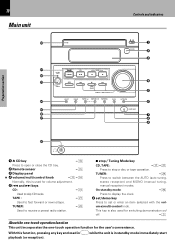
... clock. 6 set / demo 0 push open 1 2 3 4 5 6 7 8 9 Preparation section * 1 0 CD key ^ Press to open or close the CD tray. 2 Remote sensor # 3 Display panel * 4 volume/multi control knob !$ Normally, this function, pressing any key enclosed in standby mode immediately start ume/multi control knob. TAPE : ¡ Used to skip CD tracks. menu set /demo key Press to stop Tuning Mode volume / multi control sound repeat TAPE rec TAPE O.T.E. TUNER : ¢ Press to switch between the AUTO (auto tuning, stereo reception) and MONO (manual tuning, manual reception) modes...
... clock. 6 set / demo 0 push open 1 2 3 4 5 6 7 8 9 Preparation section * 1 0 CD key ^ Press to open or close the CD tray. 2 Remote sensor # 3 Display panel * 4 volume/multi control knob !$ Normally, this function, pressing any key enclosed in standby mode immediately start ume/multi control knob. TAPE : ¡ Used to skip CD tracks. menu set /demo key Press to stop Tuning Mode volume / multi control sound repeat TAPE rec TAPE O.T.E. TUNER : ¢ Press to switch between the AUTO (auto tuning, stereo reception) and MONO (manual tuning, manual reception) modes...
User Manual
Page 11
... mode, turn the tape equalizer on. 0 CD tray ^ Press the 0 CD key to open it has not been operated for setting repeated playback. ^ TAPE rec key ª Press to select the TAPE (cassette deck) input and start tape recording. menu \ volume / multi control set to the Standby mode of the volume/multi control knob to the menu select mode. " 9 ÷ The function of a tape. ing this key during CD stop records all the CD tracks onto tape. * Headphone jack % Connect...
... mode, turn the tape equalizer on. 0 CD tray ^ Press the 0 CD key to open it has not been operated for setting repeated playback. ^ TAPE rec key ª Press to select the TAPE (cassette deck) input and start tape recording. menu \ volume / multi control set to the Standby mode of the volume/multi control knob to the menu select mode. " 9 ÷ The function of a tape. ing this key during CD stop records all the CD tracks onto tape. * Headphone jack % Connect...
User Manual
Page 12
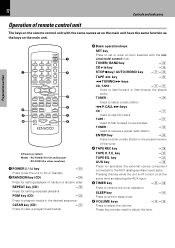
... AUX (analog auxiliary input) jacks. key TAPE EQ. key AUX key ª ‡ ¡ ° Press to reproduce the external source component connected to receive a preset radio station. ume/multi control knob. TAPE : Used to adjust the tone. Pressing this key while the unit is off turns it on at the same time as the keys on the main unit. 7 8 9 0 POWER 12 45 78 10 0 3 RANDOM 6 REPEAT 9 PGM SET CLEAR TUNER / BAND CD 6 TAPE 2 3 AUTO...
... AUX (analog auxiliary input) jacks. key TAPE EQ. key AUX key ª ‡ ¡ ° Press to reproduce the external source component connected to receive a preset radio station. ume/multi control knob. TAPE : Used to adjust the tone. Pressing this key while the unit is off turns it on at the same time as the keys on the main unit. 7 8 9 0 POWER 12 45 78 10 0 3 RANDOM 6 REPEAT 9 PGM SET CLEAR TUNER / BAND CD 6 TAPE 2 3 AUTO...
User Manual
Page 13
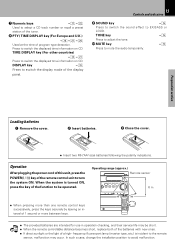
... the light of a high- In such a case, change the installation position to mute the audio temporarily. 7 Numeric keys &™ Used to select a CD track number or recall a preset station of the tuner. 8 PTY/ TIME DISPLAY key (For Europe and U.K.) *¡§ Used at the time of the remote control unit to turn the system ON. TIME DISPLAY key (For other countries) *¡ Press to EX.BASS or LOUD. Operation After plugging the power cord of...
... the light of a high- In such a case, change the installation position to mute the audio temporarily. 7 Numeric keys &™ Used to select a CD track number or recall a preset station of the tuner. 8 PTY/ TIME DISPLAY key (For Europe and U.K.) *¡§ Used at the time of the remote control unit to turn the system ON. TIME DISPLAY key (For other countries) *¡ Press to EX.BASS or LOUD. Operation After plugging the power cord of...
User Manual
Page 23
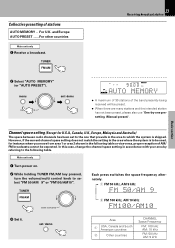
... presetting (Manual preset)". set to be expected. menu \ volume / multi control set / demo \ 23 Receiving bProlaaydbcaacskt sotfattaiopne AUTO MEMORY ÷ A maximum of 30 stations of the band presently being received will be preset. ÷ When there are many stations and the intended station has not been preset, please also use "One-by referring to select "FM 50/AM 9" or "FM100/AM10". Main unit only 1 Turn power on. 2 While holding TUNER FM...
... presetting (Manual preset)". set to be expected. menu \ volume / multi control set / demo \ 23 Receiving bProlaaydbcaacskt sotfattaiopne AUTO MEMORY ÷ A maximum of 30 stations of the band presently being received will be preset. ÷ When there are many stations and the intended station has not been preset, please also use "One-by referring to select "FM 50/AM 9" or "FM100/AM10". Main unit only 1 Turn power on. 2 While holding TUNER FM...
User Manual
Page 38
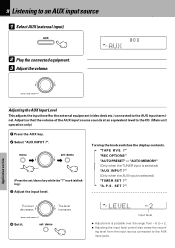
... (video deck etc.) connected to an AUX input source 1 Select AUX (external input). Turning the knob switches the display contents. " "A . " The level decreases The level increases volume / multi control 4 Set it. set /demo key while the "?" menu \ volume / multi control set / demo \ (Press the set / demo LEVEL -2 Input level ÷ Adjustment is selected) "T I M E R S E T ? "T A P E R V S. ? " (Only when the AUX input is possible over the range from the input source connected to the AUX input jacks. S E T ? ing level from - 5 to the CD. (Main unit operation only...
... (video deck etc.) connected to an AUX input source 1 Select AUX (external input). Turning the knob switches the display contents. " "A . " The level decreases The level increases volume / multi control 4 Set it. set /demo key while the "?" menu \ volume / multi control set / demo \ (Press the set / demo LEVEL -2 Input level ÷ Adjustment is selected) "T I M E R S E T ? "T A P E R V S. ? " (Only when the AUX input is possible over the range from the input source connected to the AUX input jacks. S E T ? ing level from - 5 to the CD. (Main unit operation only...
User Manual
Page 40
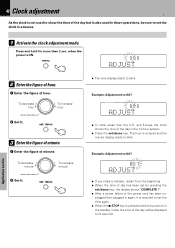
... power is also used to blink. when the power is entered and the minute display starts to show the time of day has been set by pressing the set/demo key, the display shows "COMPLETE !". ÷ After a power failure or the power cord has been un- To decrease minute To increase minute volume / multi control 2 Set it . plugged then plugged in advance. 1 Activate the clock adjustment mode. Example: Adjustment to blink. The hour is ON. menu ADJUST...
... power is also used to blink. when the power is entered and the minute display starts to show the time of day has been set by pressing the set/demo key, the display shows "COMPLETE !". ÷ After a power failure or the power cord has been un- To decrease minute To increase minute volume / multi control 2 Set it . plugged then plugged in advance. 1 Activate the clock adjustment mode. Example: Adjustment to blink. The hour is ON. menu ADJUST...

User Manual
Page 42
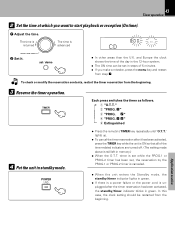
...I M E R S E T ? timer. 1 Select "TIMER SET ?". S . volume / multi control 3 Set it. Application section set volume. Turning the knob switches the display contents. 1 "O. T. 42 Timer operation Setting the O.T.T. timer Timer playback which occurs only once and only for an hour can be overwritten by simply setting the start time. Adjust the clock before setting the timer , Connect the related equipment under reference to change them, simply press the set /demo key while the "?" menu \ volume / multi control set / demo \ (Press the set /demo key.) ÷ When a timer setting has...
...I M E R S E T ? timer. 1 Select "TIMER SET ?". S . volume / multi control 3 Set it. Application section set volume. Turning the knob switches the display contents. 1 "O. T. 42 Timer operation Setting the O.T.T. timer Timer playback which occurs only once and only for an hour can be overwritten by simply setting the start time. Adjust the clock before setting the timer , Connect the related equipment under reference to change them, simply press the set /demo key while the "?" menu \ volume / multi control set / demo \ (Press the set /demo key.) ÷ When a timer setting has...
User Manual
Page 43
.... 3 Reserve the timer operation. lights up. ÷ To cancel the timer reservation after the timer reservation has been activated, the standby/timer indicator blinks in steps of the timer-related indicators are turned off. (The setting made above is set while the PROG.1 or PROG.2 timer has been set / demo CD ÷ In other areas than the U.K. In this case, the clock setting should be set in green. TIMER 4 Put the...
.... 3 Reserve the timer operation. lights up. ÷ To cancel the timer reservation after the timer reservation has been activated, the standby/timer indicator blinks in steps of the timer-related indicators are turned off. (The setting made above is set while the PROG.1 or PROG.2 timer has been set / demo CD ÷ In other areas than the U.K. In this case, the clock setting should be set in green. TIMER 4 Put the...

User Manual
Page 44
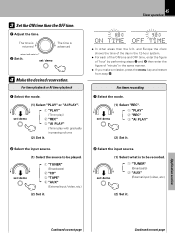
...). " (Only when the AUX input is not possible.) To listen to CD Insert a disc. (Program playback is selected) "T I M E R S E T ? Application section volume / multi control 3 Set it. To listen to tape Set a tape into. menu \ volume / multi control set / demo \ (Press the set and selected to "System connection" 6~8 1 Make preparations for recording. • To listen to radio The station should be preset prior. £ Playing the auxiliary input source Make timer setting of the component connected to the AUX input jacks. ÷ Two timer settings can be reserved...
...). " (Only when the AUX input is not possible.) To listen to CD Insert a disc. (Program playback is selected) "T I M E R S E T ? Application section volume / multi control 3 Set it. To listen to tape Set a tape into. menu \ volume / multi control set / demo \ (Press the set and selected to "System connection" 6~8 1 Make preparations for recording. • To listen to radio The station should be preset prior. £ Playing the auxiliary input source Make timer setting of the component connected to the AUX input jacks. ÷ Two timer settings can be reserved...
User Manual
Page 45
... to be recorded. \ set / demo 4 Make the desired reservation. set / demo 1 "TUNER" (Broadcasts) 2 "AUX" (External input / video, etc.) (2) Set it. For timer recording 1 Select the mode. \ set / demo (1) Select "REC". 1 "PLAY" 2 "REC" 3 "AI PLAY" (2) Set it. 2 Select the input source. (1) Select what is advanced volume / multi control 2 Set it . 45 Timer operation ON TIME OFF TIME ÷ In other areas than the U.K. and Europe the clock shows the time of the day in the 12-hour system. ÷ For...
... to be recorded. \ set / demo 4 Make the desired reservation. set / demo 1 "TUNER" (Broadcasts) 2 "AUX" (External input / video, etc.) (2) Set it. For timer recording 1 Select the mode. \ set / demo (1) Select "REC". 1 "PLAY" 2 "REC" 3 "AI PLAY" (2) Set it. 2 Select the input source. (1) Select what is advanced volume / multi control 2 Set it . 45 Timer operation ON TIME OFF TIME ÷ In other areas than the U.K. and Europe the clock shows the time of the day in the 12-hour system. ÷ For...
User Manual
Page 47
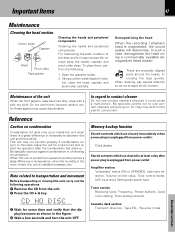
.... 4 Wait a few hours and restart the operation after power plug is unplugged from a place to contact cleaner Do not use thinner, benzine, alcohol, etc. Reference Caution on /standby" status (ON or STANDBY), Last input selection, Volume control value, Tone control levels, AUX input level, Setting auto power save Tuner section Receiving band, Frequency, Preset stations, Auto/ mono setting, Timer setting contents Cassette deck section Transport direction, Tape EQ., Reverse mode Knowledge sections Note related to transportation...
.... 4 Wait a few hours and restart the operation after power plug is unplugged from a place to contact cleaner Do not use thinner, benzine, alcohol, etc. Reference Caution on /standby" status (ON or STANDBY), Last input selection, Volume control value, Tone control levels, AUX input level, Setting auto power save Tuner section Receiving band, Frequency, Preset stations, Auto/ mono setting, Timer setting contents Cassette deck section Transport direction, Tape EQ., Reverse mode Knowledge sections Note related to transportation...
User Manual
Page 49
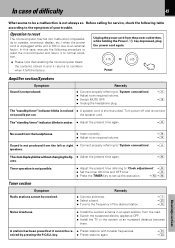
... plug. 6 % The "standby/timer" indicator blinks in and it returns to be received. the speaker cord. speakers. 6 Theclockdisplayblinkswithoutchangingthefig- ÷ Adjust the present time again. t ÷ Press the TIMER key to the symptom of your trouble. Before calling for service, check the following procedure to reset the microcomputer and return it to an required volume. % $ Sound is not always so. ures. , Timer operation is ON or due to "Clock adjustment". , ÷ Set...
... plug. 6 % The "standby/timer" indicator blinks in and it returns to be received. the speaker cord. speakers. 6 Theclockdisplayblinkswithoutchangingthefig- ÷ Adjust the present time again. t ÷ Press the TIMER key to the symptom of your trouble. Before calling for service, check the following procedure to reset the microcomputer and return it to an required volume. % $ Sound is not always so. ures. , Timer operation is ON or due to "Clock adjustment". , ÷ Set...


