
User Manual
Page 2
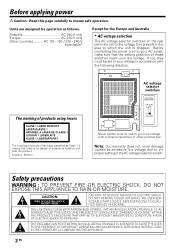
... USER TO THE PRESENCE OF IMPORTANT OPERATING AND MAINTENANCE (SERVICING) INSTRUCTIONS IN THE LITERATURE ACCOMPANYING THE APPLIANCE. 2 EN CAUTION RISK OF ELECTRIC SHOCK DO NOT OPEN CAUTION: TO REDUCE THE RISK OF ELECTRIC SHOCK, DO NOT REMOVE COVER (OR BACK). Before applying power Caution : Read this product has been classified as follows. The marking of products using lasers CLASS 1 LASER PRODUCT...
... USER TO THE PRESENCE OF IMPORTANT OPERATING AND MAINTENANCE (SERVICING) INSTRUCTIONS IN THE LITERATURE ACCOMPANYING THE APPLIANCE. 2 EN CAUTION RISK OF ELECTRIC SHOCK DO NOT OPEN CAUTION: TO REDUCE THE RISK OF ELECTRIC SHOCK, DO NOT REMOVE COVER (OR BACK). Before applying power Caution : Read this product has been classified as follows. The marking of products using lasers CLASS 1 LASER PRODUCT...
User Manual
Page 3
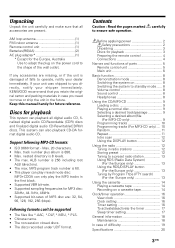
... 8 Demonstration mode 8 Switching the system on 8 Switching the system to standby mode ...... 8 Volume control 8 Sound control 8 Headphones 8 Using the CD/MP3-CD 9 Loading a disc 9 Playing a normal disc 9 Selecting a desired track/passage 9 Selecting a desired album/file (For MP3-CD only 9 Programming tracks 10 Programming tracks (For MP3-CD only) .... 10 Random 11 Repeat 11 Intro scan 12 Using the DISPLAY button 12 Using the radio 12 Tuning in radio stations 12 Storing preset 12 Tuning to ensure safe operation. This system can 't be supported •...
... 8 Demonstration mode 8 Switching the system on 8 Switching the system to standby mode ...... 8 Volume control 8 Sound control 8 Headphones 8 Using the CD/MP3-CD 9 Loading a disc 9 Playing a normal disc 9 Selecting a desired track/passage 9 Selecting a desired album/file (For MP3-CD only 9 Programming tracks 10 Programming tracks (For MP3-CD only) .... 10 Random 11 Repeat 11 Intro scan 12 Using the DISPLAY button 12 Using the radio 12 Tuning in radio stations 12 Storing preset 12 Tuning to ensure safe operation. This system can 't be supported •...

User Manual
Page 4
... power cord from the AC wall outlet when the power switch is on, press TUNER band button to select TUNER mode and waveband of +/- In such a case, change the channel space setting for the Europe and Australia) The space between radio channels has been set the channel space. When the power comes on the remote control. Before applying power Preparing the remote control Insert batteries type R6/LR6 ("AA" size) into the remote control. Operation...
... power cord from the AC wall outlet when the power switch is on, press TUNER band button to select TUNER mode and waveband of +/- In such a case, change the channel space setting for the Europe and Australia) The space between radio channels has been set the channel space. When the power comes on the remote control. Before applying power Preparing the remote control Insert batteries type R6/LR6 ("AA" size) into the remote control. Operation...

User Manual
Page 5
... the system; to select a preset radio station for CD; to view the current status of parts Remote control unit $ 1 POWER RDS/ STEREO PTY DISPLAY /MONO 2 % 3 INTRO RANDOM REPEAT TIMER SET 4 5 1 2/ABC 3/DEF TIMER ON/OFF ^ 4/GHI 5/JKL 6/MNO SLEEP 6 7/PQRS 8/TUV 9/WXYZ EQ/X-BASS & 0 PROGRAM FILE SEARCH MUTE * 7 ( 8 SEARCH /TUNING SEARCH /TUNING VOLUME UP 9 - + ENTER ) VOLUME DOWN 0 ¡ TUNER TAPE /BAND /MODE CD REC ! ™ @ RVS PLAY FWD PLAY - to a cassette tape. £ P.CALL +/- 5/∞ buttons To select a preset radio stations...
... the system; to select a preset radio station for CD; to view the current status of parts Remote control unit $ 1 POWER RDS/ STEREO PTY DISPLAY /MONO 2 % 3 INTRO RANDOM REPEAT TIMER SET 4 5 1 2/ABC 3/DEF TIMER ON/OFF ^ 4/GHI 5/JKL 6/MNO SLEEP 6 7/PQRS 8/TUV 9/WXYZ EQ/X-BASS & 0 PROGRAM FILE SEARCH MUTE * 7 ( 8 SEARCH /TUNING SEARCH /TUNING VOLUME UP 9 - + ENTER ) VOLUME DOWN 0 ¡ TUNER TAPE /BAND /MODE CD REC ! ™ @ RVS PLAY FWD PLAY - to a cassette tape. £ P.CALL +/- 5/∞ buttons To select a preset radio stations...
User Manual
Page 6
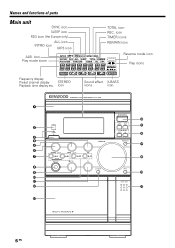
icon TIMER icons REMAIN icon ALB. icon Play mode icons INTRO MP3 R D S SYNC REC. REPEAT ALB. ALL SLEEP TOTAL REMAIN PROGRAM RANDOM TIMER ON OFF Reverse mode icon Play icons STEREO POP Frequency display Preset channel display STEREO Playback time display etc. icon CLASSIC ROCK JAZZ X-BASS Sound effect X-BASS icons icon 1 $ % 2 ^ 3 4 5 & 6 7 * 8 9 ( 0 ! @ ) # 6 EN Names and functions of parts Main unit SYNC icon SLEEP icon RDS icon (the Europe only) ALL icon INTRO icon MP3 icon TOTAL icon REC.
icon TIMER icons REMAIN icon ALB. icon Play mode icons INTRO MP3 R D S SYNC REC. REPEAT ALB. ALL SLEEP TOTAL REMAIN PROGRAM RANDOM TIMER ON OFF Reverse mode icon Play icons STEREO POP Frequency display Preset channel display STEREO Playback time display etc. icon CLASSIC ROCK JAZZ X-BASS Sound effect X-BASS icons icon 1 $ % 2 ^ 3 4 5 & 6 7 * 8 9 ( 0 ! @ ) # 6 EN Names and functions of parts Main unit SYNC icon SLEEP icon RDS icon (the Europe only) ALL icon INTRO icon MP3 icon TOTAL icon REC.

User Manual
Page 7
... desired sound effect: POP, CLASSIC, ROCK, JAZZ or FLAT; to search forward/backward or to skip to higher/lower radio frequency or search radio stations for TUNER; Names and functions of parts 1 CD tray 2 Remote sensor 3 button To switch the system on or to set timer function for timer. 8 phones jack 9 7 stop button To stop program for CD. 0 6 buttons To start or interrupt playback for CD. (6 button only) To start or interrupt playback for TAPE. ! to standby mode. Standby mode...
... desired sound effect: POP, CLASSIC, ROCK, JAZZ or FLAT; to search forward/backward or to skip to higher/lower radio frequency or search radio stations for TUNER; Names and functions of parts 1 CD tray 2 Remote sensor 3 button To switch the system on or to set timer function for timer. 8 phones jack 9 7 stop button To stop program for CD. 0 6 buttons To start or interrupt playback for CD. (6 button only) To start or interrupt playback for TAPE. ! to standby mode. Standby mode...

User Manual
Page 8
.../X-BASS button on the remote control. • The clock will continue without sound only system speaker output and the icon "MUTE" appears on the remote control. Playback will be displayed. Note: The demonstration operates automatically when a power failure has occurred, or the plug of the power cable has been pulled out while the power was on the remote control). or CD, TUNER band (TUNER/BAND on the remote control), or TAPE mode button (TAPE/MODE on . "VOL XX" will switch to standby mode...
.../X-BASS button on the remote control. • The clock will continue without sound only system speaker output and the icon "MUTE" appears on the remote control. Playback will be displayed. Note: The demonstration operates automatically when a power failure has occurred, or the plug of the power cable has been pulled out while the power was on the remote control). or CD, TUNER band (TUNER/BAND on the remote control), or TAPE mode button (TAPE/MODE on . "VOL XX" will switch to standby mode...
User Manual
Page 9
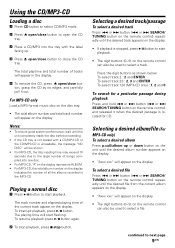
... start playback. • The digit buttons (0~9) on the remote control can also be used to select a file. For MP3-CD only Load a MP3 format music disc on the disc tray. • The total album number and total track number will appear on the display. • The digit buttons (0~9) on the remote control can also be used to select a track. To select a desired file Press 4 or ¢ button (4 or ¢ SEARCH/ TUNING button...
... start playback. • The digit buttons (0~9) on the remote control can also be used to select a file. For MP3-CD only Load a MP3 format music disc on the disc tray. • The total album number and total track number will appear on the display. • The digit buttons (0~9) on the remote control can also be used to select a track. To select a desired file Press 4 or ¢ button (4 or ¢ SEARCH/ TUNING button...

User Manual
Page 10
... stop mode, press program button on the unit (PROGRAM button on the remote control) to enter program setting. The track number returns to enter program setting. Programming tracks (For MP3-CD only) Programming tracks of a disc is possible when playback is stopped. Programming tracks Programming tracks of the file name. 3 Press FILE SEARCH button on the remote control. 4 Press 6 button to start flashing. 3 Press program button on the unit ( PROGRAM button on the remote control) to "- -" and the next program number will start...
... stop mode, press program button on the unit (PROGRAM button on the remote control) to enter program setting. The track number returns to enter program setting. Programming tracks (For MP3-CD only) Programming tracks of a disc is possible when playback is stopped. Programming tracks Programming tracks of the file name. 3 Press FILE SEARCH button on the remote control. 4 Press 6 button to start flashing. 3 Press program button on the unit ( PROGRAM button on the remote control) to "- -" and the next program number will start...

User Manual
Page 11
Using the CD/MP3 3 Press program button on the unit ( PROGRAM button on the remote control) to play the programmed tracks. Notes: • "P" represents PROGRAM. • The program is automatically cleared as soon as the CD tray is opened. • The function of program setting is set on, will disable the random play or pause mode. The icon "RANDOM" will appear on the display. 2 To exit random mode, press RANDOM button again. To repeat...
Using the CD/MP3 3 Press program button on the unit ( PROGRAM button on the remote control) to play the programmed tracks. Notes: • "P" represents PROGRAM. • The program is automatically cleared as soon as the CD tray is opened. • The function of program setting is set on, will disable the random play or pause mode. The icon "RANDOM" will appear on the display. 2 To exit random mode, press RANDOM button again. To repeat...
User Manual
Page 12
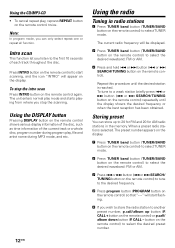
... the remote control) to select TUNER mode. CALL - Using the radio Tuning in the memory. button on the remote control shows various display information of the disc, such as time information of each track throughout the disc. To stop the scanning. To tune to a weak station briefly press 4 or ¢ button (4 or ¢ SEARCH/TUNING button on the remote control) to select the desired preset number. 12 EN The unit enters normal play mode and starts playing...
... the remote control) to select TUNER mode. CALL - Using the radio Tuning in the memory. button on the remote control shows various display information of the disc, such as time information of each track throughout the disc. To stop the scanning. To tune to a weak station briefly press 4 or ¢ button (4 or ¢ SEARCH/TUNING button on the remote control) to select the desired preset number. 12 EN The unit enters normal play mode and starts playing...

User Manual
Page 13
... TUNER mode. 2 Press TUNER band button (TUNER/BAND button on the remote control) to a preset radio station Press p.call /album down button (P. Using the radio 6 Press program button (PROGRAM button on the display (if current station is FM stereo). Tuning to select FM. 3 Press PTY button on the remote control) or p.call /album up button (P. Tuners and receivers designed for RDS reception can extract the information from the broadcast signal for stations which are able to select the desired preset number...
... TUNER mode. 2 Press TUNER band button (TUNER/BAND button on the remote control) to a preset radio station Press p.call /album down button (P. Using the radio 6 Press program button (PROGRAM button on the display (if current station is FM stereo). Tuning to select FM. 3 Press PTY button on the remote control) or p.call /album up button (P. Tuners and receivers designed for RDS reception can extract the information from the broadcast signal for stations which are able to select the desired preset number...

User Manual
Page 14
... remote control) to TUNER and select a radio station. 3 Press rec button (REC button on the remote control) to select your desired program type. icon : plays both side and stops. Recording on the display. 14 EN The icon "REC." Recording from the radio or the CD player. Using the radio 4 Press PTY button on the remote control to set the unit into recording standby mode. Using the cassette Playing a cassette tape 1 Press TAPE mode button (TAPE/MODE button on the remote control) to TAPE. 2 Press push open button...
... remote control) to TUNER and select a radio station. 3 Press rec button (REC button on the remote control) to select your desired program type. icon : plays both side and stops. Recording on the display. 14 EN The icon "REC." Recording from the radio or the CD player. Using the radio 4 Press PTY button on the remote control to set the unit into recording standby mode. Using the cassette Playing a cassette tape 1 Press TAPE mode button (TAPE/MODE button on the remote control) to TAPE. 2 Press push open button...

User Manual
Page 15
... turn off radio, press TAPE mode button to TAPE. If you want to record. 4 Press rec button (REC button on the remote control) to set the unit into the tape deck. 2 Press CD button to CD. 3 Insert a CD/MP3-CD and select the first track you wish to record only one track, program that track first, and then record it is not possible to listen to another source. •...
... turn off radio, press TAPE mode button to TAPE. If you want to record. 4 Press rec button (REC button on the remote control) to set the unit into the tape deck. 2 Press CD button to CD. 3 Insert a CD/MP3-CD and select the first track you wish to record only one track, program that track first, and then record it is not possible to listen to another source. •...

User Manual
Page 16
... an alarm to wake you wish to tune in either 12 or 24-hour mode. Timer setting The system can be displayed. The minute indication will start flashing. Notes: • The clock setting will be erased when the power cord is disconnected or a power failure occurred. • The clock can switch on the remote control) to store the setting. The timer recording of radio programs onto a cassette tape is in any source mode (CD, TUNER or TAPE), press timer set button (TIMER SET button...
... an alarm to wake you wish to tune in either 12 or 24-hour mode. Timer setting The system can be displayed. The minute indication will start flashing. Notes: • The clock setting will be erased when the power cord is disconnected or a power failure occurred. • The clock can switch on the remote control) to store the setting. The timer recording of radio programs onto a cassette tape is in any source mode (CD, TUNER or TAPE), press timer set button (TIMER SET button...

User Manual
Page 17
... activated, the system will switch to sleep time display and change as follows : "CD" → "TUNER" → "TAPE" → "REC TU" (recording tuner) 0 Press timer set up to standby mode by 10 minutes. While sleep mode is press within 7 seconds, the system will appear. ! The source switches as follows: 90 min - 80 min -70 min - 60 min - 50 min - 40 min - 30 min - 20 min - 10 min - Clock/timer operation 8 Press program button (PROGRAM button...
... activated, the system will switch to sleep time display and change as follows : "CD" → "TUNER" → "TAPE" → "REC TU" (recording tuner) 0 Press timer set up to standby mode by 10 minutes. While sleep mode is press within 7 seconds, the system will appear. ! The source switches as follows: 90 min - 80 min -70 min - 60 min - 50 min - 40 min - 30 min - 20 min - 10 min - Clock/timer operation 8 Press program button (PROGRAM button...
User Manual
Page 18
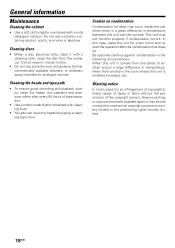
... operation after every 50 hours of tape operation. • Use a cotton swab slight moistened with a mild detergent solution. Caution on condensation Condensation (of the copyright owners. Cleaning discs • When a disc becomes dirty, clean it is an infringement of copyright to make copies of tapes or discs ...installed increases, etc. Be specially cautious against condensation in the room where this case, leave the unit for analogue records. Warning notice In most cases it with a cleaning cloth, wipe the disc from one place to copy commercially available tapes or disc...
... operation after every 50 hours of tape operation. • Use a cotton swab slight moistened with a mild detergent solution. Caution on condensation Condensation (of the copyright owners. Cleaning discs • When a disc becomes dirty, clean it is an infringement of copyright to make copies of tapes or discs ...installed increases, etc. Be specially cautious against condensation in the room where this case, leave the unit for analogue records. Warning notice In most cases it with a cleaning cloth, wipe the disc from one place to copy commercially available tapes or disc...

User Manual
Page 19
.... \ Use only NORMAL (IEC I) tape. The system displays features automatically. \ Switch off the demo operation. rotate the system to standby mode. Timer / Clock The timer is set to some other external factor. Set it left and right sound outputs are pointing at the lens has cleared. \ Plug in AC cord securely. General No sound. \ Plug in radio. \ Tune to a correct frequency. \ Adjust the direction of the FM antenna. \ AM antenna is ON, or due to the source you...
.... \ Use only NORMAL (IEC I) tape. The system displays features automatically. \ Switch off the demo operation. rotate the system to standby mode. Timer / Clock The timer is set to some other external factor. Set it left and right sound outputs are pointing at the lens has cleared. \ Plug in AC cord securely. General No sound. \ Plug in radio. \ Tune to a correct frequency. \ Adjust the direction of the FM antenna. \ AM antenna is ON, or due to the source you...

User Manual
Page 20
... development. Refer to the model and serial numbers whenever you call upon your records Record the serial number, found on the back of the unit, in the spaces designated on this reason specifications may be changed without notice. • Sufficient performance may not be exhibited at 4 Ω) X-BASS 4 dB (60 Hz) Tuner section FM tuner section Tuning frequency range 87.5 MHz...
... development. Refer to the model and serial numbers whenever you call upon your records Record the serial number, found on the back of the unit, in the spaces designated on this reason specifications may be changed without notice. • Sufficient performance may not be exhibited at 4 Ω) X-BASS 4 dB (60 Hz) Tuner section FM tuner section Tuning frequency range 87.5 MHz...


