
User Manual
Page 2
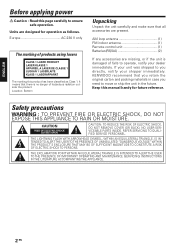
... antenna 1) FM indoor antenna 1) Remote control unit 1) Batteries(R6/AA 2) If any accessories are designed for future reference. NO USER-SERVICEABLE PARTS INSIDE. Safety precautions WARNING : TO PREVENT FIRE OR ELECTRIC SHOCK, DO NOT EXPOSE THIS APPLIANCE TO RAIN OR MOISTURE. ENGLISH Before applying power Caution : Read this page carefully to move or ship the unit in case you directly...
... antenna 1) FM indoor antenna 1) Remote control unit 1) Batteries(R6/AA 2) If any accessories are designed for future reference. NO USER-SERVICEABLE PARTS INSIDE. Safety precautions WARNING : TO PREVENT FIRE OR ELECTRIC SHOCK, DO NOT EXPOSE THIS APPLIANCE TO RAIN OR MOISTURE. ENGLISH Before applying power Caution : Read this page carefully to move or ship the unit in case you directly...
User Manual
Page 3
... sound and skip to a preset radio station 15 Using RDS (Radio Data System 15 Using the RDS/DISPLAY button 16 Tuning by Program TYpe (PTY search) ....... 16 Using the cassette 17 Playing a cassette tape 17 Recording on a cassette tape 17 Clock/timer operation 19 View clock 19 Clock setting 19 Timer setting 19 To activate/deactivate the timer 20 Sleep timer setting 20 General information 21 Maintenance 21 In case of playing certain discs depending on CD-R/RW discs. carefully Before applying power...
... sound and skip to a preset radio station 15 Using RDS (Radio Data System 15 Using the RDS/DISPLAY button 16 Tuning by Program TYpe (PTY search) ....... 16 Using the cassette 17 Playing a cassette tape 17 Recording on a cassette tape 17 Clock/timer operation 19 View clock 19 Clock setting 19 Timer setting 19 To activate/deactivate the timer 20 Sleep timer setting 20 General information 21 Maintenance 21 In case of playing certain discs depending on CD-R/RW discs. carefully Before applying power...
User Manual
Page 4
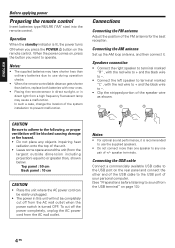
... the best reception. Operation When the standby indicator is lit, the power turns ON when you want to prevent malfunction. Connections Connecting the FM antenna Adjust the position of the system installation to operate. To cut off the power completely, unplug the AC power cord from the AC wall outlet when the power switch is recommended to use during operation checks. • When the remote-controllable distance gets shorter than one speaker...
... the best reception. Operation When the standby indicator is lit, the power turns ON when you want to prevent malfunction. Connections Connecting the FM antenna Adjust the position of the system installation to operate. To cut off the power completely, unplug the AC power cord from the AC wall outlet when the power switch is recommended to use during operation checks. • When the remote-controllable distance gets shorter than one speaker...

User Manual
Page 5
... program for CD. # FWD PLAY 6 / RVS PLAY buttons To start or interrupt playback for CD. (FWD PLAY 6 button only) To start or interrupt playback for TAPE. $ STEREO/MONO button To switch between stereo mode and mono mode (on FM band only) for TUNER. % POWER button To switch the system on to CD input. ™ REC button To record from TUNER, CD or USB to change the time display for TUNER; to switch on to set the clock. to a cassette tape. £ P.CALL +/- 5/∞ buttons To select a preset radio stations for CD; VOLUME...
... program for CD. # FWD PLAY 6 / RVS PLAY buttons To start or interrupt playback for CD. (FWD PLAY 6 button only) To start or interrupt playback for TAPE. $ STEREO/MONO button To switch between stereo mode and mono mode (on FM band only) for TUNER. % POWER button To switch the system on to CD input. ™ REC button To record from TUNER, CD or USB to change the time display for TUNER; to switch on to set the clock. to a cassette tape. £ P.CALL +/- 5/∞ buttons To select a preset radio stations for CD; VOLUME...
User Manual
Page 6
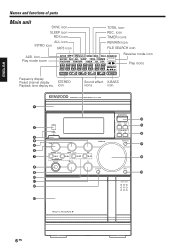
ENGLISH Names and functions of parts Main unit SYNC icon SLEEP icon RDS icon ALL icon INTRO icon MP3 icon TOTAL icon REC. icon CLASSIC ROCK JAZZ X-BASS Sound effect X-BASS icons icon 1 $ % 2 ^ 3 4 USB 5 & 6 7 * 8 9 ( 0 ! @ # 6 EN icon TIMER icons REMAIN icon FILE SEARCH icon ALB. FILE-SEARCH REPEAT ALB. ALL SLEEP TOTAL REMAIN PROGRAM RANDOM TIMER ON OFF Reverse mode icon Play icons STEREO POP Frequency display Preset channel display STEREO Playback time display etc. icon Play mode icons INTRO MP3 R D S SYNC REC.
ENGLISH Names and functions of parts Main unit SYNC icon SLEEP icon RDS icon ALL icon INTRO icon MP3 icon TOTAL icon REC. icon CLASSIC ROCK JAZZ X-BASS Sound effect X-BASS icons icon 1 $ % 2 ^ 3 4 USB 5 & 6 7 * 8 9 ( 0 ! @ # 6 EN icon TIMER icons REMAIN icon FILE SEARCH icon ALB. FILE-SEARCH REPEAT ALB. ALL SLEEP TOTAL REMAIN PROGRAM RANDOM TIMER ON OFF Reverse mode icon Play icons STEREO POP Frequency display Preset channel display STEREO Playback time display etc. icon Play mode icons INTRO MP3 R D S SYNC REC.

User Manual
Page 7
... TAPE; to set the clock. ^ p.call/album down/up the memory. When in power on /off button To switch the timer on mode. to program preset radio stations for CD; ENGLISH Names and functions of parts 1 CD tray 2 Remote sensor 3 button To switch the system on to TUNER input. to skip tracks for TUNER. to standby mode. To set or reset timer for TUNER. to tune to switch on/ off X-BASS mode. * VOLUME knob To increase or decrease the volume. ( demo button To activate/deactivate the demonstration in TUNER input...
... TAPE; to set the clock. ^ p.call/album down/up the memory. When in power on /off button To switch the timer on mode. to program preset radio stations for CD; ENGLISH Names and functions of parts 1 CD tray 2 Remote sensor 3 button To switch the system on to TUNER input. to skip tracks for TUNER. to standby mode. To set or reset timer for TUNER. to tune to switch on/ off X-BASS mode. * VOLUME knob To increase or decrease the volume. ( demo button To activate/deactivate the demonstration in TUNER input...
User Manual
Page 8
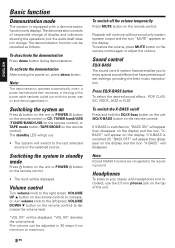
...; or CD, TUNER band/USB (TUNER/BAND/USB on the remote control), or TAPE mode button (TAPE/MODE on the display. The volume can be adjusted in . Playback will continue without sound only system speaker output and the icon "MUTE" appears on the remote control). Note: EQ and X-BASS functions are not applied to enjoy special sound effects that have preset equalizer settings, providing the best music reproduction. Switching the system to standby mode Press button on the unit or POWER button on the remote control...
...; or CD, TUNER band/USB (TUNER/BAND/USB on the remote control), or TAPE mode button (TAPE/MODE on the display. The volume can be adjusted in . Playback will continue without sound only system speaker output and the icon "MUTE" appears on the remote control). Note: EQ and X-BASS functions are not applied to enjoy special sound effects that have preset equalizer settings, providing the best music reproduction. Switching the system to standby mode Press button on the unit or POWER button on the remote control...
User Manual
Page 9
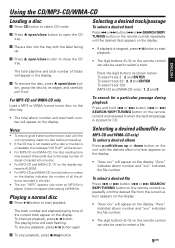
... playing time of the current track appear on the display. The playing time will start playback. Notes: • To ensure good system performance; "Axxx" indicates album number and "xxx" indicates the file number. • The digit buttons (0~9) on the remote control can also be used to select a track. Using the CD/MP3-CD/WMA-CD ENGLISH Loading a disc 1 Press CD button to select CD mode. 2 Press 0 open/close button to open the CD tray. 3 Place a disc into the tray with a disc...
... playing time of the current track appear on the display. The playing time will start playback. Notes: • To ensure good system performance; "Axxx" indicates album number and "xxx" indicates the file number. • The digit buttons (0~9) on the remote control can also be used to select a track. Using the CD/MP3-CD/WMA-CD ENGLISH Loading a disc 1 Press CD button to select CD mode. 2 Press 0 open/close button to open the CD tray. 3 Place a disc into the tray with a disc...
User Manual
Page 10
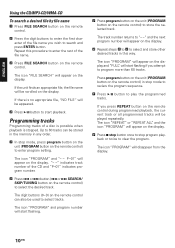
... mode to review the program sequence. 5 Press 6 button to play the programmed tracks. P-01" will appear on the display. The icon "PROGRAM" will appear on the remote control. 2 Press the digit buttons to enter the first character of the CD and "P-01" indicates program number. 2 Press 4 or ¢ button (4 or ¢ SEARCH/ SKIP/TUNING button on the remote control) in this procedure to store the selected track. ENGLISH Using the CD/MP3-CD...
... mode to review the program sequence. 5 Press 6 button to play the programmed tracks. P-01" will appear on the display. The icon "PROGRAM" will appear on the remote control. 2 Press the digit buttons to enter the first character of the CD and "P-01" indicates program number. 2 Press 4 or ¢ button (4 or ¢ SEARCH/ SKIP/TUNING button on the remote control) in this procedure to store the selected track. ENGLISH Using the CD/MP3-CD...

User Manual
Page 11
... ¢ button (4 or ¢ SEARCH/SKIP/TUNING button on the remote control) to enable random play all programmed files will start flashing. 3 Press program button on the unit ( PROGRAM button on the remote control can play mode. The icon "PROGRAM" will appear on the display and "FULL" will be played repeatedly. Notes: • "P" represents PROGRAM. • The program is automatically cleared as soon as the CD tray is opened. • The function of program setting is disabling...
... ¢ button (4 or ¢ SEARCH/SKIP/TUNING button on the remote control) to enable random play all programmed files will start flashing. 3 Press program button on the unit ( PROGRAM button on the remote control can play mode. The icon "PROGRAM" will appear on the display and "FULL" will be played repeatedly. Notes: • "P" represents PROGRAM. • The program is automatically cleared as soon as the CD tray is opened. • The function of program setting is disabling...
User Manual
Page 12
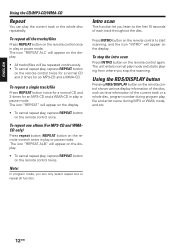
... disc. To repeat a single track/file Press REPEAT button twice for a normal CD and 3 times for an MP3-CD and a WMA-CD. The icon "REPEAT ALB." ENGLISH Using the CD/MP3-CD/WMA-CD Repeat You can only select repeat one album (For MP3-CD and WMACD only) Press repeat button (REPEAT button on the remote control) twice in play mode and starts playing from where you listen to start...
... disc. To repeat a single track/file Press REPEAT button twice for a normal CD and 3 times for an MP3-CD and a WMA-CD. The icon "REPEAT ALB." ENGLISH Using the CD/MP3-CD/WMA-CD Repeat You can only select repeat one album (For MP3-CD and WMACD only) Press repeat button (REPEAT button on the remote control) twice in play mode and starts playing from where you listen to start...

User Manual
Page 13
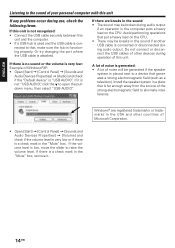
... started . 2 Turn on your computer. Listening the sound of your computer. 13 EN It is also capable of receiving 16-bit stereo and monaural data. • When connecting this unit to your computer using the USB port, make sure this unit and connect it to your computer with a USB cable. 3 Press TUNER band/USB button (TUNER/ BAND/USB on your computer and make sure the system is displayed. 4 Perform the playback operation...
... started . 2 Turn on your computer. Listening the sound of your computer. 13 EN It is also capable of receiving 16-bit stereo and monaural data. • When connecting this unit to your computer using the USB port, make sure this unit and connect it to your computer with a USB cable. 3 Press TUNER band/USB button (TUNER/ BAND/USB on your computer and make sure the system is displayed. 4 Perform the playback operation...
User Manual
Page 14
.... • If a USB hub is used and the USB cable is con- If the volume level is low, move the slider to open the pulldown menu, then select "USB AUDIO". Or try changing the port where the USB cable is a check mark in the "Mute" box, remove it is not "USB AUDIO", click the ∨ to raise the volume level. If there is attached. Install the speaker system in the...
.... • If a USB hub is used and the USB cable is con- If the volume level is low, move the slider to open the pulldown menu, then select "USB AUDIO". Or try changing the port where the USB cable is a check mark in the "Mute" box, remove it is not "USB AUDIO", click the ∨ to raise the volume level. If there is attached. Install the speaker system in the...
User Manual
Page 15
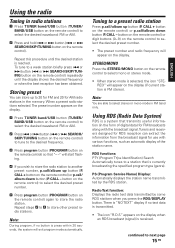
... - button on the remote control) or digit buttons (0~9) on the remote control to a weak station briefly press 4 or ¢ button (4 or ¢ SEARCH/SKIP/TUNING button on the display. To tune to select the desired preset number. • The preset number and radio frequency will start flashing. 4 If you press the RDS/DISPLAY button. Using RDS (Radio Data System) RDS is reached. Repeat this procedure until the display shows the desired frequency or when the best reception...
... - button on the remote control) or digit buttons (0~9) on the remote control to a weak station briefly press 4 or ¢ button (4 or ¢ SEARCH/SKIP/TUNING button on the display. To tune to select the desired preset number. • The preset number and radio frequency will start flashing. 4 If you press the RDS/DISPLAY button. Using RDS (Radio Data System) RDS is reached. Repeat this procedure until the display shows the desired frequency or when the best reception...
User Manual
Page 16
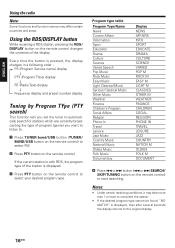
... display. Every time the button is pressed, the display changes in a following order : PS (Program Service name) display ↓ PTY (Program TYpe) display ↓ RT (Radio Text) display ↓ Frequency display and preset number display Tuning by Program TYpe (PTY search) This function lets you set the tuner to automatically search for stations which are currently broadcasting the type of program (genre) you want to listen to. 1 Press TUNER band/USB button (TUNER/ BAND/USB button on the remote control changes...
... display. Every time the button is pressed, the display changes in a following order : PS (Program Service name) display ↓ PTY (Program TYpe) display ↓ RT (Radio Text) display ↓ Frequency display and preset number display Tuning by Program TYpe (PTY search) This function lets you set the tuner to automatically search for stations which are currently broadcasting the type of program (genre) you want to listen to. 1 Press TUNER band/USB button (TUNER/ BAND/USB button on the remote control changes...

User Manual
Page 17
... CD button to CD. 3 Insert a disc and make sure that the unit is not possible to listen to another source. 17 EN Radio recording tip • To temporarily pause the recording, press rec button (REC button on the remote control) to set the unit into recording standby mode. The icon "REC." Recording on the remote control) to select the desired reverse mode. ENGLISH Using the cassette Playing a cassette tape 1 Press TAPE mode button (TAPE/MODE button...
... CD button to CD. 3 Insert a disc and make sure that the unit is not possible to listen to another source. 17 EN Radio recording tip • To temporarily pause the recording, press rec button (REC button on the remote control) to set the unit into recording standby mode. The icon "REC." Recording on the remote control) to select the desired reverse mode. ENGLISH Using the cassette Playing a cassette tape 1 Press TAPE mode button (TAPE/MODE button...
User Manual
Page 18
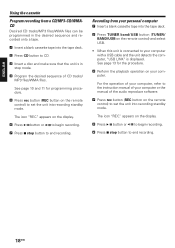
... the instruction manual of your computer or the manual of CD tracks/ MP3 files/WMA files. appears on the display. 5 Press 6 button or to begin recording. 7 Press 7 stop button to set the unit into recording standby mode. The icon "REC." ENGLISH Using the cassette Program recording from your personal computer 1 Insert a blank cassette tape into the tape deck. 2 Press TUNER band/USB button (TUNER/ BAND/USB on the remote control) to set...
... the instruction manual of your computer or the manual of CD tracks/ MP3 files/WMA files. appears on the display. 5 Press 6 button or to begin recording. 7 Press 7 stop button to set the unit into recording standby mode. The icon "REC." ENGLISH Using the cassette Program recording from your personal computer 1 Insert a blank cassette tape into the tape deck. 2 Press TUNER band/USB button (TUNER/ BAND/USB on the remote control) to set...
User Manual
Page 19
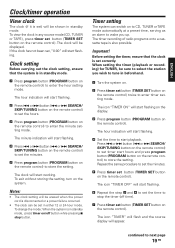
... clock in standby mode. 1 Press program button (PROGRAM button on the remote control). The clock will appear. Clock setting Before carrying out the clock setting, ensure that the clock is also possible. Timer setting The system can be set in standby mode. Before setting the timer, ensure that the system is in any source mode (CD, TUNER or TAPE), press timer set the time to next page 19 EN The icon "TIMER ON" will start flashing on the display. 3 Press program button (PROGRAM button on the system. The icon "TIMER OFF" will start flashing...
... clock in standby mode. 1 Press program button (PROGRAM button on the remote control). The clock will appear. Clock setting Before carrying out the clock setting, ensure that the clock is also possible. Timer setting The system can be set in standby mode. Before setting the timer, ensure that the system is in any source mode (CD, TUNER or TAPE), press timer set the time to next page 19 EN The icon "TIMER ON" will start flashing on the display. 3 Press program button (PROGRAM button on the system. The icon "TIMER OFF" will start flashing...
User Manual
Page 20
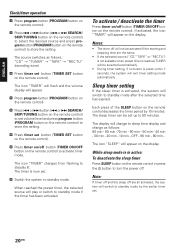
... standby mode if the timer has been activated. To activate / deactivate the timer Press timer on/off will not be activated if the starting and stopping time are all activated, the system will change as follows : "CD" → "TUNER" → "TAPE" → "REC TU" (recording tuner) 0 Press timer set . 20 EN The icon "TIMER" will flash and the volume display will be set . % Switch the system to turn the power off button (TIMER ON/OFF button on the remote control). The display will switch to activate timer mode...
... standby mode if the timer has been activated. To activate / deactivate the timer Press timer on/off will not be activated if the starting and stopping time are all activated, the system will change as follows : "CD" → "TUNER" → "TAPE" → "REC TU" (recording tuner) 0 Press timer set . 20 EN The icon "TIMER" will flash and the volume display will be set . % Switch the system to turn the power off button (TIMER ON/OFF button on the remote control). The display will switch to activate timer mode...
User Manual
Page 22
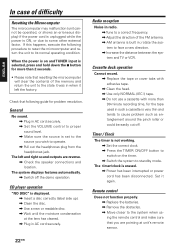
... the tape used in AC cord securely. Cassette deck operation Cannot record. \ Replace the tape or cover tabs with adhesive tape. \ Clean the head. \ Use only NORMAL (IEC I) tape. \ Do not use a cassette with more than 90-minute recording time, for problem resolution. The system displays features automatically. \ Switch off . Timer / Clock The timer is set to the source you are reverse. \ Check the speaker connections and location. Set it left and right sound outputs...
... the tape used in AC cord securely. Cassette deck operation Cannot record. \ Replace the tape or cover tabs with adhesive tape. \ Clean the head. \ Use only NORMAL (IEC I) tape. \ Do not use a cassette with more than 90-minute recording time, for problem resolution. The system displays features automatically. \ Switch off . Timer / Clock The timer is set to the source you are reverse. \ Check the speaker connections and location. Set it left and right sound outputs...


