

Instruction Manual
Page 1
... manual is a BASIC INSTRUCTION MANUAL. For more details, please refer to ensure proper use of contents. . Information on Smart User Guide You can get detailed procedures on operating the System from devices such as a smartphone. (Compatible with standard browsers on Android and iPhone) http://manual2.jvckenwood.com/audio/mobile/global/ B5A-0211-00 [E] ITALIANO COMPACT Hi-Fi SYSTEM K-575BT BASIC INSTRUCTION MANUAL Please read through the "BASIC INSTRUCTION MANUAL...
... manual is a BASIC INSTRUCTION MANUAL. For more details, please refer to ensure proper use of contents. . Information on Smart User Guide You can get detailed procedures on operating the System from devices such as a smartphone. (Compatible with standard browsers on Android and iPhone) http://manual2.jvckenwood.com/audio/mobile/global/ B5A-0211-00 [E] ITALIANO COMPACT Hi-Fi SYSTEM K-575BT BASIC INSTRUCTION MANUAL Please read through the "BASIC INSTRUCTION MANUAL...
Instruction Manual
Page 2
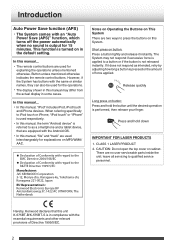
... force applied. CLASS 1 LASER PRODUCT 2. Introduction Auto Power Save function (APS) 0 The System comes with an "Auto Power Save (APS)" function, which turns off the power automatically when no user serviceable parts inside the unit; In this manual... 0 In this unit K-575BT-B/K-575BT-S is output for the operations. 0 The display shown in the default setting. When referring specifically to as intended, retry by adjusting how long a button is performed, then release...
... force applied. CLASS 1 LASER PRODUCT 2. Introduction Auto Power Save function (APS) 0 The System comes with an "Auto Power Save (APS)" function, which turns off the power automatically when no user serviceable parts inside the unit; In this manual... 0 In this unit K-575BT-B/K-575BT-S is output for the operations. 0 The display shown in the default setting. When referring specifically to as intended, retry by adjusting how long a button is performed, then release...
Instruction Manual
Page 3
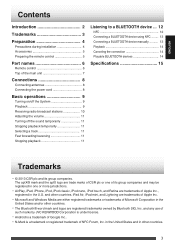
... installation 4 Accessories 5 Preparing the remote control 5 Part names 6 Remote control 6 Top of the main unit 7 Connections 8 Connecting antennas 8 Connecting the power cord 8 Basic operations 9 Turning on/off the System 9 Playback 9 Receiving radio broadcast stations 10 Adjusting the volume 11 Turning off the sound temporarily 11 Stopping playback temporarily 11 Selecting a track 11 Fast forwarding/reversing 11 Stopping playback 11 Listening to a BLUETOOTH device ... 12 NFC 12 Connecting a BLUETOOTH device using NFC ........ 13 Connecting a BLUETOOTH device manually...
... installation 4 Accessories 5 Preparing the remote control 5 Part names 6 Remote control 6 Top of the main unit 7 Connections 8 Connecting antennas 8 Connecting the power cord 8 Basic operations 9 Turning on/off the System 9 Playback 9 Receiving radio broadcast stations 10 Adjusting the volume 11 Turning off the sound temporarily 11 Stopping playback temporarily 11 Selecting a track 11 Fast forwarding/reversing 11 Stopping playback 11 Listening to a BLUETOOTH device ... 12 NFC 12 Connecting a BLUETOOTH device using NFC ........ 13 Connecting a BLUETOOTH device manually...

Instruction Manual
Page 4
between 5 ˚C and 35 ˚C. 4 Preparation Precautions during installation Caution: Proper Ventilation To avoid the risk of the System .. Notes on a level surface. Front view 15 cm 15 cm 15 cm Side view 15 cm Rear of electric shock and fire, and to prevent damage, locate the apparatus as follows: 1 Front: No obstructions and open spacing. 2 Sides/ Top/ Back: No obstructions should be placed in the areas indicated by the dimensions in the illustration. 3 Bottom: Place on installation Select a place which is level, dry and neither too hot nor too cold -
between 5 ˚C and 35 ˚C. 4 Preparation Precautions during installation Caution: Proper Ventilation To avoid the risk of the System .. Notes on a level surface. Front view 15 cm 15 cm 15 cm Side view 15 cm Rear of electric shock and fire, and to prevent damage, locate the apparatus as follows: 1 Front: No obstructions and open spacing. 2 Sides/ Top/ Back: No obstructions should be placed in the areas indicated by the dimensions in the illustration. 3 Bottom: Place on installation Select a place which is level, dry and neither too hot nor too cold -

Instruction Manual
Page 5
... a place where children cannot reach. CAUTION 0 Danger of explosion if the battery is incorrectly replaced. 0 Replace only with tape and insulate when throwing away or storing it in a fire. - Dry-cell batteries for remote control (AAA x 2) Power cord (1) FM indoor antenna (1) AAA batteries (supplied) NOTE 0 The batteries supplied are supplied for checking system operation. Do not leave the battery with new ones as soon as possible. Wrap the...
... a place where children cannot reach. CAUTION 0 Danger of explosion if the battery is incorrectly replaced. 0 Replace only with tape and insulate when throwing away or storing it in a fire. - Dry-cell batteries for remote control (AAA x 2) Power cord (1) FM indoor antenna (1) AAA batteries (supplied) NOTE 0 The batteries supplied are supplied for checking system operation. Do not leave the battery with new ones as soon as possible. Wrap the...

Instruction Manual
Page 6
... display brightness. Switches between auto tuning and manual tuning when listening to connected external device. 0 I/W (CD) button Plays or pauses the disc. 0 I/W (USB) button Plays or pauses the USB device. 0 I/W (BLUETOOTH) button Plays or pauses BLUETOOTH. O CLEAR button Deletes the setting for programmed tracks. Part names Remote control A H B I SLEEP button Sets the sleep timer. A M (CD EJECT) button For ejecting the disc. C Source buttons 0 TUNER button Switches to FM radio. 0 AUDIO IN button Switches to FM radio. Sets the Front Surround. 0 FLAT button Returns the adjusted sound...
... display brightness. Switches between auto tuning and manual tuning when listening to connected external device. 0 I/W (CD) button Plays or pauses the disc. 0 I/W (USB) button Plays or pauses the USB device. 0 I/W (BLUETOOTH) button Plays or pauses BLUETOOTH. O CLEAR button Deletes the setting for programmed tracks. Part names Remote control A H B I SLEEP button Sets the sleep timer. A M (CD EJECT) button For ejecting the disc. C Source buttons 0 TUNER button Switches to FM radio. 0 AUDIO IN button Switches to FM radio. Sets the Front Surround. 0 FLAT button Returns the adjusted sound...

Instruction Manual
Page 7
... various settings. Pressing the [VOLUME r] button increases the volume, and [VOLUME s] lowers the volume. Press and hold to radio. F A (Power) button Switches the power ON/OFF (standby). E S / T buttons For skipping tracks. Selects the broadcast station when listening to fast forward and fast reverse. Switches the radio tuning when listening to FM radio. H I / W (Playback / Pause) button Plays or pauses the BLUETOOTH device/ CD / USB device. 7 G o (Stop) button Stops playback on the CD / USB device. C N mark (NFC antenna) For use in connection with...
... various settings. Pressing the [VOLUME r] button increases the volume, and [VOLUME s] lowers the volume. Press and hold to radio. F A (Power) button Switches the power ON/OFF (standby). E S / T buttons For skipping tracks. Selects the broadcast station when listening to fast forward and fast reverse. Switches the radio tuning when listening to FM radio. H I / W (Playback / Pause) button Plays or pauses the BLUETOOTH device/ CD / USB device. 7 G o (Stop) button Stops playback on the CD / USB device. C N mark (NFC antenna) For use in connection with...

Instruction Manual
Page 8
... power cord from the outlet before connecting the antenna. 0 Generally, installing the antenna near a window helps to improve reception. 0 Listen to the actual broadcast to determine the location for an extended period of time. Rear view of System CAUTION 0 To avoid the risk of the antenna at a position and in use any power cords except the supplied power cord. .. Connections Connecting antennas Connecting the power cord Before listening to FM radio on the System, plug the power cord...
... power cord from the outlet before connecting the antenna. 0 Generally, installing the antenna near a window helps to improve reception. 0 Listen to the actual broadcast to determine the location for an extended period of time. Rear view of System CAUTION 0 To avoid the risk of the antenna at a position and in use any power cords except the supplied power cord. .. Connections Connecting antennas Connecting the power cord Before listening to FM radio on the System, plug the power cord...

Instruction Manual
Page 9
... the System Press the [A] button on the next page 9 ENGLISH 0 You can connect to and play back from remote control 0 The CD will be inserted automatically when you insert it disappears, playback starts automatically. 0 If the System has been set to another source, the System switches to the System. Operating from remote control Operating from main unit (Press repeatedly) Operating from main unit (Press repeatedly) 0 "READING" is displayed when the USB device...
... the System Press the [A] button on the next page 9 ENGLISH 0 You can connect to and play back from remote control 0 The CD will be inserted automatically when you insert it disappears, playback starts automatically. 0 If the System has been set to another source, the System switches to the System. Operating from remote control Operating from main unit (Press repeatedly) Operating from main unit (Press repeatedly) 0 "READING" is displayed when the USB device...

Instruction Manual
Page 10
... MANUAL TUNE: Press continuously until the desired frequency is heard during playback. The frequency changes continuously while the button is displayed. Press the [S] / [T] button while "AUTO TUNE" or "MANUAL TUNE" is pressed. NOTE 0 No sound is received. Remote control Main unit (Press repeatedly) 2 Start playback of 50 kHz. Remote control Main unit Receiving radio broadcast stations Switch the source to the next station automatically at each time you press the button. 2 Select a station. Remote control Main unit 0 For AUTO TUNE: Tunes...
... MANUAL TUNE: Press continuously until the desired frequency is heard during playback. The frequency changes continuously while the button is displayed. Press the [S] / [T] button while "AUTO TUNE" or "MANUAL TUNE" is pressed. NOTE 0 No sound is received. Remote control Main unit (Press repeatedly) 2 Start playback of 50 kHz. Remote control Main unit Receiving radio broadcast stations Switch the source to the next station automatically at each time you press the button. 2 Select a station. Remote control Main unit 0 For AUTO TUNE: Tunes...
Instruction Manual
Page 11
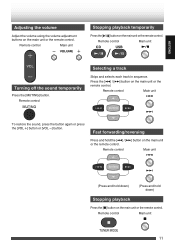
... Adjusting the volume Adjust the volume using the volume adjustment buttons on the main unit or the remote control. Remote control Main unit Stopping playback temporarily Press the [I/W] button on the main unit or the remote control. Remote control Main unit (Press and hold down) (Press and hold the [S] / [T] button on the main unit or the remote control. Remote control Main unit To restore the sound, press the button again or press the [VOL r] button...
... Adjusting the volume Adjust the volume using the volume adjustment buttons on the main unit or the remote control. Remote control Main unit Stopping playback temporarily Press the [I/W] button on the main unit or the remote control. Remote control Main unit (Press and hold down) (Press and hold the [S] / [T] button on the main unit or the remote control. Remote control Main unit To restore the sound, press the button again or press the [VOL r] button...
Instruction Manual
Page 12
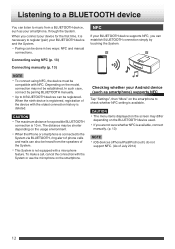
... whether NFC setting is 10 m. CAUTION 0 The maximum distance for the first time, it is deleted. In such case, connect by touching the System. The distance may differ depending on the BLUETOOTH device used. 0 If you connect your BLUETOOTH device and the System. 0 Pairing can be done in two ways: NFC and manual connections. CAUTION 0 The menu items displayed on the screen may be...
... whether NFC setting is 10 m. CAUTION 0 The maximum distance for the first time, it is deleted. In such case, connect by touching the System. The distance may differ depending on the BLUETOOTH device used. 0 If you connect your BLUETOOTH device and the System. 0 Pairing can be done in two ways: NFC and manual connections. CAUTION 0 The menu items displayed on the screen may be...

Instruction Manual
Page 13
... the screen of the target device. 0 The System switches to the pairing standby state, and the "n" icon on the display blinks. 0 If a "Connect to Bluetooth?" NOTE 0 After pairing is in standby mode or set it to as smartphone) Tap "Settings" B "Wireless and network" in use for further detail. (Example) Android device (such as target device) for the first time, perform pairing using NFC Connecting a BLUETOOTH device manually .. . 1 Turn on the target device and...
... the screen of the target device. 0 The System switches to the pairing standby state, and the "n" icon on the display blinks. 0 If a "Connect to Bluetooth?" NOTE 0 After pairing is in standby mode or set it to as smartphone) Tap "Settings" B "Wireless and network" in use for further detail. (Example) Android device (such as target device) for the first time, perform pairing using NFC Connecting a BLUETOOTH device manually .. . 1 Turn on the target device and...

Instruction Manual
Page 14
... the display of the System on the display of the System. After "DISCONNECT" is displayed, the "n" icon changes from solid light to another target device, the device currently connected will be compatible with the target device is complete. (p. 9) Canceling the connection Bluetooth K575 0 When the connection is established, "CONNECTED" appears on the target device and perform pairing again. Then the "n" icon lights up and then blinks (pairing standby state). Remote control...
... the display of the System on the display of the System. After "DISCONNECT" is displayed, the "n" icon changes from solid light to another target device, the device currently connected will be compatible with the target device is complete. (p. 9) Canceling the connection Bluetooth K575 0 When the connection is established, "CONNECTED" appears on the target device and perform pairing again. Then the "n" icon lights up and then blinks (pairing standby state). Remote control...

Instruction Manual
Page 15
... (Audio/Video Remote Control Profile) Supporting codec : SBC, AAC, aptX CD player Signal readout D/A converter Oversampling : Non-contact optical readout (Semiconductor laser) : 1 bit : 8 fs (352.8 kHz) Tuner FM tuner Reception frequency : 87.50 MHz - 108.00 MHz range Antenna impedance : FM: 75 Ω, unbalanced USB Supported USB devices : USB mass storage class devices Interface : USB 2.0 (Full speed) USB 1.1 compatible Supported file systems: FAT 16/32 Supply current : max. 500 mA Speakers Enclosure Speakers Impedance Maximum input : Bass...
... (Audio/Video Remote Control Profile) Supporting codec : SBC, AAC, aptX CD player Signal readout D/A converter Oversampling : Non-contact optical readout (Semiconductor laser) : 1 bit : 8 fs (352.8 kHz) Tuner FM tuner Reception frequency : 87.50 MHz - 108.00 MHz range Antenna impedance : FM: 75 Ω, unbalanced USB Supported USB devices : USB mass storage class devices Interface : USB 2.0 (Full speed) USB 1.1 compatible Supported file systems: FAT 16/32 Supply current : max. 500 mA Speakers Enclosure Speakers Impedance Maximum input : Bass...

Instruction Manual
Page 16
Refer to the model and serial numbers whenever you call upon your records Record the serial number, found on the back of the unit, in the spaces designated on this product. For your dealer for information or service on the warranty card, and in the space provided below. Model Serial Number
Refer to the model and serial numbers whenever you call upon your records Record the serial number, found on the back of the unit, in the spaces designated on this product. For your dealer for information or service on the warranty card, and in the space provided below. Model Serial Number


