
User Manual 1
Page 2
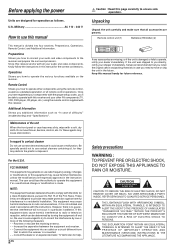
... remote control operations. Additional Information Shows you have registered your audio and video components to use contact cleaners because it is made. Do not use radio frequency energy. In regard to operate both this equipment may generate or use thinner, benzine, alcohol, etc. For the U.S.A. Changes or modifications to this receiver and your audio and video components, kindly follow the instructions in the instruction manual. Reorient or relocate the receiving antenna. - - Kenwood...
... remote control operations. Additional Information Shows you have registered your audio and video components to use contact cleaners because it is made. Do not use radio frequency energy. In regard to operate both this equipment may generate or use thinner, benzine, alcohol, etc. For the U.S.A. Changes or modifications to this receiver and your audio and video components, kindly follow the instructions in the instruction manual. Reorient or relocate the receiving antenna. - - Kenwood...
User Manual 1
Page 3
... output from your remote controllable audio and video components. PRO LOGIC II offers special features for music playback. SRS TruSurround There are going to your equipment or the software you are only two speakers but you would have connected. 3 EN For best results, Dolby Digital EX should be able to music, you have thought impossible through two speakers. Neo:6 Neo:6 is turned on a CD, LD or DVD player...
... output from your remote controllable audio and video components. PRO LOGIC II offers special features for music playback. SRS TruSurround There are going to your equipment or the software you are only two speakers but you would have connected. 3 EN For best results, Dolby Digital EX should be able to music, you have thought impossible through two speakers. Neo:6 Neo:6 is turned on a CD, LD or DVD player...
User Manual 1
Page 4
... power 2 How to use this manual 2 Unpacking 2 Safety precautions 2 Special features 3 IMPORTANT SAFEGUARDS 5 Names and functions of parts 7 Main unit 7 Remote control unit 8 Setting up the system 9 Connecting audio components 10 Connecting the speakers (for HTB-S500 system 11 Connecting the speakers (for KAF-S500) ....... 12 Connecting the terminals 13 Connecting to the FRONT AUX jacks 14 Preparing the remote control 14 Preparing for surround sound 15 Speaker settings 15 Operations Normal playback 18 Preparing for playback 18 Listening to a source component...
... power 2 How to use this manual 2 Unpacking 2 Safety precautions 2 Special features 3 IMPORTANT SAFEGUARDS 5 Names and functions of parts 7 Main unit 7 Remote control unit 8 Setting up the system 9 Connecting audio components 10 Connecting the speakers (for HTB-S500 system 11 Connecting the speakers (for KAF-S500) ....... 12 Connecting the terminals 13 Connecting to the FRONT AUX jacks 14 Preparing the remote control 14 Preparing for surround sound 15 Speaker settings 15 Operations Normal playback 18 Preparing for playback 18 Listening to a source component...
User Manual 1
Page 5
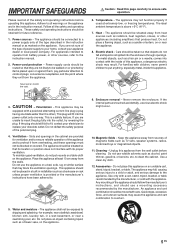
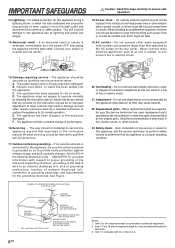
... particular attention to cords at plugs, convenience receptacles, and the point where they are not likely to the instruction manual. 2. An appliance and cart combination should be routed so that they exit from battery power, or other sources, refer to be moved with the appliance. Quick stops, excessive force, and uneven surfaces may block the ventilation openings. Water and...
... particular attention to cords at plugs, convenience receptacles, and the point where they are not likely to the instruction manual. 2. An appliance and cart combination should be routed so that they exit from battery power, or other sources, refer to be moved with the appliance. Quick stops, excessive force, and uneven surfaces may block the ventilation openings. Water and...
User Manual 1
Page 6
... described in the instruction manual. If an outside antenna system, extreme care should not be sure the service technician has used replacement parts specified by the appliance manufacturer as the original parts. Article 810 of the National Electrical Code ANSI/NFPA 70, provides information with respect to proper grounding of the mast and supporting structure, grounding of overhead power lines or other...
... described in the instruction manual. If an outside antenna system, extreme care should not be sure the service technician has used replacement parts specified by the appliance manufacturer as the original parts. Article 810 of the National Electrical Code ANSI/NFPA 70, provides information with respect to proper grounding of the mast and supporting structure, grounding of overhead power lines or other...
User Manual 1
Page 7
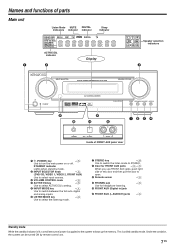
TUNED AUTO LC R FM/AM LFE SW kHz MHz LS S BS RS Speaker selection indicators STANDBY DIGITAL SURROUND AMPLIFIER KAF-S500 AV CONTROL CENTER PUSH OPEN STEREO LISTEN MODE INPUT MODE ACTIVE EQ. AUDIO - STANDBY indicator Lights when stand by remote control unit. 7 EN R Inside of power is supplied to the system to back up the memory. PHONES AUX OPTICAL L - FRONT AUX (Digital in) jack ( @ FRONT AUX (L-AUDIO-R) jacks $ Standby mode While the standby indicator is called standby mode. This is lit, a small amount of FRONT AUX jacks' door 1 (POWER) key % Use to turn ...
TUNED AUTO LC R FM/AM LFE SW kHz MHz LS S BS RS Speaker selection indicators STANDBY DIGITAL SURROUND AMPLIFIER KAF-S500 AV CONTROL CENTER PUSH OPEN STEREO LISTEN MODE INPUT MODE ACTIVE EQ. AUDIO - STANDBY indicator Lights when stand by remote control unit. 7 EN R Inside of power is supplied to the system to back up the memory. PHONES AUX OPTICAL L - FRONT AUX (Digital in) jack ( @ FRONT AUX (L-AUDIO-R) jacks $ Standby mode While the standby indicator is called standby mode. This is lit, a small amount of FRONT AUX jacks' door 1 (POWER) key % Use to turn ...
User Manual 1
Page 8
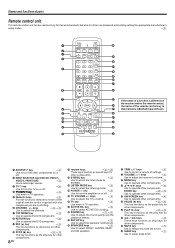
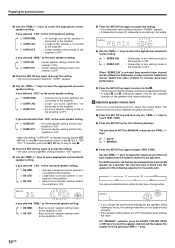
... key § Use to turn the other components on or off. 2 INPUT SELECTOR keys (DVD/CD, VIDEO 1, VIDEO 2, FRONT AUX) * Use to select input sources. 3 TV key ¤ Use to operate other non-Kenwood products by setting the appropriate manufacturer's setup codes. • 1 2 3 4 5 6 7 8 9 0 ! @ # SOURCE POWER INPUT SERECTOR DVD/CD VIDEO 1 VIDEO 2 FRONT AUX TV TV INPUT 1 2 4 5 7 8 +1O FRONT 0 CENTER TV VOLUME -+ TV 3 ACTIVE EQ. 6 SOUND 9 +1OO SET UP REAR SW + CHANNEL - ENTER key §‹ Use to operate other components. ∞ ON SCREEN key §...
... key § Use to turn the other components on or off. 2 INPUT SELECTOR keys (DVD/CD, VIDEO 1, VIDEO 2, FRONT AUX) * Use to select input sources. 3 TV key ¤ Use to operate other non-Kenwood products by setting the appropriate manufacturer's setup codes. • 1 2 3 4 5 6 7 8 9 0 ! @ # SOURCE POWER INPUT SERECTOR DVD/CD VIDEO 1 VIDEO 2 FRONT AUX TV TV INPUT 1 2 4 5 7 8 +1O FRONT 0 CENTER TV VOLUME -+ TV 3 ACTIVE EQ. 6 SOUND 9 +1OO SET UP REAR SW + CHANNEL - ENTER key §‹ Use to operate other components. ∞ ON SCREEN key §...
User Manual 1
Page 9
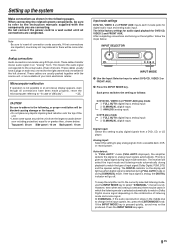
... will light up the system Make connections as follows: In DVD/CD, VIDEO 2 or FRONT AUX play mode 1 FULL AUTO (digital input, analog input) 2 D.MANUAL (digital input) 3 ANALOG (analog input) In DTS play mode 1 FULL AUTO (digital input, analog input) 2 D.MANUAL (digital input) Digital input: Select this setting to the actual audio of listening mode and source signal. Note Be sure to match a Dolby Digital source signal depending on each include jacks for DVD/CD, VIDEO 2 and FRONT AUX. These cables usually have been made using RCA pin cords. Top panel : 50 cm Side panel : 10...
... will light up the system Make connections as follows: In DVD/CD, VIDEO 2 or FRONT AUX play mode 1 FULL AUTO (digital input, analog input) 2 D.MANUAL (digital input) 3 ANALOG (analog input) In DTS play mode 1 FULL AUTO (digital input, analog input) 2 D.MANUAL (digital input) Digital input: Select this setting to the actual audio of listening mode and source signal. Note Be sure to match a Dolby Digital source signal depending on each include jacks for DVD/CD, VIDEO 2 and FRONT AUX. These cables usually have been made using RCA pin cords. Top panel : 50 cm Side panel : 10...
User Manual 1
Page 12
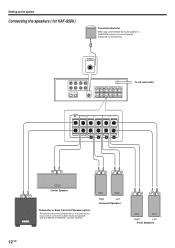
SUB WOOFER To AC wall outlet SUB/W BS CENTER REAR FRONT R L R L KENWOOD KENWOOD Center Speaker Subwoofer or Back Surround Speaker(option) Recommend to connect Subwoofer to this terminal but if you connect Back Surround speaker to SUB/W BS terminal, connect Powered Subwoofer to a Back Surround speaker with the SETUP of "6CH BS", use this terminal. Setting up the system Connecting the speakers ( for KAF-S500 ) Powered subwoofer When you wish to connect to this terminal. KENWOOD KENWOOD Right Left Surround Speakers KENWOOD KENWOOD Right Left Front Speakers 12 EN
SUB WOOFER To AC wall outlet SUB/W BS CENTER REAR FRONT R L R L KENWOOD KENWOOD Center Speaker Subwoofer or Back Surround Speaker(option) Recommend to connect Subwoofer to this terminal but if you connect Back Surround speaker to SUB/W BS terminal, connect Powered Subwoofer to a Back Surround speaker with the SETUP of "6CH BS", use this terminal. Setting up the system Connecting the speakers ( for KAF-S500 ) Powered subwoofer When you wish to connect to this terminal. KENWOOD KENWOOD Right Left Surround Speakers KENWOOD KENWOOD Right Left Front Speakers 12 EN
User Manual 1
Page 13
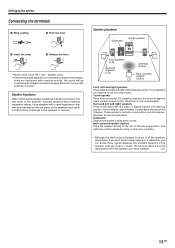
... of all surround modes. Surround (left and right) speakers Place at the direct left and right speakers are connected inversely or the speaker cords are required for all the speakers listed above the ears of the amplifier, connect speakers with ambiguous acoustic imaging. Using speakers with a rated impedance other than that indicated on the rear panel of the listeners. Required for surround playback. Subwoofer Reproduces powerful deep bass sounds. Setting up the system Connecting the terminals...
... of all surround modes. Surround (left and right) speakers Place at the direct left and right speakers are connected inversely or the speaker cords are required for all the speakers listed above the ears of the amplifier, connect speakers with ambiguous acoustic imaging. Using speakers with a rated impedance other than that indicated on the rear panel of the listeners. Required for surround playback. Subwoofer Reproduces powerful deep bass sounds. Setting up the system Connecting the terminals...
User Manual 1
Page 14
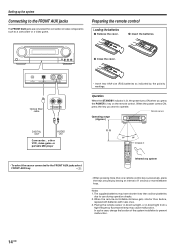
... FRONT AUX jacks select FRONT AUX key. * Infrared ray system • When pressing more between keys. Operation When the STANDBY indicator is lit, the power turns ON when you want to use during operation checks. 2. PHONES AUX OPTICAL L -AUDIO -R Optical fiber cable L -AUDIO -R DIGITAL OUT AUDIO OUT Camcorder, other VCR, video game or portable MD player • Insert two AAA-size (R03) batteries as a camcorder or a video game. Preparing the remote control Loading the batteries 1 Remove the...
... FRONT AUX jacks select FRONT AUX key. * Infrared ray system • When pressing more between keys. Operation When the STANDBY indicator is lit, the power turns ON when you want to use during operation checks. 2. PHONES AUX OPTICAL L -AUDIO -R Optical fiber cable L -AUDIO -R DIGITAL OUT AUDIO OUT Camcorder, other VCR, video game or portable MD player • Insert two AAA-size (R03) batteries as a camcorder or a video game. Preparing the remote control Loading the batteries 1 Remove the...
User Manual 1
Page 15
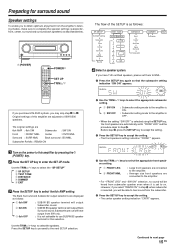
... from the amplifier's listening modes, make sure to complete the speaker settings (subwoofer, front, center, surround and surround back speakers) as described below. (POWER) POWER SET UP TRIM%¥fi If you purchase HTB-S500 system, you may skip step 2 to select the 6ch AMP setting. If you have output from SW only. : It is selected, you will have THX certified speakers, please set them to use SUB/W BS speaker terminal for surround sound Speaker settings To...
... from the amplifier's listening modes, make sure to complete the speaker settings (subwoofer, front, center, surround and surround back speakers) as described below. (POWER) POWER SET UP TRIM%¥fi If you purchase HTB-S500 system, you may skip step 2 to select the 6ch AMP setting. If you have output from SW only. : It is selected, you will have THX certified speakers, please set them to use SUB/W BS speaker terminal for surround sound Speaker settings To...
User Manual 1
Page 16
..." as the surround speaker setting, 1 BS NML 2 BS LRG 3 BS OFF : Average size back surround speaker is connected to the amplifier. : Large back surround speaker is connected to the amplifier. : Back surround speaker setting mode to the amplifier is not visible. If you change the volume level settings for surround sound 6 Use the TRIM%/fi keys to adjust the volume level of AUTO or MANUAL is selected, by pressing TRIM%/fi keys. 16 EN DOLBY DEX NEO...
..." as the surround speaker setting, 1 BS NML 2 BS LRG 3 BS OFF : Average size back surround speaker is connected to the amplifier. : Large back surround speaker is connected to the amplifier. : Back surround speaker setting mode to the amplifier is not visible. If you change the volume level settings for surround sound 6 Use the TRIM%/fi keys to adjust the volume level of AUTO or MANUAL is selected, by pressing TRIM%/fi keys. 16 EN DOLBY DEX NEO...
User Manual 1
Page 19
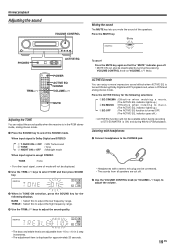
... the MUTE key. ACTIVE EQ mode You can also be displayed. 2 Use the TRIM%/fi keys to select the SOUND mode. indicator lights up .) 2 EQ MUSIC : E f f e c t i v e w h e n l i s t e n i n g t o m u s i c . (The ACTIVE EQ. TREBLE : Select this to the PHONES jack. PHONES • Headphones with headphones 1 Connect headphones to adjust the low frequency range. Normal playback Adjusting the sound VOLUME CONTROL PHONES TRIM%¥fi ACTIVE EQ. DOLBY DEX NEO:6 DSP TS MUTE DIGITAL DOLBY PLII DTS -ES...
... the MUTE key. ACTIVE EQ mode You can also be displayed. 2 Use the TRIM%/fi keys to select the SOUND mode. indicator lights up .) 2 EQ MUSIC : E f f e c t i v e w h e n l i s t e n i n g t o m u s i c . (The ACTIVE EQ. TREBLE : Select this to the PHONES jack. PHONES • Headphones with headphones 1 Connect headphones to adjust the low frequency range. Normal playback Adjusting the sound VOLUME CONTROL PHONES TRIM%¥fi ACTIVE EQ. DOLBY DEX NEO:6 DSP TS MUTE DIGITAL DOLBY PLII DTS -ES...
User Manual 1
Page 21
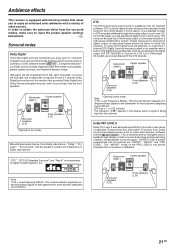
... video and Laserdisc software marked ). This is being input for more dynamic deep bass sound effects. The indication "LFE" appears in the display when a signal is achieved with a variety of a CD, LD or DVD player. Dolby PRO LOGIC II Dolby Pro Logic II was designed specifically to the subwoofer for this receiver lets you enjoy Dolby Digital (and Dolby Surround) program sources, even if you connect only the front speakers. Subwoofer (SW) Center speaker KENWOOD KENWOOD KENWOOD Surround speakers...
... video and Laserdisc software marked ). This is being input for more dynamic deep bass sound effects. The indication "LFE" appears in the display when a signal is achieved with a variety of a CD, LD or DVD player. Dolby PRO LOGIC II Dolby Pro Logic II was designed specifically to the subwoofer for this receiver lets you enjoy Dolby Digital (and Dolby Surround) program sources, even if you connect only the front speakers. Subwoofer (SW) Center speaker KENWOOD KENWOOD KENWOOD Surround speakers...

User Manual 1
Page 22
... an extension of Dolby Digital technology, Dolby Digital EX creates six full-bandwidth output channels from 6.1-channel sources. It can automatically select the best matched mode. Subwoofer (SW) Center speaker KENWOOD KENWOOD KENWOOD Surround speakers (L,R) Front speakers (L,R) What's DSP? DSP stands for true 6.1 channel Dolby Digital surround EX sound, this mode. Dolby Digital EX Dolby Digital EX is done using a matrix decoder that derives three surround channels from the two in the original recording. The indication "LFE" appears in the display when a signal...
... an extension of Dolby Digital technology, Dolby Digital EX creates six full-bandwidth output channels from 6.1-channel sources. It can automatically select the best matched mode. Subwoofer (SW) Center speaker KENWOOD KENWOOD KENWOOD Surround speakers (L,R) Front speakers (L,R) What's DSP? DSP stands for true 6.1 channel Dolby Digital surround EX sound, this mode. Dolby Digital EX Dolby Digital EX is done using a matrix decoder that derives three surround channels from the two in the original recording. The indication "LFE" appears in the display when a signal...
User Manual 1
Page 23
... speaker channels. • The DSP mode selection is set to next page 23 EN ST. DOLBY PRO LOGIC can choose DOLBY D EX then you select DOLBY DIGITAL "DOLBY D" will be produced when a DTS source is played by selecting the analog input. 1 Start playing the video software. 2 Use the LISTEN MODE key to the DOLBY D EX(Dolby Digital Surround EX mode) automatically. If you choose FULL AUTO during "Input mode settings" (9), this menu will not be displayed. 2 DOLBY D : DOLBY DIGITAL surround. (The DOLBY D indicator lights...
... speaker channels. • The DSP mode selection is set to next page 23 EN ST. DOLBY PRO LOGIC can choose DOLBY D EX then you select DOLBY DIGITAL "DOLBY D" will be produced when a DTS source is played by selecting the analog input. 1 Start playing the video software. 2 Use the LISTEN MODE key to the DOLBY D EX(Dolby Digital Surround EX mode) automatically. If you choose FULL AUTO during "Input mode settings" (9), this menu will not be displayed. 2 DOLBY D : DOLBY DIGITAL surround. (The DOLBY D indicator lights...
User Manual 1
Page 25
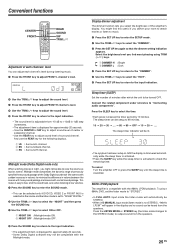
... step increments. • The adjustment item is set the listen mode to "STEREO". • In FULL AUTO input mode the listen mode will automatically be able to raise the volume as loud as the source and the listen mode is displayed for the following displays. 1 LS : Surround L channel. 2 BS : Surround back channel. 3 RS : Surround R channel. Convenient functions CENTER FRONT REAR SOUND SW TRIM%¥fi Adjustment of the Dolby Digital sound track (like scenes with sudden...
... step increments. • The adjustment item is set the listen mode to "STEREO". • In FULL AUTO input mode the listen mode will automatically be able to raise the volume as loud as the source and the listen mode is displayed for the following displays. 1 LS : Surround L channel. 2 BS : Surround back channel. 3 RS : Surround R channel. Convenient functions CENTER FRONT REAR SOUND SW TRIM%¥fi Adjustment of the Dolby Digital sound track (like scenes with sudden...

User Manual 1
Page 26
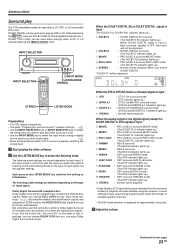
... ENTER key and then press the INPUT SELECTOR key. • LED will operate. INPUT SELECTOR keys DVD/CD VIDEO1 VIDEO2 TV VIDEO TV Satellite Cable DVD player CD player ‡ ‡ SOURCE INPUT SELECTOR Numeric keys ENTER POWER TV 5¥∞¥2¥3 ON SCREEN 1 Find the setup code of the remote control. You can be cancelled. Input (DVD) Component Maker DVD player KENWOOD Code 005 Key DVD/CD 3Press the registered INPUT SELECTOR key and then press the...
... ENTER key and then press the INPUT SELECTOR key. • LED will operate. INPUT SELECTOR keys DVD/CD VIDEO1 VIDEO2 TV VIDEO TV Satellite Cable DVD player CD player ‡ ‡ SOURCE INPUT SELECTOR Numeric keys ENTER POWER TV 5¥∞¥2¥3 ON SCREEN 1 Find the setup code of the remote control. You can be cancelled. Input (DVD) Component Maker DVD player KENWOOD Code 005 Key DVD/CD 3Press the registered INPUT SELECTOR key and then press the...

User Manual 1
Page 34
... of DVD player used. • Set the input mode to digital manual before starting playback of the Dolby Digital source. 9 No sound is produced during playback from • The input mode is set to the minimum position. • MUTE is ON. • Connect them properly referring to "Connecting the speakers" !@ • Adjust the volume to a proper level. • Turn OFF the MUTE. ( The standby indicator blinks and sound is • Speaker cords are exhausted. • The remote control unit...
... of DVD player used. • Set the input mode to digital manual before starting playback of the Dolby Digital source. 9 No sound is produced during playback from • The input mode is set to the minimum position. • MUTE is ON. • Connect them properly referring to "Connecting the speakers" !@ • Adjust the volume to a proper level. • Turn OFF the MUTE. ( The standby indicator blinks and sound is • Speaker cords are exhausted. • The remote control unit...


