
Instruction Manual
Page 1
KCA-R100 Rear Camera for information or service on the warranty card, and in the space provided below. Refer to the model and serial numbers whenever you can upon your KENWOOD dealer for Dashboard Camera INSTRUCTION MANUAL • Updated information (the latest Instruction Manual, etc.) is available from . Model KCA-R100 Serial Number US Residents Only Register Online Register your records Record the serial number, found on the back...
KCA-R100 Rear Camera for information or service on the warranty card, and in the space provided below. Refer to the model and serial numbers whenever you can upon your KENWOOD dealer for Dashboard Camera INSTRUCTION MANUAL • Updated information (the latest Instruction Manual, etc.) is available from . Model KCA-R100 Serial Number US Residents Only Register Online Register your records Record the serial number, found on the back...
Instruction Manual
Page 3
Contents EN Before Use 01 Precautions for Use 01 Accessories 03 Parts Name 03 Installation and Connection 04 Specifications 08 English
Contents EN Before Use 01 Precautions for Use 01 Accessories 03 Parts Name 03 Installation and Connection 04 Specifications 08 English
Instruction Manual
Page 4
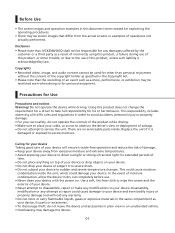
... moisture condensation inside . Use a soft, lint-free cloth to wipe the screen and the exterior of your device. • Never attempt to disassemble, repair or make any damages suffered by law. Replace the unit if it to severe shock. • Do not subject your device to sudden and severe temperature changes. Before Use • The screen images and operation examples in this document...
... moisture condensation inside . Use a soft, lint-free cloth to wipe the screen and the exterior of your device. • Never attempt to disassemble, repair or make any damages suffered by law. Replace the unit if it to severe shock. • Do not subject your device to sudden and severe temperature changes. Before Use • The screen images and operation examples in this document...

Instruction Manual
Page 5
Precautions for installation • Install the device in a position where it will interfere with driving or airbag operation. • If the device is installed incorrectly, event recording or parked recording may not work correctly. • Refer to "Installation and Connection" for use • Do not block the camera lens, get dirt on it, or place a reflective object near a digital terrestrial television antenna or...
Precautions for installation • Install the device in a position where it will interfere with driving or airbag operation. • If the device is installed incorrectly, event recording or parked recording may not work correctly. • Refer to "Installation and Connection" for use • Do not block the camera lens, get dirt on it, or place a reflective object near a digital terrestrial television antenna or...

Instruction Manual
Page 6
Accessories Before you get started, check you have everything below. Rear Camera Cable 6 4 1 3 7 6.Cable connector. 7.CAM-IN connector. 03 Parts Name Rear Camera 52 1.Rear camera. 2.Rear camera cable connector. 3.Adhesive mount. 4.Mounting port. 5.Locking ring. Rear Camera 8m Mini USB Cable Adhesive Pads Adhesive mount * Product apperance may differ slightly from that shown above.
Accessories Before you get started, check you have everything below. Rear Camera Cable 6 4 1 3 7 6.Cable connector. 7.CAM-IN connector. 03 Parts Name Rear Camera 52 1.Rear camera. 2.Rear camera cable connector. 3.Adhesive mount. 4.Mounting port. 5.Locking ring. Rear Camera 8m Mini USB Cable Adhesive Pads Adhesive mount * Product apperance may differ slightly from that shown above.

Instruction Manual
Page 7
... airbag so that it will not block the view of replacement parts and other information, contact the vehicle dealer. • Fix the power cord in a position where it does not interfere with driving. For how to be replaced after you remove the pillar cover. Rear windshield 04 Installation and Connection Recommended installation position • Install the device in place with commercially available tape or...
... airbag so that it will not block the view of replacement parts and other information, contact the vehicle dealer. • Fix the power cord in a position where it does not interfere with driving. For how to be replaced after you remove the pillar cover. Rear windshield 04 Installation and Connection Recommended installation position • Install the device in place with commercially available tape or...

Instruction Manual
Page 8
For the first installation, follow the instructions below: Step 1: Locate the Rear Camera. 1.1 Connect the device to secure cable. 6 5 05 Be sure the male and female pins is align when connecting, turn (5) Locking ring clockwise to the adhesive mount Attach the device onto (3) the adhesive mount. Make sure you align the device within the adhesive mount for proper installation. 3 1.2 Connect Rear Camera Cable Connector Connect (2) Rear Camera connector to (6) cable connector.
For the first installation, follow the instructions below: Step 1: Locate the Rear Camera. 1.1 Connect the device to secure cable. 6 5 05 Be sure the male and female pins is align when connecting, turn (5) Locking ring clockwise to the adhesive mount Attach the device onto (3) the adhesive mount. Make sure you align the device within the adhesive mount for proper installation. 3 1.2 Connect Rear Camera Cable Connector Connect (2) Rear Camera connector to (6) cable connector.
Instruction Manual
Page 9
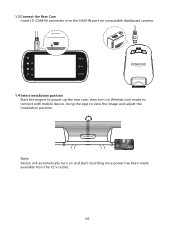
Note: Device will automatically turn on and start recording once power has been made available from the 12 V outlet. 06 Using the App to connect with mobile device. 1.3 Connect the Rear Cam Insert (7) CAM-IN connector into the CAM-IN port on compatible dashboard camera. 1.4 Select installation position Start the engine to power up the rear cam, then turn on Wireless Link mode to view the image and adjust the installation position.
Note: Device will automatically turn on and start recording once power has been made available from the 12 V outlet. 06 Using the App to connect with mobile device. 1.3 Connect the Rear Cam Insert (7) CAM-IN connector into the CAM-IN port on compatible dashboard camera. 1.4 Select installation position Start the engine to power up the rear cam, then turn on Wireless Link mode to view the image and adjust the installation position.

Instruction Manual
Page 10
... strips, use a panel removal tool to loosen any trim and hide the cable if necessary. Make sure that the routing of the cable does not affect airbags. - Windshield should be connected at room temperature before applying the adhesive (Avoid under direct sunlight). - Study the vehicle for optimum front dash camera position. Ensure that Cable can be thoroughly cleaned and mounting area...
... strips, use a panel removal tool to loosen any trim and hide the cable if necessary. Make sure that the routing of the cable does not affect airbags. - Windshield should be connected at room temperature before applying the adhesive (Avoid under direct sunlight). - Study the vehicle for optimum front dash camera position. Ensure that Cable can be thoroughly cleaned and mounting area...

Instruction Manual
Page 11
Specifications Image Sensor Frame Rate Recording Resolution Recording Format Lens Field of View Operating Voltage Current Consumption Operating Temperature Dimensions Weight Cable Length 1/2.8" CMOS Sensor 30fps 1920 x 1080 (2.0M) H.264 (MOV) F=2.0 Fixed Focus Lens Horizontal :129° / Vertical: 66° / Diagonal: 161° DC5.0V 110mA -10°C to 60°C 2-1/2" x 2-5/8" x 1-7/16" 63mm x 66mm x 36mm 11.8oz / 334g 26'-3" / 8m 08
Specifications Image Sensor Frame Rate Recording Resolution Recording Format Lens Field of View Operating Voltage Current Consumption Operating Temperature Dimensions Weight Cable Length 1/2.8" CMOS Sensor 30fps 1920 x 1080 (2.0M) H.264 (MOV) F=2.0 Fixed Focus Lens Horizontal :129° / Vertical: 66° / Diagonal: 161° DC5.0V 110mA -10°C to 60°C 2-1/2" x 2-5/8" x 1-7/16" 63mm x 66mm x 36mm 11.8oz / 334g 26'-3" / 8m 08
Instruction Manual
Page 102
Proper recycling and waste disposal will help conserve resources while preventing detrimental effects on Disposal of Old Electrical and Electronic Equipment (applicable for details in Bezug auf die RoHSRichtlinie 2011/65/EU ... UITHOORN, PAYS-BAS Konformitätserklärung in Bezug auf die EMCRichtlinie 2014/30/EU Konformitätserklärung in locating a recycle facility nearest to the RoHS Directive 2011/65/EU Manufacturer: JVCKENWOOD Corporation 3-12, Moriyacho, Kanagawa-ku, Yokohama-shi, Kanagawa 221-0022, JAPAN EU Representative: JVCKENWOOD Europe B.V. Amsterdamseweg 37...
Proper recycling and waste disposal will help conserve resources while preventing detrimental effects on Disposal of Old Electrical and Electronic Equipment (applicable for details in Bezug auf die RoHSRichtlinie 2011/65/EU ... UITHOORN, PAYS-BAS Konformitätserklärung in Bezug auf die EMCRichtlinie 2014/30/EU Konformitätserklärung in locating a recycle facility nearest to the RoHS Directive 2011/65/EU Manufacturer: JVCKENWOOD Corporation 3-12, Moriyacho, Kanagawa-ku, Yokohama-shi, Kanagawa 221-0022, JAPAN EU Representative: JVCKENWOOD Europe B.V. Amsterdamseweg 37...


