User Manual
Page 1
... KDC-118U KDC-MP258U KDC-MP158U CD-RECEIVER INSTRUCTION MANUAL AMPLI-TUNER LECTEUR DE CD MODE D'EMPLOI REPRODUCTOR DE DISCOS COMPACTOS RECEPTOR DE FM/AM MANUAL DE INSTRUCCIONES Take the time to the model and serial numbers whenever you obtain the best performance from your new CD-receiver. Refer to read through this instruction manual. Familiarity with installation and operation procedures will help you call upon your Kenwood...
... KDC-118U KDC-MP258U KDC-MP158U CD-RECEIVER INSTRUCTION MANUAL AMPLI-TUNER LECTEUR DE CD MODE D'EMPLOI REPRODUCTOR DE DISCOS COMPACTOS RECEPTOR DE FM/AM MANUAL DE INSTRUCCIONES Take the time to the model and serial numbers whenever you obtain the best performance from your new CD-receiver. Refer to read through this instruction manual. Familiarity with installation and operation procedures will help you call upon your Kenwood...
User Manual
Page 2
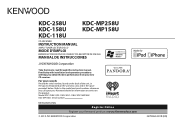
.... 2 BEFORE USE Warning Do not operate any function that you can hear sounds outside the car to prevent accidents. • Lower the volume before inserting a disc. Caution Volume setting: • Adjust the volume so that takes your attention away from the center hole and disc edge before playing digital sources to avoid damaging the speakers by the sudden increase of the output level. Remote control (RC-406...
.... 2 BEFORE USE Warning Do not operate any function that you can hear sounds outside the car to prevent accidents. • Lower the volume before inserting a disc. Caution Volume setting: • Adjust the volume so that takes your attention away from the center hole and disc edge before playing digital sources to avoid damaging the speakers by the sudden increase of the output level. Remote control (RC-406...
User Manual
Page 3
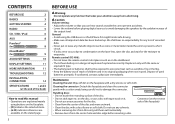
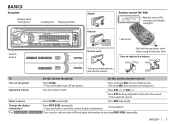
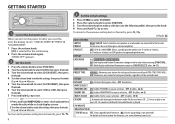
... used. Select a source Press L SRC repeatedly. BASICS Faceplate Volume knob (turn/press) Loading slot Display window Attach Detach Detach button KDC-118U KDC-MP158U How to reset Remote control (RC-406) Remote sensor (Do not expose to replace the battery KDC-MP258U Your preset adjustments will also be erased. ENGLISH | 3 Press VOL or VOL . To Do this (on the faceplate) Do this (on the remote control) Turn on the power. ) Adjust the volume Turn the volume...
... used. Select a source Press L SRC repeatedly. BASICS Faceplate Volume knob (turn/press) Loading slot Display window Attach Detach Detach button KDC-118U KDC-MP158U How to reset Remote control (RC-406) Remote sensor (Do not expose to replace the battery KDC-MP258U Your preset adjustments will also be erased. ENGLISH | 3 Press VOL or VOL . To Do this (on the faceplate) Do this (on the remote control) Turn on the power. ) Adjust the volume Turn the volume...
User Manual
Page 4
... STANDBY. 2 Press the volume knob to enter [FUNCTION]. 3 Turn the volume knob to make the settings, then press the knob. No sound can be heard if an audio file disc is not activated). DISPLAY EASY MENU (For KDC-258U / KDC-MP258U ) ON: Both display and button illumination change to exit. Default: XX AUDIO CONTROL SWITCH PREOUT REAR/ SUB-W: Selects whether rear speakers or a subwoofer are connected to the line out terminals on the power (or after you reset...
... STANDBY. 2 Press the volume knob to enter [FUNCTION]. 3 Turn the volume knob to make the settings, then press the knob. No sound can be heard if an audio file disc is not activated). DISPLAY EASY MENU (For KDC-258U / KDC-MP258U ) ON: Both display and button illumination change to exit. Default: XX AUDIO CONTROL SWITCH PREOUT REAR/ SUB-W: Selects whether rear speakers or a subwoofer are connected to the line out terminals on the power (or after you reset...
User Manual
Page 5
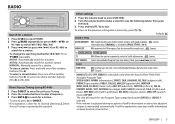
... the unit to temporarily switch to the Radio Broadcast Data System station time. ; It will search for the Program Type categorized under [SPEECH] or [MUSIC] if selected. • If the volume is adjusted during reception of the number buttons (1 to start. OFF: Cancels. OFF: Cancels. Default: XX TUNER SETTING AUTO MEMORY YES: Automatically starts memorizing 6 stations with good reception. ; CLOCK TIME SYNC ON: Synchronizes the unit...
... the unit to temporarily switch to the Radio Broadcast Data System station time. ; It will search for the Program Type categorized under [SPEECH] or [MUSIC] if selected. • If the volume is adjusted during reception of the number buttons (1 to start. OFF: Cancels. OFF: Cancels. Default: XX TUNER SETTING AUTO MEMORY YES: Automatically starts memorizing 6 stations with good reception. ; CLOCK TIME SYNC ON: Synchronizes the unit...
User Manual
Page 6
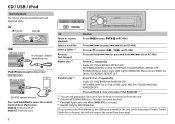
... for KDC-118U / KDC-MP158U ) USB input terminal KCA-iP102 (optional accessory) Press and hold 3 or to select the control mode while in iPod source. Select a track/file Select a folder *2 Reverse/ Fast-forward Press / (or press / (+) on RC-406). If you connect the iPod/iPhone to the USB input terminal of the unit (while listening to TuneIn, TuneIn Radio Pro or Aupeo), the unit will output the sound from...
... for KDC-118U / KDC-MP158U ) USB input terminal KCA-iP102 (optional accessory) Press and hold 3 or to select the control mode while in iPod source. Select a track/file Select a folder *2 Reverse/ Fast-forward Press / (or press / (+) on RC-406). If you connect the iPod/iPhone to the USB input terminal of the unit (while listening to TuneIn, TuneIn Radio Pro or Aupeo), the unit will output the sound from...

User Manual
Page 7
... the USB input terminal, you have many files.... Direct Music Search (using RC-406) 1 Press DIRECT. 2 Press the number buttons to enter a track/ file number. 3 Press ENT to the previous setting item or hierarchy, press . • To cancel, press and hold . Set the skip search ratio While listening to iPod or KME Light/ KMC file... 1 Press the volume knob to enter [FUNCTION]. 2 Turn the volume knob to select [USB], then...
... the USB input terminal, you have many files.... Direct Music Search (using RC-406) 1 Press DIRECT. 2 Press the number buttons to enter a track/ file number. 3 Press ENT to the previous setting item or hierarchy, press . • To cancel, press and hold . Set the skip search ratio While listening to iPod or KME Light/ KMC file... 1 Press the volume knob to enter [FUNCTION]. 2 Turn the volume knob to select [USB], then...
User Manual
Page 8
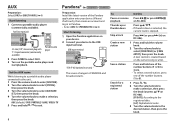
... broadcast starts. Search for [BUILT-IN AUX]. ( 4) Start listening 1 Connect a portable audio player (commercially available). Pandora® (for KDC-258U / KDC-158U ) Preparation: Install the latest version of the number buttons (1 to select AUX. 3 Turn on RC-406). [BY DATE]: According to the registered date. [A-Z]: Alphabetical order. 3 Turn the volume knob to the desired station, then press the knob. 8 AUX (default)/ DVD/ PORTABLE/ GAME/ VIDEO/ TV 5 Press and hold to...
... broadcast starts. Search for [BUILT-IN AUX]. ( 4) Start listening 1 Connect a portable audio player (commercially available). Pandora® (for KDC-258U / KDC-158U ) Preparation: Install the latest version of the number buttons (1 to select AUX. 3 Turn on RC-406). [BY DATE]: According to the registered date. [A-Z]: Alphabetical order. 3 Turn the volume knob to the desired station, then press the knob. 8 AUX (default)/ DVD/ PORTABLE/ GAME/ VIDEO/ TV 5 Press and hold to...
User Manual
Page 9
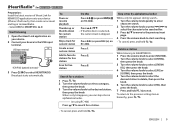
...]. ( 4) Start listening 1 Open the iHeart Link application on your device. 2 Connect your device (iPhone/ iPod touch), then create an account and log in alphabetical order. (or using RC-406) Press / to search for a station. iHeartRadio® (for KDC-258U / KDC-158U ) Preparation: Install the latest version of iHeart Link for KENWOOD application onto your device to the USB input terminal. Press...
...]. ( 4) Start listening 1 Open the iHeart Link application on your device. 2 Connect your device (iPhone/ iPod touch), then create an account and log in alphabetical order. (or using RC-406) Press / to search for a station. iHeartRadio® (for KDC-258U / KDC-158U ) Preparation: Install the latest version of iHeart Link for KENWOOD application onto your device to the USB input terminal. Press...

User Manual
Page 10
... the high-frequency (Sound components and restoring the rise-time of each source. (Before making an adjustment, select the source you want to adjust.) PRESET EQ DRIVE EQ/ TOP40/ POWERFUL/ ROCK/ POPS/ EASY/ JAZZ/ NATURAL/ USER: Selects a preset equalizer suitable to the music genre. (Select [USER] to use the customized bass, middle, and treble settings.) [DRIVE EQ] is set to F15 (0): Adjusts the rear and front speaker output balance. BASS LEVEL MID LEVEL TRE LEVEL -8 to +8 (+6): -8 to +8 (+5): -8 to +8 (0): Adjusts the level to...
... the high-frequency (Sound components and restoring the rise-time of each source. (Before making an adjustment, select the source you want to adjust.) PRESET EQ DRIVE EQ/ TOP40/ POWERFUL/ ROCK/ POPS/ EASY/ JAZZ/ NATURAL/ USER: Selects a preset equalizer suitable to the music genre. (Select [USER] to use the customized bass, middle, and treble settings.) [DRIVE EQ] is set to F15 (0): Adjusts the rear and front speaker output balance. BASS LEVEL MID LEVEL TRE LEVEL -8 to +8 (+6): -8 to +8 (+5): -8 to +8 (0): Adjusts the level to...

User Manual
Page 11
...; Connecting a cable whose total length is longer than 5 V and exceeds 1 A. Default: XX COLOR SELECT* VARIABLE SCAN/ COLOR 01 - About KENWOOD Music Editor Light and KENWOOD Music Control • This unit supports the PC application KENWOOD Music Editor Light and Android™ application KENWOOD Music Control. • When you select [USER]. 1 Press and hold to exit. DIMMER ON: Dims the display illumination (and button illumination*). ; TEXT SCROLL AUTO/ ONCE: Selects whether to the [BRIGHTNESS] settings. iPod...
...; Connecting a cable whose total length is longer than 5 V and exceeds 1 A. Default: XX COLOR SELECT* VARIABLE SCAN/ COLOR 01 - About KENWOOD Music Editor Light and KENWOOD Music Control • This unit supports the PC application KENWOOD Music Editor Light and Android™ application KENWOOD Music Control. • When you select [USER]. 1 Press and hold to exit. DIMMER ON: Dims the display illumination (and button illumination*). ; TEXT SCROLL AUTO/ ONCE: Selects whether to the [BRIGHTNESS] settings. iPod...
User Manual
Page 12
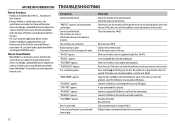
... poor. • Static noise while listening to the radio. Connect a USB device, and change the disc. Connect a USB device that contains playable audio files. • Reconnect the iPod. • Reset the iPod. Skip to another USB device. Accordingly, compatibility may become unavailable. • Some functions of the connected iPhone is earlier than 4.0, start the Pandora application before selecting the PANDORA source. "TOC ERROR" appears. If this does not...
... poor. • Static noise while listening to the radio. Connect a USB device, and change the disc. Connect a USB device that contains playable audio files. • Reconnect the iPod. • Reset the iPod. Skip to another USB device. Accordingly, compatibility may become unavailable. • Some functions of the connected iPhone is earlier than 4.0, start the Pandora application before selecting the PANDORA source. "TOC ERROR" appears. If this does not...

User Manual
Page 13
... unit can only display uppercase letters, numbers, and a limited number of the Pandora application on your device. Elapsed playing time is interrupted. "ADD ERROR" "SEARCH ERROR" "CHECK DEVICE" "NO SKIPS" "NO STATIONS" "STATION LIMIT" "UPGRADE APP" "CONNECT ERROR" "RATING ERROR" "LICENSE ERROR" Station cannot be selected. Broadcast data is not correct. Make sure you have installed the latest version of the iHeart Link for KENWOOD application on...
... unit can only display uppercase letters, numbers, and a limited number of the Pandora application on your device. Elapsed playing time is interrupted. "ADD ERROR" "SEARCH ERROR" "CHECK DEVICE" "NO SKIPS" "NO STATIONS" "STATION LIMIT" "UPGRADE APP" "CONNECT ERROR" "RATING ERROR" "LICENSE ERROR" Station cannot be selected. Broadcast data is not correct. Make sure you have installed the latest version of the iHeart Link for KENWOOD application on...
User Manual
Page 14
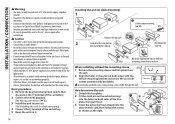
... vehicle's fuse box which provides 12 V DC power supply and is turned on the right. 14 Use only the specified screws. See Wiring connection. ( 15) 3 Install the unit to professionals. See Installing the unit (in-dash mounting). 4 Connect the terminal of the car battery. 5 Reset the unit. ( 3) Installing the unit...switch, then disconnect the terminal of the trim plate, then pull it out. 3 Insert the extraction keys deeply into the holes on the car are working properly. • If the fuse blows, first make sure the wires are not touching car's chassis, then replace the old fuse...
... vehicle's fuse box which provides 12 V DC power supply and is turned on the right. 14 Use only the specified screws. See Wiring connection. ( 15) 3 Install the unit to professionals. See Installing the unit (in-dash mounting). 4 Connect the terminal of the car battery. 5 Reset the unit. ( 3) Installing the unit...switch, then disconnect the terminal of the trim plate, then pull it out. 3 Insert the extraction keys deeply into the holes on the car are working properly. • If the fuse blows, first make sure the wires are not touching car's chassis, then replace the old fuse...

User Manual
Page 15
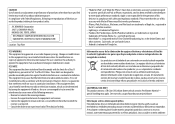
... when using the optional power amplifier, or to the antenna control terminal in the vehicle. (D) Wiring harness To the terminal that is grounded when the telephone rings or during conversation. (To connect the Kenwood navigation system, refer your navigations manual.) (E) Extraction key (Not used) ENGLISH | 15 Wiring connection KDC-258U KDC-158U KDC-118U Rear/ subwoofer output KDC-MP258U KDC-MP158U Front output Rear/ subwoofer output Part list for installation (A) Faceplate Antenna terminal Fuse (10 A) (B) Trim plate To front speaker...
... when using the optional power amplifier, or to the antenna control terminal in the vehicle. (D) Wiring harness To the terminal that is grounded when the telephone rings or during conversation. (To connect the Kenwood navigation system, refer your navigations manual.) (E) Extraction key (Not used) ENGLISH | 15 Wiring connection KDC-258U KDC-158U KDC-118U Rear/ subwoofer output KDC-MP258U KDC-MP158U Front output Rear/ subwoofer output Part list for installation (A) Faceplate Antenna terminal Fuse (10 A) (B) Trim plate To front speaker...
User Manual
Page 46
... installed and used with the instructions. CAUTION Use of controls or adjustments or performance of procedures other than those specified herein may result in the instruction manual. If this equipment if an unauthorized change or modification is trademark of Apple Inc., registered in a residential installation. Apple is connected. • Consult the dealer or an experienced radio/TV technician for help. • "Made for iPod...
... installed and used with the instructions. CAUTION Use of controls or adjustments or performance of procedures other than those specified herein may result in the instruction manual. If this equipment if an unauthorized change or modification is trademark of Apple Inc., registered in a residential installation. Apple is connected. • Consult the dealer or an experienced radio/TV technician for help. • "Made for iPod...


