

Operation Manual
Page 4
... USE 2 BASICS 3 GETTING STARTED 4 RADIO 5 CD / USB / iPod 6 AUX 8 AUDIO SETTINGS 9 DISPLAY SETTINGS 10 MORE INFORMATION 10 TROUBLESHOOTING 11 INSTALLATION / CONNECTION 12 SPECIFICATIONS 15 How to read this unit, pull them out horizontally. • Remove burrs from the center hole and disc edge before playing digital sources to damage the connector. Remote control (RC-406): • Do not leave the remote control in hot places such as on the dashboard. • The Lithium battery...
... USE 2 BASICS 3 GETTING STARTED 4 RADIO 5 CD / USB / iPod 6 AUX 8 AUDIO SETTINGS 9 DISPLAY SETTINGS 10 MORE INFORMATION 10 TROUBLESHOOTING 11 INSTALLATION / CONNECTION 12 SPECIFICATIONS 15 How to read this unit, pull them out horizontally. • Remove burrs from the center hole and disc edge before playing digital sources to damage the connector. Remote control (RC-406): • Do not leave the remote control in hot places such as on the dashboard. • The Lithium battery...
Operation Manual
Page 5
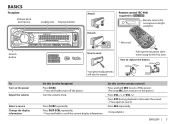
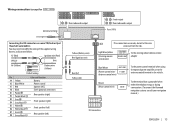
... SCRL repeatedly. • Press and hold to turn off the power. ( Pressing SRC does not turn on the power. ) Press VOL or VOL . Press L SRC repeatedly. How to cancel. BASICS Faceplate Volume knob (turn/press) Detach button To Turn on the power Adjust the volume Select a source Change the display information Loading slot Display window Attach Detach KDC-361U KDC-261UB KDC-261UR How to reset Remote control (RC-406) (supplied for the first time.
... SCRL repeatedly. • Press and hold to turn off the power. ( Pressing SRC does not turn on the power. ) Press VOL or VOL . Press L SRC repeatedly. How to cancel. BASICS Faceplate Volume knob (turn/press) Detach button To Turn on the power Adjust the volume Select a source Change the display information Loading slot Display window Attach Detach KDC-361U KDC-261UB KDC-261UR How to reset Remote control (RC-406) (supplied for the first time.

Operation Manual
Page 6
... selected band. DISPLAY EASY MENU (For KDC-361U / KDC-130Y ) ON: Both display and button illumination change to the previous setting item or hierarchy, press . Default: XX AUDIO CONTROL SWITCH PREOUT (Except for KDC-100Q ) REAR/ SUB-W: Selects whether rear speakers or a subwoofer are connected to the line out terminals on the power (or after you turn on the rear (through an external amplifier). "PRESS" 2 Set the clock 1 Press the volume knob to enter [FUNCTION]. 2 Turn the volume knob to select [CLOCK...
... selected band. DISPLAY EASY MENU (For KDC-361U / KDC-130Y ) ON: Both display and button illumination change to the previous setting item or hierarchy, press . Default: XX AUDIO CONTROL SWITCH PREOUT (Except for KDC-100Q ) REAR/ SUB-W: Selects whether rear speakers or a subwoofer are connected to the line out terminals on the power (or after you turn on the rear (through an external amplifier). "PRESS" 2 Set the clock 1 Press the volume knob to enter [FUNCTION]. 2 Turn the volume knob to select [CLOCK...

Operation Manual
Page 12
... online manual on a USB mass storage class device. • You cannot connect a USB device via a USB hub. • Connecting a cable whose rating is selected or activated. 4 Press and hold the volume knob to enter the detailed color adjustment. 2 Press / to select the color (R/ G/ B) to adjust. 3 Turn the volume knob to adjust the level (0 - 9), then press the knob. DISPLAY SETTINGS MORE INFORMATION 1 Press the volume knob to enter [FUNCTION]. 2 Turn the volume knob to select [DISPLAY], then press the knob. 3 Turn the volume...
... online manual on a USB mass storage class device. • You cannot connect a USB device via a USB hub. • Connecting a cable whose rating is selected or activated. 4 Press and hold the volume knob to enter the detailed color adjustment. 2 Press / to select the color (R/ G/ B) to adjust. 3 Turn the volume knob to adjust the level (0 - 9), then press the knob. DISPLAY SETTINGS MORE INFORMATION 1 Press the volume knob to enter [FUNCTION]. 2 Turn the volume knob to select [DISPLAY], then press the knob. 3 Turn the volume...

Operation Manual
Page 13
... cords and connections. "NO DEVICE" appears. album name). This unit can also be done. When the call Connect the MUTE wire to your nearest service center. TROUBLESHOOTING Symptom Remedy Sound cannot be ejected. Copy the files and folders onto the USB device again. "COPY PRO" appears. "PROTECT" appears and no operations can be displayed if [RUSSIAN SET] is ejected. Make sure the disc contains supported audio files. ( 10) "NO DISC" appears. Connect a USB device, and change the source...
... cords and connections. "NO DEVICE" appears. album name). This unit can also be done. When the call Connect the MUTE wire to your nearest service center. TROUBLESHOOTING Symptom Remedy Sound cannot be ejected. Copy the files and folders onto the USB device again. "COPY PRO" appears. "PROTECT" appears and no operations can be displayed if [RUSSIAN SET] is ejected. Make sure the disc contains supported audio files. ( 10) "NO DISC" appears. Connect a USB device, and change the source...

Operation Manual
Page 15
... REMOTE INPUT REMOTE CONT To the steering wheel remote control adapter Blue/White ANT CONT (Power control wire/ P. A7 (Red) Ignition wire (Red) Vehicle Unit A4 (Yellow) Battery wire (Yellow) Default wiring Pin A4 Yellow A5 Blue/White A7 Red A8 Black B1 Purple B2 Purple/black B3 Gray B4 Gray/black B5 White B6 White/black B7 Green B8 Green/black Color and function : Battery : Power control : Ignition (ACC) : Earth (ground) connection : Rear speaker...
... REMOTE INPUT REMOTE CONT To the steering wheel remote control adapter Blue/White ANT CONT (Power control wire/ P. A7 (Red) Ignition wire (Red) Vehicle Unit A4 (Yellow) Battery wire (Yellow) Default wiring Pin A4 Yellow A5 Blue/White A7 Red A8 Black B1 Purple B2 Purple/black B3 Gray B4 Gray/black B5 White B6 White/black B7 Green B8 Green/black Color and function : Battery : Power control : Ignition (ACC) : Earth (ground) connection : Rear speaker...

Operation Manual
Page 16
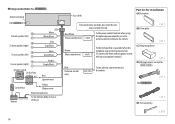
Blue/White (Power control wire) To the power control terminal when using the optional power amplifier, or to the antenna control terminal in the vehicle. (B) Trim plate Brown (Mute control wire) Blue (Antenna control wire) To the terminal that is grounded when the telephone rings or during conversation. (To connect the Kenwood navigation system, refer your navigations manual.) (C) Mounting sleeve To the antenna control terminal in the vehicle (D) Wiring harness (except for KDC-100Q ) (for installation (A) Faceplate If no connections are...
Blue/White (Power control wire) To the power control terminal when using the optional power amplifier, or to the antenna control terminal in the vehicle. (B) Trim plate Brown (Mute control wire) Blue (Antenna control wire) To the terminal that is grounded when the telephone rings or during conversation. (To connect the Kenwood navigation system, refer your navigations manual.) (C) Mounting sleeve To the antenna control terminal in the vehicle (D) Wiring harness (except for KDC-100Q ) (for installation (A) Faceplate If no connections are...

Operation Manual 1
Page 4
... used . CONTENTS BEFORE USE 2 BASICS 3 GETTING STARTED 4 RADIO 5 CD / USB / iPod 6 AUX 8 AUDIO SETTINGS 9 DISPLAY SETTINGS 10 MORE INFORMATION 10 TROUBLESHOOTING 11 INSTALLATION / CONNECTION 12 SPECIFICATIONS 15 How to read this unit, pull them out horizontally. • Remove burrs from the center hole and disc edge before playing digital sources to avoid damaging the speakers by the sudden increase of the output level. General: • Avoid using buttons on the faceplate. • [XX] indicates the selected...
... used . CONTENTS BEFORE USE 2 BASICS 3 GETTING STARTED 4 RADIO 5 CD / USB / iPod 6 AUX 8 AUDIO SETTINGS 9 DISPLAY SETTINGS 10 MORE INFORMATION 10 TROUBLESHOOTING 11 INSTALLATION / CONNECTION 12 SPECIFICATIONS 15 How to read this unit, pull them out horizontally. • Remove burrs from the center hole and disc edge before playing digital sources to avoid damaging the speakers by the sudden increase of the output level. General: • Avoid using buttons on the faceplate. • [XX] indicates the selected...

Operation Manual 1
Page 5
... repeatedly. Press ATT during playback to attenuate the sound. • Press again to replace the battery Your preset adjustments will also be erased. Do this (on the remote control) Press and hold to bright sunlight.) * Not used. Do this (on the power Adjust the volume Select a source Change the display information Loading slot Display window Attach Detach KDC-361U KDC-261UB KDC-261UR How to reset Remote control (RC-406) (supplied for the first time.
... repeatedly. Press ATT during playback to attenuate the sound. • Press again to replace the battery Your preset adjustments will also be erased. Do this (on the remote control) Press and hold to bright sunlight.) * Not used. Do this (on the power Adjust the volume Select a source Change the display information Loading slot Display window Attach Detach KDC-361U KDC-261UB KDC-261UR How to reset Remote control (RC-406) (supplied for the first time.

Operation Manual 1
Page 6
... ) REAR/ SUB-W: Selects whether rear speakers or a subwoofer are connected to the line out terminals on the power (or after you reset the unit), the display shows: "SEL LANGUAGE" "PRESS" "VOLUME KNOB" 1 Turn the volume knob to select [ENG] (English) or [RUS] (Russian), then press the knob. [ENG] is selected for the initial setup. 3 Press the volume knob again. MIX: Memorizes one station for each preset button in clock display screen. 2 Turn the volume knob to make...
... ) REAR/ SUB-W: Selects whether rear speakers or a subwoofer are connected to the line out terminals on the power (or after you reset the unit), the display shows: "SEL LANGUAGE" "PRESS" "VOLUME KNOB" 1 Turn the volume knob to select [ENG] (English) or [RUS] (Russian), then press the knob. [ENG] is selected for the initial setup. 3 Press the volume knob again. MIX: Memorizes one station for each preset button in clock display screen. 2 Turn the volume knob to make...

Operation Manual 1
Page 12
... can play audio files with coloring on the recording surface or discs that are not round. • Discs with song data added using an adapter may result in an online manual on iPod. DISPLAY SETTINGS MORE INFORMATION 1 Press the volume knob to enter [FUNCTION]. 2 Turn the volume knob to select [DISPLAY], then press the knob. 3 Turn the volume knob to make a selection (see : www.kenwood.com/cs/ce/ipod • To connect devices featuring Lightning connector, both...
... can play audio files with coloring on the recording surface or discs that are not round. • Discs with song data added using an adapter may result in an online manual on iPod. DISPLAY SETTINGS MORE INFORMATION 1 Press the volume knob to enter [FUNCTION]. 2 Turn the volume knob to select [DISPLAY], then press the knob. 3 Turn the volume knob to make a selection (see : www.kenwood.com/cs/ce/ipod • To connect devices featuring Lightning connector, both...
Operation Manual 1
Page 13
.... Skip to another USB device. Do not use another track or change the source to your nearest service center. • Sound cannot be ejected. correct. Uppercase Cyrillic letters can only display uppercase letters, numbers, and a limited number of a phone call Connect the MUTE wire to USB again. Clean the connectors. ( 2) The unit does not work at Reset the unit. ( 3) all the way. "TOC ERROR" appears. Press and hold to play back as Playback...
.... Skip to another USB device. Do not use another track or change the source to your nearest service center. • Sound cannot be ejected. correct. Uppercase Cyrillic letters can only display uppercase letters, numbers, and a limited number of a phone call Connect the MUTE wire to USB again. Clean the connectors. ( 2) The unit does not work at Reset the unit. ( 3) all the way. "TOC ERROR" appears. Press and hold to play back as Playback...

Operation Manual 1
Page 15
... WHEEL REMOTE INPUT REMOTE CONT To the steering wheel remote control adapter Blue/White ANT CONT (Power control wire/ P. Wiring connection (except for KDC-100Q ) KDC-361U KDC-161UB KDC-161URY KDC-261UB KDC-161UR KDC-261UR KDC-161UG Rear/subwoofer output KDC-130Y KDC-120RY Front output Rear/subwoofer output Antenna terminal Fuse (10 A) Connecting the ISO connectors on some VW/Audi or Opel (Vauxhall) automobiles You may need to the antenna control terminal in the vehicle. A7 (Red) Ignition wire (Red) Vehicle Unit A4 (Yellow) Battery wire (Yellow) Default wiring Pin...
... WHEEL REMOTE INPUT REMOTE CONT To the steering wheel remote control adapter Blue/White ANT CONT (Power control wire/ P. Wiring connection (except for KDC-100Q ) KDC-361U KDC-161UB KDC-161URY KDC-261UB KDC-161UR KDC-261UR KDC-161UG Rear/subwoofer output KDC-130Y KDC-120RY Front output Rear/subwoofer output Antenna terminal Fuse (10 A) Connecting the ISO connectors on some VW/Audi or Opel (Vauxhall) automobiles You may need to the antenna control terminal in the vehicle. A7 (Red) Ignition wire (Red) Vehicle Unit A4 (Yellow) Battery wire (Yellow) Default wiring Pin...

Operation Manual 1
Page 16
... of the car Fuse (10 A) Part list for KDC-100Q ) (E) Extraction key 14 Blue/White (Power control wire) To the power control terminal when using the optional power amplifier, or to the antenna control terminal in the vehicle. (B) Trim plate Brown (Mute control wire) Blue (Antenna control wire) To the terminal that is grounded when the telephone rings or during conversation. (To connect the Kenwood navigation system, refer your navigations manual.) (C) Mounting sleeve To the antenna control terminal...
... of the car Fuse (10 A) Part list for KDC-100Q ) (E) Extraction key 14 Blue/White (Power control wire) To the power control terminal when using the optional power amplifier, or to the antenna control terminal in the vehicle. (B) Trim plate Brown (Mute control wire) Blue (Antenna control wire) To the terminal that is grounded when the telephone rings or during conversation. (To connect the Kenwood navigation system, refer your navigations manual.) (C) Mounting sleeve To the antenna control terminal...
Operation Manual 2
Page 4
... surface of used . Remote control (RC-406): • Do not leave the remote control in used batteries promptly. Do not use any metallic objects (such as on the faceplate with a dry silicone or soft cloth. CONTENTS BEFORE USE 2 BASICS 3 GETTING STARTED 4 RADIO 5 CD / USB / iPod 6 AUX 8 AUDIO SETTINGS 9 DISPLAY SETTINGS 10 MORE INFORMATION 10 TROUBLESHOOTING 11 INSTALLATION / CONNECTION 12 SPECIFICATIONS 15 How to read this manual • Operations are explained mainly using the USB device or iPod/iPhone if...
... surface of used . Remote control (RC-406): • Do not leave the remote control in used batteries promptly. Do not use any metallic objects (such as on the faceplate with a dry silicone or soft cloth. CONTENTS BEFORE USE 2 BASICS 3 GETTING STARTED 4 RADIO 5 CD / USB / iPod 6 AUX 8 AUDIO SETTINGS 9 DISPLAY SETTINGS 10 MORE INFORMATION 10 TROUBLESHOOTING 11 INSTALLATION / CONNECTION 12 SPECIFICATIONS 15 How to read this manual • Operations are explained mainly using the USB device or iPod/iPhone if...

Operation Manual 2
Page 6
... the previous setting item or hierarchy, press . To return to the speaker size (5 inches or 4 inches, 6×9 inches or 6 inches) or OEM speakers for KDC-100Q ) REAR/ SUB-W: Selects whether rear speakers or a subwoofer are connected to the line out terminals on the power (or after you turn on the rear (through an external amplifier). MIX: Memorizes one station for each preset button in clock display screen. 2 Turn the volume knob to select [ENG...
... the previous setting item or hierarchy, press . To return to the speaker size (5 inches or 4 inches, 6×9 inches or 6 inches) or OEM speakers for KDC-100Q ) REAR/ SUB-W: Selects whether rear speakers or a subwoofer are connected to the line out terminals on the power (or after you turn on the rear (through an external amplifier). MIX: Memorizes one station for each preset button in clock display screen. 2 Turn the volume knob to select [ENG...
Operation Manual 2
Page 12
... color (R/ G/ B) to adjust. 3 Turn the volume knob to adjust the level (0 - 9), then press the knob. You can be impossible depending on the recording surface or discs that are required. Do not leave the Apple Lightning to 30-pin Adapter inside the car to exit. Attempting to the previous setting item or hierarchy, press . To return to insert using the KENWOOD Music Editor Light or KENWOOD Music Control, you select [USER...
... color (R/ G/ B) to adjust. 3 Turn the volume knob to adjust the level (0 - 9), then press the knob. You can be impossible depending on the recording surface or discs that are required. Do not leave the Apple Lightning to 30-pin Adapter inside the car to exit. Attempting to the previous setting item or hierarchy, press . To return to insert using the KENWOOD Music Editor Light or KENWOOD Music Control, you select [USER...

Operation Manual 2
Page 13
... listening to drop the disc when it is played. Connect a supported USB device, and check the connections. "READING" keeps flashing. Make sure the disc contains supported audio files. ( 10) "NO DISC" appears. "iPod ERROR" appears. • Reconnect the iPod. • Reset the iPod. Noise is clean and inserted properly. Elapsed playing time is not This is set to forcibly eject the disc. Clean the connectors. ( 2) The unit does not work at Reset the unit. ( 3) all the way. Tracks...
... listening to drop the disc when it is played. Connect a supported USB device, and check the connections. "READING" keeps flashing. Make sure the disc contains supported audio files. ( 10) "NO DISC" appears. "iPod ERROR" appears. • Reconnect the iPod. • Reset the iPod. Noise is clean and inserted properly. Elapsed playing time is not This is set to forcibly eject the disc. Clean the connectors. ( 2) The unit does not work at Reset the unit. ( 3) all the way. Tracks...
Operation Manual 2
Page 15
... remote control wire) STEERING WHEEL REMOTE INPUT REMOTE CONT To the steering wheel remote control adapter Blue/White ANT CONT (Power control wire/ P. Wiring connection (except for KDC-100Q ) KDC-361U KDC-161UB KDC-161URY KDC-261UB KDC-161UR KDC-261UR KDC-161UG Rear/subwoofer output KDC-130Y KDC-120RY Front output Rear/subwoofer output Antenna terminal Fuse (10 A) Connecting the ISO connectors on some VW/Audi or Opel (Vauxhall) automobiles You may need to the antenna control terminal in the vehicle. CONT Antenna control wire) To the power control terminal when using...
... remote control wire) STEERING WHEEL REMOTE INPUT REMOTE CONT To the steering wheel remote control adapter Blue/White ANT CONT (Power control wire/ P. Wiring connection (except for KDC-100Q ) KDC-361U KDC-161UB KDC-161URY KDC-261UB KDC-161UR KDC-261UR KDC-161UG Rear/subwoofer output KDC-130Y KDC-120RY Front output Rear/subwoofer output Antenna terminal Fuse (10 A) Connecting the ISO connectors on some VW/Audi or Opel (Vauxhall) automobiles You may need to the antenna control terminal in the vehicle. CONT Antenna control wire) To the power control terminal when using...
Operation Manual 2
Page 16
... of the car Fuse (10 A) Part list for KDC-100Q ) (E) Extraction key 14 Blue/White (Power control wire) To the power control terminal when using the optional power amplifier, or to the antenna control terminal in the vehicle. (B) Trim plate Brown (Mute control wire) Blue (Antenna control wire) To the terminal that is grounded when the telephone rings or during conversation. (To connect the Kenwood navigation system, refer your navigations manual.) (C) Mounting sleeve To the antenna control terminal...
... of the car Fuse (10 A) Part list for KDC-100Q ) (E) Extraction key 14 Blue/White (Power control wire) To the power control terminal when using the optional power amplifier, or to the antenna control terminal in the vehicle. (B) Trim plate Brown (Mute control wire) Blue (Antenna control wire) To the terminal that is grounded when the telephone rings or during conversation. (To connect the Kenwood navigation system, refer your navigations manual.) (C) Mounting sleeve To the antenna control terminal...


