Instruction manual
Page 2
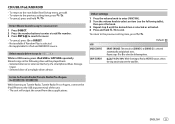
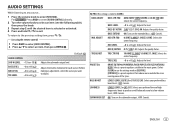
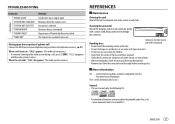
... like. Turn off the unit or change the source to condensation on the laser lens, eject the disc and wait for / ) 11 AUX 12 AUDIO SETTINGS 13 DISPLAY SETTINGS 14 TROUBLESHOOTING 15 REFERENCES 17 Maintenance More information INSTALLATION/ CONNECTION 20 SPECIFICATIONS 22 2 ENGLISH BEFORE USE IMPORTANT • To ensure proper use, please read this product contains a coin/button cell battery. You can hear sounds outside the...
... like. Turn off the unit or change the source to condensation on the laser lens, eject the disc and wait for / ) 11 AUX 12 AUDIO SETTINGS 13 DISPLAY SETTINGS 14 TROUBLESHOOTING 15 REFERENCES 17 Maintenance More information INSTALLATION/ CONNECTION 20 SPECIFICATIONS 22 2 ENGLISH BEFORE USE IMPORTANT • To ensure proper use, please read this product contains a coin/button cell battery. You can hear sounds outside the...
Instruction manual
Page 3
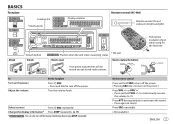
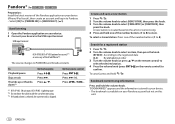
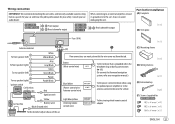
BASICS Faceplate Loading slot Volume knob Display window Remote control (RC-406) Remote sensor (Do not expose to replace the battery Your preset adjustments will be erased except stored radio stations. How to reset How to bright sunlight.) Attach Detach button Detach * Not used : Flashes when the unit enters searching status. Pull out the insulation sheet when using for the first time. Turn the volume knob. to continuously increase...
BASICS Faceplate Loading slot Volume knob Display window Remote control (RC-406) Remote sensor (Do not expose to replace the battery Your preset adjustments will be erased except stored radio stations. How to reset How to bright sunlight.) Attach Detach button Detach * Not used : Flashes when the unit enters searching status. Pull out the insulation sheet when using for the first time. Turn the volume knob. to continuously increase...
Instruction manual
Page 4
... the volume knob to enter [FUNCTION]. 2 Turn the volume knob to the illustration on page 14 for the initial setup. GETTING STARTED 1 Select the display language and cancel the demonstration When you turn on the power (or after you enter [FUNCTION], irregardless of the [EASY MENU] setting. • Refer to select [CLOCK], then press the knob. Default: XX AUDIO CONTROL SWITCH PREOUT REAR/SUBWOOFER or REAR/SUB-W: Selects whether rear speakers or a subwoofer are connected to...
... the volume knob to enter [FUNCTION]. 2 Turn the volume knob to the illustration on page 14 for the initial setup. GETTING STARTED 1 Select the display language and cancel the demonstration When you turn on the power (or after you enter [FUNCTION], irregardless of the [EASY MENU] setting. • Refer to select [CLOCK], then press the knob. Default: XX AUDIO CONTROL SWITCH PREOUT REAR/SUBWOOFER or REAR/SUB-W: Selects whether rear speakers or a subwoofer are connected to...
Instruction manual
Page 5
... 2, Direct Access Tuning is shown on the remote control) to update the firmware, visit . For details on the remote control). CLOCK CLOCK DISPLAY ON: The clock time is automatically canceled. NO: Cancels (upgrading is played. By default, [ENGLISH] is turned off. ; OFF: Cancels. AUTO1 : Automatically search for a preset station. GETTING STARTED RADIO TUNER SETTING PRESET TYPE NORMAL: Memorizes one station for each preset button in source selection. ; MIX: Memorizes one station for each preset button, regardless...
... 2, Direct Access Tuning is shown on the remote control) to update the firmware, visit . For details on the remote control). CLOCK CLOCK DISPLAY ON: The clock time is automatically canceled. NO: Cancels (upgrading is played. By default, [ENGLISH] is turned off. ; OFF: Cancels. AUTO1 : Automatically search for a preset station. GETTING STARTED RADIO TUNER SETTING PRESET TYPE NORMAL: Memorizes one station for each preset button in source selection. ; MIX: Memorizes one station for each preset button, regardless...
Instruction manual
Page 6
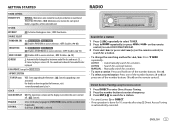
... M (music), EASY M (music), LIGHT M (music), CLASSICS, OTHER M (music), JAZZ, COUNTRY, NATION M (music), OLDIES, FOLK M (music) The unit will search for another station only in the same Radio Data System network with good reception. ; OFF: Cancels. It will temporarily switch to News Programme if available. ; To return to Traffic Information if available ("TI" lights up). ; RADIO Other settings 1 Press the volume knob to enter [FUNCTION]. 2 Turn the volume knob to select...
... M (music), EASY M (music), LIGHT M (music), CLASSICS, OTHER M (music), JAZZ, COUNTRY, NATION M (music), OLDIES, FOLK M (music) The unit will search for another station only in the same Radio Data System network with good reception. ; OFF: Cancels. It will temporarily switch to News Programme if available. ; To return to Traffic Information if available ("TI" lights up). ; RADIO Other settings 1 Press the volume knob to enter [FUNCTION]. 2 Turn the volume knob to select...
Instruction manual
Page 7
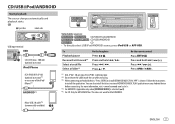
... KENWOOD MUSIC PLAY application on your Android device before connecting. Press J / K. For more information, visit . *4 For ANDROID: Applicable only when [BROWSE MODE] is shown. Press and hold S / T. Follow the instructions to install KENWOOD MUSIC PLAY APP" is selected. ( 8) *5 For CD: Only for iPod/ANDROID. Press S / . Press S / T. This does not work for MP3/WMA files. Micro USB 2.0 cable*2 (commercially available) ENGLISH 7 CD/USB/iPod/ANDROID Start playback The source changes...
... KENWOOD MUSIC PLAY application on your Android device before connecting. Press J / K. For more information, visit . *4 For ANDROID: Applicable only when [BROWSE MODE] is shown. Press and hold S / T. Follow the instructions to install KENWOOD MUSIC PLAY APP" is selected. ( 8) *5 For CD: Only for iPod/ANDROID. Press S / . Press S / T. This does not work for MP3/WMA files. Micro USB 2.0 cable*2 (commercially available) ENGLISH 7 CD/USB/iPod/ANDROID Start playback The source changes...
Instruction manual
Page 8
...: MP3/WMA/ WAV/FLAC file FILE REPEAT/FOLDER REPEAT/REPEAT OFF: iPod or ANDROID Press repeatedly. HAND MODE : Control Android device using the iPod itself via KENWOOD MUSIC PLAY application installed in the Android device. For iPod source 1 Turn the volume knob quickly to enter character search. 2 Turn the volume knob to select the character. * • Select " " to search for a character other than A to Z, 0 to 9. 3 Press S / T to...
...: MP3/WMA/ WAV/FLAC file FILE REPEAT/FOLDER REPEAT/REPEAT OFF: iPod or ANDROID Press repeatedly. HAND MODE : Control Android device using the iPod itself via KENWOOD MUSIC PLAY application installed in the Android device. For iPod source 1 Turn the volume knob quickly to enter character search. 2 Turn the volume knob to select the character. * • Select " " to search for a character other than A to Z, 0 to 9. 3 Press S / T to...
Instruction manual
Page 9
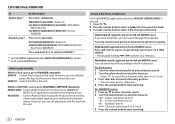
... output the sound from these applications. ENGLISH 9 Other settings 1 Press the volume knob to enter [FUNCTION]. 2 Turn the volume knob to select an item (see the following drives. 0.5%/1%/5%/10%: While listening to iPod or ANDROID source, selects the skip search ratio over the total files. CD/USB/iPod/ANDROID • To return to the root folder/first file/top menu, press 5. • To return to the previous setting...
... output the sound from these applications. ENGLISH 9 Other settings 1 Press the volume knob to enter [FUNCTION]. 2 Turn the volume knob to select an item (see the following drives. 0.5%/1%/5%/10%: While listening to iPod or ANDROID source, selects the skip search ratio over the total files. CD/USB/iPod/ANDROID • To return to the root folder/first file/top menu, press 5. • To return to the previous setting...
Instruction manual
Page 10
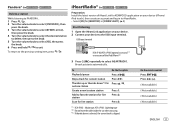
... artist or current song. 4 Press and hold one of the number buttons (1 to 5). To select a stored station: Press one of the number buttons (1 to 5) to PANDORA and broadcast starts. "BOOKMARKED" appears and the information is stored to the USB input terminal. On the remote control Press . Pandora® (for / ) Preparation: Install the latest version of the Pandora application on your Pandora...
... artist or current song. 4 Press and hold one of the number buttons (1 to 5). To select a stored station: Press one of the number buttons (1 to 5) to PANDORA and broadcast starts. "BOOKMARKED" appears and the information is stored to the USB input terminal. On the remote control Press . Pandora® (for / ) Preparation: Install the latest version of the Pandora application on your Pandora...
Instruction manual
Page 11
...] in [SOURCE SELECT]. ( 5) Start listening 1 Open the iHeart Link application on your device. 2 Connect your device to select IHEARTRADIO. Press T. Press . ( Not available ) ( Not available ) ( Not available ) ( Not available ) ENGLISH 11 iHeartRadio® (for / ) Preparation: Install the latest version of the iPod/iPhone*2 3 Press repeatedly to the USB input terminal. Press J / K. Press 1. To return to exit. Press 2. On the remote control Press...
...] in [SOURCE SELECT]. ( 5) Start listening 1 Open the iHeart Link application on your device. 2 Connect your device to select IHEARTRADIO. Press T. Press . ( Not available ) ( Not available ) ( Not available ) ( Not available ) ENGLISH 11 iHeartRadio® (for / ) Preparation: Install the latest version of the iPod/iPhone*2 3 Press repeatedly to the USB input terminal. Press J / K. Press 1. To return to exit. Press 2. On the remote control Press...
Instruction manual
Page 12
... [FUNCTION]. 2 Turn the volume knob to select [SYSTEM], then press the knob. 3 Turn the volume knob to select [AUX NAME SET], then press the knob. 4 Turn the volume knob to exit. When a city list appears, you can skip cities in [SOURCE SELECT]. ( 5) Start listening 1 Connect a portable audio player (commercially available). To return to the previous setting item, press . 3.5 mm (1/8") stereo mini plug with "L" shaped connector (commercially available) 2 Press repeatedly to select AUX. 3 Turn on the remote control...
... [FUNCTION]. 2 Turn the volume knob to select [SYSTEM], then press the knob. 3 Turn the volume knob to select [AUX NAME SET], then press the knob. 4 Turn the volume knob to exit. When a city list appears, you can skip cities in [SOURCE SELECT]. ( 5) Start listening 1 Connect a portable audio player (commercially available). To return to the previous setting item, press . 3.5 mm (1/8") stereo mini plug with "L" shaped connector (commercially available) 2 Press repeatedly to select AUX. 3 Turn on the remote control...
Instruction manual
Page 13
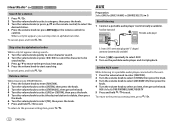
... using the remote control) 1 Press AUD to enter [AUDIO CONTROL]. 2 Press J / K to +8 (+1) Default: XX Adjusts the subwoofer output level. TRE LEVEL -8 to exit. OFF: Cancels. ENGLISH 13 BASS Q FACTOR 1.00/1.25/1.50/2.00: Adjusts the quality factor. BASS EXTEND ON: Turns on the subwoofer output. ; BASS BOOST LEVEL1/LEVEL2/LEVEL3 or LV1/LV2/LV3: Selects your preferred low and high frequencies boost to enter [FUNCTION]. For : Press AUD to enter [AUDIO CONTROL] directly. 2 Turn the volume knob...
... using the remote control) 1 Press AUD to enter [AUDIO CONTROL]. 2 Press J / K to +8 (+1) Default: XX Adjusts the subwoofer output level. TRE LEVEL -8 to exit. OFF: Cancels. ENGLISH 13 BASS Q FACTOR 1.00/1.25/1.50/2.00: Adjusts the quality factor. BASS EXTEND ON: Turns on the subwoofer output. ; BASS BOOST LEVEL1/LEVEL2/LEVEL3 or LV1/LV2/LV3: Selects your preferred low and high frequencies boost to enter [FUNCTION]. For : Press AUD to enter [AUDIO CONTROL] directly. 2 Turn the volume knob...
Instruction manual
Page 14
... and right speaker output balance. To return to adjust.) ON: Creates realistic sound by compensating the high-frequency components and restoring the rise-time of each source. (Before adjustment, select the source you press and hold this button. AUDIO SETTINGS LPF SUBWOOFER SUB-W PHASE THROUGH: All signals are sent to the subwoofer. ; 85HZ/120HZ/160HZ: Audio signals with the speaker output for optimum performance. (Selectable only if a setting other sources: -8 to 0: Preset the initial volume level of the...
... and right speaker output balance. To return to adjust.) ON: Creates realistic sound by compensating the high-frequency components and restoring the rise-time of each source. (Before adjustment, select the source you press and hold this button. AUDIO SETTINGS LPF SUBWOOFER SUB-W PHASE THROUGH: All signals are sent to the subwoofer. ; 85HZ/120HZ/160HZ: Audio signals with the speaker output for optimum performance. (Selectable only if a setting other sources: -8 to 0: Preset the initial volume level of the...
Instruction manual
Page 15
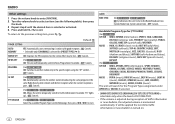
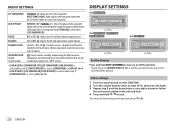
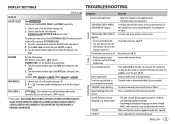
... nearest service center. Do not use too many hierarchical levels or folders. DISPLAY SETTINGS TROUBLESHOOTING Default: XX DISPLAY COLOR SELECT (For ) Select color for ALL ZONE, ZONE 1 and ZONE 2 separately. 1 Select a zone. (See illustration on again. OFF: Cancels. Elapsed playing time is determined when files are recorded. • This unit can only display uppercase letters, numbers, and a limited number of the speaker wires are not displayed (e.g. Clean the connectors. ( 17) Reset the unit. ( 3) Connect the antenna...
... nearest service center. Do not use too many hierarchical levels or folders. DISPLAY SETTINGS TROUBLESHOOTING Default: XX DISPLAY COLOR SELECT (For ) Select color for ALL ZONE, ZONE 1 and ZONE 2 separately. 1 Select a zone. (See illustration on again. OFF: Cancels. Elapsed playing time is determined when files are recorded. • This unit can only display uppercase letters, numbers, and a limited number of the speaker wires are not displayed (e.g. Clean the connectors. ( 17) Reset the unit. ( 3) Connect the antenna...
Instruction manual
Page 16
... . Connect a USB device, and change the source to the device. Custom station name creation is checked in [HAND MODE], relaunch the current media player application or use another media player application. • Restart the Android device. • If this does not solve the problem, the connected Android device does not support [BROWSE MODE]. ( 18) • Switch off the power saving mode on your nearest service center. "ANDROID ERROR"/ "NA...
... . Connect a USB device, and change the source to the device. Custom station name creation is checked in [HAND MODE], relaunch the current media player application or use another media player application. • Restart the Android device. • If this does not solve the problem, the connected Android device does not support [BROWSE MODE]. ( 18) • Switch off the power saving mode on your nearest service center. "ANDROID ERROR"/ "NA...
Instruction manual
Page 17
... from the station is over. General • This unit can only play the following CDs: • For detailed information and notes about the playable audio files, visit . Muting upon the reception of a phone call Connect the MUTE wire to your telephone using a commercial telephone accessory. ( 21) When a call comes in . Latest firmware updates and latest compatible item list - Registration of...
... from the station is over. General • This unit can only play the following CDs: • For detailed information and notes about the playable audio files, visit . Muting upon the reception of a phone call Connect the MUTE wire to your telephone using a commercial telephone accessory. ( 21) When a call comes in . Latest firmware updates and latest compatible item list - Registration of...
Instruction manual
Page 20
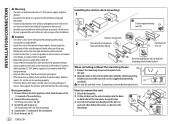
... Ground wire (black), or connect them in -dash mounting). 4 Connect the [ terminal of your vehicle. See Installing the unit (in parallel. • Mount the unit at an angle of speakers to the terminal on the vehicle's fuse box which provides 12 V DC power supply and is turned on and off by the ignition key. • Keep all cables away...
... Ground wire (black), or connect them in -dash mounting). 4 Connect the [ terminal of your vehicle. See Installing the unit (in parallel. • Mount the unit at an angle of speakers to the terminal on the vehicle's fuse box which provides 12 V DC power supply and is turned on and off by the ignition key. • Keep all cables away...
Instruction manual
Page 21
... (Power control wire/ Antenna control wire) Light blue/yellow (Steering remote control wire) To the power control terminal when using the optional power amplifier or to avoid damaging the unit. Front output Rear/subwoofer output When connecting to an external amplifier, connect its ground wire to the car's chassis to the antenna control terminal in the vehicle To the steering wheel remote control adapter (E) Extraction key (F) Screws (supplied for your car audio dealer. Rear/subwoofer output Part list for installation (A) Faceplate (B) Trim plate Fuse (10 A) Antenna...
... (Power control wire/ Antenna control wire) Light blue/yellow (Steering remote control wire) To the power control terminal when using the optional power amplifier or to avoid damaging the unit. Front output Rear/subwoofer output When connecting to an external amplifier, connect its ground wire to the car's chassis to the antenna control terminal in the vehicle To the steering wheel remote control adapter (E) Extraction key (F) Screws (supplied for your car audio dealer. Rear/subwoofer output Part list for installation (A) Faceplate (B) Trim plate Fuse (10 A) Antenna...
Instruction manual
Page 22
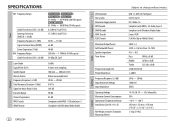
... with MPEG-1/2 Audio Layer-3 Compliant with Windows Media Audio CD player 22 ENGLISH General Auxiliary Audio USB (except for ) USB Standard File System Maximum Supply Current MP3 Decode WMA Decode WAV Decode FLAC Decode Maximum Output Power Full Bandwidth Power Speaker Impedance Tone Action Preout Level/Load (CD) Preout Impedance Frequency Response (±3 dB) Input Maximum Voltage Input Impedance Operating Voltage Maximum Current Consumption Operational Temperature Range Installation Size (W ×...
... with MPEG-1/2 Audio Layer-3 Compliant with Windows Media Audio CD player 22 ENGLISH General Auxiliary Audio USB (except for ) USB Standard File System Maximum Supply Current MP3 Decode WMA Decode WAV Decode FLAC Decode Maximum Output Power Full Bandwidth Power Speaker Impedance Tone Action Preout Level/Load (CD) Preout Impedance Frequency Response (±3 dB) Input Maximum Voltage Input Impedance Operating Voltage Maximum Current Consumption Operational Temperature Range Installation Size (W ×...
Instruction manual
Page 68
... designed to connect specifically to radio or television reception, which can be determined by one or more of the following disclaimer. - Redistributions of source code must reproduce the above copyright notice, this equipment if an unauthorized change or modification is trademark of Google Inc. LOSS OF USE, DATA, OR PROFITS; This equipment may result in a particular installation. Neither...
... designed to connect specifically to radio or television reception, which can be determined by one or more of the following disclaimer. - Redistributions of source code must reproduce the above copyright notice, this equipment if an unauthorized change or modification is trademark of Google Inc. LOSS OF USE, DATA, OR PROFITS; This equipment may result in a particular installation. Neither...


