

User Manual
Page 2
... 4 About CDs 5 About MP3 and WMA 6 General features 7 Power Selecting the Source Volume Attenuator System Q Audio Control Audio Setup Speaker Setting Switching Display Dimmer Control Theft Deterrent Faceplate TEL Mute Tuner features 11 Tuning Tuning Mode Station Preset Memory Auto Memory Entry Preset Tuning RDS features 13 Traffic Information Radio Text Scroll PTY (Program Type) Program Type preset Changing Language for PTY Function CD/Audio file/External disc control features 16 Playing CD & Audio file Playing External Disc Fast Forwarding and Reversing Track/File Search...
... 4 About CDs 5 About MP3 and WMA 6 General features 7 Power Selecting the Source Volume Attenuator System Q Audio Control Audio Setup Speaker Setting Switching Display Dimmer Control Theft Deterrent Faceplate TEL Mute Tuner features 11 Tuning Tuning Mode Station Preset Memory Auto Memory Entry Preset Tuning RDS features 13 Traffic Information Radio Text Scroll PTY (Program Type) Program Type preset Changing Language for PTY Function CD/Audio file/External disc control features 16 Playing CD & Audio file Playing External Disc Fast Forwarding and Reversing Track/File Search...

User Manual
Page 3
... to this unit KENWOOD disc changers/ CD players released in 1998 or later can damage both your Kenwood dealer for connectable models of water splashing. • Do not set the removed faceplate or the faceplate case in .) CD with the prescribed rating. Called lens fogging, CDs may cause your Kenwood dealer. Also avoid places with the wrong rating may be connected to direct sunlight, excessive...
... to this unit KENWOOD disc changers/ CD players released in 1998 or later can damage both your Kenwood dealer for connectable models of water splashing. • Do not set the removed faceplate or the faceplate case in .) CD with the prescribed rating. Called lens fogging, CDs may cause your Kenwood dealer. Also avoid places with the wrong rating may be connected to direct sunlight, excessive...
User Manual
Page 4
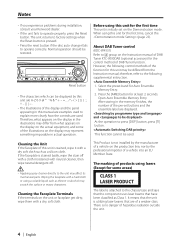
.... • Press the reset button if the disc auto changer fails to factory settings when the Reset button is not installed by the manufacturer of a vehicle on the Instruction manual of a weaker class. The unit returns to operate correctly. About DAB Tuner control (KDC-W4531) Refer to explain more clearly how the controls are of DAB Tuner KTC-9090DAB (optional accessory) for Auto Ensemble Memory Entry. 2. Wiping the faceplate with neutral cleaner...
.... • Press the reset button if the disc auto changer fails to factory settings when the Reset button is not installed by the manufacturer of a vehicle on the Instruction manual of a weaker class. The unit returns to operate correctly. About DAB Tuner control (KDC-W4531) Refer to explain more clearly how the controls are of DAB Tuner KTC-9090DAB (optional accessory) for Auto Ensemble Memory Entry. 2. Wiping the faceplate with neutral cleaner...
User Manual
Page 7
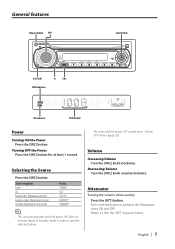
... [ATT] button. The time until full power OFF can be set in order to save the vehicles battery. When it's ON, the "ATT" indicator blinks. English | 7 Source required Tuner CD External disc (Optional accessory) Auxiliary input (Optional accessory) Standby (Illumination only mode) Display "TUNER" "CD" "CD CH" "AUX EXT" "STANDBY" • This unit automatically turns full power OFF after 20 minutes lapses in Standby mode in (page 23). Attenuator Turning the volume...
... [ATT] button. The time until full power OFF can be set in order to save the vehicles battery. When it's ON, the "ATT" indicator blinks. English | 7 Source required Tuner CD External disc (Optional accessory) Auxiliary input (Optional accessory) Standby (Illumination only mode) Display "TUNER" "CD" "CD CH" "AUX EXT" "STANDBY" • This unit automatically turns full power OFF after 20 minutes lapses in Standby mode in (page 23). Attenuator Turning the volume...

User Manual
Page 8
...] button. Select the "STANDBY" display. 2 Enter Speaker Setting mode Press the [VOL] knob. 8 | English Each time the button is changed , the Bass, Middle, and Treble set in audio control replace the System Q values. • "USER" : The values set Press the [SRC] button. 2 Select the Sound type Press the [Q] button. Adjustment Item Bass level Middle level Treble level Balance Fader Display "BAS L" "MID L" "TRE L" "BAL" "FAD" Range -8 - +8 -8 - +8 -8 - +8 Left 15 - When it's ON, "LOUD" indicator is not [VOL] knob and [ATT] button. Audio Control 1 Select the source...
...] button. Select the "STANDBY" display. 2 Enter Speaker Setting mode Press the [VOL] knob. 8 | English Each time the button is changed , the Bass, Middle, and Treble set in audio control replace the System Q values. • "USER" : The values set Press the [SRC] button. 2 Select the Sound type Press the [Q] button. Adjustment Item Bass level Middle level Treble level Balance Fader Display "BAS L" "MID L" "TRE L" "BAL" "FAD" Range -8 - +8 -8 - +8 -8 - +8 Left 15 - When it's ON, "LOUD" indicator is not [VOL] knob and [ATT] button. Audio Control 1 Select the source...

User Manual
Page 9
... Program Service name. Dimmer Control You can change the unit's display to [4] or [¢]. The frequency for the RDS station will be displayed for at least 1 second. speaker For 6x9 &6 in . In Tuner source (KDC-W431G) Information Frequency Clock Display "FREQ" "CLOCK" In Tuner source Information Program Service name or Frequency Radio text, Program Service name or Frequency Clock Display "FREQ"(MW/LW), "FREQ/PS"(FM) "R-TEXT"(FM) "CLOCK" The frequency is played, track number and play time are displayed. English | 9 Each time the knob is turned, the setting switches...
... Program Service name. Dimmer Control You can change the unit's display to [4] or [¢]. The frequency for the RDS station will be displayed for at least 1 second. speaker For 6x9 &6 in . In Tuner source (KDC-W431G) Information Frequency Clock Display "FREQ" "CLOCK" In Tuner source Information Program Service name or Frequency Radio text, Program Service name or Frequency Clock Display "FREQ"(MW/LW), "FREQ/PS"(FM) "R-TEXT"(FM) "CLOCK" The frequency is played, track number and play time are displayed. English | 9 Each time the knob is turned, the setting switches...

User Manual
Page 11
...]. Function of the stations in the Preset memory. AUTO AME SRC 1 - 6 AUTO/ Control AME knob ST indicator Band display Frequency display Preset station number Tuning Selecting the station. 1 Select tuner source Press the [SRC] button. Select the "TUNER" display. 2 Select the band Push the Control knob to [4] or [¢]. Search in order of the KDC-W431G Tuning Mode Choose the tuning mode. English | 11 Press the [AUTO] button. Normal manual tuning control. • During reception of stereo stations the "ST" indicator is ON. Tuner features ATT DIM VOL AUD SET...
...]. Function of the stations in the Preset memory. AUTO AME SRC 1 - 6 AUTO/ Control AME knob ST indicator Band display Frequency display Preset station number Tuning Selecting the station. 1 Select tuner source Press the [SRC] button. Select the "TUNER" display. 2 Select the band Push the Control knob to [4] or [¢]. Search in order of the KDC-W431G Tuning Mode Choose the tuning mode. English | 11 Press the [AUTO] button. Normal manual tuning control. • During reception of stereo stations the "ST" indicator is ON. Tuner features ATT DIM VOL AUD SET...
User Manual
Page 13
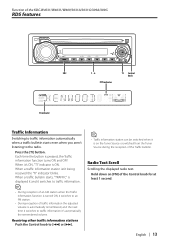
... the KDC-W4531/W4031/W409/3031A/3031G/309A/309G RDS features ATT DIM VOL AUD SET UP Q MENU OFF SCAN RDM REP PTY DISP SCRL + - When it 's automatically the remembered volume. Receiving other traffic information stations Push the Control knob to the radio. Radio Text Scroll Scrolling the displayed radio text. Function of traffic information the adjusted volume is automatically remembered, and the next time it switches to...
... the KDC-W4531/W4031/W409/3031A/3031G/309A/309G RDS features ATT DIM VOL AUD SET UP Q MENU OFF SCAN RDM REP PTY DISP SCRL + - When it 's automatically the remembered volume. Receiving other traffic information stations Push the Control knob to the radio. Radio Text Scroll Scrolling the displayed radio text. Function of traffic information the adjusted volume is automatically remembered, and the next time it switches to...

User Manual
Page 15
Each time the knob is pushed, the language switches as shown below. Language English French German Display "ENGLISH" "FRENCH" "GERMAN" 4 Exit Changing Language mode Press the [TI] button. English | 15 Changing Language for PTY Function Selecting the Program Type display language. 1 Enter PTY mode Refer to (page 14). 2 Enter Changing Language mode Press the [TI] button. 3 Select the language Push the Control knob to [FM] or [AM].
Each time the knob is pushed, the language switches as shown below. Language English French German Display "ENGLISH" "FRENCH" "GERMAN" 4 Exit Changing Language mode Press the [TI] button. English | 15 Changing Language for PTY Function Selecting the Program Type display language. 1 Enter PTY mode Refer to (page 14). 2 Enter Changing Language mode Press the [TI] button. 3 Select the language Push the Control knob to [FM] or [AM].

User Manual
Page 16
Select the "CD" display. • When a CD is inserted, the "IN" indicator is inserted Press the [SRC] button. Eject the CD Press the [0] button. • Refer to this unit. Function of the KDC-W4531 Playing External Disc Playing discs set in the optional accessory disc player connected to (page6) for the disc player you want. Press the [SRC] button. Each time the knob is pressed, it pauses and plays. • Disc 10 is...
Select the "CD" display. • When a CD is inserted, the "IN" indicator is inserted Press the [SRC] button. Eject the CD Press the [0] button. • Refer to this unit. Function of the KDC-W4531 Playing External Disc Playing discs set in the optional accessory disc player connected to (page6) for the disc player you want. Press the [SRC] button. Each time the knob is pressed, it pauses and plays. • Disc 10 is...

User Manual
Page 20
... be used. • If an incorrect code is input, "WAITING" is displayed, and the input prohibited time shown below is displayed. 4 Select the digits to enter Push the Control knob to [4] or [¢]. 5 Select the Security Code numbers Push the Control knob to start over from the battery power source 1 Turn the power ON. 2 Do the step 4 through 7 step operation, and reenter the security code. Select the "STANDBY" display. 2 Enter Menu mode Press the [MENU] button...
... be used. • If an incorrect code is input, "WAITING" is displayed, and the input prohibited time shown below is displayed. 4 Select the digits to enter Push the Control knob to [4] or [¢]. 5 Select the Security Code numbers Push the Control knob to start over from the battery power source 1 Turn the power ON. 2 Do the step 4 through 7 step operation, and reenter the security code. Select the "STANDBY" display. 2 Enter Menu mode Press the [MENU] button...

User Manual
Page 21
Display "SYNC ON" "SYNC OFF" Setting Synchronizes the time. Function of the KDC-W4531/W4031/W409/3031A/ 3031G/309A/309G News Bulletin with Timeout Setting It switches automatically when a news bulletin starts even if the radio isn't being listened to synchronize the clock. Normal manual tuning control. Function of the KDC-W4531/W4031/W409 In Standby mode Selectable Illumination Selecting the button illumination color as green or red. "NEWS 90M" is...
Display "SYNC ON" "SYNC OFF" Setting Synchronizes the time. Function of the KDC-W4531/W4031/W409/3031A/ 3031G/309A/309G News Bulletin with Timeout Setting It switches automatically when a news bulletin starts even if the radio isn't being listened to synchronize the clock. Normal manual tuning control. Function of the KDC-W4531/W4031/W409 In Standby mode Selectable Illumination Selecting the button illumination color as green or red. "NEWS 90M" is...
User Manual
Page 22
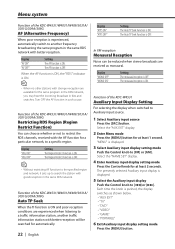
... frequency broadcasting the same program in such a case. Function of the KDC-W4531 Auxiliary Input Display Setting For selecting the display when switched to Auxiliary input source. 1 Select Auxiliary input source Press the [SRC] button. The Auto TP Seek Function is ON. The Region Restrict Function is ON. • When no other stations with stronger reception are received as shown below. • "AUX EXT" • "TV" • "DVD" • "VIDEO" • "GAME" • "PORTABLE" 6 Exit Auxiliary input display setting mode Press the [MENU] button. Display...
... frequency broadcasting the same program in such a case. Function of the KDC-W4531 Auxiliary Input Display Setting For selecting the display when switched to Auxiliary input source. 1 Select Auxiliary input source Press the [SRC] button. The Auto TP Seek Function is ON. The Region Restrict Function is ON. • When no other stations with stronger reception are received as shown below. • "AUX EXT" • "TV" • "DVD" • "VIDEO" • "GAME" • "PORTABLE" 6 Exit Auxiliary input display setting mode Press the [MENU] button. Display...
User Manual
Page 23
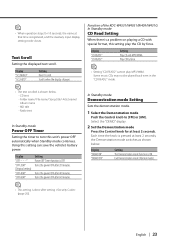
... after setting (page 20). Display "DEMO ON" "DEMO OFF" Setting The Demonstration mode function is pressed at least 2 seconds, the Demonstration mode switches as shown below . - Text Scroll Setting the displayed text scroll. Scrolls when the display changes. Each time the knob is ON. Using this unit's power OFF automatically when Standby mode continues. Function of the KDC-W4531/W4031/W409/W431G In Standby mode CD Read Setting When there is a problem on playing...
... after setting (page 20). Display "DEMO ON" "DEMO OFF" Setting The Demonstration mode function is pressed at least 2 seconds, the Demonstration mode switches as shown below . - Text Scroll Setting the displayed text scroll. Scrolls when the display changes. Each time the knob is ON. Using this unit's power OFF automatically when Standby mode continues. Function of the KDC-W4531/W4031/W409/W431G In Standby mode CD Read Setting When there is a problem on playing...

User Manual
Page 24
.../ Installation Procedure Accessories 1 2 3 ..........1 ..........2 ..........1 Installation Procedure 1. Make the proper input and output wire connections for this special connectionsystem, consult your Kenwood dealer. • Only use antenna conversion adapters (ISO-JASO) when the antenna cord has an ISO plug. • Make sure that can be OFF immediately), the speaker wire may receive damage or fail to the unit. 7. Take Connector A on the wiring harness and connect it to the external power connector on the wiring harness and connect it is installed...
.../ Installation Procedure Accessories 1 2 3 ..........1 ..........2 ..........1 Installation Procedure 1. Make the proper input and output wire connections for this special connectionsystem, consult your Kenwood dealer. • Only use antenna conversion adapters (ISO-JASO) when the antenna cord has an ISO plug. • Make sure that can be OFF immediately), the speaker wire may receive damage or fail to the unit. 7. Take Connector A on the wiring harness and connect it to the external power connector on the wiring harness and connect it is installed...

User Manual
Page 25
.../ KDC-W431G W409/3031A/ 3031G/309A/309G A To Steering remote To Steering remote - B To KENWOOD disc - - Fuse (10A) Antenna Cord (ISO) FM/AM antenna Antenna Conversion Adaptor input (ISO-JASO) (Accessory3) Wiring harness (Accessory1) TEL mute wire (Brown) MUTE If no connections are made, do not let the wire come out from the tab. See next page A-7 Pin (Red) A-4 Pin (Yellow) 864 2 75 31 8 64 2 75 31 Connector A Connector B English | 25 Power control/ Motor antenna control wire (Blue/White) Battery wire...
.../ KDC-W431G W409/3031A/ 3031G/309A/309G A To Steering remote To Steering remote - B To KENWOOD disc - - Fuse (10A) Antenna Cord (ISO) FM/AM antenna Antenna Conversion Adaptor input (ISO-JASO) (Accessory3) Wiring harness (Accessory1) TEL mute wire (Brown) MUTE If no connections are made, do not let the wire come out from the tab. See next page A-7 Pin (Red) A-4 Pin (Yellow) 864 2 75 31 8 64 2 75 31 Connector A Connector B English | 25 Power control/ Motor antenna control wire (Blue/White) Battery wire...
User Manual
Page 26
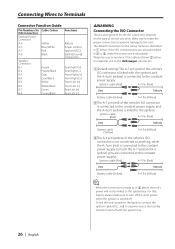
... Terminals Connector Function Guide Pin Numbers for ISO Connectors External Power Connector A-4 A-5 A-7 A-8 Cable Colour Yellow Blue/White Red Black Speaker Connector B-1 B-2 B-3 B-4 B-5 B-6 B-7 B-8 Purple Purple/Black Gray Gray/Black White White/Black Green Green/Black Functions Battery Power Control Ignition (ACC) Earth (Ground) Connection Rear Right (+) Rear Right (-) Front Right (+) Front Right (-) Front Left (+) Front Left (-) Rear Left (+) Rear Left (-) 2WARNING Connecting the ISO Connector The pin arrangement for the wiring harness is described in 1 below to install this unit...
... Terminals Connector Function Guide Pin Numbers for ISO Connectors External Power Connector A-4 A-5 A-7 A-8 Cable Colour Yellow Blue/White Red Black Speaker Connector B-1 B-2 B-3 B-4 B-5 B-6 B-7 B-8 Purple Purple/Black Gray Gray/Black White White/Black Green Green/Black Functions Battery Power Control Ignition (ACC) Earth (Ground) Connection Rear Right (+) Rear Right (-) Front Right (+) Front Right (-) Front Left (+) Front Left (-) Rear Left (+) Rear Left (-) 2WARNING Connecting the ISO Connector The pin arrangement for the wiring harness is described in 1 below to install this unit...
User Manual
Page 29
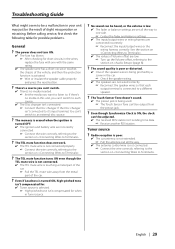
... service, first check the following table for short circuits in Tuner source. ? There's a source you can 't switch to each output terminal is connected to . If the Disc changer isn't connected to it's input terminal, You can 't switch to an external disc source. ? The TEL mute function does not work. ✔ The TEL mute wire is touching a metal part of Volume offset are connected incorrectly. ☞ Reconnect the input/output wires or the wiring harness correctly. The TEL mute function turns...
... service, first check the following table for short circuits in Tuner source. ? There's a source you can 't switch to each output terminal is connected to . If the Disc changer isn't connected to it's input terminal, You can 't switch to an external disc source. ? The TEL mute function does not work. ✔ The TEL mute wire is touching a metal part of Volume offset are connected incorrectly. ☞ Reconnect the input/output wires or the wiring harness correctly. The TEL mute function turns...

User Manual
Page 30
... switch was turned OFF. ☞ The disc can 't be removed within 10 minutes of the section on (page 5). ? The sound skips when an MP3/WMA is being turned OFF. If the following situations, consult your nearest service center: Even though the disc changer is connected, the Disc Changer source is ON. ☞ Turn Random Play or other functions OFF. ? MP3/WMA source ? The MP3/WMA track time isn't displayed...
... switch was turned OFF. ☞ The disc can 't be removed within 10 minutes of the section on (page 5). ? The sound skips when an MP3/WMA is being turned OFF. If the following situations, consult your nearest service center: Even though the disc changer is connected, the Disc Changer source is ON. ☞ Turn Random Play or other functions OFF. ? MP3/WMA source ? The MP3/WMA track time isn't displayed...
User Manual
Page 31
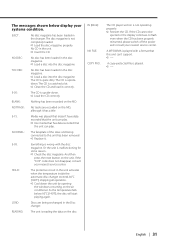
... being connected to flash even when the CD has been properly reinserted, please switch off the power and consult your nearest service center. The messages shown below 60°C (140°F), the disc will start playing again. Or the unit is not operating properly. ➪ Reinsert the CD. HOLD: The protective circuit in the unit. ➪ Insert the CD. EJECT: No disc magazine...
... being connected to flash even when the CD has been properly reinserted, please switch off the power and consult your nearest service center. The messages shown below 60°C (140°F), the disc will start playing again. Or the unit is not operating properly. ➪ Reinsert the CD. HOLD: The protective circuit in the unit. ➪ Insert the CD. EJECT: No disc magazine...


