

User Manual
Page 2
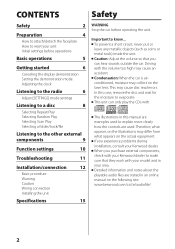
....kenwood.com/cs/ce/audiofile/ 2 This unit can hear sounds outside the car. Caution: Adjust the volume so that they work with the volume too high may cause disc read errors. CONTENTS Safety Safety 2 Preparation 4 How to attach/detach the faceplate How to reset your unit Initial settings before operations Basic operations 5 Getting started 6 Canceling the display demonstration Setting the demonstration mode Adjusting the clock Listening to the radio 6 Adjust [SETTINGS] mode settings Listening to a disc 8 Selecting Repeat Play Selecting...
....kenwood.com/cs/ce/audiofile/ 2 This unit can hear sounds outside the car. Caution: Adjust the volume so that they work with the volume too high may cause disc read errors. CONTENTS Safety Safety 2 Preparation 4 How to attach/detach the faceplate How to reset your unit Initial settings before operations Basic operations 5 Getting started 6 Canceling the display demonstration Setting the demonstration mode Adjusting the clock Listening to the radio 6 Adjust [SETTINGS] mode settings Listening to a disc 8 Selecting Repeat Play Selecting...

User Manual
Page 4
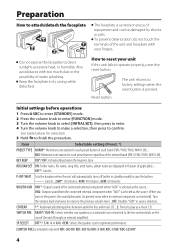
... audio file disc and music CD. ; 2: Forces to the line out terminals on the power, the sound attenuates (to factory settings when the reset button is selected as the source. ; The faceplate is connected). The unit returns to prevent noise when no external component is a precision piece of the unit (through an external amplifier). Item Selectable setting (Preset: *) PRESET TYPE NORM*: Memorizes one station for each preset button in each preset button regardless of the connected...
... audio file disc and music CD. ; 2: Forces to the line out terminals on the power, the sound attenuates (to factory settings when the reset button is selected as the source. ; The faceplate is connected). The unit returns to prevent noise when no external component is a precision piece of the unit (through an external amplifier). Item Selectable setting (Preset: *) PRESET TYPE NORM*: Memorizes one station for each preset button in each preset button regardless of the connected...

User Manual
Page 5
RDS: RDS service is loaded. Enters [FUNCTION] settings. Selects the FM bands (FM1/ FM2/ FM3) or MW/ LW. Selects track/file. Enters clock adjustment mode directly (page 6) if pressed and held . ENGLISH Basic operations Detaches the faceplate Loading slot Display window Ejects the disc Volume knob Auxiliary input jack The following button(s)... When you press or hold the following indicator lights up when... "CD" is selectable only when a disc is available. Fast...
RDS: RDS service is loaded. Enters [FUNCTION] settings. Selects the FM bands (FM1/ FM2/ FM3) or MW/ LW. Selects track/file. Enters clock adjustment mode directly (page 6) if pressed and held . ENGLISH Basic operations Detaches the faceplate Loading slot Display window Ejects the disc Volume knob Auxiliary input jack The following button(s)... When you press or hold the following indicator lights up when... "CD" is selectable only when a disc is available. Fast...

User Manual
Page 6
... station or the selected Program Type. (Refer to turn on unless you reset the unit), the display shows: [CANCEL DEMO] \ [PRESS] \ [VOLUME KNOB] 1 Press the volume knob. [YES] is selected as the initial setup. 2 Press the volume knob again to enter minute adjustment. Listening to the radio Hold to [PTY SEARCH] on the power (or after entering the PTY search mode). 6 Adjusting the clock 1 Press the volume knob to enter [FUNCTION] mode. 2 Turn...
... station or the selected Program Type. (Refer to turn on unless you reset the unit), the display shows: [CANCEL DEMO] \ [PRESS] \ [VOLUME KNOB] 1 Press the volume knob. [YES] is selected as the initial setup. 2 Press the volume knob again to enter minute adjustment. Listening to the radio Hold to [PTY SEARCH] on the power (or after entering the PTY search mode). 6 Adjusting the clock 1 Press the volume knob to enter [FUNCTION] mode. 2 Turn...

User Manual
Page 7
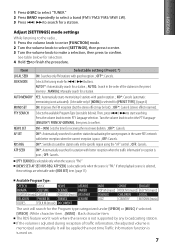
Adjust [SETTINGS] mode settings While listening to the radio... 1 Press the volume knob to enter [FUNCTION] mode. 2 Turn the volume knob to select [SETTINGS], then press to enter. 3 Turn the volume knob to make a selection, then press to start searching. Selects the available Program Type (see table below for a station. Then, press 4 / ¢ to confirm. The RDS feature won't work where the service is turned on. 7 OFF*: Cancels. AUTO1*: Automatically search for receiving the...
Adjust [SETTINGS] mode settings While listening to the radio... 1 Press the volume knob to enter [FUNCTION] mode. 2 Turn the volume knob to select [SETTINGS], then press to enter. 3 Turn the volume knob to make a selection, then press to start searching. Selects the available Program Type (see table below for a station. Then, press 4 / ¢ to confirm. The RDS feature won't work where the service is turned on. 7 OFF*: Cancels. AUTO1*: Automatically search for receiving the...

User Manual
Page 10
...preset sound mode suitable to the music genre. (Selects [USER] to confirm. SUB-W SET ON*: Turns on the extended bass. ; OFF: Cancels. Select a source before making an adjustment, select the source you want to adjust.) KDC-3051R/ KDC-3051G/ KDC-315A/ KDC-315R/ KDC-3251RY only: [SUB-W LEVEL/ SUB-W SET/ LPF SUB-W/ SUB-W PHASE] is selectable only if [SWITCH PRE] is set to [SUB-W]. (page 4) [SUB-W LEVEL/ LPF SUB-W/ SUB-W PHASE] is selectable only if [SUB-W SET] is selected/activated. Function settings 1 Press the volume knob to enter [FUNCTION] mode. 2 Turn the volume knob to select...
...preset sound mode suitable to the music genre. (Selects [USER] to confirm. SUB-W SET ON*: Turns on the extended bass. ; OFF: Cancels. Select a source before making an adjustment, select the source you want to adjust.) KDC-3051R/ KDC-3051G/ KDC-315A/ KDC-315R/ KDC-3251RY only: [SUB-W LEVEL/ SUB-W SET/ LPF SUB-W/ SUB-W PHASE] is selectable only if [SWITCH PRE] is set to [SUB-W]. (page 4) [SUB-W LEVEL/ LPF SUB-W/ SUB-W PHASE] is selectable only if [SUB-W SET] is selected/activated. Function settings 1 Press the volume knob to enter [FUNCTION] mode. 2 Turn the volume knob to select...

User Manual
Page 11
.... "TOC ERROR" appears. ENGLISH [SETTINGS] Item AUX NAME CLOCK DISPLAY RDS SET Selectable setting (Preset: *) AUX*/ DVD/ PORTABLE/ GAME/ VIDEO/ TV: Selects the desired name for the connected component. (Selectable only if "AUX" is malfunctioning for back and tracks cannot be sure the terminals of symbols. (e.g. OFF*: Cancels. "NA FILE" appears. Press the reset button on rough roads. / Change the disc. / Check the cords and connections. "COPY PRO" appears. Do not use too...
.... "TOC ERROR" appears. ENGLISH [SETTINGS] Item AUX NAME CLOCK DISPLAY RDS SET Selectable setting (Preset: *) AUX*/ DVD/ PORTABLE/ GAME/ VIDEO/ TV: Selects the desired name for the connected component. (Selectable only if "AUX" is malfunctioning for back and tracks cannot be sure the terminals of symbols. (e.g. OFF*: Cancels. "NA FILE" appears. Press the reset button on rough roads. / Change the disc. / Check the cords and connections. "COPY PRO" appears. Do not use too...

User Manual
Page 12
...: A Faceplate 1) B Escutcheon 1) C Mounting sleeve 1) D Casing for faceplate 1) E Wiring harness 1) F Removal tool 2) Basic procedure 1 Remove the key from the ignition switch, then disconnect the · terminal of the car battery. 2 Make proper input and output wire connections. \ "Wiring connection" (page 13, 14) 3 Install the unit to your own screws. Caution If your Kenwood dealer. 12 Always connect those wires to which they correspond. on the ends of the console (if any metal part in turn...
...: A Faceplate 1) B Escutcheon 1) C Mounting sleeve 1) D Casing for faceplate 1) E Wiring harness 1) F Removal tool 2) Basic procedure 1 Remove the key from the ignition switch, then disconnect the · terminal of the car battery. 2 Make proper input and output wire connections. \ "Wiring connection" (page 13, 14) 3 Install the unit to your own screws. Caution If your Kenwood dealer. 12 Always connect those wires to which they correspond. on the ends of the console (if any metal part in turn...

User Manual
Page 13
... Fuse (10 A) Light blue/yellow (Steering remote control wire) Blue/White (Power control/motor antenna control wire) Brown (Mute control wire) KDC-3051R/ KDC-3051G/ KDC-315A/ KDC-315R: To the steering wheel remote control adapter (optional accessory) To the power control terminal when using the optional power amplifier, or to modify the wiring of the supplied wiring harness as illustrated below. Red (A7) Yellow (A4) ISO connectors Ignition wire (Red) Unit Battery wire (Yellow) Default wiring A7 (Red) Vehicle A4 (Yellow) Pin Color and function A4 Yellow Battery A5 Blue/White Power...
... Fuse (10 A) Light blue/yellow (Steering remote control wire) Blue/White (Power control/motor antenna control wire) Brown (Mute control wire) KDC-3051R/ KDC-3051G/ KDC-315A/ KDC-315R: To the steering wheel remote control adapter (optional accessory) To the power control terminal when using the optional power amplifier, or to modify the wiring of the supplied wiring harness as illustrated below. Red (A7) Yellow (A4) ISO connectors Ignition wire (Red) Unit Battery wire (Yellow) Default wiring A7 (Red) Vehicle A4 (Yellow) Pin Color and function A4 Yellow Battery A5 Blue/White Power...

User Manual
Page 14
Blue/White (Power control wire) To the power control terminal when using the optional power amplifier. Brown (Mute control wire) To the terminal that is correct. (Wider hooks on the top side.) 14 Dashboard of your navigation manual.) Red (Ignition wire) Yellow (Battery wire) Black (Ground wire) Car fuse box To the metallic body or chassis of the car Ignition key switch Car fuse box Battery Installing the unit 1 Connect the wiring harness to hold the mounting sleeve firmly in the vehicle...
Blue/White (Power control wire) To the power control terminal when using the optional power amplifier. Brown (Mute control wire) To the terminal that is correct. (Wider hooks on the top side.) 14 Dashboard of your navigation manual.) Red (Ignition wire) Yellow (Battery wire) Black (Ground wire) Car fuse box To the metallic body or chassis of the car Ignition key switch Car fuse box Battery Installing the unit 1 Connect the wiring harness to hold the mounting sleeve firmly in the vehicle...

User Manual
Page 15
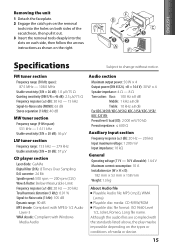
... with Windows Media Audio Audio section Maximum output power: 50 W × 4 Output power (DIN 45324, +B = 14.4 V): 30 W × 4 Speaker impedance: 4 Ω - 8 Ω Tone action: Bass: 100 Hz ±8 dB Middle: 1 kHz ±8 dB Treble: 10 kHz ±8 dB For KDC-3051R/ KDC-3051G/ KDC-315A/ KDC-315R/ KDC-3251RY: Preout level / load (CD): 2 000 mV/10 kΩ Preout impedance: ≤ 600 Ω Auxiliary input section Frequency response (±3 dB...
... with Windows Media Audio Audio section Maximum output power: 50 W × 4 Output power (DIN 45324, +B = 14.4 V): 30 W × 4 Speaker impedance: 4 Ω - 8 Ω Tone action: Bass: 100 Hz ±8 dB Middle: 1 kHz ±8 dB Treble: 10 kHz ±8 dB For KDC-3051R/ KDC-3051G/ KDC-315A/ KDC-315R/ KDC-3251RY: Preout level / load (CD): 2 000 mV/10 kΩ Preout impedance: ≤ 600 Ω Auxiliary input section Frequency response (±3 dB...
User Manual 1
Page 2
... problems during installation, consult your unit Initial settings before operations Basic operations 5 Getting started 6 Canceling the display demonstration Setting the demonstration mode Adjusting the clock Listening to the radio 6 Adjust [SETTINGS] mode settings Listening to a disc 8 Selecting Repeat Play Selecting Random Play Selecting Scan Play Selecting a folder/track/file Listening to the other external components 9 Function settings 10 Troubleshooting 11 Installation/connection 12 Basic procedure Warning Caution Wiring connection Installing the unit Specifications...
... problems during installation, consult your unit Initial settings before operations Basic operations 5 Getting started 6 Canceling the display demonstration Setting the demonstration mode Adjusting the clock Listening to the radio 6 Adjust [SETTINGS] mode settings Listening to a disc 8 Selecting Repeat Play Selecting Random Play Selecting Scan Play Selecting a folder/track/file Listening to the other external components 9 Function settings 10 Troubleshooting 11 Installation/connection 12 Basic procedure Warning Caution Wiring connection Installing the unit Specifications...
User Manual 1
Page 4
... connected to confirm. P-OFF WAIT Sets the duration when the unit will automatically turns off (while in Russian (if applicable). ; SWITCH PRE REAR*/ SUB-W: Selects whether rear speakers or a subwoofer are displayed in standby mode) to play as the source. Item Selectable setting (Preset: *) PRESET TYPE NORM*: Memorizes one station for selection. 5 Hold to the previous volume level. ; Keep the faceplate in source selection. Reset button Initial settings before operations 1 Press SRC to enter [STANDBY] mode. 2 Press the volume knob to enter [FUNCTION] mode. 3 Turn...
... connected to confirm. P-OFF WAIT Sets the duration when the unit will automatically turns off (while in Russian (if applicable). ; SWITCH PRE REAR*/ SUB-W: Selects whether rear speakers or a subwoofer are displayed in standby mode) to play as the source. Item Selectable setting (Preset: *) PRESET TYPE NORM*: Memorizes one station for selection. 5 Hold to the previous volume level. ; Keep the faceplate in source selection. Reset button Initial settings before operations 1 Press SRC to enter [STANDBY] mode. 2 Press the volume knob to enter [FUNCTION] mode. 3 Turn...

User Manual 1
Page 6
... 2, [DEMO MODE] appears and the display demonstration starts. Adjusting the clock 1 Press the volume knob to enter [FUNCTION] mode. 2 Turn the volume knob to select [SETTINGS], then press to enter. 3 Turn the volume knob to select [CLOCK], then press to enter. 4 Turn the volume knob to select [CLOCK ADJ], then press to confirm. Hold for about 20 seconds. 4 Hold to recall memorized station (or Program Type after you reset the unit), the display shows: [CANCEL DEMO...
... 2, [DEMO MODE] appears and the display demonstration starts. Adjusting the clock 1 Press the volume knob to enter [FUNCTION] mode. 2 Turn the volume knob to select [SETTINGS], then press to enter. 3 Turn the volume knob to select [CLOCK], then press to enter. 4 Turn the volume knob to select [CLOCK ADJ], then press to confirm. Hold for about 20 seconds. 4 Hold to recall memorized station (or Program Type after you reset the unit), the display shows: [CANCEL DEMO...
User Manual 1
Page 7
... receiving the next news bulletin. ; Adjust [SETTINGS] mode settings While listening to the radio... 1 Press the volume knob to enter [FUNCTION] mode. 2 Turn the volume knob to select [SETTINGS], then press to enter. 3 Turn the volume knob to make a selection, then press to enter PTY language selection. OFF*: Cancels. AUTO1*: Automatically search for selection. 4 Hold to another station broadcasting the same program in the specific region using the "AF" control. ; AUTO MEMORY YES: Automatically starts memorizing 6 stations...
... receiving the next news bulletin. ; Adjust [SETTINGS] mode settings While listening to the radio... 1 Press the volume knob to enter [FUNCTION] mode. 2 Turn the volume knob to select [SETTINGS], then press to enter. 3 Turn the volume knob to make a selection, then press to enter PTY language selection. OFF*: Cancels. AUTO1*: Automatically search for selection. 4 Hold to another station broadcasting the same program in the specific region using the "AF" control. ; AUTO MEMORY YES: Automatically starts memorizing 6 stations...

User Manual 1
Page 11
... not work . The CD player is caused by how the tracks are recorded. Stop playback while driving on the unit. Do not use too many hierarchies and folders. ENGLISH [SETTINGS] Item AUX NAME CLOCK DISPLAY RDS SET Selectable setting (Preset: *) AUX*/ DVD/ PORTABLE/ GAME/ VIDEO/ TV: Selects the desired name for the connected component. (Selectable only if "AUX" is selected as you used for some reason. Try another track or change the disc. The unit...
... not work . The CD player is caused by how the tracks are recorded. Stop playback while driving on the unit. Do not use too many hierarchies and folders. ENGLISH [SETTINGS] Item AUX NAME CLOCK DISPLAY RDS SET Selectable setting (Preset: *) AUX*/ DVD/ PORTABLE/ GAME/ VIDEO/ TV: Selects the desired name for the connected component. (Selectable only if "AUX" is selected as you used for some reason. Try another track or change the disc. The unit...

User Manual 1
Page 12
... working properly. Installation/connection Part list: A Faceplate 1) B Escutcheon 1) C Mounting sleeve 1) D Casing for faceplate 1) E Wiring harness 1) F Removal tool 2) Basic procedure 1 Remove the key from the ignition switch, then disconnect the · terminal of the car battery. 2 Make proper input and output wire connections. \ "Wiring connection" (page 13, 14) 3 Install the unit to your car. \ "Installing the unit" (page 14) 4 Reconnect the · terminal of the car battery. 5 Reset the unit. (page 4) Warning The unit can be damaged or fail to work to the power source...
... working properly. Installation/connection Part list: A Faceplate 1) B Escutcheon 1) C Mounting sleeve 1) D Casing for faceplate 1) E Wiring harness 1) F Removal tool 2) Basic procedure 1 Remove the key from the ignition switch, then disconnect the · terminal of the car battery. 2 Make proper input and output wire connections. \ "Wiring connection" (page 13, 14) 3 Install the unit to your car. \ "Installing the unit" (page 14) 4 Reconnect the · terminal of the car battery. 5 Reset the unit. (page 4) Warning The unit can be damaged or fail to work to the power source...

User Manual 1
Page 13
...) Rear speaker (left) 13 ENGLISH Wiring connection For KDC-3051R/ KDC-3051G/ KDC-315A/ KDC-315R/ KDC-3251RY KDC-3051R/ KDC-3051G/ KDC-3251RY KDC-315A/ KDC-315R Rear/subwoofer output terminals Front output terminals Rear/subwoofer output terminals Antenna terminal (JASO) Fuse (10 A) Light blue/yellow (Steering remote control wire) Blue/White (Power control/motor antenna control wire) Brown (Mute control wire) KDC-3051R/ KDC-3051G/ KDC-315A/ KDC-315R: To the steering wheel remote control adapter (optional accessory) To the power control terminal when using the optional power amplifier...
...) Rear speaker (left) 13 ENGLISH Wiring connection For KDC-3051R/ KDC-3051G/ KDC-315A/ KDC-315R/ KDC-3251RY KDC-3051R/ KDC-3051G/ KDC-3251RY KDC-315A/ KDC-315R Rear/subwoofer output terminals Front output terminals Rear/subwoofer output terminals Antenna terminal (JASO) Fuse (10 A) Light blue/yellow (Steering remote control wire) Blue/White (Power control/motor antenna control wire) Brown (Mute control wire) KDC-3051R/ KDC-3051G/ KDC-315A/ KDC-315R: To the steering wheel remote control adapter (optional accessory) To the power control terminal when using the optional power amplifier...

User Manual 1
Page 14
...) Green (+) / Green/black (-) : To rear speaker (left) Purple (+) / Purple/black (-) : To rear speaker (right) Blue (Motor antenna control wire) To the antenna control terminal in place. Blue/White (Power control wire) To the power control terminal when using the optional power amplifier. Other wiring connection has been completed earlier. (page 13, 14) 2 Before attaching, make sure the direction of the car Ignition key switch Car fuse box Battery Installing the unit 1 Connect the wiring harness to hold the mounting sleeve firmly in the vehicle.
...) Green (+) / Green/black (-) : To rear speaker (left) Purple (+) / Purple/black (-) : To rear speaker (right) Blue (Motor antenna control wire) To the antenna control terminal in place. Blue/White (Power control wire) To the power control terminal when using the optional power amplifier. Other wiring connection has been completed earlier. (page 13, 14) 2 Before attaching, make sure the direction of the car Ignition key switch Car fuse box Battery Installing the unit 1 Connect the wiring harness to hold the mounting sleeve firmly in the vehicle.
User Manual 1
Page 15
... with Windows Media Audio Audio section Maximum output power: 50 W × 4 Output power (DIN 45324, +B = 14.4 V): 30 W × 4 Speaker impedance: 4 Ω - 8 Ω Tone action: Bass: 100 Hz ±8 dB Middle: 1 kHz ±8 dB Treble: 10 kHz ±8 dB For KDC-3051R/ KDC-3051G/ KDC-315A/ KDC-315R/ KDC-3251RY: Preout level / load (CD): 2 000 mV/10 kΩ Preout impedance: ≤ 600 Ω Auxiliary input section Frequency response (±3 dB...
... with Windows Media Audio Audio section Maximum output power: 50 W × 4 Output power (DIN 45324, +B = 14.4 V): 30 W × 4 Speaker impedance: 4 Ω - 8 Ω Tone action: Bass: 100 Hz ±8 dB Middle: 1 kHz ±8 dB Treble: 10 kHz ±8 dB For KDC-3051R/ KDC-3051G/ KDC-315A/ KDC-315R/ KDC-3251RY: Preout level / load (CD): 2 000 mV/10 kΩ Preout impedance: ≤ 600 Ω Auxiliary input section Frequency response (±3 dB...


