
Quick Start Guide 1
Page 2
... Name: KENWOOD Products: CD-RECEIVER Model Name: KDC-X704/KDC-X304/KDC-BT778HD/KDC-BT378U/KDC-BT360U/ KDC-BT34/KDC-BT278U/KDC-MP378BT/KMR-D378BT Responsible Party: JVCKENWOOD USA CORPORATION 2201 East Dominguez Street, Long Beach, CA 90810, U.S.A. The user could lose the authority to operate this equipment does cause harmful interference to radio communications, if it is made. CAUTION Use of controls or adjustments or performance...
... Name: KENWOOD Products: CD-RECEIVER Model Name: KDC-X704/KDC-X304/KDC-BT778HD/KDC-BT378U/KDC-BT360U/ KDC-BT34/KDC-BT278U/KDC-MP378BT/KMR-D378BT Responsible Party: JVCKENWOOD USA CORPORATION 2201 East Dominguez Street, Long Beach, CA 90810, U.S.A. The user could lose the authority to operate this equipment does cause harmful interference to radio communications, if it is made. CAUTION Use of controls or adjustments or performance...

Quick Start Guide 1
Page 10
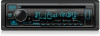
... power Adjust the volume Select a source Change the display information Display window* USB input terminal Auxiliary input jack How to evaporate. • USB rating is indicated on the main unit. Turn the volume knob. We shall bear no responsibility for any loss of recorded data. • Never put or leave any function that you turn off the unit or change the source to STANDBY when parking at a low ceiling area. 4 Detach button...
... power Adjust the volume Select a source Change the display information Display window* USB input terminal Auxiliary input jack How to evaporate. • USB rating is indicated on the main unit. Turn the volume knob. We shall bear no responsibility for any loss of recorded data. • Never put or leave any function that you turn off the unit or change the source to STANDBY when parking at a low ceiling area. 4 Detach button...

Quick Start Guide 1
Page 13
...audio settings. Adjusts the noise reduction level. Selects language for HD radio or radio source. Note: For / / , you can make the above settings. 7 Settings for the menu and music information. Selects language for using smartphone to [SUB-W] in standby mode before you need to set [SWITCH PREOUT] to control this unit. Activates or deactivates the display demonstration. * Applicable only while talking on the model. [FUNCTION] menu items [AUDIO CONTROL] : [DISPLAY] : [TUNER SETTING] : [SIRIUS XM] : [USB] : [BT MODE] : [REMOTE APP] : [MIC GAIN]* : [NR LEVEL...
...audio settings. Adjusts the noise reduction level. Selects language for HD radio or radio source. Note: For / / , you can make the above settings. 7 Settings for the menu and music information. Selects language for using smartphone to [SUB-W] in standby mode before you need to set [SWITCH PREOUT] to control this unit. Activates or deactivates the display demonstration. * Applicable only while talking on the model. [FUNCTION] menu items [AUDIO CONTROL] : [DISPLAY] : [TUNER SETTING] : [SIRIUS XM] : [USB] : [BT MODE] : [REMOTE APP] : [MIC GAIN]* : [NR LEVEL...

Quick Start Guide 1
Page 15
... Number (PIN) code immediately after searching. 3 Press the volume knob to [35], turn on the Bluetooth function of the device to show the strength of the battery and signal of the connected device. • / / : "BT1" and/or "BT2" indicator on the display window lights up . Pair and connect a Bluetooth device for the first time 1 Press B SRC to the microphone input jack on the rear panel...
... Number (PIN) code immediately after searching. 3 Press the volume knob to [35], turn on the Bluetooth function of the device to show the strength of the battery and signal of the connected device. • / / : "BT1" and/or "BT2" indicator on the display window lights up . Pair and connect a Bluetooth device for the first time 1 Press B SRC to the microphone input jack on the rear panel...

Instruction Manual
Page 2
.... NOTE: This equipment has been tested and found to part 15 of the FCC Rules. i See www.dtsc.ca.gov/hazardouswaste/perchlorate FCC CAUTION Changes or modifications not expressly approved by one or more of Conformity Trade Name: KENWOOD Products: CD-RECEIVER Model Name: KDC-X704/KDC-X304/KDC-BT778HD/KDC-BT378U/KDC-BT360U/ KDC-BT34/KDC-BT278U/KDC-MP378BT/KMR-D378BT Responsible Party: JVCKENWOOD...
.... NOTE: This equipment has been tested and found to part 15 of the FCC Rules. i See www.dtsc.ca.gov/hazardouswaste/perchlorate FCC CAUTION Changes or modifications not expressly approved by one or more of Conformity Trade Name: KENWOOD Products: CD-RECEIVER Model Name: KDC-X704/KDC-X304/KDC-BT778HD/KDC-BT378U/KDC-BT360U/ KDC-BT34/KDC-BT278U/KDC-MP378BT/KMR-D378BT Responsible Party: JVCKENWOOD...

Instruction Manual
Page 8
... operating and maintenance instructions in this manual. 2 ENGLISH Audio AMAZON ALEXA 28 Audio Settings 29 Display Settings 33 Learning Steering Remote Control 35 Installation/Connection 36 References 40 Maintenance More information Change the display information Troubleshooting 44 Specifications 47 How to carefully read this manual • The displays and faceplates shown in this reason, they may be different from the [FUNCTION] menu. (Page 7) • [XX] indicates the selected items. •...
... operating and maintenance instructions in this manual. 2 ENGLISH Audio AMAZON ALEXA 28 Audio Settings 29 Display Settings 33 Learning Steering Remote Control 35 Installation/Connection 36 References 40 Maintenance More information Change the display information Troubleshooting 44 Specifications 47 How to carefully read this manual • The displays and faceplates shown in this reason, they may be different from the [FUNCTION] menu. (Page 7) • [XX] indicates the selected items. •...
Instruction Manual
Page 11
... knob. 6 Turn the volume knob to 15. How to replace the battery To Adjust the volume Select a source Turn off the power On the remote control Press VOL or VOL . • Press and hold SRC to turn off the power. ( Pressing SRC does not turn on the power. ) 1 Select the display language and cancel the demonstration When you turn on the power for the first time (or [FACTORY RESET] is set to...
... knob. 6 Turn the volume knob to 15. How to replace the battery To Adjust the volume Select a source Turn off the power On the remote control Press VOL or VOL . • Press and hold SRC to turn off the power. ( Pressing SRC does not turn on the power. ) 1 Select the display language and cancel the demonstration When you turn on the power for the first time (or [FACTORY RESET] is set to...

Instruction Manual
Page 15
... digital broadcast only. ; [ANALOG]: Tunes in to analog broadcast only. • The setting automatically returns to [AUTO] when you can store up to four messages in to another broadcast. [CLOCK] [TIME SYNC] [ON]: Synchronizes the unit's time to the Radio Broadcast Data System station time. ; [OFF]: Cancels. While listening to the HD RADIO source... 1 Press to display the Alert Message List. 2 Turn the volume knob to select...
... digital broadcast only. ; [ANALOG]: Tunes in to analog broadcast only. • The setting automatically returns to [AUTO] when you can store up to four messages in to another broadcast. [CLOCK] [TIME SYNC] [ON]: Synchronizes the unit's time to the Radio Broadcast Data System station time. ; [OFF]: Cancels. While listening to the HD RADIO source... 1 Press to display the Alert Message List. 2 Turn the volume knob to select...

Instruction Manual
Page 23
Get over 140 channels, including commercial-free music plus the best sports, news, talk, comedy and entertainment. Preparation: 1 Connect the optional SiriusXM Vehicle Tuner (commercially available). Enter the pass code to receive the channel. (Page 19) Direct Access Tuning (using the remote control) 1 Press DIRECT to enter Direct Access Tuning. 2 Press the number buttons to enter a channel number. 3 Press ENT IW to search for the channel. • To cancel, press or DIRECT. •...
Get over 140 channels, including commercial-free music plus the best sports, news, talk, comedy and entertainment. Preparation: 1 Connect the optional SiriusXM Vehicle Tuner (commercially available). Enter the pass code to receive the channel. (Page 19) Direct Access Tuning (using the remote control) 1 Press DIRECT to enter Direct Access Tuning. 2 Press the number buttons to enter a channel number. 3 Press ENT IW to search for the channel. • To cancel, press or DIRECT. •...

Instruction Manual
Page 26
... AUX] in [SOURCE SELECT]. (Page 6) Start listening 1 Connect a portable audio player (commercially available). AUX You can control the KENWOOD car receiver from iPhone/iPod touch (via Bluetooth or via USB input terminal) or Android device (via Bluetooth) using KENWOOD Remote application 1 Start up when KENWOOD Remote application is connected. 20 ENGLISH Auxiliary input jack Portable audio player 3.5 mm (1/8") stereo mini plug with this unit via Bluetooth. (Page 22) (Make sure the USB input terminal is selected. Set the name of KENWOOD Remote...
... AUX] in [SOURCE SELECT]. (Page 6) Start listening 1 Connect a portable audio player (commercially available). AUX You can control the KENWOOD car receiver from iPhone/iPod touch (via Bluetooth or via USB input terminal) or Android device (via Bluetooth) using KENWOOD Remote application 1 Start up when KENWOOD Remote application is connected. 20 ENGLISH Auxiliary input jack Portable audio player 3.5 mm (1/8") stereo mini plug with this unit via Bluetooth. (Page 22) (Make sure the USB input terminal is selected. Set the name of KENWOOD Remote...

Instruction Manual
Page 28
... to enter the Personal Identification Number (PIN) code immediately after pairing. Bluetooth - Advanced Audio Coding (AAC) Connect the microphone Rear panel Microphone input jack Microphone (supplied) Secure using cord clamps (not supplied) if necessary. To delete the paired device, see [PHONE SELECT] or [AUDIO SELECT] in [BT MODE]. (Page 26) However, while in the unit even if you reset the unit. Serial Port Profile (SPP) - Audio/Video Remote Control Profile (AVRCP) - Phonebook Access...
... to enter the Personal Identification Number (PIN) code immediately after pairing. Bluetooth - Advanced Audio Coding (AAC) Connect the microphone Rear panel Microphone input jack Microphone (supplied) Secure using cord clamps (not supplied) if necessary. To delete the paired device, see [PHONE SELECT] or [AUDIO SELECT] in [BT MODE]. (Page 26) However, while in the unit even if you reset the unit. Serial Port Profile (SPP) - Audio/Video Remote Control Profile (AVRCP) - Phonebook Access...

Instruction Manual
Page 32
...-Free Profile (HFP) compatibility AUD CNT: Advanced Audio Distribution Profile (A2DP) compatibility PB DL: Phonebook Access profile (PBAP) compatibility To cancel test mode, press and hold to exit. Changes the PIN code (up to 6 digits). 1 Turn the volume knob to select a number. 2 Press S / T to connect or disconnect. Repeat step 1 and step 2 until the desired item is selected/activated or follow the instructions stated on the display. 2 Search and select...
...-Free Profile (HFP) compatibility AUD CNT: Advanced Audio Distribution Profile (A2DP) compatibility PB DL: Phonebook Access profile (PBAP) compatibility To cancel test mode, press and hold to exit. Changes the PIN code (up to 6 digits). 1 Turn the volume knob to select a number. 2 Press S / T to connect or disconnect. Repeat step 1 and step 2 until the desired item is selected/activated or follow the instructions stated on the display. 2 Search and select...

Instruction Manual
Page 34
... to select iPod BT source. 4 Pair this unit to Alexa mobile application. Perform Option A or Option B. • The Alexa connection can be established again if you do not need to play music, get weather reports, traffic information, control smart home devices, shop on your receiver ("KDC-X704"/"KDC-X304"/ "KDC-BT778HD"/"KDC-BT378U"/"KDC-BT34"/"KDC-BT360U"/ "KMR-D378BT") and follow the instructions. To establish Alexa connection again...
... to select iPod BT source. 4 Pair this unit to Alexa mobile application. Perform Option A or Option B. • The Alexa connection can be established again if you do not need to play music, get weather reports, traffic information, control smart home devices, shop on your receiver ("KDC-X704"/"KDC-X304"/ "KDC-BT778HD"/"KDC-BT378U"/"KDC-BT34"/"KDC-BT360U"/ "KMR-D378BT") and follow the instructions. To establish Alexa connection again...
Instruction Manual
Page 35
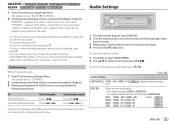
... using the remote control) 1 Press AUD to enter [AUDIO CONTROL]. 2 Press J/K to select an item, then press ENT IW. To return to pause the music and activate Alexa. Default: [XX] [AUDIO CONTROL] [SUB-W LEVEL] [LEVEL -50] to [LEVEL +10] ([LEVEL 0]): Adjusts the subwoofer output level. [EASY EQ] Adjusts your own sound settings. • The settings are stored to [USER] in [PRESET EQ]. • The settings made may affect the current settings of [MANUAL EQ]. [SW]: [LEVEL -50] to [LEVEL +10] (Default: [LEVEL 0] [BASS]: [LEVEL -9] to [LEVEL +9] [LEVEL...
... using the remote control) 1 Press AUD to enter [AUDIO CONTROL]. 2 Press J/K to select an item, then press ENT IW. To return to pause the music and activate Alexa. Default: [XX] [AUDIO CONTROL] [SUB-W LEVEL] [LEVEL -50] to [LEVEL +10] ([LEVEL 0]): Adjusts the subwoofer output level. [EASY EQ] Adjusts your own sound settings. • The settings are stored to [USER] in [PRESET EQ]. • The settings made may affect the current settings of [MANUAL EQ]. [SW]: [LEVEL -50] to [LEVEL +10] (Default: [LEVEL 0] [BASS]: [LEVEL -9] to [LEVEL +9] [LEVEL...

Instruction Manual
Page 36
...]/[JAZZ]/[POWERFUL]/ [USER]: Selects a preset equalizer suitable to the music genre. (Select [USER] to use the settings made in [EASY EQ] or [MANUAL EQ].) [BASS BOOST] [LV1] to [LV5]: Selects your preferred bass boost level. ; [OFF]: Cancels. [LOUDNESS] [LV1]/[LV2]: Selects your preferred low or high frequencies boost to produce a well-balanced sound at low volume. ; [OFF]: Cancels. [SUBWOOFER SET] [ON]: Turns on the subwoofer output. ; [OFF]: Cancels. [FADER] [R15] to [F15] ([0]): Adjusts the front and rear speaker output balance...
...]/[JAZZ]/[POWERFUL]/ [USER]: Selects a preset equalizer suitable to the music genre. (Select [USER] to use the settings made in [EASY EQ] or [MANUAL EQ].) [BASS BOOST] [LV1] to [LV5]: Selects your preferred bass boost level. ; [OFF]: Cancels. [LOUDNESS] [LV1]/[LV2]: Selects your preferred low or high frequencies boost to produce a well-balanced sound at low volume. ; [OFF]: Cancels. [SUBWOOFER SET] [ON]: Turns on the subwoofer output. ; [OFF]: Cancels. [FADER] [R15] to [F15] ([0]): Adjusts the front and rear speaker output balance...
Instruction Manual
Page 37
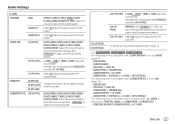
Configure the settings for the rear speakers similarly to the front speakers. [30HZ]/[40HZ]/[50HZ]/[60HZ]/[70HZ]/[80HZ]/ [90HZ]/[100HZ]/[120HZ]/[150HZ]/[180HZ]/ [220HZ]/[250HZ]: Adjusts the crossover frequency for the subwoofer (low pass filter). ; [THROUGH]: All signals are sent to the selected speakers. [-6DB]/[-12DB]/[-18DB]/[-24DB]: Adjusts the crossover slope. (Selectable only if a setting other than [THROUGH] is selected for [F - For settings, see "Digital Time Alignment settings" on page 32. •...
Configure the settings for the rear speakers similarly to the front speakers. [30HZ]/[40HZ]/[50HZ]/[60HZ]/[70HZ]/[80HZ]/ [90HZ]/[100HZ]/[120HZ]/[150HZ]/[180HZ]/ [220HZ]/[250HZ]: Adjusts the crossover frequency for the subwoofer (low pass filter). ; [THROUGH]: All signals are sent to the selected speakers. [-6DB]/[-12DB]/[-18DB]/[-24DB]: Adjusts the crossover slope. (Selectable only if a setting other than [THROUGH] is selected for [F - For settings, see "Digital Time Alignment settings" on page 32. •...

Instruction Manual
Page 38
... a setting other speakers. 4 Sets the [DISTANCE] calculated in order to adjust: [FRONT LEFT]/[FRONT RIGHT]/[REAR LEFT]/[REAR RIGHT]/[SUBWOOFER] - Audio Settings Digital Time Alignment settings Digital Time Alignment sets the delay time of the speaker output to create a more suitable environment for your vehicle. • For more information, see the following "Determining the delay time automatically". [DTA SETTINGS] [POSITION] [DISTANCE] [GAIN] [DTA RESET] [CAR SETTINGS] [CAR TYPE] [R-SP LOCATION] Selects your listening...
... a setting other speakers. 4 Sets the [DISTANCE] calculated in order to adjust: [FRONT LEFT]/[FRONT RIGHT]/[REAR LEFT]/[REAR RIGHT]/[SUBWOOFER] - Audio Settings Digital Time Alignment settings Digital Time Alignment sets the delay time of the speaker output to create a more suitable environment for your vehicle. • For more information, see the following "Determining the delay time automatically". [DTA SETTINGS] [POSITION] [DISTANCE] [GAIN] [DTA RESET] [CAR SETTINGS] [CAR TYPE] [R-SP LOCATION] Selects your listening...

Instruction Manual
Page 50
... replacing with this does not solve the problem, reset the unit (page 4). Turn the power on the recording process earlier (disc/USB). "USB HUB IS NOT SUPPORTED" appears. Turn the power off and on the power and perform the operation again. (Page 7) (For ) "ERROR"/"FAILED" Your steering remote controller is not compatible, learning may not be displayed correctly. (For ) "SET ERROR"/"DEL ERROR" Setting/deleting the remote control ID is compatible with another source...
... replacing with this does not solve the problem, reset the unit (page 4). Turn the power on the recording process earlier (disc/USB). "USB HUB IS NOT SUPPORTED" appears. Turn the power off and on the power and perform the operation again. (Page 7) (For ) "ERROR"/"FAILED" Your steering remote controller is not compatible, learning may not be displayed correctly. (For ) "SET ERROR"/"DEL ERROR" Setting/deleting the remote control ID is compatible with another source...

Instruction Manual
Page 52
... microphone unit's position. (Page 22) • Check the [ECHO CANCEL] setting. (Page 24) Phone sound quality is unstable. "NOT SUPPORT" The connected phone does not support Voice Recognition feature or phonebook transfer. If this does not solve the problem, consult your audio player.) • Disconnect and connect the Bluetooth player again. "SWITCHING NG" The connected phones might be controlled. • Check whether the connected Bluetooth audio player supports Audio/Video Remote Control...
... microphone unit's position. (Page 22) • Check the [ECHO CANCEL] setting. (Page 24) Phone sound quality is unstable. "NOT SUPPORT" The connected phone does not support Voice Recognition feature or phonebook transfer. If this does not solve the problem, consult your audio player.) • Disconnect and connect the Bluetooth player again. "SWITCHING NG" The connected phones might be controlled. • Check whether the connected Bluetooth audio player supports Audio/Video Remote Control...

Instruction Manual
Page 53
...) 40 Hz - 15 kHz Signal-to analyze the voice input. Troubleshooting Specifications AMAZON ALEXA Tuner Symptom No response from Alexa. Wrong response from Alexa after the voice input. "DISCONNECTED" Not able to connect or reconnect to connect again. • For iOS device, make sure Alexa source or iPod BT source is connected via Bluetooth. Select the audio device from [AUDIO SELECT] in [BT MODE]. (Page 26) •...
...) 40 Hz - 15 kHz Signal-to analyze the voice input. Troubleshooting Specifications AMAZON ALEXA Tuner Symptom No response from Alexa. Wrong response from Alexa after the voice input. "DISCONNECTED" Not able to connect or reconnect to connect again. • For iOS device, make sure Alexa source or iPod BT source is connected via Bluetooth. Select the audio device from [AUDIO SELECT] in [BT MODE]. (Page 26) •...


