Instruction Manual
Page 1
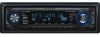
Model KDC-MP3035/MP335 Serial number _ US Residence Only Register Online © 864-3534-00/00 (KW) KDC-MP3035 KDC-MP335 CD-RECEIVER INSTRUCTION MANUAL AMPLI-TUNER LECTEUR DE CD MODE D'EMPLOI REPRODUCTOR DE DISCOS COMPACTOS RECEPTOR DE FM/AM MANUAL DE INSTRUCCIONES Kenwood Corporation ~ H?)Radio@ READY READY ((i AAC Take the time to the model and serial numbers whenever you obtain the best performance from your records Record the serial...
Model KDC-MP3035/MP335 Serial number _ US Residence Only Register Online © 864-3534-00/00 (KW) KDC-MP3035 KDC-MP335 CD-RECEIVER INSTRUCTION MANUAL AMPLI-TUNER LECTEUR DE CD MODE D'EMPLOI REPRODUCTOR DE DISCOS COMPACTOS RECEPTOR DE FM/AM MANUAL DE INSTRUCCIONES Kenwood Corporation ~ H?)Radio@ READY READY ((i AAC Take the time to the model and serial numbers whenever you obtain the best performance from your records Record the serial...
Instruction Manual
Page 2
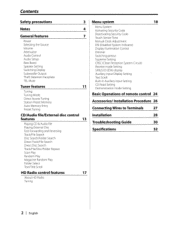
... 7 Power Selecting the Source Volume Attenuator Audio Control Audio Setup Bass Boost Speaker Setting Switching Display Subwoofer Output Theft Deterrent Faceplate TEL Mute Tuner features 11 Tuning Tuning Mode Direct Access Tuning Station Preset Memory Auto Memory Entry Preset Tuning CD/Audio file/External disc control features 13 Playing CD &Audio file Playing External Disc Fast Forwarding and Reversing Track/File Search Disc Search/Folder Search Direct Track/File Search Direct Disc Search Track/File/Disc/Folder Repeat Scan Play Random Play Magazine Random Play Folder Select Text...
... 7 Power Selecting the Source Volume Attenuator Audio Control Audio Setup Bass Boost Speaker Setting Switching Display Subwoofer Output Theft Deterrent Faceplate TEL Mute Tuner features 11 Tuning Tuning Mode Direct Access Tuning Station Preset Memory Auto Memory Entry Preset Tuning CD/Audio file/External disc control features 13 Playing CD &Audio file Playing External Disc Fast Forwarding and Reversing Track/File Search Disc Search/Folder Search Direct Track/File Search Direct Disc Search Track/File/Disc/Folder Repeat Scan Play Random Play Magazine Random Play Folder Select Text...
Instruction Manual
Page 3
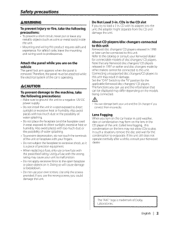
... damage both your Kenwood dealer for connectable models of the car is a piece of the unit or faceplate with too much dust or the possibility of Dolby Laboratories. Set the 1I0-NII Switch to this unit. Also avoid places with your Kenwood dealer. In such a situation, remove the disc and wait for the applicable Kenwood disc changers/ CD players. The IIAACII logo is removed. Lens Fogging When...
... damage both your Kenwood dealer for connectable models of the car is a piece of the unit or faceplate with too much dust or the possibility of Dolby Laboratories. Set the 1I0-NII Switch to this unit. Also avoid places with your Kenwood dealer. In such a situation, remove the disc and wait for the applicable Kenwood disc changers/ CD players. The IIAACII logo is removed. Lens Fogging When...
Instruction Manual
Page 4
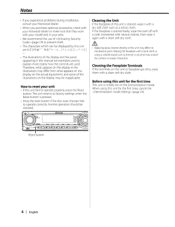
...; The illustrations of this unit is stained badly, wipe the stain off with a cloth moistened with neutral cleaner, then wipe it with your model and in this unit for the first time This unit is pressed. • Press the reset button if the disc auto changer fails to explain more clearly how the controls are examples used to operate correctly. When using this manual are used.
...; The illustrations of this unit is stained badly, wipe the stain off with a cloth moistened with neutral cleaner, then wipe it with your model and in this unit for the first time This unit is pressed. • Press the reset button if the disc auto changer fails to explain more clearly how the controls are examples used to operate correctly. When using this manual are used.
Instruction Manual
Page 6
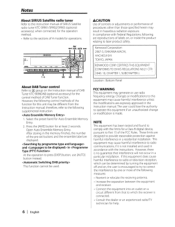
... are displayed. Select the preset band for at least 2 seconds. and in a residential installation. In compliance with Federal Regulations, following control methods of the pre-set buttons and the ensemble label are expressly approved in hazardous radiation exposure. M ~ ~~.!:'':S JS I -~- =1~ -.o M . Open Auto Ensemble Memory Entry. These limits are reproductions of the FCC Rules. Notes About SIRIUS Satellite radio tuner Refer to the instruction manual of SIRIUS Satellite radio tuner KTC...
... are displayed. Select the preset band for at least 2 seconds. and in a residential installation. In compliance with Federal Regulations, following control methods of the pre-set buttons and the ensemble label are expressly approved in hazardous radiation exposure. M ~ ~~.!:'':S JS I -~- =1~ -.o M . Open Auto Ensemble Memory Entry. These limits are reproductions of the FCC Rules. Notes About SIRIUS Satellite radio tuner Refer to the instruction manual of SIRIUS Satellite radio tuner KTC...
Instruction Manual
Page 8
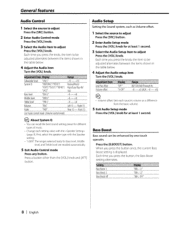
...;O (AUX : -8 - +8) ~ ~ • Volume offset: Sets each setting value with the Speaker setting. • "USER": The ranges selected lastly for at least 1 second. Bass Boost Bass sound can recall the best sound setting preset for different types of music. • Change each source's volume as Volume offset. 1 Select the source to adjust Press the [SRC] button. 2 Enter Audio Setup mode Press the [VOL] knob for Bass level, Middle level, and Treble level are recalled automatically. 5 Exit Audio Control mode Press any button. Right 15 Rear 15 - Each time...
...;O (AUX : -8 - +8) ~ ~ • Volume offset: Sets each setting value with the Speaker setting. • "USER": The ranges selected lastly for at least 1 second. Bass Boost Bass sound can recall the best sound setting preset for different types of music. • Change each source's volume as Volume offset. 1 Select the source to adjust Press the [SRC] button. 2 Enter Audio Setup mode Press the [VOL] knob for Bass level, Middle level, and Treble level are recalled automatically. 5 Exit Audio Control mode Press any button. Right 15 Rear 15 - Each time...
Instruction Manual
Page 9
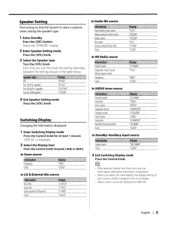
.... Switching Display Changing the information displayed. 1 Enter Switching Display mode Press the Control knob for at least 1 second. Speaker Setting Fine-tuning so that the System Q value is displayed. 2 Select the Display item Push the Control knob towards [~] or [~]. Each time you select the clock display, the display setting of each source will be changed to the clock display. • Album name cannot be displayed in . Select the "STANDBY" display. 2 Enter Speaker Setting mode Press the [VOL] knob. 3 Select the Speaker type Turn the...
.... Switching Display Changing the information displayed. 1 Enter Switching Display mode Press the Control knob for at least 1 second. Speaker Setting Fine-tuning so that the System Q value is displayed. 2 Select the Display item Push the Control knob towards [~] or [~]. Each time you select the clock display, the display setting of each source will be changed to the clock display. • Album name cannot be displayed in . Select the "STANDBY" display. 2 Enter Speaker Setting mode Press the [VOL] knob. 3 Select the Speaker type Turn the...
Instruction Manual
Page 10
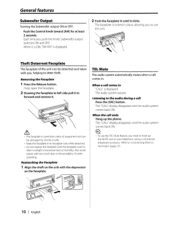
... Subwoofer Output Turning the Subwoofer output ON or OFF. Removing the Faceplate 1 Press the Release button. The "CALLI display disappears and the audio system comes back ON. Also avoid pla~es with too much dust or the possibility of equipment and can be damaged by shocks or jolts. • Keep the faceplate in until it clicks. Each time you to use the TEL Mute...
... Subwoofer Output Turning the Subwoofer output ON or OFF. Removing the Faceplate 1 Press the Release button. The "CALLI display disappears and the audio system comes back ON. Also avoid pla~es with too much dust or the possibility of equipment and can be damaged by shocks or jolts. • Keep the faceplate in until it clicks. Each time you to use the TEL Mute...
Instruction Manual
Page 11
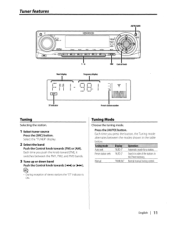
... indicator Preset station number Tuning Selecting the station. 1 Select tuner source Press the [SRC] button. Each time you push the knob toward [FM], it switches between the modes shown in the Preset memory. Each time you press the button, the Tuning mode alternates between the FM 1, FM2, and FM3 bands. 3 Tune up or down band Push the Control knob towards [FM] or [AM]. Auto seek Preset station seek Manual "AUTO 111 "AUTO 2" "MANUAL" Automatic search for astation. Select the "TUNER" display. 2 Select...
... indicator Preset station number Tuning Selecting the station. 1 Select tuner source Press the [SRC] button. Each time you push the knob toward [FM], it switches between the modes shown in the Preset memory. Each time you press the button, the Tuning mode alternates between the FM 1, FM2, and FM3 bands. 3 Tune up or down band Push the Control knob towards [FM] or [AM]. Auto seek Preset station seek Manual "AUTO 111 "AUTO 2" "MANUAL" Automatic search for astation. Select the "TUNER" display. 2 Select...
Instruction Manual
Page 14
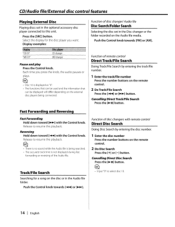
... be used and the information that can be displayed will differ depending on the disc or in the Audio file folder. Each time you want. Cancelling Direct Track/File Search Press the [~II] button. Fast Forwarding and Reversing Fast Forwarding Hold down toward [~~] with the Control knob. Display examples: Function of disc changer/ Audio file Disc Search/Folder Search Selecting the disc set in the optional accessory disc player connected...
... be used and the information that can be displayed will differ depending on the disc or in the Audio file folder. Each time you want. Cancelling Direct Track/File Search Press the [~II] button. Fast Forwarding and Reversing Fast Forwarding Hold down toward [~~] with the Control knob. Display examples: Function of disc changer/ Audio file Disc Search/Folder Search Selecting the disc set in the optional accessory disc player connected...
Instruction Manual
Page 19
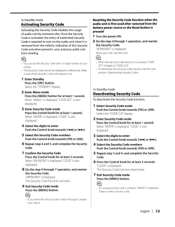
... Code function is activated, "CODE SETll changes to turn on the audio unit when it up. 1 Enter Standby Press the [SRC] button. Resetting the Security Code function when the audio unit is removed from the vehicle. Select the "STANDBY" display. 2 Enter Menu mode Press the [MENU] button for at least 1 second. When "ENTER" is displayed, "CODE" is also displayed. 3 Enter Security Code mode Press the Control knob for at least 3 seconds. Select the "CODE CLR" display. 2 Enter Security Code mode Press the Control...
... Code function is activated, "CODE SETll changes to turn on the audio unit when it up. 1 Enter Standby Press the [SRC] button. Resetting the Security Code function when the audio unit is removed from the vehicle. Select the "STANDBY" display. 2 Enter Menu mode Press the [MENU] button for at least 1 second. When "ENTER" is displayed, "CODE" is also displayed. 3 Enter Security Code mode Press the Control knob for at least 3 seconds. Select the "CODE CLR" display. 2 Enter Security Code mode Press the Control...
Instruction Manual
Page 20
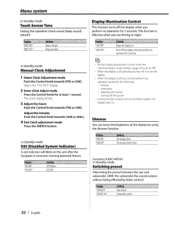
... subwoofer. (With the subwoofer the sound outputs without being effected by using the dimmer function. Function of the display by fader control.) "SWPRE R" "SWPRE SW" Rear preout. Beep canceled. Select the "elK ADJ" display. 2 Enter Clock Adjust mode Press the Control knob for the following: • Volume • Attenuator • Selecting the source • Turning off the display when you are driving at least 1 second. LED OFF. "BEEP ON" "BEEP OFF' Beep is removed...
... subwoofer. (With the subwoofer the sound outputs without being effected by using the dimmer function. Function of the display by fader control.) "SWPRE R" "SWPRE SW" Rear preout. Beep canceled. Select the "elK ADJ" display. 2 Enter Clock Adjust mode Press the Control knob for the following: • Volume • Attenuator • Selecting the source • Turning off the display when you are driving at least 1 second. LED OFF. "BEEP ON" "BEEP OFF' Beep is removed...
Instruction Manual
Page 21
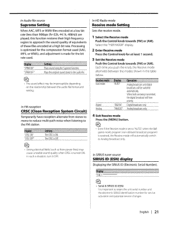
... "AUTO", when the Ball game mode program (non-delayed broadcast program) is ON. Plays the original sound stored in the table below. In HD Radio mode Receive mode Setting Sets the receive mode. 1 Select the Receive mode Push the Control knob towards [FM] or [AM]. Processing is made for service activation and potential service changes. Analog broadcasts only. 4 Exit Receive mode Press the [MENU] button. ~ ~ • Even if the Receive mode is set to the FM station. "ESN ~ ~ • Serial & SIRIUS...
... "AUTO", when the Ball game mode program (non-delayed broadcast program) is ON. Plays the original sound stored in the table below. In HD Radio mode Receive mode Setting Sets the receive mode. 1 Select the Receive mode Push the Control knob towards [FM] or [AM]. Processing is made for service activation and potential service changes. Analog broadcasts only. 4 Exit Receive mode Press the [MENU] button. ~ ~ • Even if the Receive mode is set to the FM station. "ESN ~ ~ • Serial & SIRIUS...
Instruction Manual
Page 24
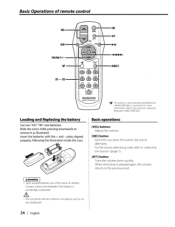
... children. Loading and Replacing the battery Basic operations [VOL] buttons Adjusts the volume. [SRC] button Each time you press the button, the source alternates. Basic Operations of remote control VOL--~.....• ~~--SRC __ _~~~ ~:II~~\ ~II ~~--ATT AUD AUO",,::,L, \[If· FM/AM/+I--~I~(..~I_;~:T ~I 11 ((~ - - - 0 DIRECT I ABC DEF I :.: KENWOOD (~ :This button is used when Kenwood Bluetooth HANDS FREE BOX is connected. Contact a doctor immediately if the battery is pressed again, the volume returns to the...
... children. Loading and Replacing the battery Basic operations [VOL] buttons Adjusts the volume. [SRC] button Each time you press the button, the source alternates. Basic Operations of remote control VOL--~.....• ~~--SRC __ _~~~ ~:II~~\ ~II ~~--ATT AUD AUO",,::,L, \[If· FM/AM/+I--~I~(..~I_;~:T ~I 11 ((~ - - - 0 DIRECT I ABC DEF I :.: KENWOOD (~ :This button is used when Kenwood Bluetooth HANDS FREE BOX is connected. Contact a doctor immediately if the battery is pressed again, the volume returns to the...
Instruction Manual
Page 25
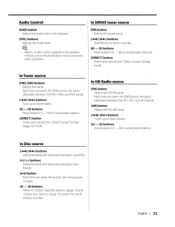
...AUD] button Selects the Audio item to be adjusted. [VOL] buttons Adjusts the Audio item. @ • Refer to recall preset channels. [DIRECT] button Enters and cancels the mode. In Disc source [I~]I [~] buttons Tune up or down band. [0] - [9] buttons Press buttons [1] - [6] to recall preset stations. In SIRIUS tuner source [FM] button Selects the preset band. [I~]I 25 English I [~] buttons Searches up or down channels. [0] - [9] buttons Press buttons [1] - [6] to (page 8) for the operation method, such as the procedures for Audio control and others operations. Each time you...
...AUD] button Selects the Audio item to be adjusted. [VOL] buttons Adjusts the Audio item. @ • Refer to recall preset channels. [DIRECT] button Enters and cancels the mode. In Disc source [I~]I [~] buttons Tune up or down band. [0] - [9] buttons Press buttons [1] - [6] to recall preset stations. In SIRIUS tuner source [FM] button Selects the preset band. [I~]I 25 English I [~] buttons Searches up or down channels. [0] - [9] buttons Press buttons [1] - [6] to (page 8) for the operation method, such as the procedures for Audio control and others operations. Each time you...
Instruction Manual
Page 26
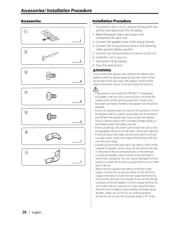
... a short circuit, remove the key from the ignition and disconnect the 8 battery. 2. Connect the speaker wires of the left speaker to a front output terminal, do not connect the 8 connector to a rear output terminal. • After the unit is installed, check whether the brake lamps, blinkers, wipers, etc. Connect the wiring harness connector to a power source that the mounting angle is displayed), the speaker wire may cause a short circuit, that the faceplate will not hit...
... a short circuit, remove the key from the ignition and disconnect the 8 battery. 2. Connect the speaker wires of the left speaker to a front output terminal, do not connect the 8 connector to a rear output terminal. • After the unit is installed, check whether the brake lamps, blinkers, wipers, etc. Connect the wiring harness connector to a power source that the mounting angle is displayed), the speaker wire may cause a short circuit, that the faceplate will not hit...
Instruction Manual
Page 27
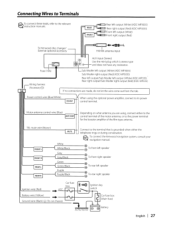
...) Car fuse box --- @=® -- EI FM/AM antenna input r=[.:j.g:.:-: 1--" AUX input (Stereo) ~_i:_lE~J:@: Use the mini-plug which is grounded when either to the control terminal of the film-type antenna. Connecting Wires to Terminals ~ To connect these leads, refer to the power terminal for t he booster amplifier of the motor antenna, or to the relevant ~ instruction manuals. To Kenwood disc External optional changer/ accessory ~ _ _- __..JF~;;;u Rear left output (White) (KDC-MP3035) Rear right output (Red) (KDC-MP3035...
...) Car fuse box --- @=® -- EI FM/AM antenna input r=[.:j.g:.:-: 1--" AUX input (Stereo) ~_i:_lE~J:@: Use the mini-plug which is grounded when either to the control terminal of the film-type antenna. Connecting Wires to Terminals ~ To connect these leads, refer to the power terminal for t he booster amplifier of the motor antenna, or to the relevant ~ instruction manuals. To Kenwood disc External optional changer/ accessory ~ _ _- __..JF~;;;u Rear left output (White) (KDC-MP3035) Rear right output (Red) (KDC-MP3035...
Instruction Manual
Page 30
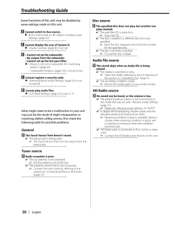
... Connect the wire correctly, referring to the CD cleaning of System Q. ~ (page 8) is not set. • Cannot set up the subwoofer. • No output from the preout jack. t/ The recording condition is not turned off. Cannot switch to Aux source. ~ AUX is not set to -KCA-S220A or other units. o Cannot register a security code. ~ (page 23) is bad. IrE Eject the disc magazine and check the number...
... Connect the wire correctly, referring to the CD cleaning of System Q. ~ (page 8) is not set. • Cannot set up the subwoofer. • No output from the preout jack. t/ The recording condition is not turned off. Cannot switch to Aux source. ~ AUX is not set to -KCA-S220A or other units. o Cannot register a security code. ~ (page 23) is bad. IrE Eject the disc magazine and check the number...

Instruction Manual
Page 31
.... The CD is activated. ¢> Wire or insulate the speaker cable properly and press the reset button. E-05: The disc is wrong with a format that the unit can 't support. ¢> ---- BLANK: Nothing has been recorded on the unit. E-99: Something is unreadable. And then press the reset button on the MD. A copy-protected file is ON. The Demonstration mode has been selected. ¢> The (page...
.... The CD is activated. ¢> Wire or insulate the speaker cable properly and press the reset button. E-05: The disc is wrong with a format that the unit can 't support. ¢> ---- BLANK: Nothing has been recorded on the unit. E-99: Something is unreadable. And then press the reset button on the MD. A copy-protected file is ON. The Demonstration mode has been selected. ¢> The (page...
Instruction Manual
Page 39
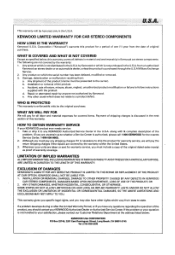
... authorized Kenwood car stereo dealer or an automobile dealer, unless the product is necessary to ship the product for warranty service, you should contact your KENWOOD product ever needs service: 1. Installation or removal of warranty coverage. OR 2. If a problem develops during or after the Limited Warranty Period, or if you have other cause which does not relate to a product defect. Repair...
... authorized Kenwood car stereo dealer or an automobile dealer, unless the product is necessary to ship the product for warranty service, you should contact your KENWOOD product ever needs service: 1. Installation or removal of warranty coverage. OR 2. If a problem develops during or after the Limited Warranty Period, or if you have other cause which does not relate to a product defect. Repair...


