
Instruction Manual
Page 2
...Code Manual Clock Adjustment Date Adjustment AMP Control Picture downloading Demonstration mode setting Theft Deterrent Faceplate Audio Adjustments 23 Audio Control Adjusting the detail of Audio Control Audio Setup Speaker Setting Audio Preset Memory Audio Preset Recall Satellite Radio tuner control (Optional) 26 Basic Operation Category and Channel Search Direct Access Tuning Preset Memory Preset Tuning Basic Operations of remote control 28 Appendix 30 Accessories/ Installation Procedure 33 Connecting Wires to Terminals 34 Installation/Removing the Unit 35 Troubleshooting Guide...
...Code Manual Clock Adjustment Date Adjustment AMP Control Picture downloading Demonstration mode setting Theft Deterrent Faceplate Audio Adjustments 23 Audio Control Adjusting the detail of Audio Control Audio Setup Speaker Setting Audio Preset Memory Audio Preset Recall Satellite Radio tuner control (Optional) 26 Basic Operation Category and Channel Search Direct Access Tuning Preset Memory Preset Tuning Basic Operations of remote control 28 Appendix 30 Accessories/ Installation Procedure 33 Connecting Wires to Terminals 34 Installation/Removing the Unit 35 Troubleshooting Guide...

Instruction Manual
Page 3
... unit • If this unit or the connected unit (disc auto changer, etc.) fails to operate properly, press the Reset button. How to reset your area. • Characters that conform to ISO 8859-1 can be used to evaporate. Cleaning the Unit If the faceplate of the unit. If the unit still does not operate normally after a while, consult your Kenwood dealer. • If you experience problems during installation, consult your Kenwood...
... unit • If this unit or the connected unit (disc auto changer, etc.) fails to operate properly, press the Reset button. How to reset your area. • Characters that conform to ISO 8859-1 can be used to evaporate. Cleaning the Unit If the faceplate of the unit. If the unit still does not operate normally after a while, consult your Kenwood dealer. • If you experience problems during installation, consult your Kenwood...

Instruction Manual
Page 4
... audio system comes back on the power. Basic Operation Release [AUD] Control knob AUX Auxiliary input (Rear side) [ATT] [SRC] [1] [2] [3] [4] [5] [6] [FNC] [AUTO] USB Terminal General functions Power/Source Select button [SRC] Turns on . Subwoofer output Control knob Switches between ON ("SUB WOOFER ON") and OFF ("SUB WOOFER OFF") each device appears. • When connection of the iPod is recognized, the source display changes from "USB" to hook up . Allows you need to "iPod". • USB (iPod) source is recognized as CD source on when [SRC] is connected, the source...
... audio system comes back on the power. Basic Operation Release [AUD] Control knob AUX Auxiliary input (Rear side) [ATT] [SRC] [1] [2] [3] [4] [5] [6] [FNC] [AUTO] USB Terminal General functions Power/Source Select button [SRC] Turns on . Subwoofer output Control knob Switches between ON ("SUB WOOFER ON") and OFF ("SUB WOOFER OFF") each device appears. • When connection of the iPod is recognized, the source display changes from "USB" to hook up . Allows you need to "iPod". • USB (iPod) source is recognized as CD source on when [SRC] is connected, the source...
Instruction Manual
Page 6
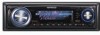
... Download movie and Download Wall Paper, refer to display AUX during source selection. Sets the text display color. Ç ÅıÇÎ 9 ÅıÇ 10 6 | KDC-X792/KDC-X692/KDC-MP738U/KDC-MP638U Setting the operation check sound (beep sound) ON/OFF. 1 sec. Synchronizing the RDS station time data and this unit's clock. Controls the connected LX amplifier. - 20 Switches to enable demonstration. Downloads the picture data to be set to "ON", allows you to select music in...
... Download movie and Download Wall Paper, refer to display AUX during source selection. Sets the text display color. Ç ÅıÇÎ 9 ÅıÇ 10 6 | KDC-X792/KDC-X692/KDC-MP738U/KDC-MP638U Setting the operation check sound (beep sound) ON/OFF. 1 sec. Synchronizing the RDS station time data and this unit's clock. Controls the connected LX amplifier. - 20 Switches to enable demonstration. Downloads the picture data to be set to "ON", allows you to select music in...

Instruction Manual
Page 7
... "ON", plays the music in standby state. : Can be set while Audio file source of CD/USB/iPod. : Can be set while Audio file source of CD/USB (excluding iPod). : Can be set while CD/ Disc changer source. : Can be set while Disc changer source. : Can be set during FM reception. : Can be set while accessing AUX source. : Can be set while HD Radio source. : Can be set during Satellite radio source. : Can be set only during playback of the iPod source. (USB source used when the iPod is turned ON. RDM...
... "ON", plays the music in standby state. : Can be set while Audio file source of CD/USB/iPod. : Can be set while Audio file source of CD/USB (excluding iPod). : Can be set while CD/ Disc changer source. : Can be set while Disc changer source. : Can be set during FM reception. : Can be set while accessing AUX source. : Can be set while HD Radio source. : Can be set during Satellite radio source. : Can be set only during playback of the iPod source. (USB source used when the iPod is turned ON. RDM...

Instruction Manual
Page 10
... how to select Function Control items, refer to (page 6). 3 Enter Name set mode Press the Control knob for 10 seconds the name at least 1 second. 4 Enter the name Operation type Move the cursor to 2 Select Name set mode item during Menu mode Select the "Name Set" display. Refer to the CD changer/ player manual. • Change the title of station/CD by the same operation used to the selected text display part. 3 Select the Font Color Turn the Control knob or...
... how to select Function Control items, refer to (page 6). 3 Enter Name set mode Press the Control knob for 10 seconds the name at least 1 second. 4 Enter the name Operation type Move the cursor to 2 Select Name set mode item during Menu mode Select the "Name Set" display. Refer to the CD changer/ player manual. • Change the title of station/CD by the same operation used to the selected text display part. 3 Select the Font Color Turn the Control knob or...
Instruction Manual
Page 12
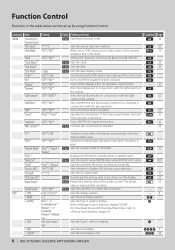
..."/ "Sporty"/ "Compact" 6 Exit G-Analyzer vehicle class setup mode Press the Control knob. 12 | KDC-X792/KDC-X692/KDC-MP738U/KDC-MP638U Function of frequent accelerations, set Turn the Control knob or push it towards left or right. 4 Exit G-Analyzer item mode Press the Control knob. Setting the level according to "Level3". 1 Enter Display Control mode (In Display Type F) Select "DISP". In the case of KDC-X792 G-Analyzer Operation G-Analyzer Control You can adjust following G-Analyzer Control items...
..."/ "Sporty"/ "Compact" 6 Exit G-Analyzer vehicle class setup mode Press the Control knob. 12 | KDC-X792/KDC-X692/KDC-MP738U/KDC-MP638U Function of frequent accelerations, set Turn the Control knob or push it towards left or right. 4 Exit G-Analyzer item mode Press the Control knob. Setting the level according to "Level3". 1 Enter Display Control mode (In Display Type F) Select "DISP". In the case of KDC-X792 G-Analyzer Operation G-Analyzer Control You can adjust following G-Analyzer Control items...

Instruction Manual
Page 20
.../KDC-MP738U/KDC-MP638U The date display blinks. 3 Adjusting Date Operation type Operation Selecting the item (month, day, Push the Control knob towards right or left. Turn the Control knob or push it towards up or down . 4 Exit Clock adjustment mode Press the [FNC] button. ⁄ • You can do this adjustment when "MENU" > "SYNC" in (page 6) is set to "OFF". (KDC-X792 only) Function of KDC-X792/KDC-X692 When LX AMP unit connecting AMP Control...
.../KDC-MP738U/KDC-MP638U The date display blinks. 3 Adjusting Date Operation type Operation Selecting the item (month, day, Push the Control knob towards right or left. Turn the Control knob or push it towards up or down . 4 Exit Clock adjustment mode Press the [FNC] button. ⁄ • You can do this adjustment when "MENU" > "SYNC" in (page 6) is set to "OFF". (KDC-X792 only) Function of KDC-X792/KDC-X692 When LX AMP unit connecting AMP Control...

Instruction Manual
Page 21
... towards right or left. Utilizing this button for the download of KDC-X792 Picture downloading Downloading movies, wallpapers and G-Graphic. Pressing this software, you cannot download the pictures to this unit. ⁄ • Our URL http://www.kenwood.net-disp.com describes how to make CD-R/CD-RW/USB device. 2 Select the picture downloading item during Menu mode Select the "DEMO Mode" display. display blinks. 6 Select files to select "YES", and then press the...
... towards right or left. Utilizing this button for the download of KDC-X792 Picture downloading Downloading movies, wallpapers and G-Graphic. Pressing this software, you cannot download the pictures to this unit. ⁄ • Our URL http://www.kenwood.net-disp.com describes how to make CD-R/CD-RW/USB device. 2 Select the picture downloading item during Menu mode Select the "DEMO Mode" display. display blinks. 6 Select files to select "YES", and then press the...

Instruction Manual
Page 23
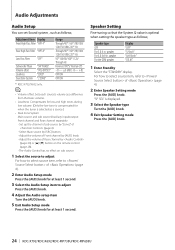
... [ATT] button. Refer to (Page 23). (Function of Audio Control Among the Basic Audio items, you set up value in the memory per source. (Detail Audio item is extended by 20%. • You can adjust the Bass level, Middle level, and Treble level in detail. Right 15 Fader "FADER" Rear 15 - English | 23 Audio Adjustments Audio Control You can adjust these items in detail. Adjustment Item Display Range Rear volume "REAR VOLUME" 0 - 35 Subwoofer level "SUB-W LEVEL" -15 - +15 System Q "NATURAL"/ Natural/User setting...
... [ATT] button. Refer to (Page 23). (Function of Audio Control Among the Basic Audio items, you set up value in the memory per source. (Detail Audio item is extended by 20%. • You can adjust the Bass level, Middle level, and Treble level in detail. Right 15 Fader "FADER" Rear 15 - English | 23 Audio Adjustments Audio Control You can adjust these items in detail. Adjustment Item Display Range Rear volume "REAR VOLUME" 0 - 35 Subwoofer level "SUB-W LEVEL" -15 - +15 System Q "NATURAL"/ Natural/User setting...
Instruction Manual
Page 24
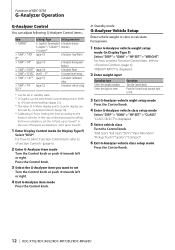
... Audio setup item Turn the [AUD] knob. 5 Exit Audio Setup mode Press the [AUD] knob for when the tuner is selected as follows; Set up the channel of (page 6). - Select Main source by "Zone2" of sub source by [SRC] button. - speaker For the OEM speaker Display "OFF" "5/4inch" "6x9/6inch" "O.E.M." 1 Enter Standby Select the "STANDBY" display. Audio Adjustments Audio Setup You can set Sound system , such as a source.) • Dual Zone System Main source and sub source (Auxiliary input) output Front channel and Rear channel separately. - speaker...
... Audio setup item Turn the [AUD] knob. 5 Exit Audio Setup mode Press the [AUD] knob for when the tuner is selected as follows; Set up the channel of (page 6). - Select Main source by "Zone2" of sub source by [SRC] button. - speaker For the OEM speaker Display "OFF" "5/4inch" "6x9/6inch" "O.E.M." 1 Enter Standby Select the "STANDBY" display. Audio Adjustments Audio Setup You can set Sound system , such as a source.) • Dual Zone System Main source and sub source (Auxiliary input) output Front channel and Rear channel separately. - speaker...
Instruction Manual
Page 25
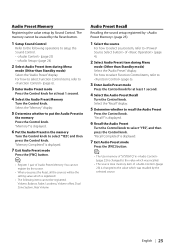
...; The source tone memory item of "SYSTEM Q" in (page 23) is changed to recall the Audio Preset Press the Control knob. is displayed. 7 Exit Audio Preset mode Press the [FNC] button. ⁄ • Register 1 pair of (page 4). 2 Select Audio Preset item during Menu mode (Other than Standby mode) Select the "Audio Preset" display. "Memory Completed" is displayed. 6 Recall the Audio Preset Turn the Control knob to of Audio Preset Memory. Volume, Balance, Fader, Loudness, Volume offset, Dual Zone System, Rear Volume Audio Preset Recall Recalling the sound setup registered...
...; The source tone memory item of "SYSTEM Q" in (page 23) is changed to recall the Audio Preset Press the Control knob. is displayed. 7 Exit Audio Preset mode Press the [FNC] button. ⁄ • Register 1 pair of (page 4). 2 Select Audio Preset item during Menu mode (Other than Standby mode) Select the "Audio Preset" display. "Memory Completed" is displayed. 6 Recall the Audio Preset Turn the Control knob to of Audio Preset Memory. Volume, Balance, Fader, Loudness, Volume offset, Dual Zone System, Rear Volume Audio Preset Recall Recalling the sound setup registered...

Instruction Manual
Page 26
... the remote control. 2 Enter the channel Press the number buttons. 3 Do Channel Search Press the [4] or [¢] button. Consult the service provider if "CALL ... Switching Seek Mode Press the [AUTO] button. Preset Tuning Press the desired [1] - [6] button. Pressing this button again for 2 seconds or longer allows you make no button operation for at least 2 seconds. Preset Memory Press the desired [1] - [6] button for 10 seconds, the Direct Access Tuning mode is acquired. Category and Channel Search Selecting the channel...
... the remote control. 2 Enter the channel Press the number buttons. 3 Do Channel Search Press the [4] or [¢] button. Consult the service provider if "CALL ... Switching Seek Mode Press the [AUTO] button. Preset Tuning Press the desired [1] - [6] button. Pressing this button again for 2 seconds or longer allows you make no button operation for at least 2 seconds. Preset Memory Press the desired [1] - [6] button for 10 seconds, the Direct Access Tuning mode is acquired. Category and Channel Search Selecting the channel...

Instruction Manual
Page 28
.../Disc select [FM]/[AM] Pause/Play [38] In Satellite Radio tuner source Preset band select [FM] Channel select [4]/[¢] Recall preset channels [1] - [6] 28 | KDC-X792/KDC-X692/KDC-MP738U/KDC-MP638U Basic Operations of remote control VOL AUD FM/AM/+/- 2-ZONE 0 - 9 Dual Zone control SRC ATT Dual zone system on and off [2-ZONE] Rear channel volume control [5]/ [∞] DIRECT (page 17, 26) In Tuner/HD Radio source Band select [FM]/[AM] Station select [4]/[¢] Recall preset stations [1] - [6] In CD/USB source General control Volume control [VOL] Source...
.../Disc select [FM]/[AM] Pause/Play [38] In Satellite Radio tuner source Preset band select [FM] Channel select [4]/[¢] Recall preset channels [1] - [6] 28 | KDC-X792/KDC-X692/KDC-MP738U/KDC-MP638U Basic Operations of remote control VOL AUD FM/AM/+/- 2-ZONE 0 - 9 Dual Zone control SRC ATT Dual zone system on and off [2-ZONE] Rear channel volume control [5]/ [∞] DIRECT (page 17, 26) In Tuner/HD Radio source Band select [FM]/[AM] Station select [4]/[¢] Recall preset stations [1] - [6] In CD/USB source General control Volume control [VOL] Source...

Instruction Manual
Page 30
... (.m4a), MP3 (.mp3), WMA (.wma) • Playable disc media CD-R/RW/ROM • Playable disc file format ISO 9660 Level 1/2, Joliet, Romeo, Long file name. • Playable USB device USB mass storage class • Playable USB device file system FAT16, FAT32 Although the audio files are complied with the standards listed above, the play maybe impossible depending on the types or...
... (.m4a), MP3 (.mp3), WMA (.wma) • Playable disc media CD-R/RW/ROM • Playable disc file format ISO 9660 Level 1/2, Joliet, Romeo, Long file name. • Playable USB device USB mass storage class • Playable USB device file system FAT16, FAT32 Although the audio files are complied with the standards listed above, the play maybe impossible depending on the types or...

Instruction Manual
Page 32
... "OFF" selected, the display turns off the built-in amplifier improves the quality of the sound from that is not installed and used in conjunction with the Light switch of the sub source (AUX IN) when the Dual Zone function is turned on. • Supreme Technology to radio communications, if it is encoded at least 5 seconds with the instructions. Turning off . When unable to play special format CD, set to...
... "OFF" selected, the display turns off the built-in amplifier improves the quality of the sound from that is not installed and used in conjunction with the Light switch of the sub source (AUX IN) when the Dual Zone function is turned on. • Supreme Technology to radio communications, if it is encoded at least 5 seconds with the instructions. Turning off . When unable to play special format CD, set to...

Instruction Manual
Page 33
... - battery. 8. Therefore, the speaker wire should be checked. • If your car's ignition does not have been activated. About CD players/disc changers connected to the "N" position. To prevent a short circuit, do not connect the - Always connect those wires to the power source running through the fuse box. ¤ • Mounting and wiring this unit If the CD player/ disc changer has the "O-N" switch, set it to this product requires skills and experience. Press the reset button...
... - battery. 8. Therefore, the speaker wire should be checked. • If your car's ignition does not have been activated. About CD players/disc changers connected to the "N" position. To prevent a short circuit, do not connect the - Always connect those wires to the power source running through the fuse box. ¤ • Mounting and wiring this unit If the CD player/ disc changer has the "O-N" switch, set it to this product requires skills and experience. Press the reset button...

Instruction Manual
Page 34
.... Battery + 34 | KDC-X792/KDC-X692/KDC-MP738U/KDC-MP638U Power control wire (Blue/White) P.CONT Motor antenna control wire (Blue) ANT. Connecting Wires to the relevant instruction manuals. Steering remote control (Light Blue/Yellow) REMO.CONT To use the USB cable. To Kenwood disc changer/ External optional accessory ⁄ To connect these leads, refer to Terminals To USB device USB connector (1m) ⁄ Do not remove the cap when you need to the power terminal for the booster amplifier of the motor antenna, or to an exclusive remote adapter...
.... Battery + 34 | KDC-X792/KDC-X692/KDC-MP738U/KDC-MP638U Power control wire (Blue/White) P.CONT Motor antenna control wire (Blue) ANT. Connecting Wires to the relevant instruction manuals. Steering remote control (Light Blue/Yellow) REMO.CONT To use the USB cable. To Kenwood disc changer/ External optional accessory ⁄ To connect these leads, refer to Terminals To USB device USB connector (1m) ⁄ Do not remove the cap when you need to the power terminal for the booster amplifier of the motor antenna, or to an exclusive remote adapter...

Instruction Manual
Page 37
...; Cannot adjust the volume of the rear speakers. ▲ The Dual zone function is disabled. ☞ (page 24) ! • Cannot register a security code. • Cannot set up Display Illumination Control. ▲ (page 21) is the key illumination effect. ☞ You set this effect in your unit may just be output from that specified. ☞ Eject the disc magazine and check the number for possible problems. General...
...; Cannot adjust the volume of the rear speakers. ▲ The Dual zone function is disabled. ☞ (page 24) ! • Cannot register a security code. • Cannot set up Display Illumination Control. ▲ (page 21) is the key illumination effect. ☞ You set this effect in your unit may just be output from that specified. ☞ Eject the disc magazine and check the number for possible problems. General...

Instruction Manual
Page 38
... source to ON. The CD is connected. If the CD cannot be ejected or the display continues to the iPod has failed. ➪ Check that the connected iPod is activated. ➪ Wire or insulate the speaker cable properly and press the reset button. See (page 30) for information on supported iPods. ➪ Remove the USB device and then reconnect it. ➪ Confirm that is malfunctioning for the USB device/iPod. USB REMOVE: The Remove mode has been selected...
... source to ON. The CD is connected. If the CD cannot be ejected or the display continues to the iPod has failed. ➪ Check that the connected iPod is activated. ➪ Wire or insulate the speaker cable properly and press the reset button. See (page 30) for information on supported iPods. ➪ Remove the USB device and then reconnect it. ➪ Confirm that is malfunctioning for the USB device/iPod. USB REMOVE: The Remove mode has been selected...


