

Instruction Manual
Page 1
Familiarity with installation and operation procedures will help you call upon your KENWOOD dealer for information or service on the warranty card, and in the space provided below. KDC-3025 KDC-325 CD-RECEIVER INSTRUCTION MANUAL AMPLI-TUNER LECTEUR DE CD MODE D'EMPLOI REPRODUCTOR DE DISCOS COMPACTOS RECEPTOR DE FM/AM MANUAL DE INSTRUCCIONES Take the time to the model and serial numbers whenever you obtain the...
Familiarity with installation and operation procedures will help you call upon your KENWOOD dealer for information or service on the warranty card, and in the space provided below. KDC-3025 KDC-325 CD-RECEIVER INSTRUCTION MANUAL AMPLI-TUNER LECTEUR DE CD MODE D'EMPLOI REPRODUCTOR DE DISCOS COMPACTOS RECEPTOR DE FM/AM MANUAL DE INSTRUCCIONES Take the time to the model and serial numbers whenever you obtain the...

Instruction Manual
Page 2
... Track/Disc Repeat Scan Play Random Play Magazine Random Play Text/Title Scroll DNPP (Disc Name Preset Play) Menu system 17 Menu System Security Code Touch Sensor Tone Manual Clock Adjustment DSI (Disabled System Indicator) Switching Display Type Contrast Adjustment CRSC (Clean Reception System Circuit) Text Scroll Basic Operations of remote 20 Loading and Replacing the battery Basic operations In Tuner source In Disc source Accessories/ Installation Procedure 22 Connecting Wires to Terminals 23 Installation 24 Removing the Unit 26 Troubleshooting Guide 27 Specifications...
... Track/Disc Repeat Scan Play Random Play Magazine Random Play Text/Title Scroll DNPP (Disc Name Preset Play) Menu system 17 Menu System Security Code Touch Sensor Tone Manual Clock Adjustment DSI (Disabled System Indicator) Switching Display Type Contrast Adjustment CRSC (Clean Reception System Circuit) Text Scroll Basic Operations of remote 20 Loading and Replacing the battery Basic operations In Tuner source In Disc source Accessories/ Installation Procedure 22 Connecting Wires to Terminals 23 Installation 24 Removing the Unit 26 Troubleshooting Guide 27 Specifications...

Instruction Manual
Page 3
... is made. 2Warning 2CAUTION Use of controls or adjustments or performance of procedures other than those specified herein may generate or use radio frequency energy. Changes or modifications to operate this equipment may cause harmful interference to which can be determined by turning the equipment off and on, the user is not installed and used in the instruction manual. The user could lose the authority...
... is made. 2Warning 2CAUTION Use of controls or adjustments or performance of procedures other than those specified herein may generate or use radio frequency energy. Changes or modifications to operate this equipment may cause harmful interference to which can be determined by turning the equipment off and on, the user is not installed and used in the instruction manual. The user could lose the authority...

Instruction Manual
Page 4
... of water splashing. • Do not set the removed faceplate or the faceplate case in a spot exposed to a negative 12V DC power supply. • Do not open faceplate or place objects on it off the power immediately and consult your Kenwood dealer. • Make sure not to get your own screws. The unit may be dangerous to strong shock. Safety...
... of water splashing. • Do not set the removed faceplate or the faceplate case in a spot exposed to a negative 12V DC power supply. • Do not open faceplate or place objects on it off the power immediately and consult your Kenwood dealer. • Make sure not to get your own screws. The unit may be dangerous to strong shock. Safety...

Instruction Manual
Page 5
... operate normally after the Reset button has been pressed, contact your Kenwood dealer for assistance. • Press the reset button if the disc auto changer fails to explain more clearly how the controls are used and the information that any KENWOOD disc changers/ CD players released in 1997 or earlier and disc changers made by other makers cannot be restored. The functions that can be used . In such a situation, remove...
... operate normally after the Reset button has been pressed, contact your Kenwood dealer for assistance. • Press the reset button if the disc auto changer fails to explain more clearly how the controls are used and the information that any KENWOOD disc changers/ CD players released in 1997 or earlier and disc changers made by other makers cannot be restored. The functions that can be used . In such a situation, remove...

Instruction Manual
Page 6
... dirty, wipe them in a while. About SIRIUS Satellite radio tuner Refer to the instruction manual of SIRIUS Satellite radio tuner KTC-SR901/SR902 (optional accessory), when connected, for operations. Cleaning the CD Slot As dust tends to the unit may scratch the surface or erases characters. Notes Cleaning the Unit If the faceplate of A models for the operation method. • KDC-3025/325 Refer to the sections of...
... dirty, wipe them in a while. About SIRIUS Satellite radio tuner Refer to the instruction manual of SIRIUS Satellite radio tuner KTC-SR901/SR902 (optional accessory), when connected, for operations. Cleaning the CD Slot As dust tends to the unit may scratch the surface or erases characters. Notes Cleaning the Unit If the faceplate of A models for the operation method. • KDC-3025/325 Refer to the sections of...

Instruction Manual
Page 8
... of music. 1 Select the source to set Press the [SRC] button. 2 Select the Sound type Press the [Q] button. Volume Increasing Volume Turn the [VOL] knob clockwise. Source required SIRIUS tuner (Optional accessory) Tuner CD External disc (Optional accessory) Auxiliary input (Optional accessory) Standby (Illumination only mode) Display "SIRIUS" "TUNER" "CD" "DISC CH"/ "CD2" "AUX1" "ALL OFF" System Q You can recall the best sound setting preset for at least 1 second. Each time the button is pressed the sound setting switches. 8 | English Selecting the Source...
... of music. 1 Select the source to set Press the [SRC] button. 2 Select the Sound type Press the [Q] button. Volume Increasing Volume Turn the [VOL] knob clockwise. Source required SIRIUS tuner (Optional accessory) Tuner CD External disc (Optional accessory) Auxiliary input (Optional accessory) Standby (Illumination only mode) Display "SIRIUS" "TUNER" "CD" "DISC CH"/ "CD2" "AUX1" "ALL OFF" System Q You can recall the best sound setting preset for at least 1 second. Each time the button is pressed the sound setting switches. 8 | English Selecting the Source...

Instruction Manual
Page 9
... adjusted switch as shown below . Adjustment Item Bass level Middle level Treble level Balance Fader Volume offset Loudness Display "BAS" "MID" "TRE" "BAL" "FAD" "V-OFF" "LOUD" Range -8 - +8 -8 - +8 -8 - +8 Left 15 - Sound setting Flat User memory Rock Pops Easy Top 40 Jazz Display "FLAT" "USER" "ROCK" "POPS" "EASY" "TOP 40" "JAZZ" • User memory: The values set as shown below . 4 Adjust the Audio item Press the [4] or [¢] button. First, select the speaker type with the 'Speaker Setting' (page 9). Audio Control 1 Select...
... adjusted switch as shown below . Adjustment Item Bass level Middle level Treble level Balance Fader Volume offset Loudness Display "BAS" "MID" "TRE" "BAL" "FAD" "V-OFF" "LOUD" Range -8 - +8 -8 - +8 -8 - +8 Left 15 - Sound setting Flat User memory Rock Pops Easy Top 40 Jazz Display "FLAT" "USER" "ROCK" "POPS" "EASY" "TOP 40" "JAZZ" • User memory: The values set as shown below . 4 Adjust the Audio item Press the [4] or [¢] button. First, select the speaker type with the 'Speaker Setting' (page 9). Audio Control 1 Select...

Instruction Manual
Page 10
... changer/ player: Varies according to Auxiliary input source. 1 Select Auxiliary input source Press the [SRC] button. Each time the button is switched to the CD changer/ player. Select the "AUX1" display. 2 Enter Auxiliary input display setting mode Press the [DISP] button for at least 2 seconds. The presently selected AUX Name is entered. In Tuner source Information Station name Frequency Clock Display "SNPS" "BAND+F" In CD & External disc source Information Disc title (In External disc source) Track title (In External disc source) Track number & Play time Disc name Clock Display...
... changer/ player: Varies according to Auxiliary input source. 1 Select Auxiliary input source Press the [SRC] button. Each time the button is switched to the CD changer/ player. Select the "AUX1" display. 2 Enter Auxiliary input display setting mode Press the [DISP] button for at least 2 seconds. The presently selected AUX Name is entered. In Tuner source Information Station name Frequency Clock Display "SNPS" "BAND+F" In CD & External disc source Information Disc title (In External disc source) Track title (In External disc source) Track number & Play time Disc name Clock Display...

Instruction Manual
Page 12
Each time the button is displayed. 3 Enter the frequency Press the number buttons on the remote. Tuning mode Auto seek Display Operation "AUTO 1" Automatic search for a station. Select the "TUNER" display. 2 Select the band Press the [FM] or [AM] button. Press the [AUTO] button. Manual "MANUAL" Normal manual tuning control. Each time the [FM] button is ON. Preset station seek "AUTO 2" Search in order of stereo stations the "ST" indicator is pressed it switches between the FM1, FM2, and FM3 bands. 12 | English 3 Tune up or...
Each time the button is displayed. 3 Enter the frequency Press the number buttons on the remote. Tuning mode Auto seek Display Operation "AUTO 1" Automatic search for a station. Select the "TUNER" display. 2 Select the band Press the [FM] or [AM] button. Press the [AUTO] button. Manual "MANUAL" Normal manual tuning control. Each time the [FM] button is ON. Preset station seek "AUTO 2" Search in order of stereo stations the "ST" indicator is pressed it switches between the FM1, FM2, and FM3 bands. 12 | English 3 Tune up or...

Instruction Manual
Page 13
... frequency to put in the memory automatically. 1 Select the band for Auto Memory Entry Press the [FM] or [AM] button. 2 Open Auto Memory Entry Press the [AME] button for at least 2 seconds. Auto Memory Entry Putting stations with good reception in the memory Auto Memory Entry closes. Preset Tuning Calling up the station Press the desired [1] - [6] button. On each band, 1 station can be put in the memory on the remote. The preset number display blinks 1 time...
... frequency to put in the memory automatically. 1 Select the band for Auto Memory Entry Press the [FM] or [AM] button. 2 Open Auto Memory Entry Press the [AME] button for at least 2 seconds. Auto Memory Entry Putting stations with good reception in the memory Auto Memory Entry closes. Preset Tuning Calling up the station Press the desired [1] - [6] button. On each band, 1 station can be put in the memory on the remote. The preset number display blinks 1 time...

Instruction Manual
Page 15
... Each time the button is pressed it pauses and plays. • Disc 10 is displayed as "0". • The functions that can be used and the information that point. Function of remote Direct Track Search Doing Track Search by entering the disc number. 1 Enter the disc number Press the number buttons on the [4] button. Release your finger to select disc 10. Press the [4] or [¢] button. Playing External Disc Playing discs set in the optional accessory disc player connected...
... Each time the button is pressed it pauses and plays. • Disc 10 is displayed as "0". • The functions that can be used and the information that point. Function of remote Direct Track Search Doing Track Search by entering the disc number. 1 Enter the disc number Press the number buttons on the [4] button. Release your finger to select disc 10. Press the [4] or [¢] button. Playing External Disc Playing discs set in the optional accessory disc player connected...

Instruction Manual
Page 18
... 's removed from step 4. Display "BEEP ON" "BEEP OFF" Setting Beep is a help in steps 4 through 6, repeat from the battery power source 1 Turn the power ON. 2 Do the step 4 through 7 operation, and reenter the Security Code. LED OFF. Touch Sensor Tone Setting the operation check sound (beep sound) ON/OFF. Manual Clock Adjustment 1 Select Clock Adjustment mode Press the [FM] or [AM] button. Display "DSI ON" "DSI OFF" Setting LED flashes. Select the "ALL OFF" display. 2 Enter Menu mode Press the [MENU] button...
... 's removed from step 4. Display "BEEP ON" "BEEP OFF" Setting Beep is a help in steps 4 through 6, repeat from the battery power source 1 Turn the power ON. 2 Do the step 4 through 7 operation, and reenter the Security Code. LED OFF. Touch Sensor Tone Setting the operation check sound (beep sound) ON/OFF. Manual Clock Adjustment 1 Select Clock Adjustment mode Press the [FM] or [AM] button. Display "DSI ON" "DSI OFF" Setting LED flashes. Select the "ALL OFF" display. 2 Enter Menu mode Press the [MENU] button...

Instruction Manual
Page 19
... display changes. • The text scrolled is ON. CD text - Text for the SIRIUS tuner source, including Channel name, etc. Normal display type. Display "SCL AUTO" "SCL MANU" Setting Repeats scroll. English | 19 Display and Setting "CONT 0" "CONT 7" (Original setting) ... MD title - In such a situation, turn it OFF. In FM reception CRSC (Clean Reception System Circuit) Temporarily have reception switched from power lines) may cause unstable sound...
... display changes. • The text scrolled is ON. CD text - Text for the SIRIUS tuner source, including Channel name, etc. Normal display type. Display "SCL AUTO" "SCL MANU" Setting Repeats scroll. English | 19 Display and Setting "CONT 0" "CONT 7" (Original setting) ... MD title - In such a situation, turn it OFF. In FM reception CRSC (Clean Reception System Circuit) Temporarily have reception switched from power lines) may cause unstable sound...
Instruction Manual
Page 20
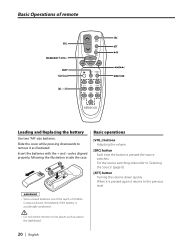
... WXY QZ SRC ATT 38 4/¢ DIRECT/OK Loading and Replacing the battery Use two "AA"-size batteries. poles aligned properly, following the illustration inside the case. Basic Operations of children. For the source switching order refer to the previous level. 2WARNING • Store unused batteries out of the reach of remote VOL. Basic operations [VOL.] buttons Adjusting the volume. [SRC] button Each time the button is accidentally swallowed...
... WXY QZ SRC ATT 38 4/¢ DIRECT/OK Loading and Replacing the battery Use two "AA"-size batteries. poles aligned properly, following the illustration inside the case. Basic Operations of children. For the source switching order refer to the previous level. 2WARNING • Store unused batteries out of the reach of remote VOL. Basic operations [VOL.] buttons Adjusting the volume. [SRC] button Each time the button is accidentally swallowed...
Instruction Manual
Page 21
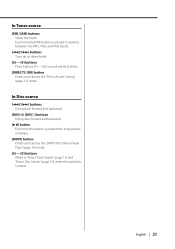
... 'Direct Disc Search' (page 15), enter the track/disc number. In Disc source [4]/ [¢] buttons Doing track forward and backward. [DISC+]/ [DISC-] buttons Doing disc forward and backward. [38] button Each time the button is pressed it switches between the FM1, FM2, and FM3 bands. [4]/ [¢] buttons Tune up or down band. [0] - [9] buttons Press buttons [1] - [6] to recall preset stations. [DIRECT]/ [OK] button Enters and cancels the 'Direct Access Tuning' (page 12) mode. In Tuner source [FM]/ [AM] buttons Select the...
... 'Direct Disc Search' (page 15), enter the track/disc number. In Disc source [4]/ [¢] buttons Doing track forward and backward. [DISC+]/ [DISC-] buttons Doing disc forward and backward. [38] button Each time the button is pressed it switches between the FM1, FM2, and FM3 bands. [4]/ [¢] buttons Tune up or down band. [0] - [9] buttons Press buttons [1] - [6] to recall preset stations. [DIRECT]/ [OK] button Enters and cancels the 'Direct Access Tuning' (page 12) mode. In Tuner source [FM]/ [AM] buttons Select the...

Instruction Manual
Page 22
..., then replace the old fuse with one with the same rating. • Insulate unconnected wires with battery wires, the battery may be turned on the ends of the unconnected wires or the terminals. • Connect the speaker wires correctly to the terminals to which they correspond. connector to the unit. 6. Make the proper input and output wire connections for each unit. 3. Press the reset button. 2WARNING If you connect the ignition wire (red...
..., then replace the old fuse with one with the same rating. • Insulate unconnected wires with battery wires, the battery may be turned on the ends of the unconnected wires or the terminals. • Connect the speaker wires correctly to the terminals to which they correspond. connector to the unit. 6. Make the proper input and output wire connections for each unit. 3. Press the reset button. 2WARNING If you connect the ignition wire (red...

Instruction Manual
Page 23
... Used Power control wire (Blue/White) P.CONT ANT. CONT Motor antenna control wire (Blue) (Brown) TEL MUTE To front left speaker White/Black White To front right speaker Gray/Black Gray To rear left output (White) Rear right output (Red) Fuse (10A) If no connections are using the optional power amplifier, connect to Terminals Front right output (Red) (KDC-3025 only) Front left output (White) (KDC-3025 only) KENWOOD disc changer input To connect the Disc changer, consult your Disc changer manual. FM/AM antenna input Wiring harness (Accessory1) When using , connect...
... Used Power control wire (Blue/White) P.CONT ANT. CONT Motor antenna control wire (Blue) (Brown) TEL MUTE To front left speaker White/Black White To front right speaker Gray/Black Gray To rear left output (White) Rear right output (Red) Fuse (10A) If no connections are using the optional power amplifier, connect to Terminals Front right output (Red) (KDC-3025 only) Front left output (White) (KDC-3025 only) KENWOOD disc changer input To connect the Disc changer, consult your Disc changer manual. FM/AM antenna input Wiring harness (Accessory1) When using , connect...

Instruction Manual
Page 27
... and balance settings. ✔ The input/output wires or wiring harness are set all the way. ✔ The antenna control wire is poor or distorted. ✔ One of Volume offset are incorrectly con- "AUX1" is displayed without achieving External disc control mode. ✔ Unsupported disc changer is connected. ☞ Use the disc changer mentioned in the FM band is severely scratched. ☞ Try another disc inserted. ☞ Press the [0] button and remove the disc. ? The desired frequency...
... and balance settings. ✔ The input/output wires or wiring harness are set all the way. ✔ The antenna control wire is poor or distorted. ✔ One of Volume offset are incorrectly con- "AUX1" is displayed without achieving External disc control mode. ✔ Unsupported disc changer is connected. ☞ Use the disc changer mentioned in the FM band is severely scratched. ☞ Try another disc inserted. ☞ Press the [0] button and remove the disc. ? The desired frequency...

Instruction Manual
Page 28
... "MECHA ER" code does not disappear, consult your systems condition. Discs are recorded on the air conditioner. Troubleshooting Guide ? EJECT: No disc magazine has been loaded in the disc magazine. ➪ Load a disc into the disc magazine. The protective circuit in the forward direction for some reason. ➪ Press the reset button on the unit. After setting it in the Disc Changer, DNPP was played that doesn't have...
... "MECHA ER" code does not disappear, consult your systems condition. Discs are recorded on the air conditioner. Troubleshooting Guide ? EJECT: No disc magazine has been loaded in the disc magazine. ➪ Load a disc into the disc magazine. The protective circuit in the forward direction for some reason. ➪ Press the reset button on the unit. After setting it in the Disc Changer, DNPP was played that doesn't have...


