

Instruction Manual
Page 2
... volume so that takes your attention away from children. CONTENTS BEFORE USE 2 BASICS 3 GETTING STARTED 4 1 Select the display language and cancel the demonstration 2 Set the clock and date 3 Set the initial settings RADIO 5 USB/iPod/ANDROID 7 AUX 9 Pandora® 10 AUDIO SETTINGS 11 DISPLAY SETTINGS 12 TROUBLESHOOTING 13 REFERENCES 15 Maintenance More information INSTALLATION/ CONNECTION 16 SPECIFICATIONS 19 BEFORE USE IMPORTANT • To ensure proper use, please read through this manual before playing digital sources...
... volume so that takes your attention away from children. CONTENTS BEFORE USE 2 BASICS 3 GETTING STARTED 4 1 Select the display language and cancel the demonstration 2 Set the clock and date 3 Set the initial settings RADIO 5 USB/iPod/ANDROID 7 AUX 9 Pandora® 10 AUDIO SETTINGS 11 DISPLAY SETTINGS 12 TROUBLESHOOTING 13 REFERENCES 15 Maintenance More information INSTALLATION/ CONNECTION 16 SPECIFICATIONS 19 BEFORE USE IMPORTANT • To ensure proper use, please read through this manual before playing digital sources...
Instruction Manual
Page 3
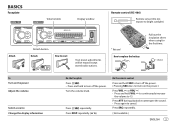
... attenuate the sound. • Press again to replace the battery Pull out the insulation sheet when using for the first time. Press DISP repeatedly. ( 16) On the remote control Press and hold the volume to turn on the power Adjust the volume Select a source Change the display information On the faceplate Press . • Press and hold to turn off the power. ( Pressing SRC does not turn off the power. Press SRC...
... attenuate the sound. • Press again to replace the battery Pull out the insulation sheet when using for the first time. Press DISP repeatedly. ( 16) On the remote control Press and hold the volume to turn on the power Adjust the volume Select a source Change the display information On the faceplate Press . • Press and hold to turn off the power. ( Pressing SRC does not turn off the power. Press SRC...
Instruction Manual
Page 4
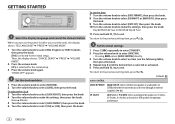
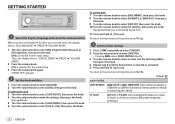
... Year or Month Day Year 11 Press and hold to select [CLOCK], then press the knob. Default: XX AUDIO CONTROL SWITCH PREOUT REAR/SUB-W: Selects whether rear speakers or a subwoofer are connected to the line out terminals on the power (or after you reset the unit), the display shows: "SEL LANGUAGE" "PRESS" "VOLUME KNOB" 1 Turn the volume knob to select [ENG] (English) or [TUR] (Turkish), then press the knob. [ENG...
... Year or Month Day Year 11 Press and hold to select [CLOCK], then press the knob. Default: XX AUDIO CONTROL SWITCH PREOUT REAR/SUB-W: Selects whether rear speakers or a subwoofer are connected to the line out terminals on the power (or after you reset the unit), the display shows: "SEL LANGUAGE" "PRESS" "VOLUME KNOB" 1 Turn the volume knob to select [ENG] (English) or [TUR] (Turkish), then press the knob. [ENG...
Instruction Manual
Page 5
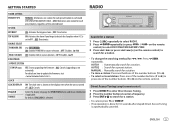
... to OFF. ; MANUAL : Manually search for a preset station. OFF: Disables. ( 9) F/W UPDATE UPDATE SYSTEM F/W UP xxxx YES: Starts upgrading the firmware. ; CLOCK CLOCK DISPLAY ON: The clock time is shown on the remote control). By default, [ENGLISH] is done for [FUNCTION] menu and music information if applicable. AUTO2 : Search for a station. • To store a station: Press and hold one of the number buttons (1 to 6). • To select a stored station: Press one of the number buttons (1 to search...
... to OFF. ; MANUAL : Manually search for a preset station. OFF: Disables. ( 9) F/W UPDATE UPDATE SYSTEM F/W UP xxxx YES: Starts upgrading the firmware. ; CLOCK CLOCK DISPLAY ON: The clock time is shown on the remote control). By default, [ENGLISH] is done for [FUNCTION] menu and music information if applicable. AUTO2 : Search for a station. • To store a station: Press and hold one of the number buttons (1 to 6). • To select a stored station: Press one of the number buttons (1 to search...
Instruction Manual
Page 6
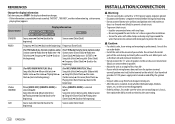
...: Switches to another station broadcasting the same program in the specific region using the "AF" control. ; OFF: Cancels. AUTO MEMORY YES: Automatically starts memorizing 6 stations with good reception. ; ON: Synchronizes the unit's time to Traffic Information if available ("TI" lights up). ; OFF: Cancels. TI ON: Allows the unit to temporarily switch to the Radio Data System station time. ; RADIO Other settings 1 Press the volume knob to enter [FUNCTION]. 2 Turn the volume knob to select...
...: Switches to another station broadcasting the same program in the specific region using the "AF" control. ; OFF: Cancels. AUTO MEMORY YES: Automatically starts memorizing 6 stations with good reception. ; ON: Synchronizes the unit's time to Traffic Information if available ("TI" lights up). ; OFF: Cancels. TI ON: Allows the unit to temporarily switch to the Radio Data System station time. ; RADIO Other settings 1 Press the volume knob to enter [FUNCTION]. 2 Turn the volume knob to select...
Instruction Manual
Page 9
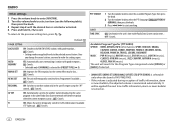
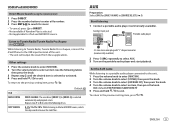
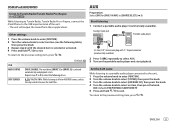
.... USB/iPod/ANDROID Direct Music Search (using the remote control) 1 Press DIRECT. 2 Press the number buttons to enter a file number. 3 Press to select AUX. 3 Turn on the portable audio player and start playback. Repeat steps 1 to 3 to select the following table), then press the knob. 3 Repeat step 2 until the desired item is selected or activated. 4 Press and hold to the previous setting item, press . USB MUSIC DRIVE SKIP SEARCH Default: XX DRIVE CHANGE: The next drive ([DRIVE...
.... USB/iPod/ANDROID Direct Music Search (using the remote control) 1 Press DIRECT. 2 Press the number buttons to enter a file number. 3 Press to select AUX. 3 Turn on the portable audio player and start playback. Repeat steps 1 to 3 to select the following table), then press the knob. 3 Repeat step 2 until the desired item is selected or activated. 4 Press and hold to the previous setting item, press . USB MUSIC DRIVE SKIP SEARCH Default: XX DRIVE CHANGE: The next drive ([DRIVE...

Instruction Manual
Page 12
... noise outside the car or running noise of the subwoofer output to be canceled once you have set to [ON]. AUDIO SETTINGS PRESET EQ DRIVE EQ/TOP40/POWERFUL/ROCK/POPS/EASY/JAZZ/NATURAL/ USER: Selects a preset equalizer suitable to the music genre. (Select [USER] to use the settings made in audio data compression. ; BASS BOOST LV1/LV2/LV3: Selects your preferred low and high frequencies boost to R15 (0): Adjusts the left and right speaker output balance.
... noise outside the car or running noise of the subwoofer output to be canceled once you have set to [ON]. AUDIO SETTINGS PRESET EQ DRIVE EQ/TOP40/POWERFUL/ROCK/POPS/EASY/JAZZ/NATURAL/ USER: Selects a preset equalizer suitable to the music genre. (Select [USER] to use the settings made in audio data compression. ; BASS BOOST LV1/LV2/LV3: Selects your preferred low and high frequencies boost to R15 (0): Adjusts the left and right speaker output balance.

Instruction Manual
Page 13
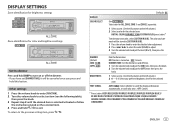
... listening to the radio. Turn the power on . ; DISPLAY SETTINGS TROUBLESHOOTING DISPLAY DIMMER BRIGHTNESS TEXT SCROLL Default: XX Dim the illumination. "MISWIRING CHECK WIRING THEN PWR ON" appears. Correct characters are insulated properly. Send the unit to the optimum level. • Check the cords and connections. Clean the connectors. ( 15) Reset the unit. ( 3) Connect the antenna firmly. A copy-protected file is not correct. Elapsed playing time is played. ON: Dimmer is caused by...
... listening to the radio. Turn the power on . ; DISPLAY SETTINGS TROUBLESHOOTING DISPLAY DIMMER BRIGHTNESS TEXT SCROLL Default: XX Dim the illumination. "MISWIRING CHECK WIRING THEN PWR ON" appears. Correct characters are insulated properly. Send the unit to the optimum level. • Check the cords and connections. Clean the connectors. ( 15) Reset the unit. ( 3) Connect the antenna firmly. A copy-protected file is not correct. Elapsed playing time is played. ON: Dimmer is caused by...

Instruction Manual
Page 14
... try to unit. ( 15) • Make sure KENWOOD MUSIC PLAY APP is unstable. Cannot playback at [BROWSE MODE]. Registration of registered stations has reached its limit. Communication is installed on the Android device. ( 7) • Reconnect the Android device and select the appropriate control mode. ( 8) • If this does not solve the problem, the connected Android device does not support [BROWSE MODE]. ( 15) • Switch off the power saving mode on the...
... try to unit. ( 15) • Make sure KENWOOD MUSIC PLAY APP is unstable. Cannot playback at [BROWSE MODE]. Registration of registered stations has reached its limit. Communication is installed on the Android device. ( 7) • Reconnect the Android device and select the appropriate control mode. ( 8) • If this does not solve the problem, the connected Android device does not support [BROWSE MODE]. ( 15) • Switch off the power saving mode on the...

Instruction Manual
Page 15
... • You cannot operate iPod if "KENWOOD" or " " is displayed on iPod. • Depending on the version of the operating system of the iPod/iPhone, some or all of the services may not operate on the reverse side of a phone call Connect the MUTE wire to change without prior notice. "CALL" disappears and the audio system resumes. More information Connector (on this unit. • For issues using a commercial telephone...
... • You cannot operate iPod if "KENWOOD" or " " is displayed on iPod. • Depending on the version of the operating system of the iPod/iPhone, some or all of the services may not operate on the reverse side of a phone call Connect the MUTE wire to change without prior notice. "CALL" disappears and the audio system resumes. More information Connector (on this unit. • For issues using a commercial telephone...
Instruction Manual
Page 16
... beginning) iPod or ANDROID When [MODE OFF]/[BROWSE MODE] is selected ( 8): Song title/Artist Album title/Artist Playing time Clock (back to the beginning) PANDORA Station name Shared/Radio station Song title Artist Album title Playing time Clock (back to the beginning) AUX Source name Clock (back to the beginning) INSTALLATION/CONNECTION Warning • The unit can only be used with cable clamps and wrap vinyl tape around the wires that has...
... beginning) iPod or ANDROID When [MODE OFF]/[BROWSE MODE] is selected ( 8): Song title/Artist Album title/Artist Playing time Clock (back to the beginning) PANDORA Station name Shared/Radio station Song title Artist Album title Playing time Clock (back to the beginning) AUX Source name Clock (back to the beginning) INSTALLATION/CONNECTION Warning • The unit can only be used with cable clamps and wrap vinyl tape around the wires that has...

Instruction Manual
Page 18
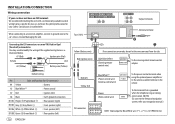
... when using the optional power amplifier or to the antenna control terminal in the vehicle Light blue/yellow (Steering remote control wire) To the steering wheel remote control adapter Brown (Mute control wire) Blue/White (Power control wire/ Antenna control wire) (12 V 350 mA) To the terminal that is grounded when the telephone rings or during conversation. ( 15) (To connect the Kenwood navigation system, refer your car audio dealer. Fuse (10 A) To front speaker (left) To front speaker (right) To rear speaker...
... when using the optional power amplifier or to the antenna control terminal in the vehicle Light blue/yellow (Steering remote control wire) To the steering wheel remote control adapter Brown (Mute control wire) Blue/White (Power control wire/ Antenna control wire) (12 V 350 mA) To the terminal that is grounded when the telephone rings or during conversation. ( 15) (To connect the Kenwood navigation system, refer your car audio dealer. Fuse (10 A) To front speaker (left) To front speaker (right) To rear speaker...

Instruction Manual
Page 6
.... 2 ENGLISH CONTENTS BEFORE USE 2 BASICS 3 GETTING STARTED 4 1 Select the display language and cancel the demonstration 2 Set the clock and date 3 Set the initial settings RADIO 5 USB/iPod/ANDROID 7 AUX 9 AUDIO SETTINGS 10 DISPLAY SETTINGS 11 TROUBLESHOOTING 12 REFERENCES 13 Maintenance More information INSTALLATION/ CONNECTION 14 SPECIFICATIONS 17 BEFORE USE IMPORTANT • To ensure proper use, please read through this manual before playing digital sources to avoid damaging the speakers by the sudden increase of the output level.
.... 2 ENGLISH CONTENTS BEFORE USE 2 BASICS 3 GETTING STARTED 4 1 Select the display language and cancel the demonstration 2 Set the clock and date 3 Set the initial settings RADIO 5 USB/iPod/ANDROID 7 AUX 9 AUDIO SETTINGS 10 DISPLAY SETTINGS 11 TROUBLESHOOTING 12 REFERENCES 13 Maintenance More information INSTALLATION/ CONNECTION 14 SPECIFICATIONS 17 BEFORE USE IMPORTANT • To ensure proper use, please read through this manual before playing digital sources to avoid damaging the speakers by the sudden increase of the output level.
Instruction Manual
Page 8
... AUD enters [AUDIO CONTROL] directly. 3 Turn the volume knob to make the settings, then press the knob. Hour Minute 5 Turn the volume knob to select [CLOCK FORMAT], then press the knob. 6 Turn the volume knob to exit. Default: XX AUDIO CONTROL SWITCH PREOUT REAR/SUB-W or REAR/ SUBWOOFER: Selects whether rear speakers or a subwoofer are connected to the line out terminals on the power (or after you turn on the rear (through an external amplifier). ( 16) SP SELECT OFF/5/4/6 ×...
... AUD enters [AUDIO CONTROL] directly. 3 Turn the volume knob to make the settings, then press the knob. Hour Minute 5 Turn the volume knob to select [CLOCK FORMAT], then press the knob. 6 Turn the volume knob to exit. Default: XX AUDIO CONTROL SWITCH PREOUT REAR/SUB-W or REAR/ SUBWOOFER: Selects whether rear speakers or a subwoofer are connected to the line out terminals on the power (or after you turn on the rear (through an external amplifier). ( 16) SP SELECT OFF/5/4/6 ×...
Instruction Manual
Page 13
USB MUSIC DRIVE SKIP SEARCH Default: XX DRIVE CHANGE: The next drive ([DRIVE 1] to [DRIVE 5]) is selected or activated. 4 Press and hold to the previous setting item, press . Set the AUX name While listening to a portable audio player connected to the unit... 1 Press the volume knob to enter [FUNCTION]. 2 Turn the volume knob to select [SYSTEM], then press the knob. 3 Turn the volume knob to select [AUX NAME SET], then press the knob. 4 Turn the volume knob to the previous...
USB MUSIC DRIVE SKIP SEARCH Default: XX DRIVE CHANGE: The next drive ([DRIVE 1] to [DRIVE 5]) is selected or activated. 4 Press and hold to the previous setting item, press . Set the AUX name While listening to a portable audio player connected to the unit... 1 Press the volume knob to enter [FUNCTION]. 2 Turn the volume knob to select [SYSTEM], then press the knob. 3 Turn the volume knob to select [AUX NAME SET], then press the knob. 4 Turn the volume knob to the previous...
Instruction Manual
Page 15
... the display information automatically, or scroll only once. ; DIMMER TIME: Set the dimmer on the left column.) 2 Select a color for the selected zone. The color you have set [DIMMER TIME], it will be canceled once you have made will be stored in [CUSTOM R/G/B]. 1 Press the volume knob to enter the detailed color adjustment. 2 Press S / T to select the color (R/G/B) to adjust. 3 Turn the volume knob to adjust the level (0 to adjust the [OFF] time, then...
... the display information automatically, or scroll only once. ; DIMMER TIME: Set the dimmer on the left column.) 2 Select a color for the selected zone. The color you have set [DIMMER TIME], it will be canceled once you have made will be stored in [CUSTOM R/G/B]. 1 Press the volume knob to enter the detailed color adjustment. 2 Press S / T to select the color (R/G/B) to adjust. 3 Turn the volume knob to adjust the level (0 to adjust the [OFF] time, then...

Instruction Manual
Page 16
...; Reconnect the Android device. • Restart the Android device. 12 ENGLISH Turn the power on the display language you have selected ( 5), some characters may not be heard. TROUBLESHOOTING USB/iPod Radio General Symptom Sound cannot be displayed correctly. The unit does not work at [BROWSE MODE]. Elapsed playing time is poor. • Static noise while listening to the nearest service center. Clean the connectors. ( 13) Reset the unit. ( 3) Connect the antenna firmly. This...
...; Reconnect the Android device. • Restart the Android device. 12 ENGLISH Turn the power on the display language you have selected ( 5), some characters may not be heard. TROUBLESHOOTING USB/iPod Radio General Symptom Sound cannot be displayed correctly. The unit does not work at [BROWSE MODE]. Elapsed playing time is poor. • Static noise while listening to the nearest service center. Clean the connectors. ( 13) Reset the unit. ( 3) Connect the antenna firmly. This...
Instruction Manual
Page 17
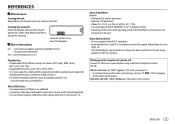
... device • This unit supports Android OS 4.1 and above ) may result in , "CALL" appears. (The audio system pauses.) • To continue listening to damage the connector. REFERENCES Maintenance Cleaning the unit Wipe off dirt on this unit always playback via a USB hub. • Connecting a cable whose rating is displayed on iPod. • Depending on the version of the operating system of the iPod/iPhone, some functions...
... device • This unit supports Android OS 4.1 and above ) may result in , "CALL" appears. (The audio system pauses.) • To continue listening to damage the connector. REFERENCES Maintenance Cleaning the unit Wipe off dirt on this unit always playback via a USB hub. • Connecting a cable whose rating is displayed on iPod. • Depending on the version of the operating system of the iPod/iPhone, some functions...
Instruction Manual
Page 18
... is selected ( 9): Song title (Artist) Song title (Album name) Song title (Date/Clock) Playing time (Date/Clock) (back to the beginning) AUX Source name Clock (back to the Source name (Date/Clock) beginning) INSTALLATION/CONNECTION Warning • The unit can only be used with vinyl tape. - Caution • For safety's sake, leave wiring and mounting to protect the wires. Do not touch the metal parts of your vehicle wiring harness does...
... is selected ( 9): Song title (Artist) Song title (Album name) Song title (Date/Clock) Playing time (Date/Clock) (back to the beginning) AUX Source name Clock (back to the Source name (Date/Clock) beginning) INSTALLATION/CONNECTION Warning • The unit can only be used with vinyl tape. - Caution • For safety's sake, leave wiring and mounting to protect the wires. Do not touch the metal parts of your vehicle wiring harness does...
Instruction Manual
Page 20
... car audio dealer. Fuse (10 A) Output terminals Antenna terminal Connecting the ISO connectors on some VW/Audi or Opel (Vauxhall) automobiles You may need to avoid damaging the unit. Light blue/yellow (Steering remote control wire) STEERING WHEEL REMOTE INPUT REMOTE CONT To the steering wheel remote control adapter Default wiring Pin Color and function (for Blue/White wire (*1) + (*2) is grounded when the telephone rings or during MUTE conversation. ( 13) (To connect the Kenwood navigation system, refer your navigation manual...
... car audio dealer. Fuse (10 A) Output terminals Antenna terminal Connecting the ISO connectors on some VW/Audi or Opel (Vauxhall) automobiles You may need to avoid damaging the unit. Light blue/yellow (Steering remote control wire) STEERING WHEEL REMOTE INPUT REMOTE CONT To the steering wheel remote control adapter Default wiring Pin Color and function (for Blue/White wire (*1) + (*2) is grounded when the telephone rings or during MUTE conversation. ( 13) (To connect the Kenwood navigation system, refer your navigation manual...


