
Instruction Manual
Page 2
...General features 8 Loading and Replacing the battery Power Selecting the Source Switching Display USB device/Audio file/External disc control features 10 Playing USB device Playing External Disc Fast Forwarding and Reversing ... DAB Reception Primary/Secondary Switching Text Scroll Menu system 17 Menu System Transmission Frequency Modulation Level Data Transmission Speed Touch Sensor Tone Touch Sensor Tone Volume Text Scroll Built-...Mode Accessories/ Installation Procedure 22 Installation 23 Connecting Wires to Terminals 24 Troubleshooting Guide 26 Specifications 28 2 | English
...General features 8 Loading and Replacing the battery Power Selecting the Source Switching Display USB device/Audio file/External disc control features 10 Playing USB device Playing External Disc Fast Forwarding and Reversing ... DAB Reception Primary/Secondary Switching Text Scroll Menu system 17 Menu System Transmission Frequency Modulation Level Data Transmission Speed Touch Sensor Tone Touch Sensor Tone Volume Text Scroll Built-...Mode Accessories/ Installation Procedure 22 Installation 23 Connecting Wires to Terminals 24 Troubleshooting Guide 26 Specifications 28 2 | English
Instruction Manual
Page 3
...or excessive heat or humidity. The "AAC" logo is trademark of water splashing. • When replacing a fuse, only use your Kenwood dealer for the applicable Kenwood disc changers/ CD players. Also avoid places with the prescribed rating. Note that can be displayed may differ depending on the models ...the machine, take the following precautions: • Make sure to ground the unit to a negative 12V DC power supply. • Do not install the unit in a spot exposed to the catalog or consult your own screws. If you use and the information that any metallic objects (such as...
...or excessive heat or humidity. The "AAC" logo is trademark of water splashing. • When replacing a fuse, only use your Kenwood dealer for the applicable Kenwood disc changers/ CD players. Also avoid places with the prescribed rating. Note that can be displayed may differ depending on the models ...the machine, take the following precautions: • Make sure to ground the unit to a negative 12V DC power supply. • Do not install the unit in a spot exposed to the catalog or consult your own screws. If you use and the information that any metallic objects (such as...

Instruction Manual
Page 4
...(page 5). • If you experience problems during installation, consult your Kenwood dealer. • When you purchase optional accessories, check with your Kenwood dealer to make sure that they work with your ...environment. Contact your area. • The characters which can be reduced a little if the KOS-A200 is used . After waiting several seconds, connect power supply cord plug again. The unit returns ...Notes • No USB device comes with this happens, turn down the volume of the car stereo. Information on the production line, nor by the professional importer of a vehicle into...
...(page 5). • If you experience problems during installation, consult your Kenwood dealer. • When you purchase optional accessories, check with your Kenwood dealer to make sure that they work with your ...environment. Contact your area. • The characters which can be reduced a little if the KOS-A200 is used . After waiting several seconds, connect power supply cord plug again. The unit returns ...Notes • No USB device comes with this happens, turn down the volume of the car stereo. Information on the production line, nor by the professional importer of a vehicle into...

Instruction Manual
Page 5
It can deform or damage due to http://www.kenwood.com/usb/. • Install the USB device in the place where it using a cable. • You cannot connect...cable is recommended. Connect it will not prevent you use the USB device conforming to the above specs, audio files cannot be erased depending on the operating conditions of the USB device. About USB device Notes on ...Use of the USB device This unit can play audio files stored in the flash memory and digital audio player that the PC can recognize as to whether your vehicle properly. • ...
It can deform or damage due to http://www.kenwood.com/usb/. • Install the USB device in the place where it using a cable. • You cannot connect...cable is recommended. Connect it will not prevent you use the USB device conforming to the above specs, audio files cannot be erased depending on the operating conditions of the USB device. About USB device Notes on ...Use of the USB device This unit can play audio files stored in the flash memory and digital audio player that the PC can recognize as to whether your vehicle properly. • ...
Instruction Manual
Page 22
... input and output wire connections for each unit. 3. Install the unit in the following order: ground, battery, ignition. 4. battery. • Only use antenna conversion adapters (ISO-JASO) when the antenna cord has an ISO plug. • If your car. 6. Connect the wiring harness wires in your vehicle...'s ignition does not have an ACC position, or if the ignition wire is installed, check whether the brake lamps, indicators, wipers, etc. To prevent a short ...
... input and output wire connections for each unit. 3. Install the unit in the following order: ground, battery, ignition. 4. battery. • Only use antenna conversion adapters (ISO-JASO) when the antenna cord has an ISO plug. • If your car. 6. Connect the wiring harness wires in your vehicle...'s ignition does not have an ACC position, or if the ignition wire is installed, check whether the brake lamps, indicators, wipers, etc. To prevent a short ...

Instruction Manual
Page 23
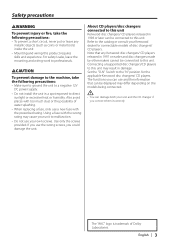
...Wipe off . • Do not install the Remote control sensor in places that the handle, shift knob, and side brake can be operated smoothly. • Installation using the self-tapping screws Use screws (Accessory4) to fix FM modulator Unit onto an audio board or another. Otherwise, the ...Remote control sensor will become deformed and unusable. • Install the Remote control sensor in places (such as...
...Wipe off . • Do not install the Remote control sensor in places that the handle, shift knob, and side brake can be operated smoothly. • Installation using the self-tapping screws Use screws (Accessory4) to fix FM modulator Unit onto an audio board or another. Otherwise, the ...Remote control sensor will become deformed and unusable. • Install the Remote control sensor in places (such as...
Instruction Manual
Page 25
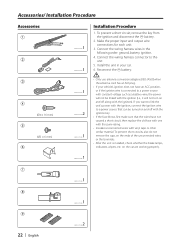
... wires to the car chassis (ground), you may cause a short circuit, that in the disc changer) If you connect the ignition wire (red) and the battery wire (yellow) to the power source running through the fuse box. English | 25 Disc Changer etc. (Optional) FM modulator unit (rear side...) TO 5L I/F Connection cable (Included in turn may start a fire. FM/AM antena output Accessory8 Car stereo (FM tuner with RDS) FM/AM antena input Accessory7 Antenna cord (ISO) Do not install an antenna of radio equipment or distribute the...
... wires to the car chassis (ground), you may cause a short circuit, that in the disc changer) If you connect the ignition wire (red) and the battery wire (yellow) to the power source running through the fuse box. English | 25 Disc Changer etc. (Optional) FM modulator unit (rear side...) TO 5L I/F Connection cable (Included in turn may start a fire. FM/AM antena output Accessory8 Car stereo (FM tuner with RDS) FM/AM antena input Accessory7 Antenna cord (ISO) Do not install an antenna of radio equipment or distribute the...
Instruction Manual
Page 28
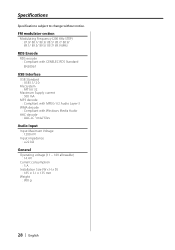
... Supply current : 500 mA MP3 decode : Compliant with MPEG-1/2 Audio Layer-3 WMA decode : Compliant with Windows Media Audio AAC decode : AAC-LC ".m4a" files Audio Input Input Maximum Voltage : 1200 mV Input impedance : ≥22 kΩ General Operating voltage (11 - 16V allowable) : 14.4 V Current consumption : 5 A Installation Size (W x H x D) : 185 × 31 × 135 mm Weight...
... Supply current : 500 mA MP3 decode : Compliant with MPEG-1/2 Audio Layer-3 WMA decode : Compliant with Windows Media Audio AAC decode : AAC-LC ".m4a" files Audio Input Input Maximum Voltage : 1200 mV Input impedance : ≥22 kΩ General Operating voltage (11 - 16V allowable) : 14.4 V Current consumption : 5 A Installation Size (W x H x D) : 185 × 31 × 135 mm Weight...