
Instruction Manual
Page 2
...General features 8 Loading and Replacing the battery Power Selecting the Source Switching Display USB device/Audio file/External disc control features 10 Playing USB device Playing External Disc Fast Forwarding and Reversing ... DAB Reception Primary/Secondary Switching Text Scroll Menu system 17 Menu System Transmission Frequency Modulation Level Data Transmission Speed Touch Sensor Tone Touch Sensor Tone Volume Text Scroll Built-... Mode Language Filter Search Mode Accessories/ Installation Procedure 22 Installation 23 Connecting Wires to Terminals 24 Troubleshooting Guide 26 Specifications...
...General features 8 Loading and Replacing the battery Power Selecting the Source Switching Display USB device/Audio file/External disc control features 10 Playing USB device Playing External Disc Fast Forwarding and Reversing ... DAB Reception Primary/Secondary Switching Text Scroll Menu system 17 Menu System Transmission Frequency Modulation Level Data Transmission Speed Touch Sensor Tone Touch Sensor Tone Volume Text Scroll Built-... Mode Language Filter Search Mode Accessories/ Installation Procedure 22 Installation 23 Connecting Wires to Terminals 24 Troubleshooting Guide 26 Specifications...

Instruction Manual
Page 4
... accessories, check with the symbol (crossed-out wheeled bin) cannot be some of the car stereo. Proper recycling and waste disposal will help conserve resources whilst preventing detrimental effects on Disposal of tuner may be reduced a little if the KOS-A200 is used. • If your car ...stereo does not have adopted separate waste collection systems) Products with your Kenwood dealer. • When you . Cleaning the Unit If the faceplate of control ...
... accessories, check with the symbol (crossed-out wheeled bin) cannot be some of the car stereo. Proper recycling and waste disposal will help conserve resources whilst preventing detrimental effects on Disposal of tuner may be reduced a little if the KOS-A200 is used. • If your car ...stereo does not have adopted separate waste collection systems) Products with your Kenwood dealer. • When you . Cleaning the Unit If the faceplate of control ...

Instruction Manual
Page 9
Source required Standby DAB (Optional accessory) USB device External disc (Optional accessory) Auxiliary input 1* Auxiliary input 2* Display "STANDBY" "DAB" "USB" "CD CH" "AUX1" "AUX2" • * You can select this source when (page 19) is ...name File name Folder number & File number Display "TITLE"* "ALBUM"* "FOLDER" "FILE" "NUMBER" In DAB source Information Service label Dynamic label PTY label Component label Audio quality Ensemble label Region label Received Frequency Display "SERV LBL"* "DYNAMIC"*¹ "PTY"*¹ "COMP"* "QUALITY"*¹ "ENSEMBLE"* "REGION"* "FREQ" 5 Exit ...
Source required Standby DAB (Optional accessory) USB device External disc (Optional accessory) Auxiliary input 1* Auxiliary input 2* Display "STANDBY" "DAB" "USB" "CD CH" "AUX1" "AUX2" • * You can select this source when (page 19) is ...name File name Folder number & File number Display "TITLE"* "ALBUM"* "FOLDER" "FILE" "NUMBER" In DAB source Information Service label Dynamic label PTY label Component label Audio quality Ensemble label Region label Received Frequency Display "SERV LBL"* "DYNAMIC"*¹ "PTY"*¹ "COMP"* "QUALITY"*¹ "ENSEMBLE"* "REGION"* "FREQ" 5 Exit ...

Instruction Manual
Page 11
...Direct Track/File Search Press the [38] button. Reversing Hold down the [¢] button. Function of disc changer/ Audio file Disc Search/Folder Search Selecting the disc set in the optional accessory disc player connected to 999. 2 Do Track/File Search Press the [4] or [¢] button. English | 11 ...Select the display for a song on the disc or in the Audio file folder. Playing External Disc Playing discs set in...
...Direct Track/File Search Press the [38] button. Reversing Hold down the [¢] button. Function of disc changer/ Audio file Disc Search/Folder Search Selecting the disc set in the optional accessory disc player connected to 999. 2 Do Track/File Search Press the [4] or [¢] button. English | 11 ...Select the display for a song on the disc or in the Audio file folder. Playing External Disc Playing discs set in...

Instruction Manual
Page 14
... manual; "MEMORY" is displayed. 14 | English Recalling a Preset Service Recalling the services in the memory on the Instruction manual of DAB Tuner KTC-9090DAB (optional accessory) for the control method of the function for this unit may be put in the memory. 1 Select the preset band Press the [5] button. Service Preset...
... manual; "MEMORY" is displayed. 14 | English Recalling a Preset Service Recalling the services in the memory on the Instruction manual of DAB Tuner KTC-9090DAB (optional accessory) for the control method of the function for this unit may be put in the memory. 1 Select the preset band Press the [5] button. Service Preset...
Instruction Manual
Page 22
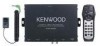
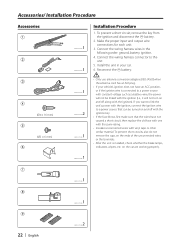
...; Only use antenna conversion adapters (ISO-JASO) when the antenna cord has an ISO plug. • If your car. 6. Make the proper input and output wire connections for each unit. 3. Install the unit in the following order:.... 4. To prevent short circuits, also do not remove the caps on the car are working properly. 7 ..........1 8 ..........1 9 22 | English ..........2 on the ends of the unconnected wires or the terminals. • After the unit is connected to the unit. 5. Accessories/ Installation Procedure Accessories 1 2 3 4 (Ø4 × 16 mm) 5 (Ø3 × 6 mm)...
...; Only use antenna conversion adapters (ISO-JASO) when the antenna cord has an ISO plug. • If your car. 6. Make the proper input and output wire connections for each unit. 3. Install the unit in the following order:.... 4. To prevent short circuits, also do not remove the caps on the car are working properly. 7 ..........1 8 ..........1 9 22 | English ..........2 on the ends of the unconnected wires or the terminals. • After the unit is connected to the unit. 5. Accessories/ Installation Procedure Accessories 1 2 3 4 (Ø4 × 16 mm) 5 (Ø3 × 6 mm)...

Instruction Manual
Page 23
... • Installation using the velcro tapes Remove the backing from the Velcro strips (Accessory9) and attach it to fix FM modulator Unit onto an audio board or another. Otherwise, the Remote control sensor will become deformed and unusable. • Install the Remote control sensor in places that the handle, shift ... on a curved surface, the tape adhesion may weaken and the controller may come off the installation location with a cleaning cloth. 2 Secure the Remote control sensor (Accessory 2) in the specified place with the double-sided adhesive tape.
... • Installation using the velcro tapes Remove the backing from the Velcro strips (Accessory9) and attach it to fix FM modulator Unit onto an audio board or another. Otherwise, the Remote control sensor will become deformed and unusable. • Install the Remote control sensor in places that the handle, shift ... on a curved surface, the tape adhesion may weaken and the controller may come off the installation location with a cleaning cloth. 2 Secure the Remote control sensor (Accessory 2) in the specified place with the double-sided adhesive tape.