
User Manual
Page 2
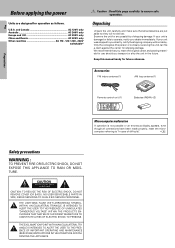
... recommend that all connections have been made properly, reset the micro- CAUTION RISK OF ELECTRIC SHOCK DO NOT OPEN CAUTION: TO REDUCE THE RISK OF ELECTRIC SHOCK, DO NOT REMOVE COVER (OR BACK). THE EXCLAMATION POINT WITHIN AN EQUILATERAL TRIANGLE IS INTENDED TO ALERT THE USER TO THE PRESENCE OF IMPORTANT OPERATING AND MAINTENANCE (SERVICING) INSTRUCTIONS IN THE LITERATURE...
... recommend that all connections have been made properly, reset the micro- CAUTION RISK OF ELECTRIC SHOCK DO NOT OPEN CAUTION: TO REDUCE THE RISK OF ELECTRIC SHOCK, DO NOT REMOVE COVER (OR BACK). THE EXCLAMATION POINT WITHIN AN EQUILATERAL TRIANGLE IS INTENDED TO ALERT THE USER TO THE PRESENCE OF IMPORTANT OPERATING AND MAINTENANCE (SERVICING) INSTRUCTIONS IN THE LITERATURE...

User Manual
Page 3
...RDS) radio stations 21 Using RDS (Radio Data System 21 Using the DISPLAY key 22 Presetting RDS stations (RDS AUTO MEMORY 22 Presetting radio stations manually 23 Receiving preset stations 23 Receiving preset stations in order (P.CALL) ... 23 Tuning by program type (PTY search 24 Ambience effects 25 Surround modes 25 Surround play 26 DVD 6-channel playback 27 Convenient functions 27 Basic remote control operation for playback 17 Listening to a source component 18 Adjusting the sound 18 Recording 19 Recording audio (analog sources 19 Recording video 20 Recording audio (digital...
...RDS) radio stations 21 Using RDS (Radio Data System 21 Using the DISPLAY key 22 Presetting RDS stations (RDS AUTO MEMORY 22 Presetting radio stations manually 23 Receiving preset stations 23 Receiving preset stations in order (P.CALL) ... 23 Tuning by program type (PTY search 24 Ambience effects 25 Surround modes 25 Surround play 26 DVD 6-channel playback 27 Convenient functions 27 Basic remote control operation for playback 17 Listening to a source component 18 Adjusting the sound 18 Recording 19 Recording audio (analog sources 19 Recording video 20 Recording audio (digital...

User Manual
Page 4
... applying the power Special features True home theater sound This receiver incorporates a wide variety of surround modes to bring you the name of the current broadcast station; station name display, to show you maximum enjoyment from software processed in adaptive matrix circuit to hear. Preparations How to use this receiver allows you own a DVD player equipped with all of your audio and video components, connecting the system can be deleted...
... applying the power Special features True home theater sound This receiver incorporates a wide variety of surround modes to bring you the name of the current broadcast station; station name display, to show you maximum enjoyment from software processed in adaptive matrix circuit to hear. Preparations How to use this receiver allows you own a DVD player equipped with all of your audio and video components, connecting the system can be deleted...
User Manual
Page 5
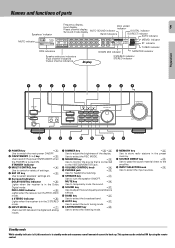
...the 3 STEREO mode. 6 INPUT MODE key 7 Use to switch between the digital and analog inputs. 7 DIMMER key )• Use to adjust the brightness of settings. 4 SET UP key ^ Use to monitor the source that is in standby mode and consumes a small amount of parts Speakers' indicator MUTE indicator Frequency display, Input display, Preset channel display, Surround mode display AUTO SOUND indicator PRO LOGIC indicator DIGITAL indicator 5 Band indicators S.DIRECT indicator AUTO indicator MEMO. This system can be switched ON by using the remote control. MUTE key ( Use to...
...the 3 STEREO mode. 6 INPUT MODE key 7 Use to switch between the digital and analog inputs. 7 DIMMER key )• Use to adjust the brightness of settings. 4 SET UP key ^ Use to monitor the source that is in standby mode and consumes a small amount of parts Speakers' indicator MUTE indicator Frequency display, Input display, Preset channel display, Surround mode display AUTO SOUND indicator PRO LOGIC indicator DIGITAL indicator 5 Band indicators S.DIRECT indicator AUTO indicator MEMO. This system can be switched ON by using the remote control. MUTE key ( Use to...
User Manual
Page 6
.... +100 key Use to select the disc number with the multi-CD player. 8 INPUT SELECTOR keys (DVD, PHONO, CD/DVD, TUNER, MD/TAPE, VIDEO1, VIDEO2) * Selects the inputs and sets the remote control to control a variety of settings. ceiver. # TITLE key Use to turn the receiver on and off. ! tered at the respective input. 9 MUTE key ( Use to temporarily mute the sound. 0 POWER ( ) key ^ Use to operate other components. 3 SOUND key ¶ Use to select the maximum adjustment setting for side...
.... +100 key Use to select the disc number with the multi-CD player. 8 INPUT SELECTOR keys (DVD, PHONO, CD/DVD, TUNER, MD/TAPE, VIDEO1, VIDEO2) * Selects the inputs and sets the remote control to control a variety of settings. ceiver. # TITLE key Use to turn the receiver on and off. ! tered at the respective input. 9 MUTE key ( Use to temporarily mute the sound. 0 POWER ( ) key ^ Use to operate other components. 3 SOUND key ¶ Use to select the maximum adjustment setting for side...

User Manual
Page 7
... below . Each press switches the setting as shown in an "analog" form. Analog input: Select this setting is indicated on each include jacks for playback (CD/DVD, DVD/6ch and VIDEO2). Auto sound: In the auto sound mode (AUTO SOUND indicator lights), the receiver selects the listening mode automatically during recording. The initial factory setting is "VIDEO 2". However, even when this setting to the instruction manuals supplied with the source unit, or are made using RCA pin cords.
... below . Each press switches the setting as shown in an "analog" form. Analog input: Select this setting is indicated on each include jacks for playback (CD/DVD, DVD/6ch and VIDEO2). Auto sound: In the auto sound mode (AUTO SOUND indicator lights), the receiver selects the listening mode automatically during recording. The initial factory setting is "VIDEO 2". However, even when this setting to the instruction manuals supplied with the source unit, or are made using RCA pin cords.
User Manual
Page 8
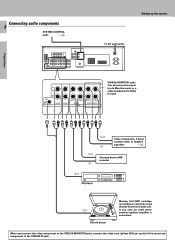
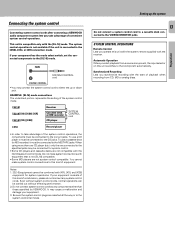
... mode, or a video component in Video 2 mode. OUT IN OUT IN Video component, 3 head cassette deck, or Graphic equalizer ( Cassette deck or MD recorder OUT CD player OUT Record player Moving Coil (MC) cartridge record player cannot be used directly from the receiver unit. When you connect the video component to the VIDEO2/MONITOR jacks, connect the video cord (yellow RCA pin cords) of the connected component to the VIDEO2 IN jack . Preparations Connecting audio components 8 SYSTEM CONTROL jacks # Setting up the system...
... mode, or a video component in Video 2 mode. OUT IN OUT IN Video component, 3 head cassette deck, or Graphic equalizer ( Cassette deck or MD recorder OUT CD player OUT Record player Moving Coil (MC) cartridge record player cannot be used directly from the receiver unit. When you connect the video component to the VIDEO2/MONITOR jacks, connect the video cord (yellow RCA pin cords) of the connected component to the VIDEO2 IN jack . Preparations Connecting audio components 8 SYSTEM CONTROL jacks # Setting up the system...
User Manual
Page 13
...] mode. Do not make system control connections to this unit with the system remote supplied with the start playback from CD, MD or analog discs. Even without effecting performance. 2. To use a cassette deck (or MD recorder) it must be carried out without system control cords, normal operations can be connected to the CD jacks. To use a CD player it must be connected to the correct jacks. Setting up or down jack. This unit is not [SL16] compatible...
...] mode. Do not make system control connections to this unit with the system remote supplied with the start playback from CD, MD or analog discs. Even without effecting performance. 2. To use a cassette deck (or MD recorder) it must be carried out without system control cords, normal operations can be connected to the CD jacks. To use a CD player it must be connected to the correct jacks. Setting up or down jack. This unit is not [SL16] compatible...

User Manual
Page 15
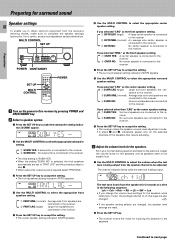
..., replace both batteries with new ones. 3. Front speakers are required for surround playback. Surround speakers : Place to prevent malfunction. These speakers recreate sound motion and atmosphere. Subwoofer : Reproduces powerful deep bass sounds. • Although the ideal surround system consists of the system installation to the direct left and right of the listeners. Speaker placement Center speaker Setting up the system Preparing the remote control 15 Loading the batteries 1 Remove the cover. 2 Insert the batteries. This speaker stabilizes the sound...
..., replace both batteries with new ones. 3. Front speakers are required for surround playback. Surround speakers : Place to prevent malfunction. These speakers recreate sound motion and atmosphere. Subwoofer : Reproduces powerful deep bass sounds. • Although the ideal surround system consists of the system installation to the direct left and right of the listeners. Speaker placement Center speaker Setting up the system Preparing the remote control 15 Loading the batteries 1 Remove the cover. 2 Insert the batteries. This speaker stabilizes the sound...
User Manual
Page 16
... S RS FM AUTO SOUND DIGITAL AUTO AM PRO LOGIC S.DIRECT MEMO MHz 3 STEREO MONITOR ST. Preparations 1 Turn on this receiver by pressing POWER and ON/STANDBY key. 2 Select a speaker system. 1 Press the SET UP key to accept the setting. • The receiver enters the speaker volume level adjustment mode. • In steps 3 and 4, indications appear only for the selected channels of the speakers that require adjusting. 3 Adjust the volume levels for inputting the distance to...
... S RS FM AUTO SOUND DIGITAL AUTO AM PRO LOGIC S.DIRECT MEMO MHz 3 STEREO MONITOR ST. Preparations 1 Turn on this receiver by pressing POWER and ON/STANDBY key. 2 Select a speaker system. 1 Press the SET UP key to accept the setting. • The receiver enters the speaker volume level adjustment mode. • In steps 3 and 4, indications appear only for the selected channels of the speakers that require adjusting. 3 Adjust the volume levels for inputting the distance to...
User Manual
Page 17
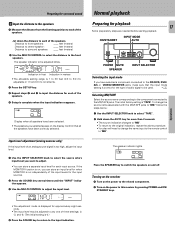
... AUTO SOUND DIGITAL AUTO AM PRO LOGIC S.DIRECT MEMO MHz 3 STEREO MONITOR ST. Normal playback Preparing for the type of the speakers. Turning on the receiver 1 Turn on the power to the MD/TAPE jacks. Distance to front speakers: ____ feet (meters) Distance to center speaker: ____ feet (meters) Distance to surround speakers: ____ feet (meters) 2 Use the MULTI CONTROL to select the distance to be used. 7 Selecting MD/TAPE Select the source...
... AUTO SOUND DIGITAL AUTO AM PRO LOGIC S.DIRECT MEMO MHz 3 STEREO MONITOR ST. Normal playback Preparing for the type of the speakers. Turning on the receiver 1 Turn on the power to the MD/TAPE jacks. Distance to front speakers: ____ feet (meters) Distance to center speaker: ____ feet (meters) Distance to surround speakers: ____ feet (meters) 2 Use the MULTI CONTROL to select the distance to be used. 7 Selecting MD/TAPE Select the source...
User Manual
Page 18
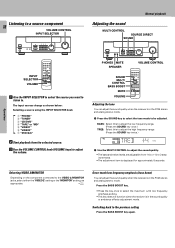
Listening to a source component 18 VOLUME CONTROL INPUT SELECTOR Normal playback Adjusting the sound MULTI CONTROL SOURCE DIRECT SOUND Operations INPUT SELECTOR VOLUME 1 Use the INPUT SELECTOR to select the source you want to listen to the previous setting Press the BASS BOOST key again. The input sources change as appropriate. 7 Once-touch low frequency emphasis (bass boost) You can adjust the sound quality when the receiver is displayed for approximately 8 seconds. PHONES MUTE SPEAKER VOLUME CONTROL SOUND MULTI CONTROL BASS BOOST MUTE VOLUME Adjusting the tone...
Listening to a source component 18 VOLUME CONTROL INPUT SELECTOR Normal playback Adjusting the sound MULTI CONTROL SOURCE DIRECT SOUND Operations INPUT SELECTOR VOLUME 1 Use the INPUT SELECTOR to select the source you want to listen to the previous setting Press the BASS BOOST key again. The input sources change as appropriate. 7 Once-touch low frequency emphasis (bass boost) You can adjust the sound quality when the receiver is displayed for approximately 8 seconds. PHONES MUTE SPEAKER VOLUME CONTROL SOUND MULTI CONTROL BASS BOOST MUTE VOLUME Adjusting the tone...

User Manual
Page 19
... Operations INPUT SELECTOR Recording a music source When recording a music source, switch the VIDEO2/MONITOR setting to "MONITOR" . 7 1 Use the INPUT SELECTOR knob to select the source (other than "MD/TAPE." 3 Start playback on the cassette deck connected to the MONITOR jacks and start recording on the cassette deck connected to the MD/TAPE jacks. kHz DOWN MIX DSP TUNED • When you turn off during the 6ch INPUT mode. FM AUTO SOUND DIGITAL AUTO AM PRO LOGIC S.DIRECT...
... Operations INPUT SELECTOR Recording a music source When recording a music source, switch the VIDEO2/MONITOR setting to "MONITOR" . 7 1 Use the INPUT SELECTOR knob to select the source (other than "MD/TAPE." 3 Start playback on the cassette deck connected to the MONITOR jacks and start recording on the cassette deck connected to the MD/TAPE jacks. kHz DOWN MIX DSP TUNED • When you turn off during the 6ch INPUT mode. FM AUTO SOUND DIGITAL AUTO AM PRO LOGIC S.DIRECT...
User Manual
Page 21
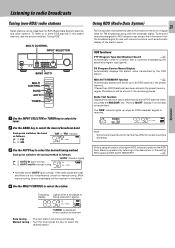
... useful information (in "Presetting RDS stations (RDS AUTO MEMORY)". ™ PS (Program Service Name) Display Automatically displays the station name transmitted by some RDS stations when you press the RDS DISP. Tuners and receivers designed for RDS reception can be received in monaural.) 4 Use the MULTI CONTROL to 40 RDS stations in stereo. Each press switches the band as follows: "AUTO" indicator lights. 1 AUTO lit (auto tuning) 2 AUTO not lit (manual tuning) FM AUTO SOUND DIGITAL AUTO AM PRO LOGIC S.DIRECT...
... useful information (in "Presetting RDS stations (RDS AUTO MEMORY)". ™ PS (Program Service Name) Display Automatically displays the station name transmitted by some RDS stations when you press the RDS DISP. Tuners and receivers designed for RDS reception can be received in monaural.) 4 Use the MULTI CONTROL to 40 RDS stations in stereo. Each press switches the band as follows: "AUTO" indicator lights. 1 AUTO lit (auto tuning) 2 AUTO not lit (manual tuning) FM AUTO SOUND DIGITAL AUTO AM PRO LOGIC S.DIRECT...

User Manual
Page 22
... up to use the PTY function, the RDS stations must be replaced by RDS stations. (i.e., If the RDS AUTO MEMORY function finds 15 RDS stations, the stations currently preset at numbers 01~15 are replaced by the RDS stations.) Each press switches the display mode as follows: 1 PS (Program Service name) display 2 RT (Radio Text) display 3 Frequency display 1 PS (Program Service name) display: The station name is displayed automatically when an RDS broadcast is received, If...
... up to use the PTY function, the RDS stations must be replaced by RDS stations. (i.e., If the RDS AUTO MEMORY function finds 15 RDS stations, the stations currently preset at numbers 01~15 are replaced by the RDS stations.) Each press switches the display mode as follows: 1 PS (Program Service name) display 2 RT (Radio Text) display 3 Frequency display 1 PS (Program Service name) display: The station name is displayed automatically when an RDS broadcast is received, If...
User Manual
Page 26
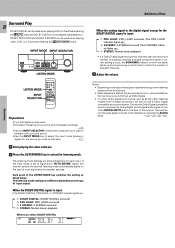
... maximum number of the signal or speaker setting, some listening modes cannot be selected. • When playback is started, the sound may be cut or interrupted before the input source is input, the DOWN MIX indicator on the front panel lights up .) 1 DOLBY DIGITAL: DOLBY DIGITAL surround 2 PRO LOGIC: PRO LOGIC surround 3 3 STEREO: 3-STEREO surround 4 STEREO: Normal stereo playback When you wish to play back. 7 1 Start playing the video software. 2 Press the LISTEN MODE key to digital auto ("AUTO SOUND" lights), the receiver...
... maximum number of the signal or speaker setting, some listening modes cannot be selected. • When playback is started, the sound may be cut or interrupted before the input source is input, the DOWN MIX indicator on the front panel lights up .) 1 DOLBY DIGITAL: DOLBY DIGITAL surround 2 PRO LOGIC: PRO LOGIC surround 3 3 STEREO: 3-STEREO surround 4 STEREO: Normal stereo playback When you wish to play back. 7 1 Start playing the video software. 2 Press the LISTEN MODE key to digital auto ("AUTO SOUND" lights), the receiver...
User Manual
Page 27
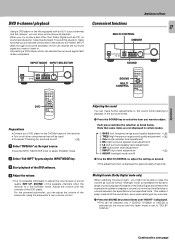
... can make sure that you connect the component to the receiver's DVD/6ch INPUT jacks through a surround processor which can enjoy surround sound playback. Connecting a DVD player which can decode the surround signal you want to listen to play a disc other components that some items are not displayed in the DVD/6ch mode. For the powered subwoofer, you can decode the surround signal itself is produced or, noise may be able to "DOLBY DIGITAL." Midnight mode...
... can make sure that you connect the component to the receiver's DVD/6ch INPUT jacks through a surround processor which can enjoy surround sound playback. Connecting a DVD player which can decode the surround signal you want to listen to play a disc other components that some items are not displayed in the DVD/6ch mode. For the powered subwoofer, you can decode the surround signal itself is produced or, noise may be able to "DOLBY DIGITAL." Midnight mode...

User Manual
Page 29
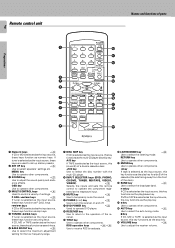
... remote control 1. P.CALL MULTI CONTROL TUNING ENTER BAND A/B+100 AUTO BASS BOOST DISC SKIP DVD PHONO CD/DVD TUNER MD/TAPE VIDEO1 VIDEO2 MUTE VOLUME RC-R0513 DVD POWER RECEIVER (Receiver mode) TITLE (Title) % (Cursor ») fi (Cursor «) @ (Cursor |) # (Cursor \) 6 (3 Play) 8 (Pause) Pressing the DVD Power key for 15 seconds after pressing any of those DVD operation buttons. (To turn the receiver operation mode within 15 seconds, press the RECEIVER key.) DVD player operation keys You can control two groups of KENWOOD DVD players directly without using...
... remote control 1. P.CALL MULTI CONTROL TUNING ENTER BAND A/B+100 AUTO BASS BOOST DISC SKIP DVD PHONO CD/DVD TUNER MD/TAPE VIDEO1 VIDEO2 MUTE VOLUME RC-R0513 DVD POWER RECEIVER (Receiver mode) TITLE (Title) % (Cursor ») fi (Cursor «) @ (Cursor |) # (Cursor \) 6 (3 Play) 8 (Pause) Pressing the DVD Power key for 15 seconds after pressing any of those DVD operation buttons. (To turn the receiver operation mode within 15 seconds, press the RECEIVER key.) DVD player operation keys You can control two groups of KENWOOD DVD players directly without using...

User Manual
Page 30
...unused number keys to help you desire. P.CALL MULTI CONTROL TUNING ENTER BAND A/B+100 AUTO BASS BOOST DISC SKIP DVD PHONO CD/DVD TUNER MD/TAPE VIDEO1 VIDEO2 MUTE VOLUME RC-R0513 6 (3 Play) Numeric keys (Select tracks) 1 (Search) ¡ (Search) DISC SKIP (Disc skip) 7 (Stop) POWER 1 2 3 4 5 6 DVD POWER 7 8 9 0 +10 RECEIVER PTY MENU OSD RETURN TITLE SET UP SOUND LISTEN MODE P.CALL RDS DISP. Cassette deck operations CD player operations 2 (Play) 1 (Rewind) ¡ (Fast forward) 7 (Stop) POWER 1 2 3 4 5 6 DVD POWER 7 8 9 0 +10 RECEIVER PTY MENU...
...unused number keys to help you desire. P.CALL MULTI CONTROL TUNING ENTER BAND A/B+100 AUTO BASS BOOST DISC SKIP DVD PHONO CD/DVD TUNER MD/TAPE VIDEO1 VIDEO2 MUTE VOLUME RC-R0513 6 (3 Play) Numeric keys (Select tracks) 1 (Search) ¡ (Search) DISC SKIP (Disc skip) 7 (Stop) POWER 1 2 3 4 5 6 DVD POWER 7 8 9 0 +10 RECEIVER PTY MENU OSD RETURN TITLE SET UP SOUND LISTEN MODE P.CALL RDS DISP. Cassette deck operations CD player operations 2 (Play) 1 (Rewind) ¡ (Fast forward) 7 (Stop) POWER 1 2 3 4 5 6 DVD POWER 7 8 9 0 +10 RECEIVER PTY MENU...

User Manual
Page 31
... speaker cords are disconnected. • VOLUME is set to some other external factor. ing the speakers" $ • Adjust the volume to a proper level. • Turn OFF the MUTE. ( • Set the SPEAKERS switch(es) to ON. & The standby indicator blinks and sound is ON, or due to digital manual. PHONO input selector is set to the minimum level. • Connect it starts. a DVD player. • Press the INPUT MODE key to select to digital auto mode. 7 A video source cannot...
... speaker cords are disconnected. • VOLUME is set to some other external factor. ing the speakers" $ • Adjust the volume to a proper level. • Turn OFF the MUTE. ( • Set the SPEAKERS switch(es) to ON. & The standby indicator blinks and sound is ON, or due to digital manual. PHONO input selector is set to the minimum level. • Connect it starts. a DVD player. • Press the INPUT MODE key to select to digital auto mode. 7 A video source cannot...


