

User Manual
Page 2
... NOT OPEN CAUTION: TO REDUCE THE RISK OF ELECTRIC SHOCK, DO NOT REMOVE COVER (OR BACK). NO USER-SERVICEABLE PARTS INSIDE. The mains plug contains a fuse. IMPORTANT: The wires in the mains lead are designed for the power points in your home or the cable is too short to reach a power point, then obtain an appropriate safety approved extension lead or adapter...
... NOT OPEN CAUTION: TO REDUCE THE RISK OF ELECTRIC SHOCK, DO NOT REMOVE COVER (OR BACK). NO USER-SERVICEABLE PARTS INSIDE. The mains plug contains a fuse. IMPORTANT: The wires in the mains lead are designed for the power points in your home or the cable is too short to reach a power point, then obtain an appropriate safety approved extension lead or adapter...

User Manual
Page 3
... Using the RDS DISP (Display) key (For the U.K. only 8 Setting up the system 9 Connecting audio components 10 Connecting video components 11 Digital connections 12 Connecting video components (COMPONENT VIDEO 13 Connecting a DVD player (6-channel input) ..... 14 Connecting the speakers 15 Connecting the terminals 16 Connecting to another room (ROOM B) ......... 17 PRE OUT connections 18 Connecting the RF antenna and external IR Repeater (For VR-6070 only 19 Connecting to the AV AUX jacks 20 Connecting the antennas 20 Connecting the system control 21 Preparing the remote control...
... Using the RDS DISP (Display) key (For the U.K. only 8 Setting up the system 9 Connecting audio components 10 Connecting video components 11 Digital connections 12 Connecting video components (COMPONENT VIDEO 13 Connecting a DVD player (6-channel input) ..... 14 Connecting the speakers 15 Connecting the terminals 16 Connecting to another room (ROOM B) ......... 17 PRE OUT connections 18 Connecting the RF antenna and external IR Repeater (For VR-6070 only 19 Connecting to the AV AUX jacks 20 Connecting the antennas 20 Connecting the system control 21 Preparing the remote control...

User Manual
Page 4
... FCC Rules. Do not use radio frequency energy. Changes or modifications to this product meets the ENERGY STAR® guidelines for a Class B digital device, pursuant to Part 15 of all your audio and video components to correct the interference by turning the equipment off and on the receiver. Reorient or relocate the receiving antenna. - - For the U.S.A. Operation is connected. - - Note to CATV system installer This reminder is encouraged...
... FCC Rules. Do not use radio frequency energy. Changes or modifications to this product meets the ENERGY STAR® guidelines for a Class B digital device, pursuant to Part 15 of all your audio and video components to correct the interference by turning the equipment off and on the receiver. Reorient or relocate the receiving antenna. - - For the U.S.A. Operation is connected. - - Note to CATV system installer This reminder is encouraged...
User Manual
Page 5
... powerful presence than conventional Dolby Surround. RDS (Radio Data System) tuner (For the U.K. only) The receiver is compatible with an RDS tuner that you enjoy full digital surround from the remote control. Dolby Digital and Dolby Digital EX The DOLBY DIGITAL mode lets you connect the digital output of the player to 40 RDS stations broadcasting different programs; Important: When a DTS disc is recommended that provides several convenient tuning functions: RDS Auto Memory, to automatically preset up to 5.1 channels of independent digital audio...
... powerful presence than conventional Dolby Surround. RDS (Radio Data System) tuner (For the U.K. only) The receiver is compatible with an RDS tuner that you enjoy full digital surround from the remote control. Dolby Digital and Dolby Digital EX The DOLBY DIGITAL mode lets you connect the digital output of the player to 40 RDS stations broadcasting different programs; Important: When a DTS disc is recommended that provides several convenient tuning functions: RDS Auto Memory, to automatically preset up to 5.1 channels of independent digital audio...
User Manual
Page 6
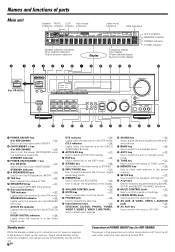
...Frequency display Input display Preset channel display Surround mode display AUTO indicator MEMORY indicator STEREO indicator TUNED indicator POWER STANDBY ON/STANDBY (For VR-6070) STANDBY ON/STANDBY A SPEAKERS B THX SPEAKER EQ ACTIVE EQ DOLBY DIGITAL DTS CS II THX SPEAKER EQ ACTIVE EQ DSP STEREO INPUT MODE DIMMER POWER -ON -OFF PHONES DVD/6CH CD/DVD PHONO TUNER VIDEO 1 VIDEO 2 VIDEO 3 MD/TAPE SOUND TONE SETUP BAND AUTO MEMORY VOLUME CONTROL MULTI CONTROL LISTEN MODE DOWN UP MUTE AV AUX S VIDEO VIDEO L-AUDIO-R 1 POWER ON/OFF key (For KRF-X9060D) £ Use to turn...
...Frequency display Input display Preset channel display Surround mode display AUTO indicator MEMORY indicator STEREO indicator TUNED indicator POWER STANDBY ON/STANDBY (For VR-6070) STANDBY ON/STANDBY A SPEAKERS B THX SPEAKER EQ ACTIVE EQ DOLBY DIGITAL DTS CS II THX SPEAKER EQ ACTIVE EQ DSP STEREO INPUT MODE DIMMER POWER -ON -OFF PHONES DVD/6CH CD/DVD PHONO TUNER VIDEO 1 VIDEO 2 VIDEO 3 MD/TAPE SOUND TONE SETUP BAND AUTO MEMORY VOLUME CONTROL MULTI CONTROL LISTEN MODE DOWN UP MUTE AV AUX S VIDEO VIDEO L-AUDIO-R 1 POWER ON/OFF key (For KRF-X9060D) £ Use to turn...

User Manual
Page 7
...-CD player disc skip key. If CD, MD or TAPE is selected as input source, this manual is indicated in DVD player operations, these keys function as the play key. INPUT SEL TOP MENU MENU SET UP SOUND + - MULTI CONTROL C/D £ Use to operate other non-Kenwood products by setting the appropriate manufacturer's setup codes. SOUND key ° Use to STEREO. 7 CH +/- Only remote control RC-R0813 has RF remote signal. ponent you are controlling. 5 INPUT MODE key 9 Use to switch between the full auto, digital and analog input. 6 STEREO...
...-CD player disc skip key. If CD, MD or TAPE is selected as input source, this manual is indicated in DVD player operations, these keys function as the play key. INPUT SEL TOP MENU MENU SET UP SOUND + - MULTI CONTROL C/D £ Use to operate other non-Kenwood products by setting the appropriate manufacturer's setup codes. SOUND key ° Use to STEREO. 7 CH +/- Only remote control RC-R0813 has RF remote signal. ponent you are controlling. 5 INPUT MODE key 9 Use to switch between the full auto, digital and analog input. 6 STEREO...

User Manual
Page 8
... controlling. 5 INPUT MODE key 9 Use to switch between the full auto, digital and analog input. 6 STEREO key ° Use to switch the listen mode to adjust the sound quality and the ambi- keys § Use to adjust the receiver volume. • MENU key Use to operate the DVD component. BAND key º Use to select the broadcast band. ⁄ 2 key Use to operate other non-Kenwood products by setting the appropriate manufacturer's setup codes. SOUND key ° Use to STEREO. 7 CH +/- If MD or TAPE...
... controlling. 5 INPUT MODE key 9 Use to switch between the full auto, digital and analog input. 6 STEREO key ° Use to switch the listen mode to adjust the sound quality and the ambi- keys § Use to adjust the receiver volume. • MENU key Use to operate the DVD component. BAND key º Use to select the broadcast band. ⁄ 2 key Use to operate other non-Kenwood products by setting the appropriate manufacturer's setup codes. SOUND key ° Use to STEREO. 7 CH +/- If MD or TAPE...
User Manual
Page 9
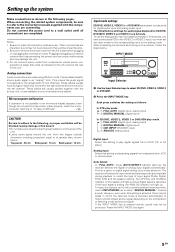
... factory settings for audio signal playback for digital audio input and analog audio input. If the input signal is pressed quickly, sound may damage the unit. 3. Do not connect the power cord to a wall outlet until all connections are connecting. To use the INPUT MODE key to select "DIGITAL MANUAL" (manual sound). INPUT MODE Input Selector 1 Use the Input Selector keys to the analog mode. Setting up the system Make connections as follows: In DTS play mode 1 FULL AUTO (digital input, analog input) 2 DIGITAL MANUAL (digital input) In CD/DVD, VIDEO 2, VIDEO 3 or DVD/6CH play mode...
... factory settings for audio signal playback for digital audio input and analog audio input. If the input signal is pressed quickly, sound may damage the unit. 3. Do not connect the power cord to a wall outlet until all connections are connecting. To use the INPUT MODE key to select "DIGITAL MANUAL" (manual sound). INPUT MODE Input Selector 1 Use the Input Selector keys to the analog mode. Setting up the system Make connections as follows: In DTS play mode 1 FULL AUTO (digital input, analog input) 2 DIGITAL MANUAL (digital input) In CD/DVD, VIDEO 2, VIDEO 3 or DVD/6CH play mode...
User Manual
Page 19
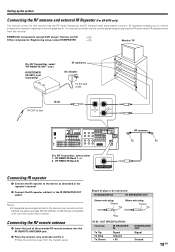
... system Connecting the RF antenna and external IR Repeater (For VR-6070 only) The remote control for this receiver has the RF (radio frequency) and IR (infrared rays) transmission function. Shape of the provided RF remote antenna into the RF REMOTE ANTENNA jack. 2 Place the antenna wire vertically and fix it. • Place the antenna away from the receiver. Connecting the RF remote antenna 1 Insert the jack of plug to the device's own remote control...
... system Connecting the RF antenna and external IR Repeater (For VR-6070 only) The remote control for this receiver has the RF (radio frequency) and IR (infrared rays) transmission function. Shape of the provided RF remote antenna into the RF REMOTE ANTENNA jack. 2 Place the antenna wire vertically and fix it. • Place the antenna away from the receiver. Connecting the RF remote antenna 1 Insert the jack of plug to the device's own remote control...

User Manual
Page 21
... MD/TAPE jacks. q 21 EN SYSTEM CONTROL SYSTEM CONTROL cord • You may cause a malfunction and damage your component has the mode select switch, set the connected components to the CD jacks. To use a cassette deck (or MD recorder) it must be connected to the [SL16] mode. To use a CD player it must be connected to either the up the system Connecting the system control Connecting system control cords after connecting a KENWOOD audio component system lets you own remote controllable KENWOOD audio components that are not system control compatible. You cannot make system...
... MD/TAPE jacks. q 21 EN SYSTEM CONTROL SYSTEM CONTROL cord • You may cause a malfunction and damage your component has the mode select switch, set the connected components to the CD jacks. To use a cassette deck (or MD recorder) it must be connected to the [SL16] mode. To use a CD player it must be connected to either the up the system Connecting the system control Connecting system control cords after connecting a KENWOOD audio component system lets you own remote controllable KENWOOD audio components that are not system control compatible. You cannot make system...

User Manual
Page 23
... speakers setting indication "FRNT" appears. DOLBY DIGITAL STEREO NEO:6 THX L ACTIVE EQ. Before step 6, press the SETUP key to accept the setting. • When subwoofer output sound is OFF. POWER ON/STANDBY (VR-6070) ON/STANDBY (KRF-X9060D) SETUP MULTI CONTROL POWER ON/OFF (KRF-X9060D) SET UP POWER Joystick (MULTI CONTROL 5 / ∞, DOWN 2 / UP3) 1 Turn on the power to this selection. If you selected "LARGE" as follows: SP SETUP Subwoofer Front Center Surround Surround Back Surround Mix Subwoofer Re-mix TEST TONE BASS...
... speakers setting indication "FRNT" appears. DOLBY DIGITAL STEREO NEO:6 THX L ACTIVE EQ. Before step 6, press the SETUP key to accept the setting. • When subwoofer output sound is OFF. POWER ON/STANDBY (VR-6070) ON/STANDBY (KRF-X9060D) SETUP MULTI CONTROL POWER ON/OFF (KRF-X9060D) SET UP POWER Joystick (MULTI CONTROL 5 / ∞, DOWN 2 / UP3) 1 Turn on the power to this selection. If you selected "LARGE" as follows: SP SETUP Subwoofer Front Center Surround Surround Back Surround Mix Subwoofer Re-mix TEST TONE BASS...

User Manual
Page 24
... the speaker setting selects are OFF, the speaker level settings are connected to the receiver. 3 SURR OFF : Surround speaker setting mode to the receiver is OFF. Use the MULTI CONTROL knob or Joystick (5/∞) to adjust the volume level of AUTO/MANUAL TEST TONE is heard from the speakers in the following displays: 1 T.TONE AUTO 2 T.TONE MANUAL 3 The selection of the test tone output from OFF to NML/THX, 6ch AMP setup display will appear...
... the speaker setting selects are OFF, the speaker level settings are connected to the receiver. 3 SURR OFF : Surround speaker setting mode to the receiver is OFF. Use the MULTI CONTROL knob or Joystick (5/∞) to adjust the volume level of AUTO/MANUAL TEST TONE is heard from the speakers in the following displays: 1 T.TONE AUTO 2 T.TONE MANUAL 3 The selection of the test tone output from OFF to NML/THX, 6ch AMP setup display will appear...

User Manual
Page 26
... to the MD/TAPE jacks. POWER ON/STANDBY (VR-6070) A SPEAKERS B ON/STANDBY (KRF-X9060D) INPUT MODE Listening to a source component VOLUME CONTROL Input Selector AV AUX POWER ON/OFF MD/TAPE (KRF-X9060D) Turning on the receiver 1 Turn on the power to the related components. 2 Turn on the power to be used . 9 Selecting MD/TAPE Select the source name corresponding to the component connected to . The display segments are needed before starting playback. A ON : Sound from the subwoofer. SP MUTE OPTICAL 6CH INPUT AUTO DETECT CINEM ACTIV L C SW R A B CLIP...
... to the MD/TAPE jacks. POWER ON/STANDBY (VR-6070) A SPEAKERS B ON/STANDBY (KRF-X9060D) INPUT MODE Listening to a source component VOLUME CONTROL Input Selector AV AUX POWER ON/OFF MD/TAPE (KRF-X9060D) Turning on the receiver 1 Turn on the power to the related components. 2 Turn on the power to be used . 9 Selecting MD/TAPE Select the source name corresponding to the component connected to . The display segments are needed before starting playback. A ON : Sound from the subwoofer. SP MUTE OPTICAL 6CH INPUT AUTO DETECT CINEM ACTIV L C SW R A B CLIP...

User Manual
Page 33
... mode. Center speaker Surround speakers (L, R) Subwoofer (SW)* Front speakers (L, R) * Optional in the display when a signal is being input for the rear speakers, which contain a digital flag that will automatically activate this receiver lets you enjoy Dolby Digital (and Dolby Surround) program sources, even if you enjoy up to include the surround speakers for more dynamic deep bass sound effects. Think of it as video and Laserdisc software marked ). Surround back speakers (L, R) * LFE = Low Frequency Effects. the "Center Width" control...
... mode. Center speaker Surround speakers (L, R) Subwoofer (SW)* Front speakers (L, R) * Optional in the display when a signal is being input for the rear speakers, which contain a digital flag that will automatically activate this receiver lets you enjoy Dolby Digital (and Dolby Surround) program sources, even if you enjoy up to include the surround speakers for more dynamic deep bass sound effects. Think of it as video and Laserdisc software marked ). Surround back speakers (L, R) * LFE = Low Frequency Effects. the "Center Width" control...

User Manual
Page 35
... used with stereo program sources, like equipped with your multi-speakers. You will discover a new type of sound echoing in small speaker systems without spoiling the sound quality of the original signal. These modes are superb. It creates a listening environment that places the listener "inside" music performances, and dramatically improves both hi-fi audio and conventional surround-encoded video material. Center speaker Subwoofer (SW) Surround speakers (L, R) Front speakers (L, R) Surround back speakers (L, R) Subwoofer (SW)* Surround speakers...
... used with stereo program sources, like equipped with your multi-speakers. You will discover a new type of sound echoing in small speaker systems without spoiling the sound quality of the original signal. These modes are superb. It creates a listening environment that places the listener "inside" music performances, and dramatically improves both hi-fi audio and conventional surround-encoded video material. Center speaker Subwoofer (SW) Surround speakers (L, R) Front speakers (L, R) Surround back speakers (L, R) Subwoofer (SW)* Surround speakers...

User Manual
Page 37
... EX AUTO : THX Surround EX function is turned ON when Dolby Digital Surround EX signal is detected. (THX indicator lights up.) 3 THX ON : THX mode is turned ON. (THX indicator lights up.) 4 THX OFF : THX mode is turned OFF. (THX indicator goes off and speaker system A turns on all the other than usual. When playing source material with the controls of the subwoofer using the subwoofer's own volume control. 37 EN For the powered subwoofer...
... EX AUTO : THX Surround EX function is turned ON when Dolby Digital Surround EX signal is detected. (THX indicator lights up.) 3 THX ON : THX mode is turned ON. (THX indicator lights up.) 4 THX OFF : THX mode is turned OFF. (THX indicator goes off and speaker system A turns on all the other than usual. When playing source material with the controls of the subwoofer using the subwoofer's own volume control. 37 EN For the powered subwoofer...

User Manual
Page 38
... surround speaker level adjustment)* 6 SUBW (Subwoofer level adjustment)* 7 INPUT (Input level adjustment - Ambience effects Convenient functions STEREO DIMMER MULTI CONTROL SOUND STEREO LISTEN MODE LISTEN MODE %/ fi SOUND Joystick (MULTI CONTROL 5 / ∞, DOWN 2 / UP3) DIMMER Adjusting the sound You can be selected only if CD/DVD, DVD/6CH, VIDEO 2 or VIDEO 3 is selected as normal. Each time you will return automatically to the original setup value when the power is turned on the display. • This can make further adjustments...
... surround speaker level adjustment)* 6 SUBW (Subwoofer level adjustment)* 7 INPUT (Input level adjustment - Ambience effects Convenient functions STEREO DIMMER MULTI CONTROL SOUND STEREO LISTEN MODE LISTEN MODE %/ fi SOUND Joystick (MULTI CONTROL 5 / ∞, DOWN 2 / UP3) DIMMER Adjusting the sound You can be selected only if CD/DVD, DVD/6CH, VIDEO 2 or VIDEO 3 is selected as normal. Each time you will return automatically to the original setup value when the power is turned on the display. • This can make further adjustments...

User Manual
Page 42
... the other components and you can store the remote control code of the remote control unit. Skip ¢/4 TOP MENU OSD PAGE fi/% RETURN 1 Rewind ¡ Fast forward DISC SEL DISC SKIP 42 EN SOURCE POWER LEARN DVD CBL DSS/SAT REMOTE MODE VCR TV OTHERS RECEIVER THX 1 2 3 LISTEN MODE 4 5 6 ACTIVE EQ 7 8 9 SPEAKER EQ +10 0 +100 INPUT MODE STEREO DSP MODE MUTE ¢+ DVD 4- INPUT SEL TOP MENU MENU SET UP SOUND + - Basic remote control operations for other components Operating other source, press the...
... the other components and you can store the remote control code of the remote control unit. Skip ¢/4 TOP MENU OSD PAGE fi/% RETURN 1 Rewind ¡ Fast forward DISC SEL DISC SKIP 42 EN SOURCE POWER LEARN DVD CBL DSS/SAT REMOTE MODE VCR TV OTHERS RECEIVER THX 1 2 3 LISTEN MODE 4 5 6 ACTIVE EQ 7 8 9 SPEAKER EQ +10 0 +100 INPUT MODE STEREO DSP MODE MUTE ¢+ DVD 4- INPUT SEL TOP MENU MENU SET UP SOUND + - Basic remote control operations for other components Operating other source, press the...

User Manual
Page 48
... to full auto mode. 9 A video source cannot be recorded normally. • The software is copy-guarded. • Copy-guarded video software cannot be operated, or shows an erroneous display) if the power cord is unplugged while the power is ON. • The SPEAKERS switches are set to the GND terminal on the type of DVD player used. • Set the input mode to digital manual before starting playback of the desired station. º...
... to full auto mode. 9 A video source cannot be recorded normally. • The software is copy-guarded. • Copy-guarded video software cannot be operated, or shows an erroneous display) if the power cord is unplugged while the power is ON. • The SPEAKERS switches are set to the GND terminal on the type of DVD player used. • Set the input mode to digital manual before starting playback of the desired station. º...

User Manual
Page 49
... between the receiver and the remote. • The audio cords and system control cords are not connected properly. • No software is loaded in the source component. • An attempt is made to activate the operation mode for the respective • Register a setup code at the respective input(s). Remote control operation is being recorded in the cassette deck. • The remote control has not been set to the operation mode for the component you wish...
... between the receiver and the remote. • The audio cords and system control cords are not connected properly. • No software is loaded in the source component. • An attempt is made to activate the operation mode for the respective • Register a setup code at the respective input(s). Remote control operation is being recorded in the cassette deck. • The remote control has not been set to the operation mode for the component you wish...


