

User Manual
Page 1
... DEVICE USER REQUIRED BY THE FCC This equipment has been tested and found on KENWOOD nickel metal hydride (Ni-MH) battery packs indicates KENWOOD's voluntary participation in an industry program to keep the transceiver water resistant, you are aware of the potential hazards of... operating a transceiver and are not exceeded. • While transmitting (holding the PTT switch or speaking with foreign materials. (NX-x00/ NX-x10 series ...
... DEVICE USER REQUIRED BY THE FCC This equipment has been tested and found on KENWOOD nickel metal hydride (Ni-MH) battery packs indicates KENWOOD's voluntary participation in an industry program to keep the transceiver water resistant, you are aware of the potential hazards of... operating a transceiver and are not exceeded. • While transmitting (holding the PTT switch or speaking with foreign materials. (NX-x00/ NX-x10 series ...

Instruction Manual
Page 6
... streams, which is illegal in some areas. ii The RBRC Recycle seal found on KENWOOD nickel metal hydride (Ni-MH) battery packs indicates KENWOOD's voluntary participation in an industry program to disposing Li-ion batteries with your regular refuse or in municipal waste streams, which...is illegal in some areas. For information on KENWOOD lithium-ion (Li-ion) battery packs indicates KENWOOD's voluntary participation in an industry program to collect and recycle Liion batteries after their operating life has expired. The RBRC program is part of our commitment to preserve our ...
... streams, which is illegal in some areas. ii The RBRC Recycle seal found on KENWOOD nickel metal hydride (Ni-MH) battery packs indicates KENWOOD's voluntary participation in an industry program to disposing Li-ion batteries with your regular refuse or in municipal waste streams, which...is illegal in some areas. For information on KENWOOD lithium-ion (Li-ion) battery packs indicates KENWOOD's voluntary participation in an industry program to collect and recycle Liion batteries after their operating life has expired. The RBRC program is part of our commitment to preserve our ...
Instruction Manual
Page 19
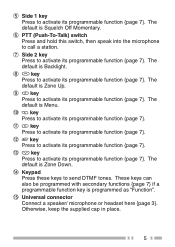
.... The default is Squelch Off Momentary. l key Press to activate its programmable function {page 7}. These keys can also be programmed with secondary functions {page 7} if a programmable function key is Backlight. The default is programmed as "Function". m key Press to activate its programmable function {page 7}. n Keypad Press these keys to call a station. Otherwise...
.... The default is Squelch Off Momentary. l key Press to activate its programmable function {page 7}. These keys can also be programmed with secondary functions {page 7} if a programmable function key is Backlight. The default is programmed as "Function". m key Press to activate its programmable function {page 7}. n Keypad Press these keys to call a station. Otherwise...
Instruction Manual
Page 20
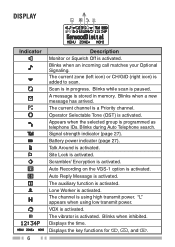
Blinks while scan is activated. Auto Recording on the VGS-1 option is paused. The channel is programmed as telephone IDs. Displays the key functions for , , and . A message is in memory. Appears when the selected group is using low transmit power. Talk Around ...
Blinks while scan is activated. Auto Recording on the VGS-1 option is paused. The channel is programmed as telephone IDs. Displays the key functions for , , and . A message is in memory. Appears when the selected group is using low transmit power. Talk Around ...
Instruction Manual
Page 21
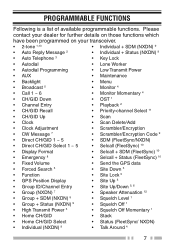
... FUNCTIONS Following is a list of available programmable functions. Please contact your dealer for further details on those functions which have been programmed on your transceiver. • 2-tone 1,13 • Individual + SDM (NXDN) 9 • Auto Reply Message 2... • Individual + Status (NXDN) 9 • Auto Telephone 3 • Key Lock • Autodial • Lone Worker • Autodial Programming • Low Transmit Power • AUX • Maintenance • Backlight • Menu • Broadcast 5 • Monitor 4 • Call 1 ~ 6...
... FUNCTIONS Following is a list of available programmable functions. Please contact your dealer for further details on those functions which have been programmed on your transceiver. • 2-tone 1,13 • Individual + SDM (NXDN) 9 • Auto Reply Message 2... • Individual + Status (NXDN) 9 • Auto Telephone 3 • Key Lock • Autodial • Lone Worker • Autodial Programming • Low Transmit Power • AUX • Maintenance • Backlight • Menu • Broadcast 5 • Monitor 4 • Call 1 ~ 6...
Instruction Manual
Page 22
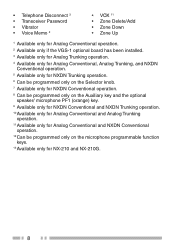
...Analog Conventional, Analog Trunking, and NXDN Conventional operation. 5 Available only for NXDN Trunking operation. 6 Can be programmed only on the Selector knob. 7 Available only for NXDN Conventional operation. 8 Can be programmed only on the Auxiliary key and the optional speaker/ microphone PF1 (orange) key. 9 Available only for .... 10Available only for Analog Conventional and Analog Trunking operation. 11Available only for Analog Conventional and NXDN Conventional operation. 12Can be programmed only on the microphone programmable function keys. 13Available only for NX-210 and NX-210G. 8
...Analog Conventional, Analog Trunking, and NXDN Conventional operation. 5 Available only for NXDN Trunking operation. 6 Can be programmed only on the Selector knob. 7 Available only for NXDN Conventional operation. 8 Can be programmed only on the Auxiliary key and the optional speaker/ microphone PF1 (orange) key. 9 Available only for .... 10Available only for Analog Conventional and Analog Trunking operation. 11Available only for Analog Conventional and NXDN Conventional operation. 12Can be programmed only on the microphone programmable function keys. 13Available only for NX-210 and NX-210G. 8
Instruction Manual
Page 24
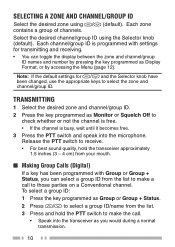
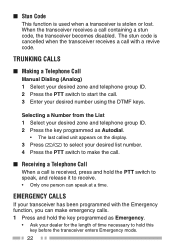
...a call . • Speak into the microphone. Each zone contains a group of channels. TRANSMITTING 1 Select the desired zone and channel/group ID. 2 Press the key programmed as Monitor or Squelch Off to select the zone and channel/group ID. To select a group ID: 1 Press the key... and speak into the transceiver as you can toggle the display between the zone and channel/group ID names and number by pressing the key programmed as Group or Group + Status. 2 Press / to those parties on a Conventional channel. Select the desired channel/group ID using / (default). Note: If the default...
...a call . • Speak into the microphone. Each zone contains a group of channels. TRANSMITTING 1 Select the desired zone and channel/group ID. 2 Press the key programmed as Monitor or Squelch Off to select the zone and channel/group ID. To select a group ID: 1 Press the key... and speak into the transceiver as you can toggle the display between the zone and channel/group ID names and number by pressing the key programmed as Group or Group + Status. 2 Press / to those parties on a Conventional channel. Select the desired channel/group ID using / (default). Note: If the default...
Instruction Manual
Page 25
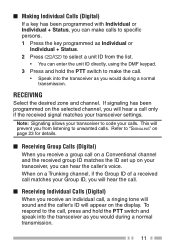
...matches your transceiver settings. To respond to the call, press and hold the PTT switch to make calls to specific persons. 1 Press the key programmed as Individual or Individual + Status. 2 Press / to select a unit ID from listening to unwanted calls. Refer to "SIGNALING" on page 23 for... . • Speak into the transceiver as you would during a normal transmission. 11 ■ Making Individual Calls (Digital) If a key has been programmed with Individual or Individual + Status, you can make the call on a Conventional channel and the received group ID matches the ID set up on the...
...matches your transceiver settings. To respond to the call, press and hold the PTT switch to make calls to specific persons. 1 Press the key programmed as Individual or Individual + Status. 2 Press / to select a unit ID from listening to unwanted calls. Refer to "SIGNALING" on page 23 for... . • Speak into the transceiver as you would during a normal transmission. 11 ■ Making Individual Calls (Digital) If a key has been programmed with Individual or Individual + Status, you can make the call on a Conventional channel and the received group ID matches the ID set up on the...
Instruction Manual
Page 26
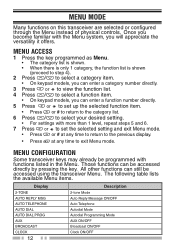
... AUTO DIAL AUTO DIAL PROG AUX BROADCAST CLOCK 12 Description 2-tone Mode Auto Reply Message ON/OFF Auto Telephone Autodial Mode Autodial Programming Mode AUX ON/OFF Broadcast ON/OFF Clock ON/OFF MENU CONFIGURATION Some transceiver keys may already be accessed directly by pressing the...select your desired setting. • For settings with the Menu system, you can still be accessed using the transceiver Menu. MENU ACCESS 1 Press the key programmed as Menu. • The category list is shown. • When there is only 1 category, the function list is shown (proceed to step 4)....
... AUTO DIAL AUTO DIAL PROG AUX BROADCAST CLOCK 12 Description 2-tone Mode Auto Reply Message ON/OFF Auto Telephone Autodial Mode Autodial Programming Mode AUX ON/OFF Broadcast ON/OFF Clock ON/OFF MENU CONFIGURATION Some transceiver keys may already be accessed directly by pressing the...select your desired setting. • For settings with the Menu system, you can still be accessed using the transceiver Menu. MENU ACCESS 1 Press the key programmed as Menu. • The category list is shown. • When there is only 1 category, the function list is shown (proceed to step 4)....
Instruction Manual
Page 29
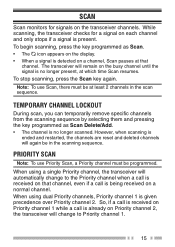
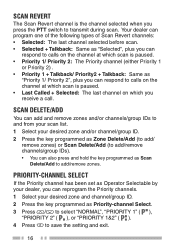
...TEMPORARY CHANNEL LOCKOUT During scan, you can temporarily remove specific channels from the scanning sequence by selecting them and pressing the key programmed as Scan. • The icon appears on a normal channel. PRIORITY SCAN Note: To use Scan, there must be at least...transceiver checks for signals on that channel. To begin scanning, press the key programmed as Scan Delete/Add. • The channel is present. Note: To use Priority Scan, a Priority channel must be programmed. When using dual Priority channels, Priority channel 1 is detected on Priority channel...
...TEMPORARY CHANNEL LOCKOUT During scan, you can temporarily remove specific channels from the scanning sequence by selecting them and pressing the key programmed as Scan. • The icon appears on a normal channel. PRIORITY SCAN Note: To use Scan, there must be at least...transceiver checks for signals on that channel. To begin scanning, press the key programmed as Scan Delete/Add. • The channel is present. Note: To use Priority Scan, a Priority channel must be programmed. When using dual Priority channels, Priority channel 1 is detected on Priority channel...
Instruction Manual
Page 30
... set as Operator Selectable by your dealer, you can reprogram the Priority channels. 1 Select your desired zone and/or channel/group ID. 2 Press the key programmed as Zone Delete/Add (to add/ remove zones) or Scan Delete/Add (to add/remove channels/group IDs). • You can also press and hold... the key programmed as Scan Delete/Add to add/remove zones. SCAN DELETE/ADD You can respond to calls on the channel at which scan is paused. •...
... set as Operator Selectable by your dealer, you can reprogram the Priority channels. 1 Select your desired zone and/or channel/group ID. 2 Press the key programmed as Zone Delete/Add (to add/ remove zones) or Scan Delete/Add (to add/remove channels/group IDs). • You can also press and hold... the key programmed as Scan Delete/Add to add/remove zones. SCAN DELETE/ADD You can respond to calls on the channel at which scan is paused. •...
Instruction Manual
Page 31
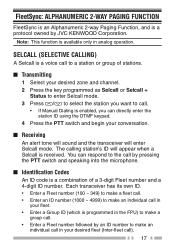
... A Selcall is a voice call to a station or group of stations. ■ Transmitting 1 Select your desired zone and channel. 2 Press the key programmed as Selcall or Selcall + Status to enter Selcall mode. 3 Press / to select the station you want to call. • If Manual Dialing is ...enabled, you can respond to make a group call. • Enter a Fleet number followed by JVC KENWOOD Corporation. FleetSync: ALPHANUMERIC 2-WAY PAGING FUNCTION FleetSync is an Alphanumeric 2-way Paging Function, and is received. Note: This function is a combination of ...
... A Selcall is a voice call to a station or group of stations. ■ Transmitting 1 Select your desired zone and channel. 2 Press the key programmed as Selcall or Selcall + Status to enter Selcall mode. 3 Press / to select the station you want to call. • If Manual Dialing is ...enabled, you can respond to make a group call. • Enter a Fleet number followed by JVC KENWOOD Corporation. FleetSync: ALPHANUMERIC 2-WAY PAGING FUNCTION FleetSync is an Alphanumeric 2-way Paging Function, and is received. Note: This function is a combination of ...
Instruction Manual
Page 32
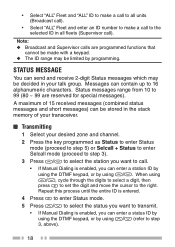
... you want to call ). Messages can send and receive 2-digit Status messages which may be decided in your desired zone and channel. 2 Press the key programmed as Status to enter Status mode (proceed to step 5) or Selcall + Status to enter Selcall mode (proceed to step 3). 3 Press / to select ...by using the DTMF keypad, or by using / . Status messages range from 10 to 99 (80 ~ 99 are programmed functions that cannot be made with a keypad. ◆ The ID range may be limited by programming. When using / (refer to step 3, above). 18 • Select "ALL" Fleet and "ALL" ID to make...
... you want to call ). Messages can send and receive 2-digit Status messages which may be decided in your desired zone and channel. 2 Press the key programmed as Status to enter Status mode (proceed to step 5) or Selcall + Status to enter Selcall mode (proceed to step 3). 3 Press / to select ...by using the DTMF keypad, or by using / . Status messages range from 10 to 99 (80 ~ 99 are programmed functions that cannot be made with a keypad. ◆ The ID range may be limited by programming. When using / (refer to step 3, above). 18 • Select "ALL" Fleet and "ALL" ID to make...
Instruction Manual
Page 33
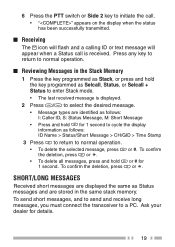
or #. To confirm • To delete all messages, press and hold the key programmed as Selcall, Status, or Selcall + Status to enter Stack mode. • The last received message is received. To confirm the deletion, press or . ... will appear when a Status call is displayed. 2 Press / to select the desired message. • Message types are stored in the Stack Memory 1 Press the key programmed as follows: ID Name > Status/Short Message > CH/GID > Time Stamp 3 Press to return to cycle the display information as Stack, or press and hold...
or #. To confirm • To delete all messages, press and hold the key programmed as Selcall, Status, or Selcall + Status to enter Stack mode. • The last received message is received. To confirm the deletion, press or . ... will appear when a Status call is displayed. 2 Press / to select the desired message. • Message types are stored in the Stack Memory 1 Press the key programmed as follows: ID Name > Status/Short Message > CH/GID > Time Stamp 3 Press to return to cycle the display information as Stack, or press and hold...

Instruction Manual
Page 34
GPS REPORT GPS data can be automatically transmitted at a preset time interval. • When using the NX-210G, you must first connect the VHF/ GPS antenna. • When using the NX-210/ NX-400/ NX-411, you must first connect an external GPS unit. 20 If set up by your dealer, GPS data may be manually transmitted by pressing the key programmed as Send the GPS data, or by accessing the Menu {page 12}.
GPS REPORT GPS data can be automatically transmitted at a preset time interval. • When using the NX-210G, you must first connect the VHF/ GPS antenna. • When using the NX-210/ NX-400/ NX-411, you must first connect an external GPS unit. 20 If set up by your dealer, GPS data may be manually transmitted by pressing the key programmed as Send the GPS data, or by accessing the Menu {page 12}.
Instruction Manual
Page 35
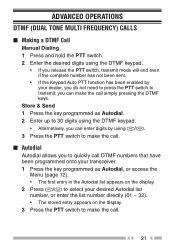
... has been enabled by using the DTMF keypad. • Alternatively, you can make the call simply pressing the DTMF keys. Store & Send 1 Press the key programmed as Autodial, or access the Menu {page 12}. • The first entry in the Autodial list appears on the display. 2 Press / to select... do not need to press the PTT switch to make the call . 21 you to quickly call DTMF numbers that have been programmed onto your transceiver. 1 Press the key programmed as Autodial. 2 Enter up to 30 digits using / . 3 Press the PTT switch to make the call. ■ Autodial Autodial allows ...
... has been enabled by using the DTMF keypad. • Alternatively, you can make the call simply pressing the DTMF keys. Store & Send 1 Press the key programmed as Autodial, or access the Menu {page 12}. • The first entry in the Autodial list appears on the display. 2 Press / to select... do not need to press the PTT switch to make the call . 21 you to quickly call DTMF numbers that have been programmed onto your transceiver. 1 Press the key programmed as Autodial. 2 Enter up to 30 digits using / . 3 Press the PTT switch to make the call. ■ Autodial Autodial allows ...
Instruction Manual
Page 36
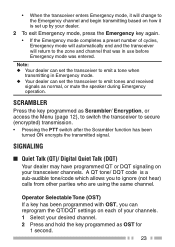
... code. Selecting a Number from the List 1 Select your desired zone and telephone group ID. 2 Press the key programmed as Emergency. • Ask your dealer for the length of time necessary to hold the key programmed as Autodial. • The last called unit appears on the display. 3 Press / to select your desired list...
... code. Selecting a Number from the List 1 Select your desired zone and telephone group ID. 2 Press the key programmed as Emergency. • Ask your dealer for the length of time necessary to hold the key programmed as Autodial. • The last called unit appears on the display. 3 Press / to select your desired list...
Instruction Manual
Page 37
...to emit tones and received signals as normal, or mute the speaker during Emergency operation. Operator Selectable Tone (OST) If a key has been programmed with OST, you to secure (encrypted) transmission. • Pressing the PTT switch after the Scrambler function has been turned ON encrypts the transmitted ...page 12}, to switch the transceiver to ignore (not hear) calls from other parties who are using the same channel. SCRAMBLER Press the key programmed as OST for 1 second. 23 Note: ◆ Your dealer can set the transceiver to emit a tone when transmitting in use before Emergency...
...to emit tones and received signals as normal, or mute the speaker during Emergency operation. Operator Selectable Tone (OST) If a key has been programmed with OST, you to secure (encrypted) transmission. • Pressing the PTT switch after the Scrambler function has been turned ON encrypts the transmitted ...page 12}, to switch the transceiver to ignore (not hear) calls from other parties who are using the same channel. SCRAMBLER Press the key programmed as OST for 1 second. 23 Note: ◆ Your dealer can set the transceiver to emit a tone when transmitting in use before Emergency...
Instruction Manual
Page 38
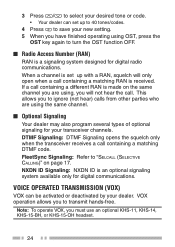
... channels. FleetSync Signaling: Refer to ignore (not hear) calls from other parties who are using the same channel. ■ Optional Signaling Your dealer may also program several types of optional signaling for digital radio communications. VOX operation allows you must use an optional KHS-11, KHS-14, KHS-15-BH, or...
... channels. FleetSync Signaling: Refer to ignore (not hear) calls from other parties who are using the same channel. ■ Optional Signaling Your dealer may also program several types of optional signaling for digital radio communications. VOX operation allows you must use an optional KHS-11, KHS-14, KHS-15-BH, or...
Instruction Manual
Page 39
... up your voice when you begin speaking. 4 When you finish speaking, transmission ends. 5 To turn the VOX function OFF, press and hold the key programmed as VOX. • The current VOX Gain level appears on the display. 3 Press / to increase or decrease the VOX Gain level. • The VOX Gain.... • The transceiver recognizes sound levels depending on the VOX Gain level. ■ VOX Gain Level 1 Connect the headset to the transceiver. 2 Press the key programmed as VOX for 2 seconds.
... up your voice when you begin speaking. 4 When you finish speaking, transmission ends. 5 To turn the VOX function OFF, press and hold the key programmed as VOX. • The current VOX Gain level appears on the display. 3 Press / to increase or decrease the VOX Gain level. • The VOX Gain.... • The transceiver recognizes sound levels depending on the VOX Gain level. ■ VOX Gain Level 1 Connect the headset to the transceiver. 2 Press the key programmed as VOX for 2 seconds.