

Operation Manual
Page 1
INSTRUCTION MANUAL VHF FM TRANSCEIVER TK-2307 UHF FM TRANSCEIVER TK-3307 B62-2317-20 (C)
INSTRUCTION MANUAL VHF FM TRANSCEIVER TK-2307 UHF FM TRANSCEIVER TK-3307 B62-2317-20 (C)

Operation Manual
Page 2
... AC plug should be readily accessible. Notices to the User ◆ Government law prohibits the operation of unlicensed radio transmitters within the territories under government control. ◆ Illegal operation is aware of, and understands, hazards common to the transceiver, reduce the transceiver volume. Pay attention to the volume level when turning the squelch off before installing optional accessories. • The charger is connected to the operation...
... AC plug should be readily accessible. Notices to the User ◆ Government law prohibits the operation of unlicensed radio transmitters within the territories under government control. ◆ Illegal operation is aware of, and understands, hazards common to the transceiver, reduce the transceiver volume. Pay attention to the volume level when turning the squelch off before installing optional accessories. • The charger is connected to the operation...
Operation Manual
Page 3
...the use of the transceiver while you use only a speaker/microphone in these conditions, to extremely hot or cold conditions. • Do not carry the battery pack (or battery case) with metal objects, as they may short the battery terminals. • When operating the ...time may result in a high-frequency burn. • If an abnormal odor or smoke is detected coming from the transceiver, switch the transceiver power off immediately, remove the battery pack from the antenna covering. i We recommend you are exposed from the transceiver, and contact your KENWOOD dealer. • Use of radio...
...the use of the transceiver while you use only a speaker/microphone in these conditions, to extremely hot or cold conditions. • Do not carry the battery pack (or battery case) with metal objects, as they may short the battery terminals. • When operating the ...time may result in a high-frequency burn. • If an abnormal odor or smoke is detected coming from the transceiver, switch the transceiver power off immediately, remove the battery pack from the antenna covering. i We recommend you are exposed from the transceiver, and contact your KENWOOD dealer. • Use of radio...

Operation Manual
Page 4
..., rupture, or burst into flame. • Do not use or leave the battery near fire or under direct sunlight! Information concerning the battery pack: The battery pack includes flammable objects such as wires, chain-necklace or hairpins). The battery pack has a safety function and protection circuit to the battery. terminals using any form of damage to avoid danger. Mishandling may...
..., rupture, or burst into flame. • Do not use or leave the battery near fire or under direct sunlight! Information concerning the battery pack: The battery pack includes flammable objects such as wires, chain-necklace or hairpins). The battery pack has a safety function and protection circuit to the battery. terminals using any form of damage to avoid danger. Mishandling may...

Operation Manual
Page 5
..., an unexpected large amount of the battery. The battery may generate heat or smoke, rupture, or burst into flame. • Do not use the battery pack if it is charged in any object, strike it with a remodeled charger), it ; The battery may generate heat or smoke, rupture,...not solder directly onto the battery! The battery may generate heat or smoke, rupture, or burst into flame. • Do not pierce the battery with any way! check the polarity of current may occur. This may occur. iii If the battery pack does not smoothly connect with a charger or operating equipment,...
..., an unexpected large amount of the battery. The battery may generate heat or smoke, rupture, or burst into flame. • Do not use the battery pack if it is charged in any object, strike it with a remodeled charger), it ; The battery may generate heat or smoke, rupture,...not solder directly onto the battery! The battery may generate heat or smoke, rupture, or burst into flame. • Do not pierce the battery with any way! check the polarity of current may occur. This may occur. iii If the battery pack does not smoothly connect with a charger or operating equipment,...
Operation Manual
Page 6
...problems. • Do not charge the battery for any other reason, remove it from flammable areas. If the battery pack is deformed, or seems abnormal for longer than the specified time! If the battery pack has not finished charging even after the regulated time has passed, stop it from the charger or operating equipment and do not use... an abnormal battery! The battery may generate heat or ...
...problems. • Do not charge the battery for any other reason, remove it from flammable areas. If the battery pack is deformed, or seems abnormal for longer than the specified time! If the battery pack has not finished charging even after the regulated time has passed, stop it from the charger or operating equipment and do not use... an abnormal battery! The battery may generate heat or ...
Operation Manual
Page 7
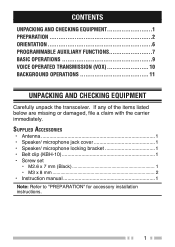
...; Antenna 1 • Speaker/ microphone jack cover 1 • Speaker/ microphone locking bracket 1 • Belt clip (KBH-10 1 • Screw set • M2.6 x 7 mm (Black 1 • M3 x 8 mm 2 • Instruction manual 1 Note: Refer to "PREPARATION" for accessory installation instructions. 1 If any of the items listed below are missing or damaged, file a claim with the carrier immediately. CONTENTS UNPACKING AND CHECKING EQUIPMENT 1 PREPARATION 2 ORIENTATION 6 PROGRAMMABLE AUXILIARY FUNCTIONS 7 BASIC OPERATIONS...
...; Antenna 1 • Speaker/ microphone jack cover 1 • Speaker/ microphone locking bracket 1 • Belt clip (KBH-10 1 • Screw set • M2.6 x 7 mm (Black 1 • M3 x 8 mm 2 • Instruction manual 1 Note: Refer to "PREPARATION" for accessory installation instructions. 1 If any of the items listed below are missing or damaged, file a claim with the carrier immediately. CONTENTS UNPACKING AND CHECKING EQUIPMENT 1 PREPARATION 2 ORIENTATION 6 PROGRAMMABLE AUXILIARY FUNCTIONS 7 BASIC OPERATIONS...

Operation Manual
Page 8
PREPARATION INSTALLING/ REMOVING THE (OPTIONAL) BATTERY PACK ◆ Do not short the battery terminals or dispose of the battery by fire. ◆ Never attempt to remove the casing from the battery pack. 1 Align the battery pack with the back of the transceiver, then press the battery pack and transceiver firmly... together until the release latch on the base of the transceiver locks. 2 To remove the battery pack, lift the safety catch on...
PREPARATION INSTALLING/ REMOVING THE (OPTIONAL) BATTERY PACK ◆ Do not short the battery terminals or dispose of the battery by fire. ◆ Never attempt to remove the casing from the battery pack. 1 Align the battery pack with the back of the transceiver, then press the battery pack and transceiver firmly... together until the release latch on the base of the transceiver locks. 2 To remove the battery pack, lift the safety catch on...
Operation Manual
Page 9
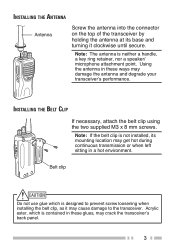
... a handle, a key ring retainer, nor a speaker/ microphone attachment point. Note: The antenna is not installed, its base and turning it may get hot during continuous transmission or when left sitting in these ways may crack the transceiver's back panel. 3 INSTALLING THE ANTENNA Antenna Screw the antenna into the connector on the top of the transceiver by holding the antenna at its mounting location...
... a handle, a key ring retainer, nor a speaker/ microphone attachment point. Note: The antenna is not installed, its base and turning it may get hot during continuous transmission or when left sitting in these ways may crack the transceiver's back panel. 3 INSTALLING THE ANTENNA Antenna Screw the antenna into the connector on the top of the transceiver by holding the antenna at its mounting location...
Operation Manual
Page 10
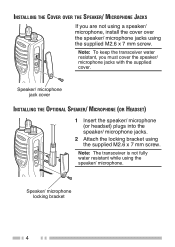
... SPEAKER/ MICROPHONE JACKS If you must cover the speaker/ microphone jacks with the supplied cover. Speaker/ microphone jack cover INSTALLING THE OPTIONAL SPEAKER/ MICROPHONE (OR HEADSET) 1 Insert the speaker/ microphone (or headset) plugs into the speaker/ microphone jacks. 2 Attach the locking bracket using the speaker/ microphone. Note: The transceiver is not fully water resistant while using the supplied M2.6 x 7 mm screw. Note: To keep the transceiver water resistant, you are not using a speaker/ microphone, install the cover over the speaker/ microphone jacks using the supplied...
... SPEAKER/ MICROPHONE JACKS If you must cover the speaker/ microphone jacks with the supplied cover. Speaker/ microphone jack cover INSTALLING THE OPTIONAL SPEAKER/ MICROPHONE (OR HEADSET) 1 Insert the speaker/ microphone (or headset) plugs into the speaker/ microphone jacks. 2 Attach the locking bracket using the speaker/ microphone. Note: The transceiver is not fully water resistant while using the supplied M2.6 x 7 mm screw. Note: To keep the transceiver water resistant, you are not using a speaker/ microphone, install the cover over the speaker/ microphone jacks using the supplied...
Operation Manual
Page 11
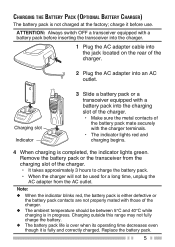
... charger terminals. • The indicator lights red and charging begins. 4 When charging is in progress. ATTENTION: Always switch OFF a transceiver equipped with a battery pack before use. Charging outside this range may not fully charge the battery. ◆ The battery pack life is over when its operating time decreases even though it before inserting the transceiver into the charger. 1 Plug the AC adapter cable into the jack...
... charger terminals. • The indicator lights red and charging begins. 4 When charging is in progress. ATTENTION: Always switch OFF a transceiver equipped with a battery pack before use. Charging outside this range may not fully charge the battery. ◆ The battery pack life is over when its operating time decreases even though it before inserting the transceiver into the charger. 1 Plug the AC adapter cable into the jack...

Operation Manual
Page 12
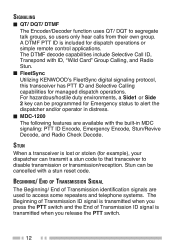
... jack. 6 Speaker/ microphone jacks Insert the Speaker/ microphone or Headset plug into the microphone to page 9. Side 1 key {refer to page 7} Press to adjust the volume level. Rotate to activate its programmable function. Side 2 key {refer to page 7} Press to switch ON the transceiver. Power switch/ Volume control Turn clockwise to activate its programmable function. To switch OFF the transceiver, turn counterclockwise until a click sounds. Antenna ORIENTATION Battery pack Channel selector Rotate to change the operating channel. • Channel...
... jack. 6 Speaker/ microphone jacks Insert the Speaker/ microphone or Headset plug into the microphone to page 9. Side 1 key {refer to page 7} Press to adjust the volume level. Rotate to activate its programmable function. Side 2 key {refer to page 7} Press to switch ON the transceiver. Power switch/ Volume control Turn clockwise to activate its programmable function. To switch OFF the transceiver, turn counterclockwise until a click sounds. Antenna ORIENTATION Battery pack Channel selector Rotate to change the operating channel. • Channel...

Operation Manual
Page 13
... the transceiver power is used to carry out emergency actions. ■ Key Lock Press and hold this key to deactivate signaling (QT/DQT, FleetSync signaling, etc.). Release the key to return to normal operation. 7 Press the key again to return to normal operation. ■ Monitor Momentary Press and hold this key to enter Emergency Mode. PROGRAMMABLE AUXILIARY FUNCTIONS Your dealer can program the Side...
... the transceiver power is used to carry out emergency actions. ■ Key Lock Press and hold this key to deactivate signaling (QT/DQT, FleetSync signaling, etc.). Release the key to return to normal operation. 7 Press the key again to return to normal operation. ■ Monitor Momentary Press and hold this key to enter Emergency Mode. PROGRAMMABLE AUXILIARY FUNCTIONS Your dealer can program the Side...

Operation Manual
Page 14
... listening in complete privacy. Press the key again to return to normal operation. ■ Squelch Off Momentary Press and hold a conversation in on your channel will be unable to understand your conversation. ■ Squelch Off Momentarily press this key to change the transmit power to low power (you cannot change low transmit power channels to use high power). 8 ■ Scan Press this key to start scanning the transceiver...
... listening in complete privacy. Press the key again to return to normal operation. ■ Squelch Off Momentary Press and hold a conversation in on your channel will be unable to understand your conversation. ■ Squelch Off Momentarily press this key to change the transmit power to low power (you cannot change low transmit power channels to use high power). 8 ■ Scan Press this key to start scanning the transceiver...

Operation Manual
Page 15
... Indicator Color Lights red Lights green Blinks red Blinks green Meaning Transmitting Receiving a call Battery power is low while transmitting Scanning Blinks orange Receiving an encoded call , press and hold the PTT switch, then speak into the microphone using your normal speaking voice. • Hold the microphone approximately 3 to receive. BASIC OPERATIONS 1 Turn the Power switch/ Volume control clockwise to switch the transceiver power ON. • A beep sounds if enabled by your dealer. 2 Press the key programmed with...
... Indicator Color Lights red Lights green Blinks red Blinks green Meaning Transmitting Receiving a call Battery power is low while transmitting Scanning Blinks orange Receiving an encoded call , press and hold the PTT switch, then speak into the microphone using your normal speaking voice. • Hold the microphone approximately 3 to receive. BASIC OPERATIONS 1 Turn the Power switch/ Volume control clockwise to switch the transceiver power ON. • A beep sounds if enabled by your dealer. 2 Press the key programmed with...

Operation Manual
Page 16
... 2 key to start transmission. 10 Note: If a headset is connected to the transceiver while the VOX function is switched ON and the VOX Gain level is selected, a beep sounds. 5 Press the PTT switch to save the setting. • A beep will sound. • The transceiver announces the new VOX Gain level. 6 Turn the transceiver power OFF and the ON again to transmit hands-free...
... 2 key to start transmission. 10 Note: If a headset is connected to the transceiver while the VOX function is switched ON and the VOX Gain level is selected, a beep sounds. 5 Press the PTT switch to save the setting. • A beep will sound. • The transceiver announces the new VOX Gain level. 6 Turn the transceiver power OFF and the ON again to transmit hands-free...

Operation Manual
Page 17
... a signal is received or an operation is operating, the LED may flash green when receiving a QT/DQT signal which does not match the QT/DQT tone/code set up in use. BUSY CHANNEL LOCKOUT (BCL) When activated, BCL prevents you continuously transmit for the duration programmed by your dealer, the Battery Saver function decreases the amount of power used after no signal is present and no operations...
... a signal is received or an operation is operating, the LED may flash green when receiving a QT/DQT signal which does not match the QT/DQT tone/code set up in use. BUSY CHANNEL LOCKOUT (BCL) When activated, BCL prevents you continuously transmit for the duration programmed by your dealer, the Battery Saver function decreases the amount of power used after no signal is present and no operations...
Operation Manual
Page 18
... cancelled with ID, "Wild Card" Group Calling, and Radio Stun. ■ FleetSync Utilizing KENWOOD's FleetSync digital signaling protocol, this transceiver has PTT ID and Selective Calling capabilities for dispatch operations or simple remote control applications. For hazardous/hostile duty environments, a Side1 or Side 2 key can transmit a stun code to that transceiver to segregate talk groups, so users only hear calls from...
... cancelled with ID, "Wild Card" Group Calling, and Radio Stun. ■ FleetSync Utilizing KENWOOD's FleetSync digital signaling protocol, this transceiver has PTT ID and Selective Calling capabilities for dispatch operations or simple remote control applications. For hazardous/hostile duty environments, a Side1 or Side 2 key can transmit a stun code to that transceiver to segregate talk groups, so users only hear calls from...


