

User Manual 1
Page 7
Pay attention to the volume level when turning the squelch off before operating the transceiver. • Always switch the transceiver power off . • Do not place the microphone cable around your neck while near machinery that may become hot. Do not touch these locations when replacing the battery pack. • Do not immerse the transceiver in water. • When water gets...
Pay attention to the volume level when turning the squelch off before operating the transceiver. • Always switch the transceiver power off . • Do not place the microphone cable around your neck while near machinery that may become hot. Do not touch these locations when replacing the battery pack. • Do not immerse the transceiver in water. • When water gets...
User Manual 1
Page 9
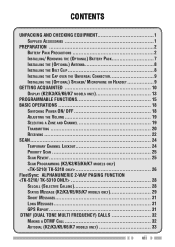
... EQUIPMENT 1 Supplied Accessories 1 PREPARATION 2 Battery Pack Precautions 2 Installing/ Removing the (Optional) Battery Pack 7 Installing the (Optional) Antenna 8 Installing the Belt Clip 8 Installing the Cap over the Universal Connector 9 Installing the (Optional) Speaker/ Microphone or Headset 9 GETTING ACQUAINTED 10 Display (K2/K3/K5/K6/K7 models only 13 PROGRAMMABLE FUNCTIONS 15 BASIC OPERATIONS 18 Switching Power ON/ OFF 18 Adjusting the Volume 19 Selecting a Zone and Channel 19 Transmitting 20 Receiving 22 SCAN 24 Temporary Channel Lockout...
... EQUIPMENT 1 Supplied Accessories 1 PREPARATION 2 Battery Pack Precautions 2 Installing/ Removing the (Optional) Battery Pack 7 Installing the (Optional) Antenna 8 Installing the Belt Clip 8 Installing the Cap over the Universal Connector 9 Installing the (Optional) Speaker/ Microphone or Headset 9 GETTING ACQUAINTED 10 Display (K2/K3/K5/K6/K7 models only 13 PROGRAMMABLE FUNCTIONS 15 BASIC OPERATIONS 18 Switching Power ON/ OFF 18 Adjusting the Volume 19 Selecting a Zone and Channel 19 Transmitting 20 Receiving 22 SCAN 24 Temporary Channel Lockout...
User Manual 1
Page 27
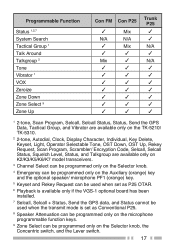
... the GPS Data, Tactical Group, and Vibrator are available only on the TK-5210/ TK-5310. 2 2-tone, Autodial, Clock, Display Character, Individual, Key Delete, Keyset, Light, Operator Selectable Tone, OST Down, OST Up, Rekey Request, Scan Program, Scrambler/ Encryption Code, Selcall, Selcall Status, Squelch Level, Status, and Talkgroup are available only on K2/K3/K5/K6/K7 model transceivers. 3 Channel Select can be programmed only...
... the GPS Data, Tactical Group, and Vibrator are available only on the TK-5210/ TK-5310. 2 2-tone, Autodial, Clock, Display Character, Individual, Key Delete, Keyset, Light, Operator Selectable Tone, OST Down, OST Up, Rekey Request, Scan Program, Scrambler/ Encryption Code, Selcall, Selcall Status, Squelch Level, Status, and Talkgroup are available only on K2/K3/K5/K6/K7 model transceivers. 3 Channel Select can be programmed only...

User Manual 1
Page 41
... must first connect a GPS microphone to a PC. GPS data can be stored in the stack memory. GPS Report To send your dealer for details. 31 ■ Reviewing Messages in the Stack Memory 1 Press and hold the B or # key for 1 second. To confirm the deletion, press the B or # key again. • To delete all messages, press and hold the key programmed as...
... must first connect a GPS microphone to a PC. GPS data can be stored in the stack memory. GPS Report To send your dealer for details. 31 ■ Reviewing Messages in the Stack Memory 1 Press and hold the B or # key for 1 second. To confirm the deletion, press the B or # key again. • To delete all messages, press and hold the key programmed as...

User Manual 1
Page 44
... knob, and then set the selected digit by pressing the D> key. TRUNKING CALLS Making a Telephone Call ■ Manual Dialing (K2/K3/K5/K6/K7 models only) 1 Press the key programmed as Autodial. • The last called unit appears on the display. • Press the A key to switch the display between the unit name and the list number. 2 Press and hold the A key to make the call...
... knob, and then set the selected digit by pressing the D> key. TRUNKING CALLS Making a Telephone Call ■ Manual Dialing (K2/K3/K5/K6/K7 models only) 1 Press the key programmed as Autodial. • The last called unit appears on the display. • Press the A key to switch the display between the unit name and the list number. 2 Press and hold the A key to make the call...

User Manual 1
Page 49
... a channel is set up with Operator Selectable Tone, you are using , squelch will only open and you have programmed QT or DQT signaling on your transceiver channels. SIGNALING Note: Signaling can reprogram the QT tone or DQT code on each of your channels. 1 Select your desired channel. 2 Press and hold the key programmed as Operator Selectable Tone for 1 second. • The icon appears on the display. 3 Press...
... a channel is set up with Operator Selectable Tone, you are using , squelch will only open and you have programmed QT or DQT signaling on your transceiver channels. SIGNALING Note: Signaling can reprogram the QT tone or DQT code on each of your channels. 1 Select your desired channel. 2 Press and hold the key programmed as Operator Selectable Tone for 1 second. • The icon appears on the display. 3 Press...
User Manual 1
Page 54
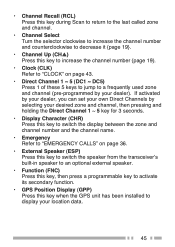
... power, 4 represents medium power, 3 represents low power, and 2 represents very low power. When an Individual Call is represented by the number of times the LED indicator flashes red. Battery status is received, the Alert tone stops. • Channel Down (CH▼) Press this key to decrease the channel number {page 19}. 44 If the LED flashes red only 1 time, recharge or replace your desired code, then press the PTT switch...
... power, 4 represents medium power, 3 represents low power, and 2 represents very low power. When an Individual Call is represented by the number of times the LED indicator flashes red. Battery status is received, the Alert tone stops. • Channel Down (CH▼) Press this key to decrease the channel number {page 19}. 44 If the LED flashes red only 1 time, recharge or replace your desired code, then press the PTT switch...

User Manual 1
Page 55
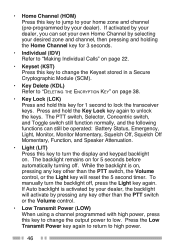
... and channel number and the channel name. • Emergency Refer to "EMERGENCY CALLS" on page 36. • External Speaker (ESP) Press this key to switch the speaker from the transceiver's built-in speaker to an optional external speaker. • Function (FNC) Press this key, then press a programmable key to activate its secondary function. • GPS Position Display (GPP) Press this key when the GPS unit has been installed to display...
... and channel number and the channel name. • Emergency Refer to "EMERGENCY CALLS" on page 36. • External Speaker (ESP) Press this key to switch the speaker from the transceiver's built-in speaker to an optional external speaker. • Function (FNC) Press this key, then press a programmable key to activate its secondary function. • GPS Position Display (GPP) Press this key when the GPS unit has been installed to display...

User Manual 1
Page 56
... automatically turning off , press the Light key again. If Auto backlight is on, pressing any key other than the PTT switch or the Volume control. • Low Transmit Power (LOW) When using a channel programmed with high power, press this key to high power. 46 The PTT switch, Selector, Concentric switch, and Toggle switch still function normally, and the following functions can set your own Home Channel by pressing any key other...
... automatically turning off , press the Light key again. If Auto backlight is on, pressing any key other than the PTT switch or the Volume control. • Low Transmit Power (LOW) When using a channel programmed with high power, press this key to high power. 46 The PTT switch, Selector, Concentric switch, and Toggle switch still function normally, and the following functions can set your own Home Channel by pressing any key other...
User Manual 1
Page 58
... the display. The transceiver cannot search for 2 seconds to unlock the transceiver to allow roaming again. • Speaker Attenuation Press this microphone key to adjust the transceiver squelch level. Press and hold the Site Lock key for alternate sites, and on K2/K3/K5/K6/K7 model transceivers, "SITE LOCK" appears on page 28. • Send the GPS data (GPS) Press this key when the GPS unit...
... the display. The transceiver cannot search for 2 seconds to unlock the transceiver to allow roaming again. • Speaker Attenuation Press this microphone key to adjust the transceiver squelch level. Press and hold the Site Lock key for alternate sites, and on K2/K3/K5/K6/K7 model transceivers, "SITE LOCK" appears on page 28. • Send the GPS data (GPS) Press this key when the GPS unit...

User Manual 1
Page 61
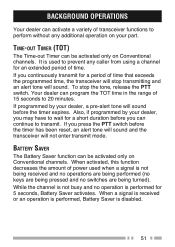
... decreases the amount of power used when a signal is used to perform without any caller from using a channel for a short duration before the timer expires. Also, if programmed by your dealer, a pre-alert tone will not enter transmit mode. It is not being received and no operations are being performed (no keys are being turned). Time-out Timer (TOT) The Time-out Timer can be activated only...
... decreases the amount of power used when a signal is used to perform without any caller from using a channel for a short duration before the timer expires. Also, if programmed by your dealer, a pre-alert tone will not enter transmit mode. It is not being received and no operations are being performed (no keys are being turned). Time-out Timer (TOT) The Time-out Timer can be activated only...

User Manual 1
Page 64
... changing the zone and/or channel, an audio voice will indicate a network condition on the registered site. When a control channel has been found, the antenna icon remains on the display when the transceiver receives a network disabled message. Control Channel Hunt On Trunking channels, the transceiver must search for a control channel. Site Trunking On Trunking channels, if set up by your dealer, the transceiver will announce the new zone and channel number...
... changing the zone and/or channel, an audio voice will indicate a network condition on the registered site. When a control channel has been found, the antenna icon remains on the display when the transceiver receives a network disabled message. Control Channel Hunt On Trunking channels, the transceiver must search for a control channel. Site Trunking On Trunking channels, if set up by your dealer, the transceiver will announce the new zone and channel number...
Operation Manual
Page 7
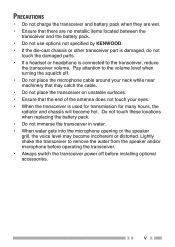
...volume level when turning the squelch off. • Do not place the microphone cable around your eyes. • When the transceiver is connected to remove the water from the speaker and/or microphone before operating the transceiver. • Always switch the transceiver power off before installing optional accessories. v Do not touch these locations when replacing the battery... battery pack. • Do not use options not specified by KENWOOD. • If the die-cast chassis or other transceiver part is damaged, do not touch the damaged parts. • If a headset or headphone is used ...
...volume level when turning the squelch off. • Do not place the microphone cable around your eyes. • When the transceiver is connected to remove the water from the speaker and/or microphone before operating the transceiver. • Always switch the transceiver power off before installing optional accessories. v Do not touch these locations when replacing the battery... battery pack. • Do not use options not specified by KENWOOD. • If the die-cast chassis or other transceiver part is damaged, do not touch the damaged parts. • If a headset or headphone is used ...
Operation Manual
Page 41
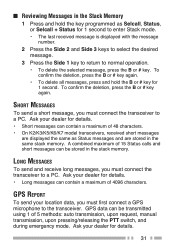
... To send and receive long messages, you must first connect a GPS microphone to a PC. Ask your location data, you must connect the transceiver to the transceiver. GPS REPORT To send your dealer for details. • Long messages can be transmitted using 1 of 5 methods: auto transmission, upon request, manual transmission, upon pressing/releasing the PTT switch, and during emergency mode. ■ Reviewing Messages in...
... To send and receive long messages, you must first connect a GPS microphone to a PC. Ask your location data, you must connect the transceiver to the transceiver. GPS REPORT To send your dealer for details. • Long messages can be transmitted using 1 of 5 methods: auto transmission, upon request, manual transmission, upon pressing/releasing the PTT switch, and during emergency mode. ■ Reviewing Messages in...
Operation Manual
Page 44
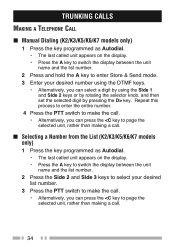
... knob, and then set the selected digit by pressing the D> key. TRUNKING CALLS MAKING A TELEPHONE CALL ■ Manual Dialing (K2/K3/K5/K6/K7 models only) 1 Press the key programmed as Autodial. • The last called unit appears on the display. • Press the A key to switch the display between the unit name and the list number. 2 Press and hold the A key to make the call...
... knob, and then set the selected digit by pressing the D> key. TRUNKING CALLS MAKING A TELEPHONE CALL ■ Manual Dialing (K2/K3/K5/K6/K7 models only) 1 Press the key programmed as Autodial. • The last called unit appears on the display. • Press the A key to switch the display between the unit name and the list number. 2 Press and hold the A key to make the call...
Operation Manual
Page 49
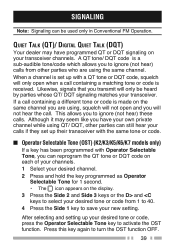
... a call . A QT tone/ DQT code is received. If a call containing a different tone or code is made on your transceiver. SIGNALING Note: Signaling can reprogram the QT tone or DQT code on each of your channels. 1 Select your desired channel. 2 Press and hold the key programmed as Operator Selectable Tone for 1 second. • The icon appears on the display. 3 Press the Side 2 and...
... a call . A QT tone/ DQT code is received. If a call containing a different tone or code is made on your transceiver. SIGNALING Note: Signaling can reprogram the QT tone or DQT code on each of your channels. 1 Select your desired channel. 2 Press and hold the key programmed as Operator Selectable Tone for 1 second. • The icon appears on the display. 3 Press the Side 2 and...
Operation Manual
Page 55
... speaker to an optional external speaker. • Function (FNC) Press this key, then press a programmable key to activate its secondary function. • GPS Position Display (GPP) Press this key when the GPS unit has been installed to a frequently used zone and channel (pre-programmed by selecting your desired zone and channel, then pressing and holding the Direct Channel 1 ~ 5 key for 3 seconds. • Display Character (CHR) Press this key to switch the display...
... speaker to an optional external speaker. • Function (FNC) Press this key, then press a programmable key to activate its secondary function. • GPS Position Display (GPP) Press this key when the GPS unit has been installed to a frequently used zone and channel (pre-programmed by selecting your desired zone and channel, then pressing and holding the Direct Channel 1 ~ 5 key for 3 seconds. • Display Character (CHR) Press this key to switch the display...
Operation Manual
Page 56
... turning off , press the Light key again. If Auto backlight is on . While the backlight is activated by your dealer, the backlight will reset the 5 second timer. Press the Low Transmit Power key again to return to unlock the keys. To manually turn the display and keypad backlight on , pressing any key other than the PTT switch or the Volume control. • Low Transmit Power (LOW) When using a channel programmed...
... turning off , press the Light key again. If Auto backlight is on . While the backlight is activated by your dealer, the backlight will reset the 5 second timer. Press the Low Transmit Power key again to return to unlock the keys. To manually turn the display and keypad backlight on , pressing any key other than the PTT switch or the Volume control. • Low Transmit Power (LOW) When using a channel programmed...

Operation Manual
Page 58
... 2-WAY PAGING FUNCTION" on the display. The transceiver cannot search for 2 seconds to unlock the transceiver to allow roaming again. • Speaker Attenuation Press this key to lock the current site. This reduces the strength of the speaker output to cut back any noise and distortion present in the signal. • Squelch Level (SQL) Press this microphone key to attenuate received voice signals.
... 2-WAY PAGING FUNCTION" on the display. The transceiver cannot search for 2 seconds to unlock the transceiver to allow roaming again. • Speaker Attenuation Press this key to lock the current site. This reduces the strength of the speaker output to cut back any noise and distortion present in the signal. • Squelch Level (SQL) Press this microphone key to attenuate received voice signals.
Operation Manual
Page 61
... from using a channel for 5 seconds, Battery Saver activates. When a signal is received or an operation is performed, Battery Saver is not being received and no operations are being performed (no keys are being turned). If you continuously transmit for a short duration before you press the PTT switch before the timer expires. To stop transmitting and an alert tone will sound before the timer has been reset...
... from using a channel for 5 seconds, Battery Saver activates. When a signal is received or an operation is performed, Battery Saver is not being received and no operations are being performed (no keys are being turned). If you continuously transmit for a short duration before you press the PTT switch before the timer expires. To stop transmitting and an alert tone will sound before the timer has been reset...


