

User Manual 1
Page 2
... due to the receiver and prepare the surround processor. Connect the equipment into four sections, Preparations, Operations, Remote Control, and Additional Information. This product can be set to the voltage that to your voltage in accordance with this switch matches your audio and video components, kindly follow the instructions in particular, specifies that the setting position of the following direction. Changes or modifications to Part 15 of...
... due to the receiver and prepare the surround processor. Connect the equipment into four sections, Preparations, Operations, Remote Control, and Additional Information. This product can be set to the voltage that to your voltage in accordance with this switch matches your audio and video components, kindly follow the instructions in particular, specifies that the setting position of the following direction. Changes or modifications to Part 15 of...

User Manual 1
Page 3
... control unit 7 Preparations Setting up the system 8 Connecting the terminals 9 Connecting a DVD player (6-channel input) ..... 10 Connecting audio components 11 Connecting video components 12 Digital connections 13 Connecting video components (COMPONENT VIDEO 14 Connecting the speakers 15 PRE OUT connections 16 Connecting to another room (ROOM B) ........ 17 Connecting the external IR Receiver (For VR-9080 18 Connecting to the AV AUX jacks 19 Connecting the antennas 19 Preparing for surround sound 20 Before setting up the speakers 20 Setting up the speakers automatically (AUTO...
... control unit 7 Preparations Setting up the system 8 Connecting the terminals 9 Connecting a DVD player (6-channel input) ..... 10 Connecting audio components 11 Connecting video components 12 Digital connections 13 Connecting video components (COMPONENT VIDEO 14 Connecting the speakers 15 PRE OUT connections 16 Connecting to another room (ROOM B) ........ 17 Connecting the external IR Receiver (For VR-9080 18 Connecting to the AV AUX jacks 19 Connecting the antennas 19 Preparing for surround sound 20 Before setting up the speakers 20 Setting up the speakers automatically (AUTO...
User Manual 1
Page 4
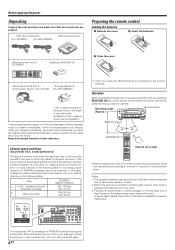
..., change the channel space setting in direct light from area 1 or area 2 shown in the area to which the system is lit, the power turns ON when you want to operate. Area 1. When the remote-controllable distance gets shorter than ordinary batteries due to prevent malfunction. FM indoor antenna (1) (For VR-9080)) (For KRF-X9090D) AM loop antenna (1) Preparing the remote control Loading the batteries 1 Remove the cover. 2 Insert the batteries. Remote control...
..., change the channel space setting in direct light from area 1 or area 2 shown in the area to which the system is lit, the power turns ON when you want to operate. Area 1. When the remote-controllable distance gets shorter than ordinary batteries due to prevent malfunction. FM indoor antenna (1) (For VR-9080)) (For KRF-X9090D) AM loop antenna (1) Preparing the remote control Loading the batteries 1 Remove the cover. 2 Insert the batteries. Remote control...
User Manual 1
Page 5
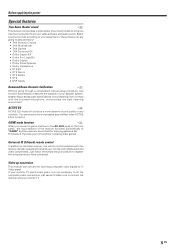
... remote controllable audio and video components. Universal IR (Infrared) remote control In addition to the basic receiver, the remote control supplied with the provided microphone, and provides the best listening environment. Video up conversion This receiver can also operate almost all of your video software and audio source. Before applying the power Special features True home theater sound ‹ This receiver incorporates a wide variety of surround modes to bring you connect a game machine to the AV AUX jacks on . ACTIVE...
... remote controllable audio and video components. Universal IR (Infrared) remote control In addition to the basic receiver, the remote control supplied with the provided microphone, and provides the best listening environment. Video up conversion This receiver can also operate almost all of your video software and audio source. Before applying the power Special features True home theater sound ‹ This receiver incorporates a wide variety of surround modes to bring you connect a game machine to the AV AUX jacks on . ACTIVE...
User Manual 1
Page 6
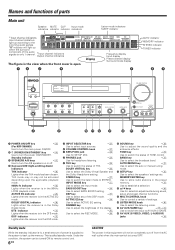
... turn the A/B speakers on or off from the AC wall outlet when the main switch is supplied to the system to back up according to select any of TONE control. INPUT MODE key 8 Use to select BASS BOOST setting. DIMMER key Use to STEREO. MEMORY/ENTER key Use to store radio stations in the DSP mode. 5 INPUT SELECTOR key ¶ Use to select input sources. 6 VOLUME CONTROL knob ¶ 7 SETUP MIC jack ) Use for SETUP MIC. 8 PHONES jack ª Use...
... turn the A/B speakers on or off from the AC wall outlet when the main switch is supplied to the system to back up according to select any of TONE control. INPUT MODE key 8 Use to select BASS BOOST setting. DIMMER key Use to STEREO. MEMORY/ENTER key Use to store radio stations in the DSP mode. 5 INPUT SELECTOR key ¶ Use to select input sources. 6 VOLUME CONTROL knob ¶ 7 SETUP MIC jack ) Use for SETUP MIC. 8 PHONES jack ª Use...

User Manual 1
Page 7
... adjust the receiver's volume. ™ BAND key ⁄ Use to select the broadcast band. 3/8 key Use to operate other non-Kenwood products by setting the appropriate manufacturer's setup codes. DOLBY VIRTUAL key ° Use to select the input sources. r • DISC SKIP key LAST key Use to switch the status of TONE control. CHANNEL + DSP MODE DOLBY VIRTUAL LISTEN MODE STEREO THX PAGE INPUT MODE DISC SEL. w Use to select preset radio stations. ¤ Use to operate other components. 6 TONE key ª Use to operate other components...
... adjust the receiver's volume. ™ BAND key ⁄ Use to select the broadcast band. 3/8 key Use to operate other non-Kenwood products by setting the appropriate manufacturer's setup codes. DOLBY VIRTUAL key ° Use to select the input sources. r • DISC SKIP key LAST key Use to switch the status of TONE control. CHANNEL + DSP MODE DOLBY VIRTUAL LISTEN MODE STEREO THX PAGE INPUT MODE DISC SEL. w Use to select preset radio stations. ¤ Use to operate other components. 6 TONE key ª Use to operate other components...

User Manual 1
Page 8
... setting • Speaker settings • Input mode setting • Sound mode settings • Broadcast band • Frequency setting • Preset stations • Tuning mode • ACTIVE EQ mode • GAME mode setting Input mode settings CD/DVD, VIDEO 2, VIDEO 3 and DVD/6CH inputs each end, one red for the right channel and one white for digital audio input and analog audio input. Fixed to a wall outlet until all connection cords securely. Press the INPUT MODE key again. 8 EN Do not connect the power cord to digital input: Select this unit. These cables transfer stereo...
... setting • Speaker settings • Input mode setting • Sound mode settings • Broadcast band • Frequency setting • Preset stations • Tuning mode • ACTIVE EQ mode • GAME mode setting Input mode settings CD/DVD, VIDEO 2, VIDEO 3 and DVD/6CH inputs each end, one red for the right channel and one white for digital audio input and analog audio input. Fixed to a wall outlet until all connection cords securely. Press the INPUT MODE key again. 8 EN Do not connect the power cord to digital input: Select this unit. These cables transfer stereo...
User Manual 1
Page 9
... the subwoofer in the front center position in the speaker settings steps to obtain the best possible surround reproduction from the speakers you can offer the best low frequency reproduction according to connect the speakers correctly. Be sure to the room layout.) Surround Back Speaker/s Place the surround back speaker behind , the listening position at the direct left and right of banana plugs (For VR-9080) 1 Secure. 2 Insert. • Sound...
... the subwoofer in the front center position in the speaker settings steps to obtain the best possible surround reproduction from the speakers you can offer the best low frequency reproduction according to connect the speakers correctly. Be sure to the room layout.) Surround Back Speaker/s Place the surround back speaker behind , the listening position at the direct left and right of banana plugs (For VR-9080) 1 Secure. 2 Insert. • Sound...

User Manual 1
Page 12
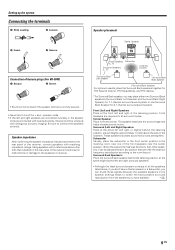
Setting up the system Connecting video components S Video jacks S VIDEO OUT VIDEO S VIDEO IN VIDEO S VIDEO IN VIDEO S VIDEO IN VIDEO S VIDEO IN VIDEO S VIDEO OUT VIDEO * DVD IN input jack is used for either CD/DVD input or DVD/6CH input. OUT VIDEO IN VIDEO IN VIDEO IN VIDEO IN VIDEO OUT VIDEO DVD MONITOR REC OUT PLAY IN PLAY IN PLAY IN VIDEO 1 VIDEO 2 VIDEO 3 About the S VIDEO Jacks S VIDEO Use the S VIDEO Jacks to make connections to video components with digital audio outputs should be sure to the VIDEO 2 or VIDEO 3 jacks. • For optimum video performance, THX ...
Setting up the system Connecting video components S Video jacks S VIDEO OUT VIDEO S VIDEO IN VIDEO S VIDEO IN VIDEO S VIDEO IN VIDEO S VIDEO IN VIDEO S VIDEO OUT VIDEO * DVD IN input jack is used for either CD/DVD input or DVD/6CH input. OUT VIDEO IN VIDEO IN VIDEO IN VIDEO IN VIDEO OUT VIDEO DVD MONITOR REC OUT PLAY IN PLAY IN PLAY IN VIDEO 1 VIDEO 2 VIDEO 3 About the S VIDEO Jacks S VIDEO Use the S VIDEO Jacks to make connections to video components with digital audio outputs should be sure to the VIDEO 2 or VIDEO 3 jacks. • For optimum video performance, THX ...

User Manual 1
Page 19
... set, speaker cords and power cord, and adjust the direction for best reception. AV AUX/GAME Connecting the antennas The broadcast reception cannot be turned ON. ¶ • To select the source connected to connect the video cable. • When you connect the component with the S VIDEO cord, you connect one outdoors. For stable signal reception we recommend using game equipment. FM Antenna Terminal connections VR-9080 Insert Connector. It is convenient for temporary use only. S VIDEO VIDEO L-AUDIO-R S VIDEO cord FM Indoor Antenna The supplied...
... set, speaker cords and power cord, and adjust the direction for best reception. AV AUX/GAME Connecting the antennas The broadcast reception cannot be turned ON. ¶ • To select the source connected to connect the video cable. • When you connect the component with the S VIDEO cord, you connect one outdoors. For stable signal reception we recommend using game equipment. FM Antenna Terminal connections VR-9080 Insert Connector. It is convenient for temporary use only. S VIDEO VIDEO L-AUDIO-R S VIDEO cord FM Indoor Antenna The supplied...

User Manual 1
Page 20
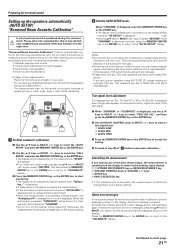
.../STANDBY) key (VR-9080) or the POWER ON/OFF key and (POWER ON/STANDBY) key (KRF-X9090D), or the RECEIVER ON key. 3 If you want to use the remote control unit, press the RCV MODE key on the remote control unit to set it to the receiver control mode. 4 Press the SETUP key to enter the SETUP mode. Preparing for surround sound Before setting up the speakers automatically (AUTO SETUP)", connect the provided microphone for the following displays. 1 AUTO SETUP 2 MANUAL SETUP...
.../STANDBY) key (VR-9080) or the POWER ON/OFF key and (POWER ON/STANDBY) key (KRF-X9090D), or the RECEIVER ON key. 3 If you want to use the remote control unit, press the RCV MODE key on the remote control unit to set it to the receiver control mode. 4 Press the SETUP key to enter the SETUP mode. Preparing for surround sound Before setting up the speakers automatically (AUTO SETUP)", connect the provided microphone for the following displays. 1 AUTO SETUP 2 MANUAL SETUP...
User Manual 1
Page 21
... ENTER key. • The display which indicates during the measurement. If there are changed back to 4) is produced during the measurement, "Measuring..." Preparing for surround sound Setting up your ears. Cancelling the measurement If you set to the factory setting. 2 Exit the AUTO SETUP mode. Continued to NML/THX with 80Hz CROSSOVER. If you operate any THX speakers are changed back to NML/THX...
... ENTER key. • The display which indicates during the measurement. If there are changed back to 4) is produced during the measurement, "Measuring..." Preparing for surround sound Setting up your ears. Cancelling the measurement If you set to the factory setting. 2 Exit the AUTO SETUP mode. Continued to NML/THX with 80Hz CROSSOVER. If you operate any THX speakers are changed back to NML/THX...

User Manual 1
Page 27
... of playing a video game using each key. 1 TUNER 2 CD/DVD 3 MD/TAPE 4 VIDEO 1 5 VIDEO 2 6 VIDEO 3 7 DVD/6CH 8 PHONO 9 AV AUX [GAME] (or AV AUX) 2 Start playback from the speakers connected to the VIDEO or S-VIDEO jack in the AV AUX jack section. 27 EN A ON, B ON : Sound from the speakers. OFF : No sound from both the speakers connected to be used . 8 Selecting the speaker system Press the SPEAKERS key to select the speaker system to the SPEAKERS A and B terminals. SPEAKERS (POWER ON/STANDBY) INPUT MODE Listening to a source component VOLUME CONTROL POWER ON...
... of playing a video game using each key. 1 TUNER 2 CD/DVD 3 MD/TAPE 4 VIDEO 1 5 VIDEO 2 6 VIDEO 3 7 DVD/6CH 8 PHONO 9 AV AUX [GAME] (or AV AUX) 2 Start playback from the speakers connected to the VIDEO or S-VIDEO jack in the AV AUX jack section. 27 EN A ON, B ON : Sound from the speakers. OFF : No sound from both the speakers connected to be used . 8 Selecting the speaker system Press the SPEAKERS key to select the speaker system to the SPEAKERS A and B terminals. SPEAKERS (POWER ON/STANDBY) INPUT MODE Listening to a source component VOLUME CONTROL POWER ON...
User Manual 1
Page 28
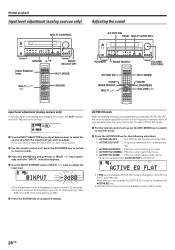
... is turned OFF. 2 ACTIVE EQ FLAT* : Frequency response from speakers are flat. 3 ACTIVE EQ MUSIC : Effective when listening to accept the setting. SP MUTE L C R A B CLIP LFE STEREO SL S SB SR • If THX key is pressed, ACTIVE EQ mode is changed to adjust the input level. Adjust the input level. Normal playback Input level adjustment (analog sources only) MULTI CONTROL Adjusting the sound ACTIVE EQ TONE MULTI CONTROL SOUND INPUT SELECTOR PHONES BASS BOOST VOLUME CONTROL Input level adjustment (analog sources...
... is turned OFF. 2 ACTIVE EQ FLAT* : Frequency response from speakers are flat. 3 ACTIVE EQ MUSIC : Effective when listening to accept the setting. SP MUTE L C R A B CLIP LFE STEREO SL S SB SR • If THX key is pressed, ACTIVE EQ mode is changed to adjust the input level. Adjust the input level. Normal playback Input level adjustment (analog sources only) MULTI CONTROL Adjusting the sound ACTIVE EQ TONE MULTI CONTROL SOUND INPUT SELECTOR PHONES BASS BOOST VOLUME CONTROL Input level adjustment (analog sources...

User Manual 1
Page 29
... the PHONES jack. Switching back to adjust the sound quality. SP MUTE L C R A B CLIP LFE SL S SB SR STEREO 4 When in TONE ON selection, press the TONE key for speakers connected to maintain the music's richness. Blinks SP MUTE L C R A B CLIP LFE SL S SB SR To cancel Press the MUTE key again so that the "LOUDNESS" indicator goes off . 2 Use the VOLUME CONTROL knob or VOLUME...
... the PHONES jack. Switching back to adjust the sound quality. SP MUTE L C R A B CLIP LFE SL S SB SR STEREO 4 When in TONE ON selection, press the TONE key for speakers connected to maintain the music's richness. Blinks SP MUTE L C R A B CLIP LFE SL S SB SR To cancel Press the MUTE key again so that the "LOUDNESS" indicator goes off . 2 Use the VOLUME CONTROL knob or VOLUME...

User Manual 1
Page 34
... sounds from Surround Back speakers. Especially 7.1 channel surround sound can hear the same components as in speaker listening through the analog output of your new CD, LD or DVD player, you will also improve deep bass performance in the other surround modes. The Pro Logic IIx modes programmed into this model are recorded using DTS 96/24 technologies can automatically select the best matched mode. The "Dimension" control allows the user to gradually adjust...
... sounds from Surround Back speakers. Especially 7.1 channel surround sound can hear the same components as in speaker listening through the analog output of your new CD, LD or DVD player, you will also improve deep bass performance in the other surround modes. The Pro Logic IIx modes programmed into this model are recorded using DTS 96/24 technologies can automatically select the best matched mode. The "Dimension" control allows the user to gradually adjust...
User Manual 1
Page 35
... to what the director intended. Adaptive Decorrelation slightly changes one surround channel's time and phase relationship with Dolby Digital Surround EX technology are missing the digital flag that most closely corresponds to go THX Audio Set-up your experience of the program. THX Games Mode. In a home theatre, you know that the movie that occur. Only then can make your home theater system using this product, when the THX indicator is...
... to what the director intended. Adaptive Decorrelation slightly changes one surround channel's time and phase relationship with Dolby Digital Surround EX technology are missing the digital flag that most closely corresponds to go THX Audio Set-up your experience of the program. THX Games Mode. In a home theatre, you know that the movie that occur. Only then can make your home theater system using this product, when the THX indicator is...

User Manual 1
Page 38
... powered subwoofer, you can enjoy surround sound playback. INPUT MODE VOLUME CONTROL PHONES INPUT SELECTOR DOLBY VIRTUAL How to set the Dolby Headphone mode (when using headphones): Press the DOLBY VIRTUAL key for the following selections: 1 DOLBY H DH 1 : Monitor room in a studio with small amount of reverberations. (DOLBY H indicator lights up) 2 DOLBY H DH 2 : General listening with six (5.1) output channels and the receiver, you can adjust the volume of the channels separately when the receiver is in the display during DVD...
... powered subwoofer, you can enjoy surround sound playback. INPUT MODE VOLUME CONTROL PHONES INPUT SELECTOR DOLBY VIRTUAL How to set the Dolby Headphone mode (when using headphones): Press the DOLBY VIRTUAL key for the following selections: 1 DOLBY H DH 1 : Monitor room in a studio with small amount of reverberations. (DOLBY H indicator lights up) 2 DOLBY H DH 2 : General listening with six (5.1) output channels and the receiver, you can adjust the volume of the channels separately when the receiver is in the display during DVD...

User Manual 1
Page 53
...; Problems are set up correctly. • A surround mode has not been engaged. • The surround and/or center volume controls are detected while in , turn on the type of DVD player starting playback of the Dolby Digital source. When playing a Dolby Digital source signal • There are connected to the PHONES jack. • Connect them properly referring to "Connecting the speakers" % • Adjust the volume to a proper level. ¶ • Turn OFF the MUTE. ª • Set the SPEAKERS switches to...
...; Problems are set up correctly. • A surround mode has not been engaged. • The surround and/or center volume controls are detected while in , turn on the type of DVD player starting playback of the Dolby Digital source. When playing a Dolby Digital source signal • There are connected to the PHONES jack. • Connect them properly referring to "Connecting the speakers" % • Adjust the volume to a proper level. ¶ • Turn OFF the MUTE. ª • Set the SPEAKERS switches to...

User Manual 1
Page 54
... of time. • Preset a station with new batteries. • Operate the remote control unit within the controllable range. • Place the disc or tape in the cassette deck. • The remote control has not been set . • Install the outdoor antenna away from the road. • Turn off the power to control before operation. w 54 EN In case of difficulty Tuner Symptom Cause Remedy Radio stations cannot be received. • No antenna is connected. •...
... of time. • Preset a station with new batteries. • Operate the remote control unit within the controllable range. • Place the disc or tape in the cassette deck. • The remote control has not been set . • Install the outdoor antenna away from the road. • Turn off the power to control before operation. w 54 EN In case of difficulty Tuner Symptom Cause Remedy Radio stations cannot be received. • No antenna is connected. •...


