

User Manual
Page 2
... AC 240 V only Caution : Read this switch matches your line voltage with the following direction. Before connecting the power cord to improper setting of this page carefully to match your line voltage...rear panel and says that the component uses laser beams that are designed for some areas) CLASS 1 LASER PRODUCT The marking is utilizing laser beams that have been classified as follows. NO USER-SERVICEABLE PARTS INSIDE, REFER SERVICING TO QUALIFIED SERVICE PERSONNEL. U.S.A. The marking of products using lasers (Except for operation as Class 1. THE LIGHTNING FLASH...
... AC 240 V only Caution : Read this switch matches your line voltage with the following direction. Before connecting the power cord to improper setting of this page carefully to match your line voltage...rear panel and says that the component uses laser beams that are designed for some areas) CLASS 1 LASER PRODUCT The marking is utilizing laser beams that have been classified as follows. NO USER-SERVICEABLE PARTS INSIDE, REFER SERVICING TO QUALIFIED SERVICE PERSONNEL. U.S.A. The marking of products using lasers (Except for operation as Class 1. THE LIGHTNING FLASH...

User Manual
Page 3
..., change the channel space setting in the following table. XD SERIES (En) Contents Preparation Before applying power 2 Safety precautions 2 Contents ...3 CHANNEL SPACE setting 3 Special features 4 Demonstration 4 Accessories ...4 IMPORTANT SAFEGUARDS 5 Handling of discs and tapes 7 system connection 8 AM loop antenna connection 8 FM antenna connection 8 Connection of the speaker system 9 Connection of options (Optional parts 9 Controls and indicators 10 CD and Receiver unit 10 Cassette deck unit 11 Display ...11 Operation of difficulty 39 Specifications 42 CHANNEL SPACE...
..., change the channel space setting in the following table. XD SERIES (En) Contents Preparation Before applying power 2 Safety precautions 2 Contents ...3 CHANNEL SPACE setting 3 Special features 4 Demonstration 4 Accessories ...4 IMPORTANT SAFEGUARDS 5 Handling of discs and tapes 7 system connection 8 AM loop antenna connection 8 FM antenna connection 8 Connection of the speaker system 9 Connection of options (Optional parts 9 Controls and indicators 10 CD and Receiver unit 10 Cassette deck unit 11 Display ...11 Operation of difficulty 39 Specifications 42 CHANNEL SPACE...

User Manual
Page 4
... unit automatically starts the demonstration function (display only), During the demonstration, the display changes in the future. 4 XD SERIES (En) Special features 3-Disc carousel CD player Three discs can be set the CD program and timer-related operations while observing the operating conditions shown by the display and icons. 3D large-sized color display panel The large sound level meter represents the movement in again during use, this manual handy for use is...
... unit automatically starts the demonstration function (display only), During the demonstration, the display changes in the future. 4 XD SERIES (En) Special features 3-Disc carousel CD player Three discs can be set the CD program and timer-related operations while observing the operating conditions shown by the display and icons. 3D large-sized color display panel The large sound level meter represents the movement in again during use, this manual handy for use is...

User Manual
Page 5
... operating instructions. to your home, consult your obsolete outlet. Power sources - For appliances intended to overturn. The ideal ambient temperature is not spilled into the outlet, try reversing the plug. CAUTION - Follow all warnings on the appliance and in the cabinet are not sure of the type of this appliance. Power-cord protection - Slots and openings in the instruction manual. Enclosure removal...
... operating instructions. to your home, consult your obsolete outlet. Power sources - For appliances intended to overturn. The ideal ambient temperature is not spilled into the outlet, try reversing the plug. CAUTION - Follow all warnings on the appliance and in the cabinet are not sure of the type of this appliance. Power-cord protection - Slots and openings in the instruction manual. Enclosure removal...

User Manual
Page 6
... of antenna discharge unit, connection to qualified service personnel. 17.Outdoor antenna grounding - Contact your dealer or nearest service center. 18.Power lines - When installing an outside antenna is connected to the AC outlet on the rear panel. C. Adjust only those controls that are not required except for grounded or polarized equipment. 2. All other audio equipment with them might be sure the antenna system is in the instruction manual...
... of antenna discharge unit, connection to qualified service personnel. 17.Outdoor antenna grounding - Contact your dealer or nearest service center. 18.Power lines - When installing an outside antenna is connected to the AC outlet on the rear panel. C. Adjust only those controls that are not required except for grounded or polarized equipment. 2. All other audio equipment with them might be sure the antenna system is in the instruction manual...
User Manual
Page 8
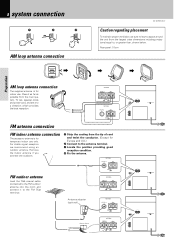
... the main system, TV set, speaker cords and power cord, and set it to a direction which provides the best reception. For stable signal reception we recommend using an outdoor antenna. R + AC 110 -120V AC 220 -240V AUX INPUT R L ANTENNA FM 75 Ω AM GND SPEAKERS (6-16 Ω) + L - - R + AC 110 -120V AC 220 -240V Rear panel: 10 cm Preparation AM loop antenna connection The supplied antenna is for indoor use only. ANTENNA FM 75...
... the main system, TV set, speaker cords and power cord, and set it to a direction which provides the best reception. For stable signal reception we recommend using an outdoor antenna. R + AC 110 -120V AC 220 -240V AUX INPUT R L ANTENNA FM 75 Ω AM GND SPEAKERS (6-16 Ω) + L - - R + AC 110 -120V AC 220 -240V Rear panel: 10 cm Preparation AM loop antenna connection The supplied antenna is for indoor use only. ANTENNA FM 75...
User Manual
Page 9
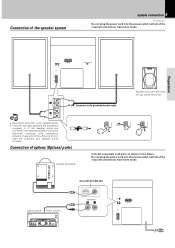
...;) + L - - speaker cords. • If the left and right speakers are connected inversely or if the speaker cords are connected with reversed polarity, the sound becomes unnatural with ambiguous acoustic image positioning. Be sure to connect the speakers and speaker cords correctly. MD PLAYER Audio output Only XD-A31/XD-302 SUPER WOOFER PRE OUT AUX INPUT R L SUPER WOOFER PRE OUT AUX INPUT R L ANTENNA FM 75 Ω AM GND SPEAKERS (6-16 Ω) + L - - Do not plug the power cord...
...;) + L - - speaker cords. • If the left and right speakers are connected inversely or if the speaker cords are connected with reversed polarity, the sound becomes unnatural with ambiguous acoustic image positioning. Be sure to connect the speakers and speaker cords correctly. MD PLAYER Audio output Only XD-A31/XD-302 SUPER WOOFER PRE OUT AUX INPUT R L SUPER WOOFER PRE OUT AUX INPUT R L ANTENNA FM 75 Ω AM GND SPEAKERS (6-16 Ω) + L - - Do not plug the power cord...

User Manual
Page 10
... 5 DISC 1 DISC 2 DISC 3 DISC SKIP ON/STANDBY VOLUME INPUT EX.BASS DISPDLEAMYO MENU MULTI CONTROL ENTER SELECT BAND TUNING MODE TAPE A/B REC/ARM PHONES 6 7 8 9 $# @ !0 XD SERIES (En) Preparation 1 OPEN/CLOSE (0) key ^ The disc tray is opened and closed. 2 Disc selection keys & The disc number is selected directly and playback starts. 3 DISC SKIP key & Used to skip discs. 4 Stop (7) key 5 Play/pause (6) key 6 VOLUME CONTROL knob ^ ^ $ This is used for volume adjustment. 7 BAND key ™ Press to switch the receiving band. 8 PHONES terminal % For connection of...
... 5 DISC 1 DISC 2 DISC 3 DISC SKIP ON/STANDBY VOLUME INPUT EX.BASS DISPDLEAMYO MENU MULTI CONTROL ENTER SELECT BAND TUNING MODE TAPE A/B REC/ARM PHONES 6 7 8 9 $# @ !0 XD SERIES (En) Preparation 1 OPEN/CLOSE (0) key ^ The disc tray is opened and closed. 2 Disc selection keys & The disc number is selected directly and playback starts. 3 DISC SKIP key & Used to skip discs. 4 Stop (7) key 5 Play/pause (6) key 6 VOLUME CONTROL knob ^ ^ $ This is used for volume adjustment. 7 BAND key ™ Press to switch the receiving band. 8 PHONES terminal % For connection of...

User Manual
Page 12
..., change the installation position to the remote sensor, malfunction may be short. 2. If direct sunlight or the light of the batteries with the same names as on the main unit have the same functions as the keys on the main unit. 1 POWER TIME SLEEP 2 @ SOUND EX.BASS INPUT 3 # RANDOM REPEAT BAND 4 $ DISC SKIP A/B TAPE 3 5 % 1 TUNING ¡ 6 6 ^ 4 P.CALL ¢ 7 7 & 2 3 MUTE 8 * 9 SELECT MULTI CONTROL MENU ENTER VOLUME ( 0 ! Preparation 12 Operation...
..., change the installation position to the remote sensor, malfunction may be short. 2. If direct sunlight or the light of the batteries with the same names as on the main unit have the same functions as the keys on the main unit. 1 POWER TIME SLEEP 2 @ SOUND EX.BASS INPUT 3 # RANDOM REPEAT BAND 4 $ DISC SKIP A/B TAPE 3 5 % 1 TUNING ¡ 6 6 ^ 4 P.CALL ¢ 7 7 & 2 3 MUTE 8 * 9 SELECT MULTI CONTROL MENU ENTER VOLUME ( 0 ! Preparation 12 Operation...

User Manual
Page 13
...," you can return to the operation mode. +Scrolled display (Clock Options) Clock Opti The following items can be selected by turning the MULTI CONTROL jog dial. "Sleep Time" "Adjust Time" "Timer" Example: Adjustment to adjust the correct time before setting the timer. 13 XD SERIES (En) This unit incorporates a clock function. SELECT 4Enter the figure of minute. ON/STANDBY 2Select "Clock Options". Preparation Clock adjustment Adjust the clock before using the timer function. Be sure to 8:45...
...," you can return to the operation mode. +Scrolled display (Clock Options) Clock Opti The following items can be selected by turning the MULTI CONTROL jog dial. "Sleep Time" "Adjust Time" "Timer" Example: Adjustment to adjust the correct time before setting the timer. 13 XD SERIES (En) This unit incorporates a clock function. SELECT 4Enter the figure of minute. ON/STANDBY 2Select "Clock Options". Preparation Clock adjustment Adjust the clock before using the timer function. Be sure to 8:45...

User Manual
Page 14
... the desired output 1 TUNER (Radio) 2 CD 3 TAPE 4 AUX (External input) ™ ^ ¢ 9 When CD has been selected. INPUT 2. 14 Let's put out some sound Basic use method XD SERIES (En) Operation 1 POWER TIME SLEEP SOUND EX.BASS INPUT RANDOM REPEAT BAND DISC SKIP A/B TAPE 3 1 TUNING ¡ 6 4 P.CALL ¢ 7 2 3 MUTE SELECT MULTI CONTROL MENU ENTER VOLUME XD 2 3 1 2 MULTI CONTROL 3 A PLAY B REC/ PLAY ON/STANDBY 1. CD01 0:00 VOLUME To increase volume 3. Volume adjustment To decrease volume Volume display Volume 19 Switching the power ON If a disc has...
... the desired output 1 TUNER (Radio) 2 CD 3 TAPE 4 AUX (External input) ™ ^ ¢ 9 When CD has been selected. INPUT 2. 14 Let's put out some sound Basic use method XD SERIES (En) Operation 1 POWER TIME SLEEP SOUND EX.BASS INPUT RANDOM REPEAT BAND DISC SKIP A/B TAPE 3 1 TUNING ¡ 6 4 P.CALL ¢ 7 2 3 MUTE SELECT MULTI CONTROL MENU ENTER VOLUME XD 2 3 1 2 MULTI CONTROL 3 A PLAY B REC/ PLAY ON/STANDBY 1. CD01 0:00 VOLUME To increase volume 3. Volume adjustment To decrease volume Volume display Volume 19 Switching the power ON If a disc has...

User Manual
Page 15
... factory setting is ON. ÷ The Equalizer setting will be turned ON from all speakers are cut off " .... Rock music "Pop" ........ Classic music "Jazz" ....... "Display Auto" "Display 1" "Display 2" "Display 3" CD01 0:00 This part changes in playback, playback starts at the same time. Pop music "Classic" ... Normal playback Switching the sound level meter dis- STANDBY mode of ON/STANDBY ( ) switch When the power cable plug of this unit is selected and a disc has been loaded in the disc tray or a tape...
... factory setting is ON. ÷ The Equalizer setting will be turned ON from all speakers are cut off " .... Rock music "Pop" ........ Classic music "Jazz" ....... "Display Auto" "Display 1" "Display 2" "Display 3" CD01 0:00 This part changes in playback, playback starts at the same time. Pop music "Classic" ... Normal playback Switching the sound level meter dis- STANDBY mode of ON/STANDBY ( ) switch When the power cable plug of this unit is selected and a disc has been loaded in the disc tray or a tape...

User Manual
Page 17
... disc and playback starts. ÷ When no disc is played, removal may become impossible, and trouble can impair your eyes can be caused. Time display on the CD player Each press of the TIME key of the remote control unit switches the displayed time information. @ 1 1 : 1 2 Elapsed time of track being played 2 - 4 : 1 8 Remaining time of track being played is released. High-speed search in a tray, the unit skips to a Different Disc DISC SKIP or DISC...
... disc and playback starts. ÷ When no disc is played, removal may become impossible, and trouble can impair your eyes can be caused. Time display on the CD player Each press of the TIME key of the remote control unit switches the displayed time information. @ 1 1 : 1 2 Elapsed time of track being played 2 - 4 : 1 8 Remaining time of track being played is released. High-speed search in a tray, the unit skips to a Different Disc DISC SKIP or DISC...

User Manual
Page 22
... a key is held depressed, preset stations will be skipped at an interval of stations (auto preset) Operation 1. Select the broadcast band. 22 Receiving broadcast station It is also possible to receive them by one-touch operations by -one presetting 3 POWER TIME SLEEP SOUND EX.BASS INPUT RANDOM REPEAT BAND DISC SKIP A/B TAPE 3 1 TUNING ¡ 6 4 P.CALL ¢ 7 2 3 MUTE SELECT MULTI CONTROL MENU ENTER VOLUME XD 1 3 MULTI CONTROL A PLAY B REC/ PLAY 1 2 Collective presetting of about 0.2 second. XD SERIES (En) When the...
... a key is held depressed, preset stations will be skipped at an interval of stations (auto preset) Operation 1. Select the broadcast band. 22 Receiving broadcast station It is also possible to receive them by one-touch operations by -one presetting 3 POWER TIME SLEEP SOUND EX.BASS INPUT RANDOM REPEAT BAND DISC SKIP A/B TAPE 3 1 TUNING ¡ 6 4 P.CALL ¢ 7 2 3 MUTE SELECT MULTI CONTROL MENU ENTER VOLUME XD 1 3 MULTI CONTROL A PLAY B REC/ PLAY 1 2 Collective presetting of about 0.2 second. XD SERIES (En) When the...
User Manual
Page 26
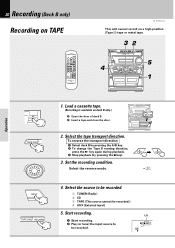
...-position (Type II) tape or metal tape. 32 4 MULTI CONTROL A PLAY B REC/ PLAY 5 1 Operation TAPE A/B 1. Select the tape transport direction. Select the source to be recorded.) 4 AUX (External input) 5. Select the reverse mode. ¶ INPUT TAPE A/B REC/ARM 4. Set the recording condition. Start recording. 26 Recording (Deck B only) Recording on TAPE POWER TIME SLEEP SOUND EX.BASS INPUT RANDOM REPEAT BAND DISC SKIP A/B TAPE 3 1 TUNING ¡ 6 4 P.CALL ¢ 7 2 3 MUTE SELECT MULTI CONTROL MENU ENTER VOLUME XD XD SERIES (En) This unit cannot...
...-position (Type II) tape or metal tape. 32 4 MULTI CONTROL A PLAY B REC/ PLAY 5 1 Operation TAPE A/B 1. Select the tape transport direction. Select the source to be recorded.) 4 AUX (External input) 5. Select the reverse mode. ¶ INPUT TAPE A/B REC/ARM 4. Set the recording condition. Start recording. 26 Recording (Deck B only) Recording on TAPE POWER TIME SLEEP SOUND EX.BASS INPUT RANDOM REPEAT BAND DISC SKIP A/B TAPE 3 1 TUNING ¡ 6 4 P.CALL ¢ 7 2 3 MUTE SELECT MULTI CONTROL MENU ENTER VOLUME XD XD SERIES (En) This unit cannot...
User Manual
Page 29
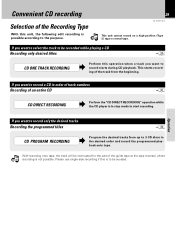
... the programmed titles ¤ CD PROGRAM RECORDING \ Program the desired tracks from the beginning. Convenient CD recording 29 Selection of the Recording Type XD SERIES (En) With this unit, the following edit recording is possible according to 3 CD discs in stop mode to record starts during CD playback. Please use single-side recording if this is to be interrupted for the part of the guide tape...
... the programmed titles ¤ CD PROGRAM RECORDING \ Program the desired tracks from the beginning. Convenient CD recording 29 Selection of the Recording Type XD SERIES (En) With this unit, the following edit recording is possible according to 3 CD discs in stop mode to record starts during CD playback. Please use single-side recording if this is to be interrupted for the part of the guide tape...

User Manual
Page 32
... by turning the MULTI CONTROL jog dial. "CD Program Play" "Recording Options" "Saund Options" "Clock Options" +Scrolled display (Recording Options) Recording 3Select "CD Program Recording". To return to the normal mode, it is required to cancel the program mode. ( Operation CD STOP key ÷ Both the cassette deck and CD player stop mode. 32 Convenient CD recording XD SERIES (En) Recording the programmed titles (CD PROGRAM RECORDING) Program the desired tracks from up to 3 CD discs...
... by turning the MULTI CONTROL jog dial. "CD Program Play" "Recording Options" "Saund Options" "Clock Options" +Scrolled display (Recording Options) Recording 3Select "CD Program Recording". To return to the normal mode, it is required to cancel the program mode. ( Operation CD STOP key ÷ Both the cassette deck and CD player stop mode. 32 Convenient CD recording XD SERIES (En) Recording the programmed titles (CD PROGRAM RECORDING) Program the desired tracks from up to 3 CD discs...
User Manual
Page 35
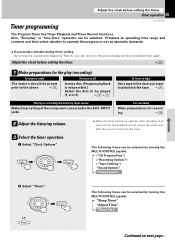
... be played (1, 2 or 3). ^& Playing or recording the auxiliary input source Make timer setting of an input source, the speakers do a procedure over again. MENU SELECT ÷ When the timer function is not possible.) Select the disc to the AUX INPUT jacks. SELECT Lit The following items can be selected by turning the MULTI CONTROL jog dial. ("CD Program Play") ("Recording Options") ("Tape Dubbing") "Sound Options" "Clock Options" 2 Select "Timer". Timer operation 35 XD SERIES (En) The Program Timer has Timer Playback and Timer Record...
... be played (1, 2 or 3). ^& Playing or recording the auxiliary input source Make timer setting of an input source, the speakers do a procedure over again. MENU SELECT ÷ When the timer function is not possible.) Select the disc to the AUX INPUT jacks. SELECT Lit The following items can be selected by turning the MULTI CONTROL jog dial. ("CD Program Play") ("Recording Options") ("Tape Dubbing") "Sound Options" "Clock Options" 2 Select "Timer". Timer operation 35 XD SERIES (En) The Program Timer has Timer Playback and Timer Record...

User Manual
Page 38
... the tape guides. Do not use contact cleaners because it could cause a malfunction. In regardto contact cleaner Do not use thinner, benzine, alcohol, etc. Note related to transportation and movement (CD player) Before transporting or moving this unit is carried from a place to use contact cleaners containing oil, for these agents may deform the plastic component. Turn power off. Knowledge Open...
... the tape guides. Do not use contact cleaners because it could cause a malfunction. In regardto contact cleaner Do not use thinner, benzine, alcohol, etc. Note related to transportation and movement (CD player) Before transporting or moving this unit is carried from a place to use contact cleaners containing oil, for these agents may deform the plastic component. Turn power off. Knowledge Open...

User Manual
Page 39
... factory. Receiver, speakers Symptom Sound is not produced. nection". 9 ÷ Switch MUTE OFF. % ÷ Unplug the headphone plug. % Sound is not produced from the road. 8 ÷ Switch the suspected electric appliance OFF. ÷ Install the TV or the system at an increased distance between them. Radio stations cannot be received. ÷ The present time has not been adjusted or there was a power failure. ÷ The timer ON time...
... factory. Receiver, speakers Symptom Sound is not produced. nection". 9 ÷ Switch MUTE OFF. % ÷ Unplug the headphone plug. % Sound is not produced from the road. 8 ÷ Switch the suspected electric appliance OFF. ÷ Install the TV or the system at an increased distance between them. Radio stations cannot be received. ÷ The present time has not been adjusted or there was a power failure. ÷ The timer ON time...


