
User Manual
Page 2
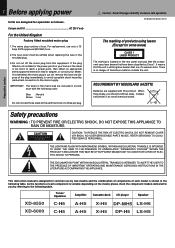
... USER-SERVICEABLE PARTS INSIDE, REFER SERVICING TO QUALIFIED SERVICE PERSONNEL. As the functions of the plug immediately, to avoid a possible shock hazard by inadvertent connection to the mains supply. If the plug fitted is variable depending on the rear panel and says that the component uses laser beams that have been classified as small chemical waste. Instead, hand them in as Class 1. For replacement, use...
... USER-SERVICEABLE PARTS INSIDE, REFER SERVICING TO QUALIFIED SERVICE PERSONNEL. As the functions of the plug immediately, to avoid a possible shock hazard by inadvertent connection to the mains supply. If the plug fitted is variable depending on the rear panel and says that the component uses laser beams that have been classified as small chemical waste. Instead, hand them in as Class 1. For replacement, use...
User Manual
Page 3
... discs and tapes 5 System connection 6 Connection of the System Accessories 6 Connection of other components and accessories .. 8 Controls and indicators 10 Tuner/Equalizer Unit (C-H6 10 Display (C-H6 11 Tuner/Equalizer Unit (C-H5 12 Display (C-H5 13 Amplifier unit 14 Cassette deck unit 15 CD player unit (DP-H5 16 CD player unit (DP-MH5 17 Remote control Unit 18 Operation of remote control unit 19 Basic section Let's put out some sound 20 Basic use...
... discs and tapes 5 System connection 6 Connection of the System Accessories 6 Connection of other components and accessories .. 8 Controls and indicators 10 Tuner/Equalizer Unit (C-H6 10 Display (C-H6 11 Tuner/Equalizer Unit (C-H5 12 Display (C-H5 13 Amplifier unit 14 Cassette deck unit 15 CD player unit (DP-H5 16 CD player unit (DP-MH5 17 Remote control Unit 18 Operation of remote control unit 19 Basic section Let's put out some sound 20 Basic use...

User Manual
Page 4
... area. Accessories FM indoor antenna (1) AM loop antenna (1) Loop antenna stand (1) Speaker cords (2) Knowledge sections Remote control unit (1) Batteries (R6/AA) (2) Parallel cord (1) Preparation section Versatile spectrum analyzer display The desired spectrum analyzer display can be selected from preset patterns, but patterns also can be created and registered. 4 Before applying power Special features XD-8550/XD-6000 (En/T) 3D dual display (For XD-8550) The 3D dual...
... area. Accessories FM indoor antenna (1) AM loop antenna (1) Loop antenna stand (1) Speaker cords (2) Knowledge sections Remote control unit (1) Batteries (R6/AA) (2) Parallel cord (1) Preparation section Versatile spectrum analyzer display The desired spectrum analyzer display can be selected from preset patterns, but patterns also can be created and registered. 4 Before applying power Special features XD-8550/XD-6000 (En/T) 3D dual display (For XD-8550) The 3D dual...

User Manual
Page 7
... view is connected, also read the instruction manual of the component. 5. Never short-circuit the + and - polarity are inverted, the sound will be caused by overheating. If connection cords are imperfect, the sound may result. 3. Application section Knowledge sections Please install as shown below . If their connections are plugged or unplugged with unclear positioning of musical instruments, etc. When arranging the system units...
... view is connected, also read the instruction manual of the component. 5. Never short-circuit the + and - polarity are inverted, the sound will be caused by overheating. If connection cords are imperfect, the sound may result. 3. Application section Knowledge sections Please install as shown below . If their connections are plugged or unplugged with unclear positioning of musical instruments, etc. When arranging the system units...

User Manual
Page 8
... ANTENNA AM GND FM 75Ω MD REC OUT PLAY IN AUX INPUT L R CONNECT WITH A-H5 Audio cord OPTICAL DIGITAL OUTPUT CONNECT WITH C-H5 OR C-H6 OR C-H7 AND X-H5 OR DM-H5 Audio input Audio output CONNECT WITH DP-H5 OR DP-MH5 SYSTEM CONROL MD recorder (DM-F70) (Optional) Optical fibre cable Digital input terminal Remove cap OPTICAL DIGITAL OUTPUT Optical fibre cable Remove the protection cap for use. (Take care not to lose the cap) System control cord Connection of system control cord Plugging...
... ANTENNA AM GND FM 75Ω MD REC OUT PLAY IN AUX INPUT L R CONNECT WITH A-H5 Audio cord OPTICAL DIGITAL OUTPUT CONNECT WITH C-H5 OR C-H6 OR C-H7 AND X-H5 OR DM-H5 Audio input Audio output CONNECT WITH DP-H5 OR DP-MH5 SYSTEM CONROL MD recorder (DM-F70) (Optional) Optical fibre cable Digital input terminal Remove cap OPTICAL DIGITAL OUTPUT Optical fibre cable Remove the protection cap for use. (Take care not to lose the cap) System control cord Connection of system control cord Plugging...

User Manual
Page 10
... receiving band. º @AUTO key When power is STANDBY: Used in the clock adjustment. #ENTER key Used for time setting, timer setting, etc. key ¡i When power is ON: P Switches the displayed information. tion of the TUNING UP/DOWN keys. Switches the demonstration on and off . When power is ON: ⁄‰ Switches the tuning mode. 1 0 Controls and indicators Tuner/Equalizer Unit (C-H6) XD-8550/XD-6000 (En/T) 12 3 456 TUNER / GRAPHIC EQUALIZER C-H6 (÷) SOUND RETRIEVAL SYSTEM STEREO...
... receiving band. º @AUTO key When power is STANDBY: Used in the clock adjustment. #ENTER key Used for time setting, timer setting, etc. key ¡i When power is ON: P Switches the displayed information. tion of the TUNING UP/DOWN keys. Switches the demonstration on and off . When power is ON: ⁄‰ Switches the tuning mode. 1 0 Controls and indicators Tuner/Equalizer Unit (C-H6) XD-8550/XD-6000 (En/T) 12 3 456 TUNER / GRAPHIC EQUALIZER C-H6 (÷) SOUND RETRIEVAL SYSTEM STEREO...
User Manual
Page 14
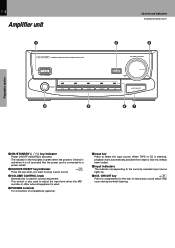
... the input source. CIRCUIT Preparation section 4 5 67 Basic section Application section 1ON/STANDBY ( ) key/Indicator Power ON/OFF switching is used for the lack of a headphone (optional). 5Input key Press to adjust the input level when the MD recorder or other external equipment is executed. 14 Amplifier unit Controls and indicators XD-8550/XD-6000 (En/T) 1 STEREO INTEGRATED AMPLIFIER A-H5 2 3 VOLUME CONTROL ON / STANDBY SOURCE DIRECT DOWN UP PHONES AUX MD TAPE TUNER CD N.B.
... the input source. CIRCUIT Preparation section 4 5 67 Basic section Application section 1ON/STANDBY ( ) key/Indicator Power ON/OFF switching is used for the lack of a headphone (optional). 5Input key Press to adjust the input level when the MD recorder or other external equipment is executed. 14 Amplifier unit Controls and indicators XD-8550/XD-6000 (En/T) 1 STEREO INTEGRATED AMPLIFIER A-H5 2 3 VOLUME CONTROL ON / STANDBY SOURCE DIRECT DOWN UP PHONES AUX MD TAPE TUNER CD N.B.

User Manual
Page 18
MUTE MD TAPE CD TAPE VOLUME ∞ 5 REMOTE CONTROL UNIT RC-H7R 7 8 9 0 ! key : Press to compensate for playback or recording. 2 SLEEP key Press to set the sleep timer function. ˇ 3 Tone control-related keys SOURCE DIRECT key : Press the key when you want to be played or recorded. BASS key : Press to switch the receiving band. º ENTER/AUTO M. O Knowledge sections Controls and indicators XD-8550/XD-6000 (En/T) 4Numeric...
MUTE MD TAPE CD TAPE VOLUME ∞ 5 REMOTE CONTROL UNIT RC-H7R 7 8 9 0 ! key : Press to compensate for playback or recording. 2 SLEEP key Press to set the sleep timer function. ˇ 3 Tone control-related keys SOURCE DIRECT key : Press the key when you want to be played or recorded. BASS key : Press to switch the receiving band. º ENTER/AUTO M. O Knowledge sections Controls and indicators XD-8550/XD-6000 (En/T) 4Numeric...

User Manual
Page 20
...; DUBBING MD=TAPE CD=TAPE A / B DOLBY NR REV.MODE 7 2 3 O.T.E. 2 0 Let's put out some sound Basic use method XD-8550/XD-6000 (En/T) Preparation section Basic section Making the sound purer Listening through headphones PHONES Headphones plug Bass compensation SLEEP DISC SKIP INPUT SOURCE DIRECT EQ. Volume adjustment volume Application section Knowledge sections DOWN To decrease volume UP 3 ÷ Quick turning produces a larger change amount. (Dynamic rotary volume control function) ÷ The display shows a reference value. CIRCUIT TUNER / GRAPHIC EQUALIZER...
...; DUBBING MD=TAPE CD=TAPE A / B DOLBY NR REV.MODE 7 2 3 O.T.E. 2 0 Let's put out some sound Basic use method XD-8550/XD-6000 (En/T) Preparation section Basic section Making the sound purer Listening through headphones PHONES Headphones plug Bass compensation SLEEP DISC SKIP INPUT SOURCE DIRECT EQ. Volume adjustment volume Application section Knowledge sections DOWN To decrease volume UP 3 ÷ Quick turning produces a larger change amount. (Dynamic rotary volume control function) ÷ The display shows a reference value. CIRCUIT TUNER / GRAPHIC EQUALIZER...

User Manual
Page 21
... left the factory. ECHO P.B.C. MANU. Auto power save is used . ÷ This function is not available when the AUX input is referred to back up the memory contents. STANDBY mode While the power cord of the set is plugged into the PHONES jack. ÷ The sounds from the remote control unit. 2 1 Let's put out some sound XD-8550/XD-6000 (En/T) Preparation section Basic section Making the sound purer (SOURCE DIRECT) When SOURCE DIRECT is on...
... left the factory. ECHO P.B.C. MANU. Auto power save is used . ÷ This function is not available when the AUX input is referred to back up the memory contents. STANDBY mode While the power cord of the set is plugged into the PHONES jack. ÷ The sounds from the remote control unit. 2 1 Let's put out some sound XD-8550/XD-6000 (En/T) Preparation section Basic section Making the sound purer (SOURCE DIRECT) When SOURCE DIRECT is on...

User Manual
Page 22
... TUNER / GRAPHIC EQUALIZER (÷) SOUND RETRIEVAL SYSTEM EX. LEVEL ADJUST CCRS REC / ARM 8 PAUSE To stop playback 2 Skipping tracks 0 1 1. Start playback. 6 2 Lights up when play starts PLAY/PAUSE 6 Application section Knowledge sections MUTE MD TAPE CD TAPE VOLUME ∞ 5 REMOTE CONTROL UNIT RC-H7R High-speed search in forward and reverse directions Skipping tracks STEREO INTEGRATED AMPLIFIER A-H5 VOLUME CONTROL ON / STANDBY SOURCE DIRECT DOWN UP PHONES AUX MD TAPE TUNER CD N.B. TA/NEWS/INFO. Load a disc. 1 Open the tray. 2 Place a disc...
... TUNER / GRAPHIC EQUALIZER (÷) SOUND RETRIEVAL SYSTEM EX. LEVEL ADJUST CCRS REC / ARM 8 PAUSE To stop playback 2 Skipping tracks 0 1 1. Start playback. 6 2 Lights up when play starts PLAY/PAUSE 6 Application section Knowledge sections MUTE MD TAPE CD TAPE VOLUME ∞ 5 REMOTE CONTROL UNIT RC-H7R High-speed search in forward and reverse directions Skipping tracks STEREO INTEGRATED AMPLIFIER A-H5 VOLUME CONTROL ON / STANDBY SOURCE DIRECT DOWN UP PHONES AUX MD TAPE TUNER CD N.B. TA/NEWS/INFO. Load a disc. 1 Open the tray. 2 Place a disc...

User Manual
Page 24
...-speed search in forward and reverse directions Skipping tracks STEREO INTEGRATED AMPLIFIER A-H5 VOLUME CONTROL ON / STANDBY SOURCE DIRECT DOWN UP PHONES AUX MD TAPE TUNER CD N.B. MUTE MD TAPE CD TAPE VOLUME ∞ 5 REMOTE CONTROL UNIT RC-H7R Playback from desired track SLEEP DISC SKIP INPUT SOURCE DIRECT EQ. LEVEL ADJUST CCRS REC / ARM 8 PAUSE High-speed search in the CD player unit. EX.BASS SRS 3D TIME REPEAT 1 2 3 SPACE RANDOM 4 5 6 CHECK P.MODE 7 8 9 PTY SEARCH CLEAR EDIT 0 +10...
...-speed search in forward and reverse directions Skipping tracks STEREO INTEGRATED AMPLIFIER A-H5 VOLUME CONTROL ON / STANDBY SOURCE DIRECT DOWN UP PHONES AUX MD TAPE TUNER CD N.B. MUTE MD TAPE CD TAPE VOLUME ∞ 5 REMOTE CONTROL UNIT RC-H7R Playback from desired track SLEEP DISC SKIP INPUT SOURCE DIRECT EQ. LEVEL ADJUST CCRS REC / ARM 8 PAUSE High-speed search in the CD player unit. EX.BASS SRS 3D TIME REPEAT 1 2 3 SPACE RANDOM 4 5 6 CHECK P.MODE 7 8 9 PTY SEARCH CLEAR EDIT 0 +10...
User Manual
Page 26
... playback can be started by using the equalizer or SRS effect should be used for playback. RDS DISPLAY TA/NEWS /INFO. BAND AUTO ENTER MULTIPLE COMPACT DISC PLAYER DP-MH5 COMPACT DIGITAL AUDIO 6 DISC CHANGER OPEN / CLOSE 01 02 03 04 05 06 TWIN REC 1 ¡ 4 ¢ 7 RANDOM DISC 1 DISC 2 DISC 3 DISC 4 DISC 5 DISC 6 REPEAT 6 Selection of Dolby NR STEREO INTEGRATED AMPLIFIER A-H5 VOLUME CONTROL ON / STANDBY SOURCE DIRECT DOWN UP PHONES AUX MD TAPE TUNER CD N.B. PTY A/B P.CALL DOWN TUNING UP 4 ¢ 1 ¡...
... playback can be started by using the equalizer or SRS effect should be used for playback. RDS DISPLAY TA/NEWS /INFO. BAND AUTO ENTER MULTIPLE COMPACT DISC PLAYER DP-MH5 COMPACT DIGITAL AUDIO 6 DISC CHANGER OPEN / CLOSE 01 02 03 04 05 06 TWIN REC 1 ¡ 4 ¢ 7 RANDOM DISC 1 DISC 2 DISC 3 DISC 4 DISC 5 DISC 6 REPEAT 6 Selection of Dolby NR STEREO INTEGRATED AMPLIFIER A-H5 VOLUME CONTROL ON / STANDBY SOURCE DIRECT DOWN UP PHONES AUX MD TAPE TUNER CD N.B. PTY A/B P.CALL DOWN TUNING UP 4 ¢ 1 ¡...
User Manual
Page 30
...RDS DISPLAY TA/NEWS /INFO. PTY A/B P.CALL DOWN TUNING UP 4 ¢ 1 ¡ REC/ARM ¶ TAPE ™ £ CD 7 6 O.T.E. MUTE MD TAPE CD TAPE VOLUME ∞ 5 REMOTE CONTROL UNIT RC-H7R STEREO INTEGRATED AMPLIFIER A-H5 VOLUME CONTROL ON / STANDBY SOURCE DIRECT DOWN UP PHONES AUX MD TAPE TUNER CD N.B. CIRCUIT TUNER / GRAPHIC EQUALIZER (÷) SOUND RETRIEVAL SYSTEM 2 STEREO EX. BASS SRS 3D EEFQFECT MODE UP TUNING DOWN R D S EON PTY O.T.T RDS DISP. BAND AUTO ENTER 1 MULTIPLE COMPACT DISC PLAYER DP-MH5 COMPACT DIGITAL AUDIO 6 DISC CHANGER OPEN...
...RDS DISPLAY TA/NEWS /INFO. PTY A/B P.CALL DOWN TUNING UP 4 ¢ 1 ¡ REC/ARM ¶ TAPE ™ £ CD 7 6 O.T.E. MUTE MD TAPE CD TAPE VOLUME ∞ 5 REMOTE CONTROL UNIT RC-H7R STEREO INTEGRATED AMPLIFIER A-H5 VOLUME CONTROL ON / STANDBY SOURCE DIRECT DOWN UP PHONES AUX MD TAPE TUNER CD N.B. CIRCUIT TUNER / GRAPHIC EQUALIZER (÷) SOUND RETRIEVAL SYSTEM 2 STEREO EX. BASS SRS 3D EEFQFECT MODE UP TUNING DOWN R D S EON PTY O.T.T RDS DISP. BAND AUTO ENTER 1 MULTIPLE COMPACT DISC PLAYER DP-MH5 COMPACT DIGITAL AUDIO 6 DISC CHANGER OPEN...

User Manual
Page 32
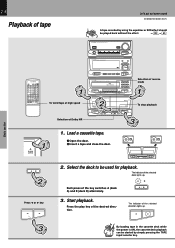
... is started . 3. PTY A/B P.CALL DOWN TUNING UP 4 ¢ 1 ¡ REC/ARM ¶ TAPE ™ £ CD 7 6 O.T.E. Load a tape in this cassette deck cannot record onto Metal tapes. N.B. LEVEL ADJUST CCRS REC / ARM 8 PAUSE 1 52 Basic section Application section 1 A 0 PUSH OPEN 1 2 3 2 2 7 2 DOLBY NR REV.MODE 3 1. Knowledge sections MUTE MD TAPE CD TAPE VOLUME ∞ 5 REMOTE CONTROL UNIT RC-H7R STEREO INTEGRATED AMPLIFIER A-H5 VOLUME CONTROL ON / STANDBY SOURCE DIRECT DOWN UP PHONES AUX MD TAPE TUNER CD N.B. Select the tape...
... is started . 3. PTY A/B P.CALL DOWN TUNING UP 4 ¢ 1 ¡ REC/ARM ¶ TAPE ™ £ CD 7 6 O.T.E. Load a tape in this cassette deck cannot record onto Metal tapes. N.B. LEVEL ADJUST CCRS REC / ARM 8 PAUSE 1 52 Basic section Application section 1 A 0 PUSH OPEN 1 2 3 2 2 7 2 DOLBY NR REV.MODE 3 1. Knowledge sections MUTE MD TAPE CD TAPE VOLUME ∞ 5 REMOTE CONTROL UNIT RC-H7R STEREO INTEGRATED AMPLIFIER A-H5 VOLUME CONTROL ON / STANDBY SOURCE DIRECT DOWN UP PHONES AUX MD TAPE TUNER CD N.B. Select the tape...
User Manual
Page 54
... total playing time does not exceed the recording time of the tape. ÷ Up to 32 tracks can be adjusted automatically in approx. 60 seconds (variable depending on side A. OP Note Character information indicators cannot be programmed. P.MODE Lights PGM MEMO EDIT AUTO DISC ALL TUNED STEREO MAX RDS EON TA CD* SLEEP O.T.T Preparation section Basic section 2 Enter disc Nos. in the order you make...
... total playing time does not exceed the recording time of the tape. ÷ Up to 32 tracks can be adjusted automatically in approx. 60 seconds (variable depending on side A. OP Note Character information indicators cannot be programmed. P.MODE Lights PGM MEMO EDIT AUTO DISC ALL TUNED STEREO MAX RDS EON TA CD* SLEEP O.T.T Preparation section Basic section 2 Enter disc Nos. in the order you make...

User Manual
Page 66
... program No. Make timer setting of PROG.1 and PROG.2, the timer data including the operating period and played contents can be played by the timer. 3 Set the POWER switch to the AUX or MD jacks. Make prepara- Basic section Application section Knowledge sections 4 Select a program No. 1 EX.BASS Within 8 seconds! 2 ENTER AUTO M. lights. ÷ If a program No. In each of the component connected to OFF (STANDBY) position. Program 2 3 Normal operation Lights Lights C-H6 display PROG. Adjust the clock before setting the timer...
... program No. Make timer setting of PROG.1 and PROG.2, the timer data including the operating period and played contents can be played by the timer. 3 Set the POWER switch to the AUX or MD jacks. Make prepara- Basic section Application section Knowledge sections 4 Select a program No. 1 EX.BASS Within 8 seconds! 2 ENTER AUTO M. lights. ÷ If a program No. In each of the component connected to OFF (STANDBY) position. Program 2 3 Normal operation Lights Lights C-H6 display PROG. Adjust the clock before setting the timer...
User Manual
Page 69
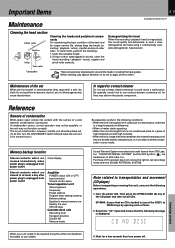
... use contact cleaners because it is for these agents may deform the plastic component. In regard to a warm place, and there is a large temperature difference. ÷ When a heater starts operating. ÷ When the unit is brought from power outlet Amplifier POWER status (ON or OFF) Input selection Volume control value Tuner/equalizer unit Receiving band Frequency Preset stations Program timer setting contents Balance setting Equalizer's manual memory created by opening...
... use contact cleaners because it is for these agents may deform the plastic component. In regard to a warm place, and there is a large temperature difference. ÷ When a heater starts operating. ÷ When the unit is brought from power outlet Amplifier POWER status (ON or OFF) Input selection Volume control value Tuner/equalizer unit Receiving band Frequency Preset stations Program timer setting contents Balance setting Equalizer's manual memory created by opening...
User Manual
Page 70
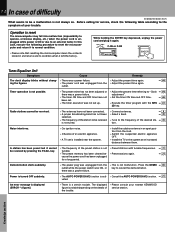
.... Radio stations cannot be received. ÷ The antennas have not been set. ÷ The timer execution was unplugged from the road. ÷ Switch the suspected electric appliance OFF. ÷ Install the TV or the system at an increased distance between them. While holding the ENTER key depressed, unplug the power cord and plug it left the factory. Power is turned OFF suddenly. ÷ The AUTO POWER SAVE...
.... Radio stations cannot be received. ÷ The antennas have not been set. ÷ The timer execution was unplugged from the road. ÷ Switch the suspected electric appliance OFF. ÷ Install the TV or the system at an increased distance between them. While holding the ENTER key depressed, unplug the power cord and plug it left the factory. Power is turned OFF suddenly. ÷ The AUTO POWER SAVE...
User Manual
Page 72
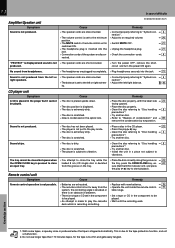
... OPEN/CLOSE key, en- ¢ sure that the DISC indicator is placed in the component to be played. XD-8550/XD-6000 (En/T) Cause ÷ The speaker cords are disconnected. ÷ The volume control is set to the minimum position. ÷ The MUTE switch of remote control unit is switched ON. ÷ The headphone plug is inserted into the jack. ¡ Sound is not produced from the system, the controlling...
... OPEN/CLOSE key, en- ¢ sure that the DISC indicator is placed in the component to be played. XD-8550/XD-6000 (En/T) Cause ÷ The speaker cords are disconnected. ÷ The volume control is set to the minimum position. ÷ The MUTE switch of remote control unit is switched ON. ÷ The headphone plug is inserted into the jack. ¡ Sound is not produced from the system, the controlling...


