

User Manual
Page 2
... the following direction. AC 110 / 127 / 220 / 230 240 V switchable* For the United Kingdom Factory fitted moulded mains plug 1. The mains plug contains a fuse. NO USERSERVICEABLE PARTS INSIDE. The marking of products using lasers (Except for operation as Class 1. AC voltage selector switches Turn the selector to match your voltage in the moulded plug. 3. REFER SERVICING TO QUALIFIED SERVICE PERSONNEL. For replacement, use only a 3-Amp ASTA...
... the following direction. AC 110 / 127 / 220 / 230 240 V switchable* For the United Kingdom Factory fitted moulded mains plug 1. The mains plug contains a fuse. NO USERSERVICEABLE PARTS INSIDE. The marking of products using lasers (Except for operation as Class 1. AC voltage selector switches Turn the selector to match your voltage in the moulded plug. 3. REFER SERVICING TO QUALIFIED SERVICE PERSONNEL. For replacement, use only a 3-Amp ASTA...
User Manual
Page 3
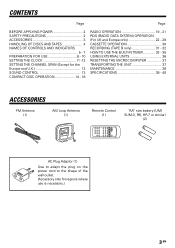
... OF DISCS AND TAPES 4 NAMES OF CONTROLS AND INDICATORS 5 - 7 PREPARATION FOR USE 8 - 10 SETTING THE CLOCK 11 -12 SETTING THE CHANNEL SPAN (Except for the Europe and U.K 12 SOUND CONTROL 13 COMPACT DISC OPERATION 14 - 18 RADIO OPERATION 19 - 21 RDS (RADIO DATA SYSTEM) OPERATION (For UK and Europe only 22 - 29 CASSETTE OPERATION 30 RECORDING (TAPE B only 31 - 32 HOW TO USE THE BUILT-IN TIMER 33 - 35 USING EXTERNAL UNITS 36 RESETTING...
... OF DISCS AND TAPES 4 NAMES OF CONTROLS AND INDICATORS 5 - 7 PREPARATION FOR USE 8 - 10 SETTING THE CLOCK 11 -12 SETTING THE CHANNEL SPAN (Except for the Europe and U.K 12 SOUND CONTROL 13 COMPACT DISC OPERATION 14 - 18 RADIO OPERATION 19 - 21 RDS (RADIO DATA SYSTEM) OPERATION (For UK and Europe only 22 - 29 CASSETTE OPERATION 30 RECORDING (TAPE B only 31 - 32 HOW TO USE THE BUILT-IN TIMER 33 - 35 USING EXTERNAL UNITS 36 RESETTING...

User Manual
Page 4
...CD (12 cm, 8 cm) and the audio part of the discs. Disc accessories The disc accessories (stabilizer, protection sheet, protection ring, etc.) which is subject to avoid danger, never use an endless tape, as the disc cleaner should not be played with more than 90 minutes recording time, for a long period of time, remove it from the center of tape...and wind the reel hub to the disc, lightly wipe the disc with tape or adhesive agent. Note : • Do not use a cracked or deformed disc or a disc repaired with a soft cotton cloth (or similar) from the player and store it in its case. ...
...CD (12 cm, 8 cm) and the audio part of the discs. Disc accessories The disc accessories (stabilizer, protection sheet, protection ring, etc.) which is subject to avoid danger, never use an endless tape, as the disc cleaner should not be played with more than 90 minutes recording time, for a long period of time, remove it from the center of tape...and wind the reel hub to the disc, lightly wipe the disc with tape or adhesive agent. Note : • Do not use a cracked or deformed disc or a disc repaired with a soft cotton cloth (or similar) from the player and store it in its case. ...

User Manual
Page 5
... the unit's internal circuitry to as the standby mode of the unit. NAMES OF CONTROLS AND INDICATORS FRONT PANEL 1 EX.BASS / DEMO button 2 STANDBY / TIMER indicator 3 REVERSE MODE button 4 ON / STANDBY button 5 VIDEO / AUX button 6 TAPE (A/B) button 7 TUNER (BAND) button 8 CD button 9 2 (Reverse play) button 0 7 STOP button ! 3 (Play / repeat) button @ PHONES socket # PUSH OPEN (Tape A) $ (TAPE A) cassette compartment % Display ^ Disc tray & DISC SKIP button * 0 OPEN / CLOSE button ( SOUND MODE button ) CLOCK button ¡ TIMER button ™ MEMORY / SET button £ P.
... the unit's internal circuitry to as the standby mode of the unit. NAMES OF CONTROLS AND INDICATORS FRONT PANEL 1 EX.BASS / DEMO button 2 STANDBY / TIMER indicator 3 REVERSE MODE button 4 ON / STANDBY button 5 VIDEO / AUX button 6 TAPE (A/B) button 7 TUNER (BAND) button 8 CD button 9 2 (Reverse play) button 0 7 STOP button ! 3 (Play / repeat) button @ PHONES socket # PUSH OPEN (Tape A) $ (TAPE A) cassette compartment % Display ^ Disc tray & DISC SKIP button * 0 OPEN / CLOSE button ( SOUND MODE button ) CLOCK button ¡ TIMER button ™ MEMORY / SET button £ P.

User Manual
Page 6
... Indicator * Radio Text Indicator ( Traffic Programme Indicator ) Traffic Information Indicator ¡ Traffic Announcement Indicator REAR PANEL 1 2 1 AC voltage selector switches (Except for the Europe and U.K.) 2 AC Power Cord 3 FM 75 Ω Antenna Socket 4 AM Loop Antenna Socket 5 Span Selector (Except for the Europe and U.K.) 6 Video / Auxiliary (Audio Signal) Input sockets 7 Speaker Terminals 3 4 5 6 7 6 EN DISPLAY 34567 890 2 1 1 Timer Related Indicator 2 Disc Number Indicator 3 Repeat Indicator 4 FM Stereo Mode Indicator 5 Play Indicator...
... Indicator * Radio Text Indicator ( Traffic Programme Indicator ) Traffic Information Indicator ¡ Traffic Announcement Indicator REAR PANEL 1 2 1 AC voltage selector switches (Except for the Europe and U.K.) 2 AC Power Cord 3 FM 75 Ω Antenna Socket 4 AM Loop Antenna Socket 5 Span Selector (Except for the Europe and U.K.) 6 Video / Auxiliary (Audio Signal) Input sockets 7 Speaker Terminals 3 4 5 6 7 6 EN DISPLAY 34567 890 2 1 1 Timer Related Indicator 2 Disc Number Indicator 3 Repeat Indicator 4 FM Stereo Mode Indicator 5 Play Indicator...
User Manual
Page 7
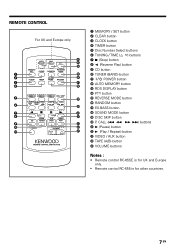
...VIDEO / AUX button ¢ TAPE (A/B) button ∞ VOLUME buttons Notes : • Remote control RC-655E is for UK and Europe only. • Remote control RC-655 is for other countries. 7 EN REMOTE CONTROL For UK and Europe only 1 MEMORY / SET button 2 CLEAR button 3 CLOCK button 4 TIMER button 5 Disc Number Select buttons 6 TUNING / TIME (% fi) buttons 7 7 (Stop) button 8 2 (Reverse Play) button 9 CD button 0 TUNER (BAND) button ! POWER button @ AUTO MEMORY button # RDS DISPLAY button $ PTY button % REVERSE MODE button ^ RANDOM button & EX.BASS button * SOUND...
...VIDEO / AUX button ¢ TAPE (A/B) button ∞ VOLUME buttons Notes : • Remote control RC-655E is for UK and Europe only. • Remote control RC-655 is for other countries. 7 EN REMOTE CONTROL For UK and Europe only 1 MEMORY / SET button 2 CLEAR button 3 CLOCK button 4 TIMER button 5 Disc Number Select buttons 6 TUNING / TIME (% fi) buttons 7 7 (Stop) button 8 2 (Reverse Play) button 9 CD button 0 TUNER (BAND) button ! POWER button @ AUTO MEMORY button # RDS DISPLAY button $ PTY button % REVERSE MODE button ^ RANDOM button & EX.BASS button * SOUND...

User Manual
Page 8
... speaker Left speaker Connect the black wire to the minus (-) terminal, and the red wire to the unit. ers. Use speakers with an impedance of unit. ÷ Leave space around the unit (from the AC socket before connecting or disconnecting any objects to the SPEAKERS terminals as lower impedance speakers can damage the unit. System Name Speaker Model Name XD-855 / XD-855E / XD855 LS-N90S XD-755 / XD...
... speaker Left speaker Connect the black wire to the minus (-) terminal, and the red wire to the unit. ers. Use speakers with an impedance of unit. ÷ Leave space around the unit (from the AC socket before connecting or disconnecting any objects to the SPEAKERS terminals as lower impedance speakers can damage the unit. System Name Speaker Model Name XD-855 / XD-855E / XD855 LS-N90S XD-755 / XD...

User Manual
Page 10
...; Keep the remote control away from moisture, excessive heat, shock, and vibrations. 10 EN Change the lighting or the direction of time. This will enter into the demonstration mode: When the unit is in the low power consumption mode, the display will disappear. • When the power is on, the EX.BASS/DEMO button can be used for battery use : • Replace the batteries if the operating distance is reduced...
...; Keep the remote control away from moisture, excessive heat, shock, and vibrations. 10 EN Change the lighting or the direction of time. This will enter into the demonstration mode: When the unit is in the low power consumption mode, the display will disappear. • When the power is on, the EX.BASS/DEMO button can be used for battery use : • Replace the batteries if the operating distance is reduced...

User Manual
Page 12
... between radio channels has been set to the one that prevails in accordance with your area by refering to which the system is shipped. To change the time display mode : 1 Perform steps 1 - 2 in memory including clock and timer settings, and tuner and CD presets. 12 EN If this case, change the clock time. FM : 100 kHz AM : 10 kHz FM : 50 kHz AM : 9 kHz 1 Press the ON/STANDBY button...
... between radio channels has been set to the one that prevails in accordance with your area by refering to which the system is shipped. To change the time display mode : 1 Perform steps 1 - 2 in memory including clock and timer settings, and tuner and CD presets. 12 EN If this case, change the clock time. FM : 100 kHz AM : 10 kHz FM : 50 kHz AM : 9 kHz 1 Press the ON/STANDBY button...

User Manual
Page 15
... played sequentially. To remove the CDs : Whilst in the display and the unit will not func- This may also cause malfunctions. • Do not place two CDs in the disc trays. Notes : • When the DISC SKIP button is pressed during playback, playback will begin automatically from the same point. To interrupt playback : 1 Press the 8 button on the remote control. • "8" will light...
... played sequentially. To remove the CDs : Whilst in the display and the unit will not func- This may also cause malfunctions. • Do not place two CDs in the disc trays. Notes : • When the DISC SKIP button is pressed during playback, playback will begin automatically from the same point. To interrupt playback : 1 Press the 8 button on the remote control. • "8" will light...
User Manual
Page 18
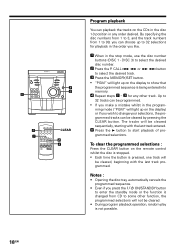
... to select the desired track. 3 Press the MEMORY/SET button. • "PGM" will be cleared by pressing the CLEAR button. Notes : • Opening the disc tray, automatically cancels the programmed sequence. • Even if you press the ON/STANDBY button to enter the standby mode or the function is changed from 1 to 99, you make a mistake whilst in the stop mode, use the disc number buttons (DISC 1 - grammed selections.
... to select the desired track. 3 Press the MEMORY/SET button. • "PGM" will be cleared by pressing the CLEAR button. Notes : • Opening the disc tray, automatically cancels the programmed sequence. • Even if you press the ON/STANDBY button to enter the standby mode or the function is changed from 1 to 99, you make a mistake whilst in the stop mode, use the disc number buttons (DISC 1 - grammed selections.

User Manual
Page 19
... the auto tuning, press theTUNING/TIME (%UP or fiDOWN) button again. • When a RDS (Radio Data System) station is pressed for more than 0.5 second, scanning will start automatically and the tuner will stop at the first receivable broadcast station. 4 2,3, 1 5,6 After use : Press the ON/STANDBY button to the standby mode. indicator goes off. • The reception changes to mono, the sound be recalled, even after changing the tuning band...
... the auto tuning, press theTUNING/TIME (%UP or fiDOWN) button again. • When a RDS (Radio Data System) station is pressed for more than 0.5 second, scanning will start automatically and the tuner will stop at the first receivable broadcast station. 4 2,3, 1 5,6 After use : Press the ON/STANDBY button to the standby mode. indicator goes off. • The reception changes to mono, the sound be recalled, even after changing the tuning band...

User Manual
Page 25
...) button. 3 Press the TUNER (BAND) button to select the FM ST or FM band. 4 Press and hold down the AUTO MEMORY but- The number of stations and "END" will each be displayed for 4 seconds. • If no stations have been automatically stored in memory will be displayed for 4 seconds, and then "END" will appear for about 4 seconds, scanning will start...
...) button. 3 Press the TUNER (BAND) button to select the FM ST or FM band. 4 Press and hold down the AUTO MEMORY but- The number of stations and "END" will each be displayed for 4 seconds. • If no stations have been automatically stored in memory will be displayed for 4 seconds, and then "END" will appear for about 4 seconds, scanning will start...

User Manual
Page 30
... not open the cassette compart- To rewind it, press the P. In this case, wait until power is performed using the remote control, press the 3 button. CALL 4 1 button. CALL ¡ ¢ button. Selection of reverse mode (TAPE B only) : Press the REVERSE MODE button repeatedly to select the following setting : Playback stops after having played both decks, press the TAPE (A/ B) button to select TAPE A or TAPE B. 2 To advance the tape, press...
... not open the cassette compart- To rewind it, press the P. In this case, wait until power is performed using the remote control, press the 3 button. CALL 4 1 button. CALL ¡ ¢ button. Selection of reverse mode (TAPE B only) : Press the REVERSE MODE button repeatedly to select the following setting : Playback stops after having played both decks, press the TAPE (A/ B) button to select TAPE A or TAPE B. 2 To advance the tape, press...
User Manual
Page 31
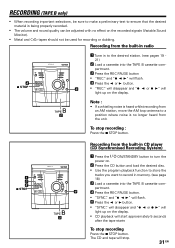
... adjusted with no longer heard from the built-in CD player (CD Synchronised Recroding System) 1 Press the ON/STANDBY button to turn the power on the display. • CD playback will flash. 5 Press the 2 or 3 button. • "SYNC." and "¶ 2 3" will start approximately 5 seconds after the tape starts To stop recording Press the 7 STOP button. and "¶ 2 3" will light up on . 2 Press the CD button and load the desired disc. • Use...
... adjusted with no longer heard from the built-in CD player (CD Synchronised Recroding System) 1 Press the ON/STANDBY button to turn the power on the display. • CD playback will flash. 5 Press the 2 or 3 button. • "SYNC." and "¶ 2 3" will start approximately 5 seconds after the tape starts To stop recording Press the 7 STOP button. and "¶ 2 3" will light up on . 2 Press the CD button and load the desired disc. • Use...

User Manual
Page 32
... memory using the program playback function, recording will display the track number which was being played at that TAPE A is reached whilst re- "ERASE" and "¶ 2 or ¶ 3" will light up on . 2 Load a prerecorded cassette into the TAPE B cas- cording, the CD player will restart from tape to tape 1 Press the ON/STANDBY button to restart recording from the beginning of tape. "ERASE" and "¶ 2 3" will flash...
... memory using the program playback function, recording will display the track number which was being played at that TAPE A is reached whilst re- "ERASE" and "¶ 2 or ¶ 3" will light up on . 2 Load a prerecorded cassette into the TAPE B cas- cording, the CD player will restart from tape to tape 1 Press the ON/STANDBY button to restart recording from the beginning of tape. "ERASE" and "¶ 2 3" will flash...

User Manual
Page 33
... standby mode after the timer playback starts. 33 EN HOW TO USE THE BUILT-IN TIMER • Before setting the timer, make sure that the clock setting is correct. (page 11) Timer playback STANDBY/TIMER ON/ STANDBY VIDEO/AUX TUNER (BAND) CD TAPE (A/B) MEMORY /SET TIMER CD BAND / TUNER POWER TIMER MEMORY/ SET VOLUME CONTROL TUNING/ TIME (%UP fiDOWN) TUNING/TIME (fi %) VIDEO / AUX TAPE (A/B) VOLUME 1 Press the ON/STANDBY button to turn the power on 2 Press the CD, TUNER (BAND), TAPE (A/B) or VIDEO/AUX button to select the desired function, and then adjust the sound volume...
... standby mode after the timer playback starts. 33 EN HOW TO USE THE BUILT-IN TIMER • Before setting the timer, make sure that the clock setting is correct. (page 11) Timer playback STANDBY/TIMER ON/ STANDBY VIDEO/AUX TUNER (BAND) CD TAPE (A/B) MEMORY /SET TIMER CD BAND / TUNER POWER TIMER MEMORY/ SET VOLUME CONTROL TUNING/ TIME (%UP fiDOWN) TUNING/TIME (fi %) VIDEO / AUX TAPE (A/B) VOLUME 1 Press the ON/STANDBY button to turn the power on 2 Press the CD, TUNER (BAND), TAPE (A/B) or VIDEO/AUX button to select the desired function, and then adjust the sound volume...

User Manual
Page 34
.../ STANDBY VIDEO /AUX TUNER (BAND) MEMORY /SET TIMER TUNER (BAND) POWER 3 REC 4 REC REC 5 REC Timer recording TIMER MEMORY/ SET VOLUME CONTROL TUNING/ TIME (%UP fiDOWN) TUNING/TIME (fi %) VIDEO / AUX VOLUME 1 Press the ON/STANDBY button to turn the power on . • Load a cassettle for recording into the TAPE B cassette compartment. 2 Press the TUNER (BAND) or VIDEO/AUX button to set , the setting will enter the standby mode. ton to select the desired function, and then adjust the sound volume using the VOLUME CON- To cancel timer operation...
.../ STANDBY VIDEO /AUX TUNER (BAND) MEMORY /SET TIMER TUNER (BAND) POWER 3 REC 4 REC REC 5 REC Timer recording TIMER MEMORY/ SET VOLUME CONTROL TUNING/ TIME (%UP fiDOWN) TUNING/TIME (fi %) VIDEO / AUX VOLUME 1 Press the ON/STANDBY button to turn the power on . • Load a cassettle for recording into the TAPE B cassette compartment. 2 Press the TUNER (BAND) or VIDEO/AUX button to set , the setting will enter the standby mode. ton to select the desired function, and then adjust the sound volume using the VOLUME CON- To cancel timer operation...
User Manual
Page 36
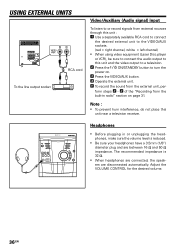
... are connected, the speak- Headphones • Before plugging in radio" section on . 3 Press the VIDEO/AUX button. 4 Operate the external unit. 5 To record the sound from the built-in or unplugging the head- Adjust the VOLUME CONTROL for the desired volume. 36 EN Note : • To prevent hum interference, do not place this unit and the video output to a television. 2 Press the ON/STANDBY button to...
... are connected, the speak- Headphones • Before plugging in radio" section on . 3 Press the VIDEO/AUX button. 4 Operate the external unit. 5 To record the sound from the built-in or unplugging the head- Adjust the VOLUME CONTROL for the desired volume. 36 EN Note : • To prevent hum interference, do not place this unit and the video output to a television. 2 Press the ON/STANDBY button to...
User Manual
Page 37
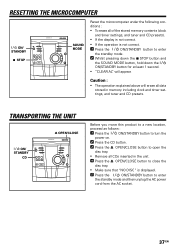
... the ON/STANDBY button to open the disc tray. • Remove all data stored in memory including clock and timer settings, and tuner and CD presets. ditions : • To erase all of the stored memory contents (clock and timer settings, and tuner and CD presets). • If the display is not correct. • If the operation is displayed. 5 Press the ON/STANDBY button to enter the standby mode and then unplug the AC power cord from the...
... the ON/STANDBY button to open the disc tray. • Remove all data stored in memory including clock and timer settings, and tuner and CD presets. ditions : • To erase all of the stored memory contents (clock and timer settings, and tuner and CD presets). • If the display is not correct. • If the operation is displayed. 5 Press the ON/STANDBY button to enter the standby mode and then unplug the AC power cord from the...


