
User Manual
Page 2
... this laser product, a laser diode classified as Class 3A laser radiation is utilizing laser beams that the setting position of a weaker class. Before connecting the power cord to the mains supply. REFER SERVICING TO QUALIFIED SERVICE PERSONNEL. It means that the unit is contained as Class 1. Preparation section 2 Before applying power Caution : Read this equipment. U.S.A. For replacement, use only a 13-Amp ASTA...
... this laser product, a laser diode classified as Class 3A laser radiation is utilizing laser beams that the setting position of a weaker class. Before connecting the power cord to the mains supply. REFER SERVICING TO QUALIFIED SERVICE PERSONNEL. It means that the unit is contained as Class 1. Preparation section 2 Before applying power Caution : Read this equipment. U.S.A. For replacement, use only a 13-Amp ASTA...

User Manual
Page 3
... 36 R.D.S. (Radio Data System) (For U.K. This product can save energy. Preparation section Application section Before applying power 2 Safety precautions 2 Special features 4 System connection 5 Accessories 5 Connection of the system accessories 5 Connection with desired tone and sound field 46 Equalizer pattern setting and saving 47 Surround setting 48 Switching the AUX Input 50 Surround function 50 Timer operation 52 Sleep timer 52 Timer programming 53 Auto Power Save 54 Knowledge section Handling of discs and tapes 56 Important...
... 36 R.D.S. (Radio Data System) (For U.K. This product can save energy. Preparation section Application section Before applying power 2 Safety precautions 2 Special features 4 System connection 5 Accessories 5 Connection of the system accessories 5 Connection with desired tone and sound field 46 Equalizer pattern setting and saving 47 Surround setting 48 Switching the AUX Input 50 Surround function 50 Timer operation 52 Sleep timer 52 Timer programming 53 Auto Power Save 54 Knowledge section Handling of discs and tapes 56 Important...

User Manual
Page 4
... power supply is restored after a power failure or the power cord is turned ON by the display. There are top-level surround modes that can be set the CD program and timer-related operations while observing the operating conditions shown by the timer, the sound level increases gradually. During the demonstration, the display changes in again during demonstration to set . Preparation section 4 Special features Dolby Pro Logic Surround, Dolby 3 Stereo Surround and Dolby Virtual Surround Dolby Pro Logic Surround, Dolby 3 Stereo Surround...
... power supply is restored after a power failure or the power cord is turned ON by the display. There are top-level surround modes that can be set the CD program and timer-related operations while observing the operating conditions shown by the timer, the sound level increases gradually. During the demonstration, the display changes in again during demonstration to set . Preparation section 4 Special features Dolby Pro Logic Surround, Dolby 3 Stereo Surround and Dolby Virtual Surround Dolby Pro Logic Surround, Dolby 3 Stereo Surround...

User Manual
Page 5
.... 3 Surround speaker system Surround speaker (2) Speaker cord (2) Speaker stabilizer (8) Center speaker (1) Speaker cord (1) Speaker stabilizer (4) Connection of the system accessories CAUTION Note on Connection Connect the components as possible from the main system, TV set, speaker cords and power cord, and set it as far as shown in the future. FM indoor antenna The accessory antenna is necessary.) Unpacking Unpack the unit carefully and make sure that you directly, notify the shipping company without delay. tion condition. 3 Fix the antenna. Only plug...
.... 3 Surround speaker system Surround speaker (2) Speaker cord (2) Speaker stabilizer (8) Center speaker (1) Speaker cord (1) Speaker stabilizer (4) Connection of the system accessories CAUTION Note on Connection Connect the components as possible from the main system, TV set, speaker cords and power cord, and set it as far as shown in the future. FM indoor antenna The accessory antenna is necessary.) Unpacking Unpack the unit carefully and make sure that you directly, notify the shipping company without delay. tion condition. 3 Fix the antenna. Only plug...

User Manual
Page 8
...- and Canada) Remove the cap and plug the optical-fiber cable. Preparation section 8 System connection Connection with the MD recorder) DIGITAL OUT OPTICAL ÷ Insert the optical-fiber cable straight into a power outlet once connec- DVD player, etc. (6ch output) Digital input Audio output Optical-fiber cable AUX *For U.K. INPUT L R FRONT R L SURROUND CENTER SUB WOOFER DIGITAL OUT OPTICAL *Audio front out Audio surround out Audio center out Audio subwoofer out DIGITAL OUT OPTICAL jack (Except for U.S.A. Cap fiber cable. DVD player, Video recorder, MD...
...- and Canada) Remove the cap and plug the optical-fiber cable. Preparation section 8 System connection Connection with the MD recorder) DIGITAL OUT OPTICAL ÷ Insert the optical-fiber cable straight into a power outlet once connec- DVD player, etc. (6ch output) Digital input Audio output Optical-fiber cable AUX *For U.K. INPUT L R FRONT R L SURROUND CENTER SUB WOOFER DIGITAL OUT OPTICAL *Audio front out Audio surround out Audio center out Audio subwoofer out DIGITAL OUT OPTICAL jack (Except for U.S.A. Cap fiber cable. DVD player, Video recorder, MD...

User Manual
Page 9
Use a commercially-available antenna adapter (a small-sized model). Power cord To wall AC outlet SUPER WOOFER PRE OUT ANTENNA AM GND FM 75Ω Preparation section System connection 9 Super woofer Extremely low sound is played back powerfully. (SW-500/optional) FM outdoor antenna Lead the 75Ω coaxial cable connected to the FM outdoor antenna into the room and connect it to the FM 75Ω terminal.
Use a commercially-available antenna adapter (a small-sized model). Power cord To wall AC outlet SUPER WOOFER PRE OUT ANTENNA AM GND FM 75Ω Preparation section System connection 9 Super woofer Extremely low sound is played back powerfully. (SW-500/optional) FM outdoor antenna Lead the 75Ω coaxial cable connected to the FM outdoor antenna into the room and connect it to the FM 75Ω terminal.

User Manual
Page 11
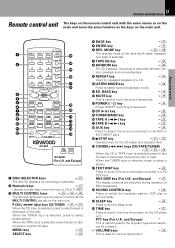
... ( Switches the extra bass play . 7 MENU key % Press to switch the mode set with the MULTI CONTROL jog dial to select or set a variety of operation modes. 0 BACK key % Press when setting a mode using the MULTI CON- INPUT jacks. % Display @ * Surround-related indicators y ( TUNER (BAND) key § Press to select the tuner and switch the receiving band. ¡ VOLUME CONTROL knob * This is used to select a station. Pressing this dial is used to skip tracks. When the TAPE input...
... ( Switches the extra bass play . 7 MENU key % Press to switch the mode set with the MULTI CONTROL jog dial to select or set a variety of operation modes. 0 BACK key % Press when setting a mode using the MULTI CON- INPUT jacks. % Display @ * Surround-related indicators y ( TUNER (BAND) key § Press to select the tuner and switch the receiving band. ¡ VOLUME CONTROL knob * This is used to select a station. Pressing this dial is used to skip tracks. When the TAPE input...
User Manual
Page 13
... to select preset station. When the TAPE input is selected, press to skip forward or backward on the CD player unit. forward or rewind the tape. MODE key £ª The reverse mode of a CD. 0 LISTEN MODE key y Press to the AUX or 6CH. Preparation section POWER 1 DISC 1 DISC 2 DISC 3 # 1 2 3 CD 2 $ 4 5 6 TUNER/BAND % 7 8 9 TAPE A ^ 0 +10 AUX TAPE B & P.CALL * 3 MENU SELECT 4 5 ENTER BACK 6 STOP ( 7 TAPE EQ REV.MODE TUNING ) 8 9 0 REPEAT RANDOM TIME TEXT DISP LISTEN SOUND MODE EX.BASS CONTROL SLEEP...
... to select preset station. When the TAPE input is selected, press to skip forward or backward on the CD player unit. forward or rewind the tape. MODE key £ª The reverse mode of a CD. 0 LISTEN MODE key y Press to the AUX or 6CH. Preparation section POWER 1 DISC 1 DISC 2 DISC 3 # 1 2 3 CD 2 $ 4 5 6 TUNER/BAND % 7 8 9 TAPE A ^ 0 +10 AUX TAPE B & P.CALL * 3 MENU SELECT 4 5 ENTER BACK 6 STOP ( 7 TAPE EQ REV.MODE TUNING ) 8 9 0 REPEAT RANDOM TIME TEXT DISP LISTEN SOUND MODE EX.BASS CONTROL SLEEP...
User Manual
Page 16
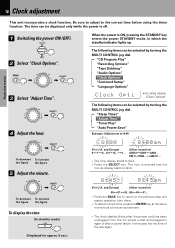
... Timer" "Adjust Time" "Timer Play" "Auto Power Save" Example: Adjustment to the correct time before using the timer function. PM1ÔPM2...ÔAM12 ... ÷ The time display starts to blink. 8:45 8:45am (For U.K. In this case, set the time of the day again. (Displayed for approx. 5 sec.) STANDBY TIMER 2 Select "Clock Options". "CD Program Play" "Recording Options" "Tape Dubbing" "Audio Options" "Clock Options" "Surround Setup" "Language Options" Clock Opti +Scrolled display (Clock Options) The following items can be selected by turning the...
... Timer" "Adjust Time" "Timer Play" "Auto Power Save" Example: Adjustment to the correct time before using the timer function. PM1ÔPM2...ÔAM12 ... ÷ The time display starts to blink. 8:45 8:45am (For U.K. In this case, set the time of the day again. (Displayed for approx. 5 sec.) STANDBY TIMER 2 Select "Clock Options". "CD Program Play" "Recording Options" "Tape Dubbing" "Audio Options" "Clock Options" "Surround Setup" "Language Options" Clock Opti +Scrolled display (Clock Options) The following items can be selected by turning the...
User Manual
Page 46
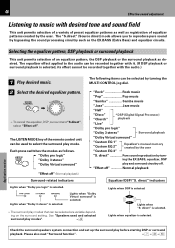
... EQ 3" Equalizer's manual memory created by the user "S. ing the EX.BASS, equalizer, DSP play mode. direct" is selected. Please also read "Surround function". 7ip The equalizer effect applied to the audio can be recorded together with the audio.) 1 Play desired music. Each press switches the modes as follows. Lights when "Dolby Virtual surround" is selected. ing on the surround setting. 46 Effective sound adjustment Listening to music with desired tone...
... EQ 3" Equalizer's manual memory created by the user "S. ing the EX.BASS, equalizer, DSP play mode. direct" is selected. Please also read "Surround function". 7ip The equalizer effect applied to the audio can be recorded together with the audio.) 1 Play desired music. Each press switches the modes as follows. Lights when "Dolby Virtual surround" is selected. ing on the surround setting. 46 Effective sound adjustment Listening to music with desired tone...

User Manual
Page 49
.... (Center speaker setting = Surround speaker setting = Delay time setting = "Press 'ENTER' to Save") To start surround play, select surround playback with respect to that output from -10 dB to the surround speakers "15ms" ... When the listening position is located between the front and surround speakers "30ms" ... "20ms" ... When the listening position is displayed. 2 Adjust the surround speaker volumes equal to the volume of the sound output from the surround speakers with the MULTI CONTROL jog dial or LISTEN MODE...
.... (Center speaker setting = Surround speaker setting = Delay time setting = "Press 'ENTER' to Save") To start surround play, select surround playback with respect to that output from -10 dB to the surround speakers "15ms" ... When the listening position is located between the front and surround speakers "30ms" ... "20ms" ... When the listening position is displayed. 2 Adjust the surround speaker volumes equal to the volume of the sound output from the surround speakers with the MULTI CONTROL jog dial or LISTEN MODE...

User Manual
Page 50
Each press switches the modes as follows. INPUT source on tape. These modes are particularly effective when used with stereo program sources, like CD, television, and FM radio. INPUT jacks (DVD, VIDEO,etc), it is not possible on tape, be sure to switch the AUX input. nent to the 6CH. Input", correct recording is required to set the source compo- Input", the audio from the surround L/ R channels becomes monaural. "DVD(2ch.)" .... (For U.K. This switches the lighted indicator between "DVD (2ch.)" and "VIDEO". Headphone...
Each press switches the modes as follows. INPUT source on tape. These modes are particularly effective when used with stereo program sources, like CD, television, and FM radio. INPUT jacks (DVD, VIDEO,etc), it is not possible on tape, be sure to switch the AUX input. nent to the 6CH. Input", correct recording is required to set the source compo- Input", the audio from the surround L/ R channels becomes monaural. "DVD(2ch.)" .... (For U.K. This switches the lighted indicator between "DVD (2ch.)" and "VIDEO". Headphone...

User Manual
Page 51
... in the Dolby Pro Logic and Dolby 3 Stereo modes have usually been set surround speakers. Center speaker Super woofer* Front speakers Application section Dolby Virtual Surround The surround signals output in the Dolby 3 Stereo mode the surround information is played, this mode. This mode is available for systems that are used with Dolby Surround program sources, but can also improve sound field unity for use with programs that are not Dolby Surround encoded. Super woofer* Front speakers round home video software. Dolby Pro Logic Surround When video (LD...
... in the Dolby Pro Logic and Dolby 3 Stereo modes have usually been set surround speakers. Center speaker Super woofer* Front speakers Application section Dolby Virtual Surround The surround signals output in the Dolby 3 Stereo mode the surround information is played, this mode. This mode is available for systems that are used with Dolby Surround program sources, but can also improve sound field unity for use with programs that are not Dolby Surround encoded. Super woofer* Front speakers round home video software. Dolby Pro Logic Surround When video (LD...

User Manual
Page 52
... remote control unit. "CD Program Play" "Recording Options" "Tape Dubbing" "Audio Options" "Clock Options" "Surround Setup" "Language Options" +Scrolled display (Clock Options) Clock Opti The following items can be turned OFF. 1 Select "Clock Options". Adjust the clock before setting the timer. Sleep timer Set the number of minutes after which the power is to 0 or the mute function is switched off "Ô10 Ô20 ... ÷ The displayed time changes in the set time range. MENU MULTI CONTROL SELECT 2 Select "Sleep Timer...
... remote control unit. "CD Program Play" "Recording Options" "Tape Dubbing" "Audio Options" "Clock Options" "Surround Setup" "Language Options" +Scrolled display (Clock Options) Clock Opti The following items can be turned OFF. 1 Select "Clock Options". Adjust the clock before setting the timer. Sleep timer Set the number of minutes after which the power is to 0 or the mute function is switched off "Ô10 Ô20 ... ÷ The displayed time changes in the set time range. MENU MULTI CONTROL SELECT 2 Select "Sleep Timer...

User Manual
Page 53
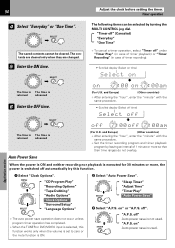
... recording Make preparations for each timer program. To listen to radio To listen to CD The stations to be received should already be activated or deactivated as desired. ÷ If you want to play (recording). ing. • 2 Adjust the listening volume. 3 Select the timer operation. MENU "CD Program Play" MULTI CONTROL "Recording Options" "Tape Dubbing" "Audio Options" "Clock Options" SELECT "Surround Setup" "Language Options" 2 Select "Timer Play". Either "Everyday" (executing a timer program once every day) or "One Time...
... recording Make preparations for each timer program. To listen to radio To listen to CD The stations to be received should already be activated or deactivated as desired. ÷ If you want to play (recording). ing. • 2 Adjust the listening volume. 3 Select the timer operation. MENU "CD Program Play" MULTI CONTROL "Recording Options" "Tape Dubbing" "Audio Options" "Clock Options" SELECT "Surround Setup" "Language Options" 2 Select "Timer Play". Either "Everyday" (executing a timer program once every day) or "One Time...
User Manual
Page 54
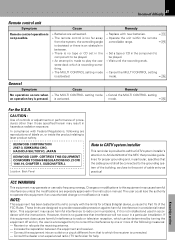
... "A.P.S. MENU "CD Program Play" "Recording Options" MULTI CONTROL "Tape Dubbing" "Audio Options" "Clock Options" "Surround Setup" SELECT "Language Options" ÷ The auto power save is used . on The time is The time is returned advanced (For U.K. "Timer off " under "Timer Play" (in case of timer playback) or "Timer Recording" (in case of 1 minute or more , the power is switched off " Auto power save operation does not occur unless program timer operation has completed. ÷ When the TUNER or DVD/VIDEO input is...
... "A.P.S. MENU "CD Program Play" "Recording Options" MULTI CONTROL "Tape Dubbing" "Audio Options" "Clock Options" "Surround Setup" SELECT "Language Options" ÷ The auto power save is used . on The time is The time is returned advanced (For U.K. "Timer off " under "Timer Play" (in case of timer playback) or "Timer Recording" (in case of 1 minute or more , the power is switched off " Auto power save operation does not occur unless program timer operation has completed. ÷ When the TUNER or DVD/VIDEO input is...

User Manual
Page 57
...) Input selection Volume control value Balance level Equalizer's manual memory created by the user DVD/VIDEO input level Auto Power Save Tuner unit Receiving band Frequency Preset stations Program timer setting con- Important Items In case of difficulty 57 Maintenance Cleaning the head section Cotton swab Capstan Head Pinch roller Tape guides Cleaning the heads and peripheral components For maintaining the best condition of the deck and for a few seconds then turn power...
...) Input selection Volume control value Balance level Equalizer's manual memory created by the user DVD/VIDEO input level Auto Power Save Tuner unit Receiving band Frequency Preset stations Program timer setting con- Important Items In case of difficulty 57 Maintenance Cleaning the head section Cotton swab Capstan Head Pinch roller Tape guides Cleaning the heads and peripheral components For maintaining the best condition of the deck and for a few seconds then turn power...

User Manual
Page 58
... speaker cords are set simulta- R Radio stations cannot be received. ÷ The antennas have not been connected. ÷ A proper broadcasting band has not been selected. ÷ The frequency of the station to be set to "No". t ance. PUT (external input) is not produced. Before calling for a single timer program. tem connection". 67 ÷ Adjust the left and right volumes are disconnected. ÷ The MUTE switch of remote control unit...
... speaker cords are set simulta- R Radio stations cannot be received. ÷ The antennas have not been connected. ÷ A proper broadcasting band has not been selected. ÷ The frequency of the station to be set to "No". t ance. PUT (external input) is not produced. Before calling for a single timer program. tem connection". 67 ÷ Adjust the left and right volumes are disconnected. ÷ The MUTE switch of remote control unit...

User Manual
Page 59
... after turning the power ON. ÷ A tape is not inserted in tape length or characteristics of the a malfunction. cies. ¶ ÷ Preset stations again. ¶ Demonstration starts sud- ÷ The power plug was a power failure. Press denly. DSP play and surround play pattern ÷ Select other equalizer pattern than 100 minutes tapes, for a long period. ÷ Preset stations with tunable frequen- mechanisms of operation. ÷ Set it to...
... after turning the power ON. ÷ A tape is not inserted in tape length or characteristics of the a malfunction. cies. ¶ ÷ Preset stations again. ¶ Demonstration starts sud- ÷ The power plug was a power failure. Press denly. DSP play and surround play pattern ÷ Select other equalizer pattern than 100 minutes tapes, for a long period. ÷ Preset stations with tunable frequen- mechanisms of operation. ÷ Set it to...
User Manual
Page 61
... unauthorized change or modification is made to play the cassette deck which the receiver is not installed and used in accordance with new batteries. $ ÷ Operate the unit within the remote controllable range. $ ÷ Set a tape or CD in a residential installation. mode. % For the U.S.A. Increase the separation between . ÷ There is no guarantee that to radio communications, if it is connected. -- These limits are reproductions of cable...
... unauthorized change or modification is made to play the cassette deck which the receiver is not installed and used in accordance with new batteries. $ ÷ Operate the unit within the remote controllable range. $ ÷ Set a tape or CD in a residential installation. mode. % For the U.S.A. Increase the separation between . ÷ There is no guarantee that to radio communications, if it is connected. -- These limits are reproductions of cable...


