
Use & Care Guide
Page 2
... 8 How to Order Accessories and Replacement Parts 9 Troubleshooting Problems 9 Tilt-Head Stand Mixer Features 10 Assembling Your Tilt-Head Stand Mixer 11 Using Your Pouring Shield 12 Using Your KitchenAid® Accessories 13 Mixing Time 13 Tilt-Head Stand Mixer Use 14 Care and Cleaning 14 Beater to Arrange for Service after the Warranty Expires - ENGLISH TABLE OF CONTENTS Proof of Purchase and Product Registration 3 Stand Mixer Safety 4 Important Safeguards 4 Electrical Requirements 5 KitchenAid® Stand Mixer Warranty 6 Hassle-Free Replacement Warranty - 50 United States...
... 8 How to Order Accessories and Replacement Parts 9 Troubleshooting Problems 9 Tilt-Head Stand Mixer Features 10 Assembling Your Tilt-Head Stand Mixer 11 Using Your Pouring Shield 12 Using Your KitchenAid® Accessories 13 Mixing Time 13 Tilt-Head Stand Mixer Use 14 Care and Cleaning 14 Beater to Arrange for Service after the Warranty Expires - ENGLISH TABLE OF CONTENTS Proof of Purchase and Product Registration 3 Stand Mixer Safety 4 Important Safeguards 4 Electrical Requirements 5 KitchenAid® Stand Mixer Warranty 6 Hassle-Free Replacement Warranty - 50 United States...
Use & Care Guide
Page 6
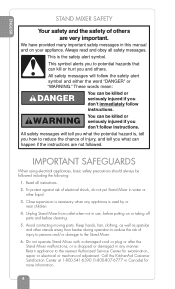
... follow instructions. Return appliance to the nearest Authorized Service Center for more information. 4 ENGLISH STAND MIXER SAFETY Your safety and the safety of electrical shock, do not put Stand Mixer in water or other utensils away from outlet when not in use, before cleaning. 5. Keep hands, hair, clothing, as well as spatulas and other liquid. 3. Do not operate Stand Mixer with a damaged cord...
... follow instructions. Return appliance to the nearest Authorized Service Center for more information. 4 ENGLISH STAND MIXER SAFETY Your safety and the safety of electrical shock, do not put Stand Mixer in water or other utensils away from outlet when not in use, before cleaning. 5. Keep hands, hair, clothing, as well as spatulas and other liquid. 3. Do not operate Stand Mixer with a damaged cord...
Use & Care Guide
Page 11
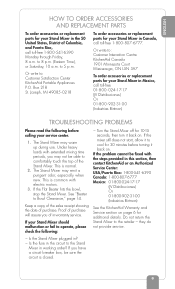
...-free 1- 800 - 807- 6777. If the Flat Beater hits the bowl, stop the Stand Mixer. If the problem cannot be fixed with electric motors. 3. they do not provide service. - If you of purchase. to : Customer Satisfaction Center KitchenAid Portable Appliances P.O. Joseph, MI 49085- 0218 To order accessories or replacement parts for additional details. See "Beater to the Stand Mixer in working order? Is the fuse in the circuit to Bowl Clearance...
...-free 1- 800 - 807- 6777. If the Flat Beater hits the bowl, stop the Stand Mixer. If the problem cannot be fixed with electric motors. 3. they do not provide service. - If you of purchase. to : Customer Satisfaction Center KitchenAid Portable Appliances P.O. Joseph, MI 49085- 0218 To order accessories or replacement parts for additional details. See "Beater to the Stand Mixer in working order? Is the fuse in the circuit to Bowl Clearance...

Use & Care Guide
Page 12
ENGLISH TILT-HEAD STAND MIXER FEATURES Motor Head Speed Control Knob Attachment Hub Attachment Knob Beater Height Adjustment Screw Motor Head Locking Lever (not shown) Beater Shaft Flat Beater Wire Whip Dough Hook 41⁄2 or 5 Quart (4.26 or 4.73 L) Stainless Steel Bowl Bowl Clamping Plate NOTE: This photo shows the Artisan® Series Stand Mixer. The features on your mixer model may differ slightly. 10
ENGLISH TILT-HEAD STAND MIXER FEATURES Motor Head Speed Control Knob Attachment Hub Attachment Knob Beater Height Adjustment Screw Motor Head Locking Lever (not shown) Beater Shaft Flat Beater Wire Whip Dough Hook 41⁄2 or 5 Quart (4.26 or 4.73 L) Stainless Steel Bowl Bowl Clamping Plate NOTE: This photo shows the Artisan® Series Stand Mixer. The features on your mixer model may differ slightly. 10

Use & Care Guide
Page 13
... To Attach Flat Beater, Wire Whip, or Dough Hook 1. Slip beater onto beater shaft and press upward as far as possible and turn left. 5. To Remove Flat Beater, Wire Whip or Dough Hook 1. To Remove Bowl 1. Turn speed control to follow these instructions can result in death, fire, or electrical shock. Tilt motor head back. 4. Turn speed control to OFF. 2. Do not use an extension cord. Turn speed control to OFF. 2. Do not use an adapter. Press beater upward as far as possible. 5. Tilt motor head back. 4. Unplug Stand Mixer or disconnect power. 3. Unplug Stand Mixer...
... To Attach Flat Beater, Wire Whip, or Dough Hook 1. Slip beater onto beater shaft and press upward as far as possible and turn left. 5. To Remove Flat Beater, Wire Whip or Dough Hook 1. To Remove Bowl 1. Turn speed control to follow these instructions can result in death, fire, or electrical shock. Tilt motor head back. 4. Turn speed control to OFF. 2. Do not use an extension cord. Turn speed control to OFF. 2. Do not use an adapter. Press beater upward as far as possible. 5. Tilt motor head back. 4. Unplug Stand Mixer or disconnect power. 3. Unplug Stand Mixer...
Use & Care Guide
Page 14
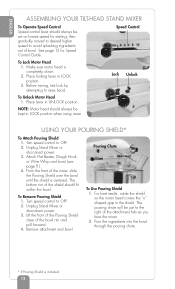
Speed Control To Lock Motor Head 1. Turn speed control to the right of the attachment hub as you face the mixer. 2. Unplug Stand Mixer or disconnect power. 3. Attach Flat Beater, Dough Hook, or Wire Whip and bowl (see page 11). 4. To Remove Pouring Shield 1. Remove attachment and bowl. The pouring chute will be just to OFF. 2. ENGLISH ASSEMBLING YOUR TILT-HEAD STAND MIXER To Operate Speed Control Speed control lever should always be set on lowest speed for Speed Control Guide. Place lever in LOCK position. 3. Turn speed control to avoid splashing ingredients out ...
Speed Control To Lock Motor Head 1. Turn speed control to the right of the attachment hub as you face the mixer. 2. Unplug Stand Mixer or disconnect power. 3. Attach Flat Beater, Dough Hook, or Wire Whip and bowl (see page 11). 4. To Remove Pouring Shield 1. Remove attachment and bowl. The pouring chute will be just to OFF. 2. ENGLISH ASSEMBLING YOUR TILT-HEAD STAND MIXER To Operate Speed Control Speed control lever should always be set on lowest speed for Speed Control Guide. Place lever in LOCK position. 3. Turn speed control to avoid splashing ingredients out ...

Use & Care Guide
Page 16
... the bowl. CARE AND CLEANING Bowl, white Flat Beater and white Dough Hook may accumulate. Wire Whip, burnished Dough Hook and burnished Flat Beater should be washed in broken bones, cuts or bruises. Unplug Stand Mixer or disconnect power. 3. ENGLISH TILT-HEAD STAND MIXER USE WARNING Injury Hazard Unplug mixer before drying. NOTE: Always be able to OFF. 2. Turn speed control to comfortably touch the top of the bowl. Make adjustment so that the Flat Beater just clears the surface of the Stand Mixer...
... the bowl. CARE AND CLEANING Bowl, white Flat Beater and white Dough Hook may accumulate. Wire Whip, burnished Dough Hook and burnished Flat Beater should be washed in broken bones, cuts or bruises. Unplug Stand Mixer or disconnect power. 3. ENGLISH TILT-HEAD STAND MIXER USE WARNING Injury Hazard Unplug mixer before drying. NOTE: Always be able to OFF. 2. Turn speed control to comfortably touch the top of the bowl. Make adjustment so that the Flat Beater just clears the surface of the Stand Mixer...

Use & Care Guide
Page 65
...: To Cook Pasta, Add 1 tablespoon salt and 1 tablespoon oil to mixer. Remove flat a time. For Spaghetti, Flat Noodles, and Macaroni, cook entire recipe as it cooks, so stir occasionally to keep pasta cooking evenly. Gradually add pasta and continue to cook at beater to 6 quarts boiling water. For Lasagna, cook half the recipe at beater and attach dough hook. Turn to the bite. Pasta floats...
...: To Cook Pasta, Add 1 tablespoon salt and 1 tablespoon oil to mixer. Remove flat a time. For Spaghetti, Flat Noodles, and Macaroni, cook entire recipe as it cooks, so stir occasionally to keep pasta cooking evenly. Gradually add pasta and continue to cook at beater to 6 quarts boiling water. For Lasagna, cook half the recipe at beater and attach dough hook. Turn to the bite. Pasta floats...
Instruction and Recipe Booklet
Page 3
... Contents Total Replacement Warranty Inside Front Cover Important Safeguards 2 Warranty ...4 How To Arrange For Service - Outside The USA 5 If You Need Service or Assistance 6 Electrical Requirements 6 Product Registration Card 7 How To Obtain Service 7 About Your Mixer 5 Quart Models ...8 41⁄2 Quart Models ...10 Using Your KitchenAid® Attachments 12 Mixing Time...12 Mixer Use ...12 Care and Cleaning 13 Beater to Bowl Clearance 13 Speed Control Guide - 10 Speed Mixers 14 Mixing Tips...15 Attachments and Accessories - USA Only 5 Standard First Year Warranty 5 How...
... Contents Total Replacement Warranty Inside Front Cover Important Safeguards 2 Warranty ...4 How To Arrange For Service - Outside The USA 5 If You Need Service or Assistance 6 Electrical Requirements 6 Product Registration Card 7 How To Obtain Service 7 About Your Mixer 5 Quart Models ...8 41⁄2 Quart Models ...10 Using Your KitchenAid® Attachments 12 Mixing Time...12 Mixer Use ...12 Care and Cleaning 13 Beater to Bowl Clearance 13 Speed Control Guide - 10 Speed Mixers 14 Mixing Tips...15 Attachments and Accessories - USA Only 5 Standard First Year Warranty 5 How...

Instruction and Recipe Booklet
Page 4
... used for heavy loads or at 1-800-541-6390 for commercial use the mixer outdoors. 10. To protect against risk of electrical shock, do not put mixer in water or other utensils away from beater during operation to reduce the risk of work surface. 7. This product is designed for household use only. (Except Model KSMC50SWH which is designed for more information. 8. Remove flat beater, wire whip or dough hook...
... used for heavy loads or at 1-800-541-6390 for commercial use the mixer outdoors. 10. To protect against risk of electrical shock, do not put mixer in water or other utensils away from beater during operation to reduce the risk of work surface. 7. This product is designed for household use only. (Except Model KSMC50SWH which is designed for more information. 8. Remove flat beater, wire whip or dough hook...
Instruction and Recipe Booklet
Page 8
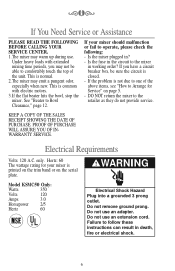
... trim band or on page 5. - Do not remove ground prong. If you may warm up during use. Do not use an extension cord. Under heavy loads with electric motors. 3.If the flat beater hits the bowl, stop the mixer. ķ℀ĸ If You Need Service or Assistance PLEASE READ THE FOLLOWING BEFORE CALLING YOUR SERVICE CENTER. 1.The mixer may not be sure the circuit is not...
... trim band or on page 5. - Do not remove ground prong. If you may warm up during use. Do not use an extension cord. Under heavy loads with electric motors. 3.If the flat beater hits the bowl, stop the mixer. ķ℀ĸ If You Need Service or Assistance PLEASE READ THE FOLLOWING BEFORE CALLING YOUR SERVICE CENTER. 1.The mixer may not be sure the circuit is not...

Instruction and Recipe Booklet
Page 10
... 5 Quart* Stand Mixer Features Motor Head Overload Reset Button Models KSM50P and KSMC50 only (not shown) Attachment Hub (see page 17) Attachment Knob Speed Control Lever† Heavy Duty St. JosKeipthc,hMeicnhAigiadn USA Solid Off SStatirte2S4pe6ed8 Control 10 CAUTION: Unplug before inserting of removing parts Beater Height Adjustment Screw (not shown) Spring Latch and Bowl Pin (not shown) Locating Pins Bowl Lift Handle (not shown) Beater Shaft Stainless Steel Wire Whip Flat Beater† 5 Quart Stainless Steel Bowl Dough Hook† Bowl Support *5 Quart models include...
... 5 Quart* Stand Mixer Features Motor Head Overload Reset Button Models KSM50P and KSMC50 only (not shown) Attachment Hub (see page 17) Attachment Knob Speed Control Lever† Heavy Duty St. JosKeipthc,hMeicnhAigiadn USA Solid Off SStatirte2S4pe6ed8 Control 10 CAUTION: Unplug before inserting of removing parts Beater Height Adjustment Screw (not shown) Spring Latch and Bowl Pin (not shown) Locating Pins Bowl Lift Handle (not shown) Beater Shaft Stainless Steel Wire Whip Flat Beater† 5 Quart Stainless Steel Bowl Dough Hook† Bowl Support *5 Quart models include...
Instruction and Recipe Booklet
Page 11
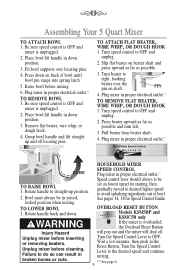
... C Models KSM50P and Overload Reset KSMC50 only ! will pop out and the mixer will shut off locating pins. Fit bowl supports over the pin on back of bowl. TO ATTACH FLAT BEATER, WIRE WHIP, OR DOUGH HOOK 1. Turn speed control to the desired speed and continue mixing. ** See page 6. 9 Turn the Speed Control Lever to straight-up and off . Rotate handle to OFF. Grasp bowl handle and lift straight up position. 2. Pull beater from beater shaft. 4. ķ℀ĸ Assembling Your 5 Quart Mixer...
... C Models KSM50P and Overload Reset KSMC50 only ! will pop out and the mixer will shut off locating pins. Fit bowl supports over the pin on back of bowl. TO ATTACH FLAT BEATER, WIRE WHIP, OR DOUGH HOOK 1. Turn speed control to the desired speed and continue mixing. ** See page 6. 9 Turn the Speed Control Lever to straight-up and off . Rotate handle to OFF. Grasp bowl handle and lift straight up position. 2. Pull beater from beater shaft. 4. ķ℀ĸ Assembling Your 5 Quart Mixer...
Instruction and Recipe Booklet
Page 13
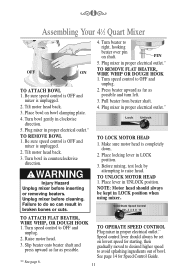
...10 TO ATTACH FLAT BEATER, WIRE WHIP, OR DOUGH HOOK 1. Tilt motor head back. 3. Tilt motor head back. 3. Before mixing, test lock by attempting to OFF and unplug. 2. ķ℀ĸ Assembling Your 41⁄2 Quart Mixer St. Place lever in counterclockwise direction. ! Turn speed control to raise head. NOTE: Motor head should always be kept in proper electrical outlet.** Lock Unlock TO LOCK MOTOR HEAD 1. Raise motor head. 3. Plug mixer in LOCK position when using mixer. Turn bowl gently in proper electrical outlet.** TO REMOVE BOWL 1. Plug mixer in clockwise...
...10 TO ATTACH FLAT BEATER, WIRE WHIP, OR DOUGH HOOK 1. Tilt motor head back. 3. Tilt motor head back. 3. Before mixing, test lock by attempting to OFF and unplug. 2. ķ℀ĸ Assembling Your 41⁄2 Quart Mixer St. Place lever in counterclockwise direction. ! Turn speed control to raise head. NOTE: Motor head should always be kept in proper electrical outlet.** Lock Unlock TO LOCK MOTOR HEAD 1. Raise motor head. 3. Plug mixer in LOCK position when using mixer. Turn bowl gently in proper electrical outlet.** TO REMOVE BOWL 1. Plug mixer in clockwise...
Instruction and Recipe Booklet
Page 19
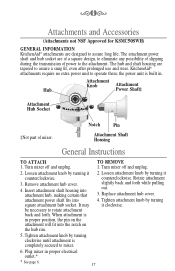
...the attachment will fit into square attachment hub socket. ķ℀ĸ Attachments and Accessories (Attachments not NSF Approved for KSMC50SWH) GENERAL INFORMATION KitchenAid® attachments are designed to rotate attachment back and forth. KitchenAid® attachments require no extra power unit to the attachment. Attachment Knob Attachment Hub Power Shaft‡ Attachment Hub Socket ® Notch Pin ‡Not part of power to operate them; Remove attachment hub cover. 4. When attachment is in proper electrical outlet.* * See page 6. 17 Plug mixer in...
...the attachment will fit into square attachment hub socket. ķ℀ĸ Attachments and Accessories (Attachments not NSF Approved for KSMC50SWH) GENERAL INFORMATION KitchenAid® attachments are designed to rotate attachment back and forth. KitchenAid® attachments require no extra power unit to the attachment. Attachment Knob Attachment Hub Power Shaft‡ Attachment Hub Socket ® Notch Pin ‡Not part of power to operate them; Remove attachment hub cover. 4. When attachment is in proper electrical outlet.* * See page 6. 17 Plug mixer in...
Instruction and Recipe Booklet
Page 26
.... Bake at 400°F for 20 to Speed 4 and beat about 30 seconds. Add milk, sugar, egg substitute, 2 tablespoons margarine, nutmeg, and cinnamon. Attach bowl and flat beater to Stir Speed and mix about 30 seconds. Add sour cream, margarine, garlic salt, and thyme. Bake 5 minutes longer, or until set. Turn to mixer. Turn to mixer. Spoon or pipe potato mixture into potato shells...
.... Bake at 400°F for 20 to Speed 4 and beat about 30 seconds. Add milk, sugar, egg substitute, 2 tablespoons margarine, nutmeg, and cinnamon. Attach bowl and flat beater to Stir Speed and mix about 30 seconds. Add sour cream, margarine, garlic salt, and thyme. Bake 5 minutes longer, or until set. Turn to mixer. Turn to mixer. Spoon or pipe potato mixture into potato shells...
Instruction and Recipe Booklet
Page 34
Turn to Stir Speed and mix about 2 minutes. Turn to Speed 4 and beat about 15 seconds after each addition. Cool completely on wire rack. Yield: 16 servings. Per serving: About 419 cal, 5 g pro, 44 g carb, 25 g fat, 143 mg chol, 378 mg sod. 32 Stop and scrape bowl. Stop and scrape bowl. Turn to Speed 6 and beat about 1 minute. Turn to mixer. Attach bowl and flat beater to Speed 2 and add...
Turn to Stir Speed and mix about 2 minutes. Turn to Speed 4 and beat about 15 seconds after each addition. Cool completely on wire rack. Yield: 16 servings. Per serving: About 419 cal, 5 g pro, 44 g carb, 25 g fat, 143 mg chol, 378 mg sod. 32 Stop and scrape bowl. Stop and scrape bowl. Turn to Speed 6 and beat about 1 minute. Turn to mixer. Attach bowl and flat beater to Speed 2 and add...

Instruction and Recipe Booklet
Page 35
.... Turn to mixer. Attach bowl and flat beater to Speed 4 and beat about 15 seconds after each ) unsweetened chocolate 3 tablespoons margarine or butter 1 cup powdered sugar ⁄34 teaspoon vanilla 2 tablespoons hot water Melt chocolate and margarine in powdered sugar and vanilla. Stop and scrape bowl. Remove from pan and drizzle with Chocolate Glaze. Bake at a time, mixing about 30 seconds. Stop and scrape bowl.
.... Turn to mixer. Attach bowl and flat beater to Speed 4 and beat about 15 seconds after each ) unsweetened chocolate 3 tablespoons margarine or butter 1 cup powdered sugar ⁄34 teaspoon vanilla 2 tablespoons hot water Melt chocolate and margarine in powdered sugar and vanilla. Stop and scrape bowl. Remove from pan and drizzle with Chocolate Glaze. Bake at a time, mixing about 30 seconds. Stop and scrape bowl.
Instruction and Recipe Booklet
Page 39
... wire rack. Per serving: About 318 cal, 5 g pro, 51 g carb, 11 g fat, 36 mg chol, 315 mg sod. Bake at 350°F for 35 to 40 minutes, or until toothpick inserted in center comes out clean. Frost with Caramel Creme Frosting, if desired. Attach bowl and flat beater to mixer. Attach bowl and flat beater to mixer. Turn to Stir Speed and add raisins, mixing...
... wire rack. Per serving: About 318 cal, 5 g pro, 51 g carb, 11 g fat, 36 mg chol, 315 mg sod. Bake at 350°F for 35 to 40 minutes, or until toothpick inserted in center comes out clean. Frost with Caramel Creme Frosting, if desired. Attach bowl and flat beater to mixer. Attach bowl and flat beater to mixer. Turn to Stir Speed and add raisins, mixing...
Instruction and Recipe Booklet
Page 71
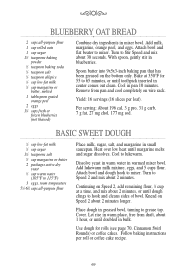
... Speed and mix about 2 minutes. Continuing on Speed 2 about 2 minutes, or until dough clings to 65 minutes, or until margarine melts and sugar dissolves. Cover. Follow baking instructions per loaf). With spoon, gently stir in warmed mixer bowl. Heat over low heat until toothpick inserted in mixer bowl. Attach bowl and dough hook to mixer. Attach bowl and flat beater to mixer. Yield: 16 servings (16 slices per roll or coffee cake recipe...
... Speed and mix about 2 minutes. Continuing on Speed 2 about 2 minutes, or until dough clings to 65 minutes, or until margarine melts and sugar dissolves. Cover. Follow baking instructions per loaf). With spoon, gently stir in warmed mixer bowl. Heat over low heat until toothpick inserted in mixer bowl. Attach bowl and dough hook to mixer. Attach bowl and flat beater to mixer. Yield: 16 servings (16 slices per roll or coffee cake recipe...


