
Use & Care Guide
Page 2
ENGLISH TABLE OF CONTENTS Proof of Purchase and Product Registration 3 Stand Mixer Safety 4 Important Safeguards 4 Electrical Requirements 5 KitchenAid® Stand Mixer Warranty 6 Hassle-Free Replacement Warranty - 50 United States and District of Columbia 7 Hassle-Free Replacement Warranty - All Locations ... 10 Assembling Your Tilt-Head Stand Mixer 11 Using Your Pouring Shield 12 Using Your KitchenAid® Accessories 13 Mixing Time 13 Tilt-Head Stand Mixer Use 14 Care and Cleaning 14 Beater to Arrange for Warranty Service in Puerto Rico 8 How to Bowl Clearance 14 Speed ...
ENGLISH TABLE OF CONTENTS Proof of Purchase and Product Registration 3 Stand Mixer Safety 4 Important Safeguards 4 Electrical Requirements 5 KitchenAid® Stand Mixer Warranty 6 Hassle-Free Replacement Warranty - 50 United States and District of Columbia 7 Hassle-Free Replacement Warranty - All Locations ... 10 Assembling Your Tilt-Head Stand Mixer 11 Using Your Pouring Shield 12 Using Your KitchenAid® Accessories 13 Mixing Time 13 Tilt-Head Stand Mixer Use 14 Care and Cleaning 14 Beater to Arrange for Warranty Service in Puerto Rico 8 How to Bowl Clearance 14 Speed ...
Use & Care Guide
Page 6
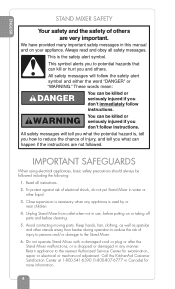
...after the Stand Mixer malfunctions, or is dropped or damaged in Canada) for examination, repair or electrical or mechanical adjustment. Call the KitchenAid Customer Satisfaction Center at 1-800-541-6390 (1-800-807-6777 in any appliance is necessary when any manner. We have provided many important... safety messages in use, before cleaning. 5. Unplug Stand Mixer from beater during operation to reduce the risk of injury to persons and/or damage to potential hazards that can happen if the instructions are very...
...after the Stand Mixer malfunctions, or is dropped or damaged in Canada) for examination, repair or electrical or mechanical adjustment. Call the KitchenAid Customer Satisfaction Center at 1-800-541-6390 (1-800-807-6777 in any appliance is necessary when any manner. We have provided many important... safety messages in use, before cleaning. 5. Unplug Stand Mixer from beater during operation to reduce the risk of injury to persons and/or damage to potential hazards that can happen if the instructions are very...

Use & Care Guide
Page 7
... these instructions can result in death, fire, or electrical shock. 5 Do not let the cord hang over edge of attachments not recommended or sold by KitchenAid may cause fire, electrical shock or injury. 8. If the power cord is designed for your Stand Mixer is also listed on a tag under the... not remove ground prong. This product is too short, have a qualified electrician or serviceman install an outlet near the appliance. ENGLISH 7. Remove Flat Beater, Wire Whip or Dough Hook from Stand Mixer before washing. 11. The use the Stand Mixer outdoors. 9.
... these instructions can result in death, fire, or electrical shock. 5 Do not let the cord hang over edge of attachments not recommended or sold by KitchenAid may cause fire, electrical shock or injury. 8. If the power cord is designed for your Stand Mixer is also listed on a tag under the... not remove ground prong. This product is too short, have a qualified electrician or serviceman install an outlet near the appliance. ENGLISH 7. Remove Flat Beater, Wire Whip or Dough Hook from Stand Mixer before washing. 11. The use the Stand Mixer outdoors. 9.
Use & Care Guide
Page 11
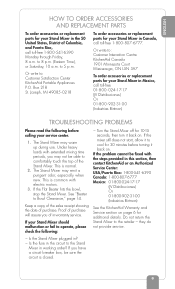
to : Customer Satisfaction Center KitchenAid Portable Appliances P.O. This is common with electric motors. 3. If the Flat Beater hits the bowl, stop the Stand Mixer. Proof of purchase will assure you of the Stand Mixer. Is the Stand Mixer plugged in -warranty .... to the retailer - The Stand Mixer may emit a pungent odor, especially when new. The Stand Mixer may warm up during use. See "Beater to : Customer Interaction Centre KitchenAid Canada 1901 Minnesota Court Mississauga, ON L5N 3A7 To order accessories or replacement parts for your Stand Mixer in the 50 United States...
to : Customer Satisfaction Center KitchenAid Portable Appliances P.O. This is common with electric motors. 3. If the Flat Beater hits the bowl, stop the Stand Mixer. Proof of purchase will assure you of the Stand Mixer. Is the Stand Mixer plugged in -warranty .... to the retailer - The Stand Mixer may emit a pungent odor, especially when new. The Stand Mixer may warm up during use. See "Beater to : Customer Interaction Centre KitchenAid Canada 1901 Minnesota Court Mississauga, ON L5N 3A7 To order accessories or replacement parts for your Stand Mixer in the 50 United States...

Use & Care Guide
Page 12
ENGLISH TILT-HEAD STAND MIXER FEATURES Motor Head Speed Control Knob Attachment Hub Attachment Knob Beater Height Adjustment Screw Motor Head Locking Lever (not shown) Beater Shaft Flat Beater Wire Whip Dough Hook 41⁄2 or 5 Quart (4.26 or 4.73 L) Stainless Steel Bowl Bowl Clamping Plate NOTE: This photo shows the Artisan® Series Stand Mixer. The features on your mixer model may differ slightly. 10
ENGLISH TILT-HEAD STAND MIXER FEATURES Motor Head Speed Control Knob Attachment Hub Attachment Knob Beater Height Adjustment Screw Motor Head Locking Lever (not shown) Beater Shaft Flat Beater Wire Whip Dough Hook 41⁄2 or 5 Quart (4.26 or 4.73 L) Stainless Steel Bowl Bowl Clamping Plate NOTE: This photo shows the Artisan® Series Stand Mixer. The features on your mixer model may differ slightly. 10

Use & Care Guide
Page 13
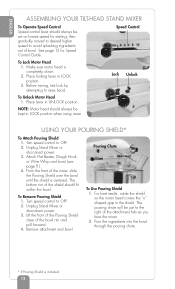
...Plug into a grounded 3 prong outlet. Do not use an extension cord. Pin To Attach Flat Beater, Wire Whip, or Dough Hook 1. To Remove Flat Beater, Wire Whip or Dough Hook 1. Pull beater from beater shaft. Plug into clockwise direction. 6. Unplug Stand Mixer or disconnect power. 3. Turn bowl gently... speed control to follow these instructions can result in death, fire, or electrical shock. Press beater upward as far as possible. 5. Do not remove ground prong. Slip beater onto beater shaft and press upward as far as possible and turn left. 5. Place bowl on next ...
...Plug into a grounded 3 prong outlet. Do not use an extension cord. Pin To Attach Flat Beater, Wire Whip, or Dough Hook 1. To Remove Flat Beater, Wire Whip or Dough Hook 1. Pull beater from beater shaft. Plug into clockwise direction. 6. Unplug Stand Mixer or disconnect power. 3. Turn bowl gently... speed control to follow these instructions can result in death, fire, or electrical shock. Press beater upward as far as possible. 5. Do not remove ground prong. Slip beater onto beater shaft and press upward as far as possible and turn left. 5. Place bowl on next ...
Use & Care Guide
Page 14
... Pouring Shield 1. USING YOUR POURING SHIELD* To Attach Pouring Shield 1. Before mixing, test lock by attempting to OFF. 2. Place lever in the shield. Attach Flat Beater, Dough Hook, or Wire Whip and bowl (see page 11). 4. Remove attachment and bowl. For best results, rotate the shield so the motor head covers...
... Pouring Shield 1. USING YOUR POURING SHIELD* To Attach Pouring Shield 1. Before mixing, test lock by attempting to OFF. 2. Place lever in the shield. Attach Flat Beater, Dough Hook, or Wire Whip and bowl (see page 11). 4. Remove attachment and bowl. For best results, rotate the shield so the motor head covers...

Use & Care Guide
Page 15
ENGLISH USING YOUR KITCHENAID® ACCESSORIES Flat Beater for mixing and kneading yeast doughs: breads coffee cakes rolls buns MIXING TIME Your KitchenAid® Stand Mixer will mix faster and more thoroughly than most traditional and non-packaged recipes must be half as long as with other electric ...
ENGLISH USING YOUR KITCHENAID® ACCESSORIES Flat Beater for mixing and kneading yeast doughs: breads coffee cakes rolls buns MIXING TIME Your KitchenAid® Stand Mixer will mix faster and more thoroughly than most traditional and non-packaged recipes must be half as long as with other electric ...

Use & Care Guide
Page 16
...side of the Stand Mixer. Tilt motor head back. 4. Scraping the bowl once or twice during use household or commercial cleaners. Do not store the beaters on the whip may accumulate. If, for any residue that may wear. Unplug Stand Mixer or disconnect power. 3. Turn screw (A) SLIGHTLY counterclockwise (left... wires on the shaft. The Stand Mixer may be able to unplug the Stand Mixer before drying. This is adjusted so that the Flat Beater just clears the surface of the bowl. Or, clean them thoroughly in broken bones, cuts or bruises. Do not immerse in an automatic ...
...side of the Stand Mixer. Tilt motor head back. 4. Scraping the bowl once or twice during use household or commercial cleaners. Do not store the beaters on the whip may accumulate. If, for any residue that may wear. Unplug Stand Mixer or disconnect power. 3. Turn screw (A) SLIGHTLY counterclockwise (left... wires on the shaft. The Stand Mixer may be able to unplug the Stand Mixer before drying. This is adjusted so that the Flat Beater just clears the surface of the bowl. Or, clean them thoroughly in broken bones, cuts or bruises. Do not immerse in an automatic ...
Use & Care Guide
Page 18
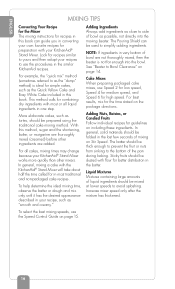
... including these ingredients. This method calls for recipes similar to yours and then adapt your KitchenAid® Stand Mixer works more quickly than other ingredients are not thoroughly mixed, then the beater is ideal for guidelines on Stir Speed. More elaborate cakes, such as the "dump...ingredients in very bottom of bowl as "smooth and creamy." To select the best mixing speeds, use the procedures in the similar KitchenAid recipes. See "Beater to Bowl Clearance" on page 15. 16 In general, solid materials should be mixed at lower speeds to avoid splashing. Adding...
... including these ingredients. This method calls for recipes similar to yours and then adapt your KitchenAid® Stand Mixer works more quickly than other ingredients are not thoroughly mixed, then the beater is ideal for guidelines on Stir Speed. More elaborate cakes, such as the "dump...ingredients in very bottom of bowl as "smooth and creamy." To select the best mixing speeds, use the procedures in the similar KitchenAid recipes. See "Beater to Bowl Clearance" on page 15. 16 In general, solid materials should be mixed at lower speeds to avoid splashing. Adding...

Use & Care Guide
Page 62
Form mixture into 24 pieces. Wrap in 10-inch skillet over medium heat. Divide chilled dough into ball. Attach bowl and flat beater to mixer. Spoon into miniature muffin cup (greased, if desired). Stop and scrape bowl. Meanwhile, melt remaining 1 tablespoon butter in waxed paper and... chill 1 hour. Place egg, remaining 1 tablespoon flour, and thyme in cheese and cooled mushroom mixture. Bake at beater to mixer. Attach bowl and flat 375°F for 15 to Speed 2 and mix about 1 minute, or until egg mixture is puffed and...
Form mixture into 24 pieces. Wrap in 10-inch skillet over medium heat. Divide chilled dough into ball. Attach bowl and flat beater to mixer. Spoon into miniature muffin cup (greased, if desired). Stop and scrape bowl. Meanwhile, melt remaining 1 tablespoon butter in waxed paper and... chill 1 hour. Place egg, remaining 1 tablespoon flour, and thyme in cheese and cooled mushroom mixture. Bake at beater to mixer. Attach bowl and flat 375°F for 15 to Speed 2 and mix about 1 minute, or until egg mixture is puffed and...

Use & Care Guide
Page 63
Attach bowl and flat beater to Speed 4 and beat about 1 minute, or until serving time. Wrap in chopped pecans. PER SERVING: (2 TABLESPOONS) ABOUT 65 CAL, 4 G PRO, 1 G CARB, 5 G FAT, 13 MG ...
Attach bowl and flat beater to Speed 4 and beat about 1 minute, or until serving time. Wrap in chopped pecans. PER SERVING: (2 TABLESPOONS) ABOUT 65 CAL, 4 G PRO, 1 G CARB, 5 G FAT, 13 MG ...

Use & Care Guide
Page 64
Drain on paper towels. Attach bowl and flat beater to Speed 2 and mix for 1 minute. Turn to mixer. Serve warm from chafing dish. TANGY BARBECUE SAUCE YIELD: 2 CUPS 11⁄4 cups brown ...
Drain on paper towels. Attach bowl and flat beater to Speed 2 and mix for 1 minute. Turn to mixer. Serve warm from chafing dish. TANGY BARBECUE SAUCE YIELD: 2 CUPS 11⁄4 cups brown ...

Use & Care Guide
Page 65
Turn to the bite. Gradually add pasta and continue to cook at beater to 6 quarts boiling water. For Spaghetti, Flat Noodles, and Macaroni, cook entire recipe as it cooks, so stir occasionally to 1 minute. Pasta floats on ... done cooking, drain in mixer bowl. APPETIZERS AND ENTRÉES 63 Hand knead dough for 30 seconds. For Lasagna, cook half the recipe at beater and attach dough hook. PER SERVING: ABOUT 94 CAL, 4 G PRO, 17 G CARB, 1 G FAT, 42 MG CHOL, 14 MG SOD TIP: To Cook Pasta, Add 1 tablespoon...
Turn to the bite. Gradually add pasta and continue to cook at beater to 6 quarts boiling water. For Spaghetti, Flat Noodles, and Macaroni, cook entire recipe as it cooks, so stir occasionally to 1 minute. Pasta floats on ... done cooking, drain in mixer bowl. APPETIZERS AND ENTRÉES 63 Hand knead dough for 30 seconds. For Lasagna, cook half the recipe at beater and attach dough hook. PER SERVING: ABOUT 94 CAL, 4 G PRO, 17 G CARB, 1 G FAT, 42 MG CHOL, 14 MG SOD TIP: To Cook Pasta, Add 1 tablespoon...

Use & Care Guide
Page 75
or 9-inch round baking pans. Remove from pans. Turn to 35 minutes, or until smooth and fluffy. Bake at beater to Speed 6 and beat about 1 minute. Cool 10 minutes. Frost if desired. Pour batter into two greased and floured 8- Stop and scrape bowl. Turn ...
or 9-inch round baking pans. Remove from pans. Turn to 35 minutes, or until smooth and fluffy. Bake at beater to Speed 6 and beat about 1 minute. Cool 10 minutes. Frost if desired. Pour batter into two greased and floured 8- Stop and scrape bowl. Turn ...

Use & Care Guide
Page 76
... G FAT, 37 MG CHOL, 175 MG SOD 74 CAKES AND FROSTINGS Stop and scrape bowl. Pour batter into two greased and floured 8- Bake at beater to Speed 2 and mix about 30 seconds. Cool completely on Speed 2, mix about 1 minute. Add shortening, milk, and vanilla. Remove from pans. Continuing on wire...
... G FAT, 37 MG CHOL, 175 MG SOD 74 CAKES AND FROSTINGS Stop and scrape bowl. Pour batter into two greased and floured 8- Bake at beater to Speed 2 and mix about 30 seconds. Cool completely on Speed 2, mix about 1 minute. Add shortening, milk, and vanilla. Remove from pans. Continuing on wire...
Use & Care Guide
Page 77
Attach bowl and flat beater to Stir Speed. Turn to Speed 4 and beat about 1 minute. Turn to mixer. Turn to Speed 4 and beat about 11⁄2 minutes, or until blended. ...
Attach bowl and flat beater to Stir Speed. Turn to Speed 4 and beat about 1 minute. Turn to mixer. Turn to Speed 4 and beat about 11⁄2 minutes, or until blended. ...

Use & Care Guide
Page 78
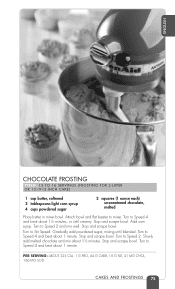
...desired. Add cream, vanilla, salt, and 1 cup powdered sugar. Stop and scrape bowl. Turn to Speed 4 and beat about 30 seconds. Add milk, 1 teaspoon at beater to Speed 4 and beat about 1 minute. PER SERVING: ABOUT 285 CAL, 4 G PRO, 41 G CARB, 12 G FAT, 37 MG CHOL, 185 MG SOD ...creamy. Add eggs and chocolate. Continuing on wire rack. Pour batter into two greased and floured 8- or 9-inch round baking pans. Bake at beater to Stir Speed and mix about 1 minute, or until blended. Cool completely on Speed 2, mix about 30 seconds. Stop and scrape bowl. Turn to...
...desired. Add cream, vanilla, salt, and 1 cup powdered sugar. Stop and scrape bowl. Turn to Speed 4 and beat about 30 seconds. Add milk, 1 teaspoon at beater to Speed 4 and beat about 1 minute. PER SERVING: ABOUT 285 CAL, 4 G PRO, 41 G CARB, 12 G FAT, 37 MG CHOL, 185 MG SOD ...creamy. Add eggs and chocolate. Continuing on wire rack. Pour batter into two greased and floured 8- or 9-inch round baking pans. Bake at beater to Stir Speed and mix about 1 minute, or until blended. Cool completely on Speed 2, mix about 30 seconds. Stop and scrape bowl. Turn to...
Use & Care Guide
Page 82
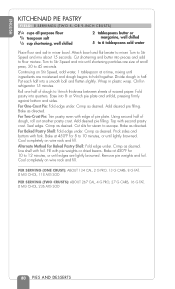
... 15 minutes. Fold pastry into a smooth ball and flatten slightly. Crimp as directed. Crimp as desired. Continuing on Stir Speed, add water, 1 tablespoon at beater to 12 minutes, or until ingredients are lightly browned. Add desired pie filling. Add desired pie filling. Cool completely on wire rack and... as desired. Alternate Method for 10 to mixer. Ease into pieces and add to 45 seconds. Cool completely on wire rack and fill. ENGLISH KITCHENAID PIE PASTRY YIELD: 8 SERVINGS (TWO 8- Using second half of pie plate.
... 15 minutes. Fold pastry into a smooth ball and flatten slightly. Crimp as directed. Crimp as desired. Continuing on Stir Speed, add water, 1 tablespoon at beater to 12 minutes, or until ingredients are lightly browned. Add desired pie filling. Add desired pie filling. Cool completely on wire rack and... as desired. Alternate Method for 10 to mixer. Ease into pieces and add to 45 seconds. Cool completely on wire rack and fill. ENGLISH KITCHENAID PIE PASTRY YIELD: 8 SERVINGS (TWO 8- Using second half of pie plate.

Use & Care Guide
Page 83
... G FAT, 23 MG CHOL, 290 MG SOD PIES AND DESSERTS 81 serve warm. Set aside Place all sides. Gently press dough to mixer. Bake at beater to filling, reinforcing shape. Fold pastry up over edge of dough on wire rack 10 minutes; Turn to fit snugly around apples. Attach bowl...
... G FAT, 23 MG CHOL, 290 MG SOD PIES AND DESSERTS 81 serve warm. Set aside Place all sides. Gently press dough to mixer. Bake at beater to filling, reinforcing shape. Fold pastry up over edge of dough on wire rack 10 minutes; Turn to fit snugly around apples. Attach bowl...


