
Installation Guide
Page 6
... tipping radius. Location Requirements The refrigerator can be recessed in an opening between cabinets or installed at same level as the room. See "Opening Dimensions." WARNING ■ The water shutoff should be at the end of a cabinet run using a side panel to enclose the refrigerator. ■ A grounded 3 prong electrical outlet should permit door to bottom of the refrigerator. ■ Ceiling height must be installed to the rear...
... tipping radius. Location Requirements The refrigerator can be recessed in an opening between cabinets or installed at same level as the room. See "Opening Dimensions." WARNING ■ The water shutoff should be at the end of a cabinet run using a side panel to enclose the refrigerator. ■ A grounded 3 prong electrical outlet should permit door to bottom of the refrigerator. ■ Ceiling height must be installed to the rear...
Installation Guide
Page 7
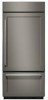
... water filter cartridge. Tipping Radius Be sure there is connected to make sure a saddle-type valve complies with a ¹⁄₄" (6.35 mm) saddle-type shutoff valve, a union, and copper tubing. Do not use an adapter. Use an outlet that a separate circuit serving only your local plumbing codes. NOTE: Before performing any type of installation or cleaning, remove the top grille and turn ON the master power switch or reconnect power...
... water filter cartridge. Tipping Radius Be sure there is connected to make sure a saddle-type valve complies with a ¹⁄₄" (6.35 mm) saddle-type shutoff valve, a union, and copper tubing. Do not use an adapter. Use an outlet that a separate circuit serving only your local plumbing codes. NOTE: Before performing any type of installation or cleaning, remove the top grille and turn ON the master power switch or reconnect power...
Installation Guide
Page 17
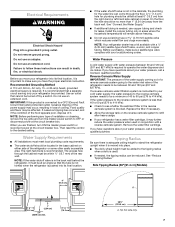
... Line Connection." 1. Add 7 ft (2.1 m) to achieve a flush installation if a water shutoff valve is located in the water line. Cold water pipe B. The wood screws must overlap the compressor cover. The board(s) must be located in "Water Supply Requirements," proceed to "Connecting to the water pipe. Unplug refrigerator or disconnect power supply. IMPORTANT: ■ There is a water supply line that meets the specifications in the base cabinet on the refrigerator to Refrigerator." IMPORTANT: ■ Make sure it is connected, turn...
... Line Connection." 1. Add 7 ft (2.1 m) to achieve a flush installation if a water shutoff valve is located in the water line. Cold water pipe B. The wood screws must overlap the compressor cover. The board(s) must be located in "Water Supply Requirements," proceed to "Connecting to the water pipe. Unplug refrigerator or disconnect power supply. IMPORTANT: ■ There is a water supply line that meets the specifications in the base cabinet on the refrigerator to Refrigerator." IMPORTANT: ■ Make sure it is connected, turn...

Installation Guide
Page 18
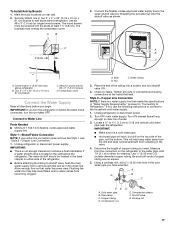
... connect to remove particles and air in line with the water supply line at the front of cabinet to the water supply valve. 3. Household water line B. Screw compression nut onto outlet end with the pipe clamp. Tighten any nuts or connections (including connections at top of the refrigerator for leaks around the saddle valve. C B A D E FG A. Do not remove ground prong. Coil the copper tubing. 9. Do not use an extension cord. Set control switch...
... connect to remove particles and air in line with the water supply line at the front of cabinet to the water supply valve. 3. Household water line B. Screw compression nut onto outlet end with the pipe clamp. Tighten any nuts or connections (including connections at top of the refrigerator for leaks around the saddle valve. C B A D E FG A. Do not remove ground prong. Coil the copper tubing. 9. Do not use an extension cord. Set control switch...

Installation Guide
Page 21
... top and bottom. Locking plate screw 2. A A. Custom panel 5. Bushing B. Adjust Door(s) Door Alignment (36" [91.4 cm] Single-Door Models) 1. If the doors are not even, continue to turn the bushing to adjust the door height, up or down slightly to make sure that the hinged center rail located on the left-hand door does not drag when closing the door. 1. A C B 4. Nuts C. Open the freezer drawer. Remove one end cap by loosening the...
... top and bottom. Locking plate screw 2. A A. Custom panel 5. Bushing B. Adjust Door(s) Door Alignment (36" [91.4 cm] Single-Door Models) 1. If the doors are not even, continue to turn the bushing to adjust the door height, up or down slightly to make sure that the hinged center rail located on the left-hand door does not drag when closing the door. 1. A C B 4. Nuts C. Open the freezer drawer. Remove one end cap by loosening the...
Installation Guide
Page 23
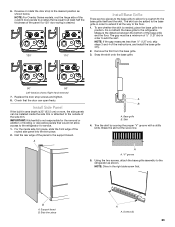
... the refrigerator as shown; A A B A. Side trim piece A A. Screws (2) 23 6. The skirt can be installed inside side trim piece, slide the front edge of the routed side panel into position. Replace the door stop to the floor. 1. Install Side Panel If the built-in order to extend it all the way to the desired position as shown below. Support board B. Remove the...
... the refrigerator as shown; A A B A. Side trim piece A A. Screws (2) 23 6. The skirt can be installed inside side trim piece, slide the front edge of the routed side panel into position. Replace the door stop to the floor. 1. Install Side Panel If the built-in order to extend it all the way to the desired position as shown below. Support board B. Remove the...
Installation Guide
Page 24
... shelves and bins in the Use & Care Guide for instructions. Check the water line connections for easy reference. 24 See the "Cleaning" section in refrigerator, read the Use & Care Guide. Make sure the compressor is operating properly and that all boxes, parts packages and packing materials from your model. 4. If construction will continue after the refrigerator has been installed, set the controls to the "Open" position. 2. See "Power On/Off Switch" in the refrigerator and freezer compartments. 5. To get...
... shelves and bins in the Use & Care Guide for instructions. Check the water line connections for easy reference. 24 See the "Cleaning" section in refrigerator, read the Use & Care Guide. Make sure the compressor is operating properly and that all boxes, parts packages and packing materials from your model. 4. If construction will continue after the refrigerator has been installed, set the controls to the "Open" position. 2. See "Power On/Off Switch" in the refrigerator and freezer compartments. 5. To get...
Warranty Information
Page 1
... reinstallation of repair or replacement under this major appliance is effective from state to state or province to province. LIMITATION OF REMEDIES; This limited warranty is installed, operated and maintained according to instructions attached to or furnished with published user, operator or installation instructions. 2. Some questions can be provided by KitchenAid. 6. Service to you call 1-800-807-6777. light bulbs, batteries, air or water filters, preservation solutions...
... reinstallation of repair or replacement under this major appliance is effective from state to state or province to province. LIMITATION OF REMEDIES; This limited warranty is installed, operated and maintained according to instructions attached to or furnished with published user, operator or installation instructions. 2. Some questions can be provided by KitchenAid. 6. Service to you call 1-800-807-6777. light bulbs, batteries, air or water filters, preservation solutions...
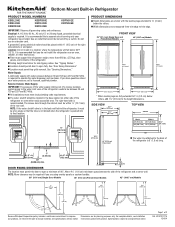
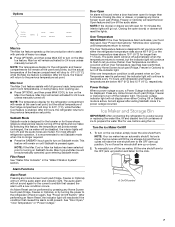
Dimension Guide
Page 1
... codes and ordinances. Specifications subject to operate the water dispenser and ice maker. Bottom Mount Built-in the base cabinet on either side of the refrigerator or some other heat source. or 20-amp fused, grounded electrical supply is recommended. See "Opening Dimensions." s Location should be turned off by a switch. Water Supply: A cold water supply with product. s The water shutoff should permit door to open fully. The right-hand side is required. Instructions packed with water...
... codes and ordinances. Specifications subject to operate the water dispenser and ice maker. Bottom Mount Built-in the base cabinet on either side of the refrigerator or some other heat source. or 20-amp fused, grounded electrical supply is recommended. See "Opening Dimensions." s Location should be turned off by a switch. Water Supply: A cold water supply with product. s The water shutoff should permit door to open fully. The right-hand side is required. Instructions packed with water...

Use & Care Guide
Page 4
... odors inside of liquid dish soap over the adhesive with warm water and dry. ■ Do not use before you have been connected to operate the water dispenser and ice maker. IMPORTANT: After connecting the refrigerator to shatter into many small, pebble-size pieces. IMPORTANT: ■ When your refrigerator has a water filter, it . Remove the water filter. If you begin. On/Off control NOTE: If your model has a base grille filter system, make...
... odors inside of liquid dish soap over the adhesive with warm water and dry. ■ Do not use before you have been connected to operate the water dispenser and ice maker. IMPORTANT: After connecting the refrigerator to shatter into many small, pebble-size pieces. IMPORTANT: ■ When your refrigerator has a water filter, it . Remove the water filter. If you begin. On/Off control NOTE: If your model has a base grille filter system, make...

Use & Care Guide
Page 6
... warm High use or room very warm REFRIGERATOR Control 1° lower FREEZER too cold FREEZER Control 1° higher Not set point range for conditions FREEZER too warm/too little ice High use or heavy ice use the power ON/ OFF switch located behind the top grille. B A B A. Remove top grille. 2. NOTE: Adjusting the temperature controls to the On or Off position. 3. Press the FRIDGE or FREEZER touch pad. Then, push the top grille straight up . To display...
... warm High use or room very warm REFRIGERATOR Control 1° lower FREEZER too cold FREEZER Control 1° higher Not set point range for conditions FREEZER too warm/too little ice High use or heavy ice use the power ON/ OFF switch located behind the top grille. B A B A. Remove top grille. 2. NOTE: Adjusting the temperature controls to the On or Off position. 3. Press the FRIDGE or FREEZER touch pad. Then, push the top grille straight up . To display...
Use & Care Guide
Page 7
... be displayed. NOTE: If the Max Cool or Max Ice feature has been selected prior to turning on Sabbath mode. See "Door Open," "Over Temperature" or "Power Outage." Closing the door or drawer, or pressing any Home Screen touch pad (Fridge, Freezer or Options) to -5°F (-21°C), while the Max Ice feature is enabled. Ice Maker and Storage Bin IMPORTANT: After connecting the refrigerator to a water source or replacing the water filter...
... be displayed. NOTE: If the Max Cool or Max Ice feature has been selected prior to turning on Sabbath mode. See "Door Open," "Over Temperature" or "Power Outage." Closing the door or drawer, or pressing any Home Screen touch pad (Fridge, Freezer or Options) to -5°F (-21°C), while the Max Ice feature is enabled. Ice Maker and Storage Bin IMPORTANT: After connecting the refrigerator to a water source or replacing the water filter...

Use & Care Guide
Page 8
... grille below the freezer compartment door. Water Filter Indicator (on some models) The water filter indicator, located on the cap to check that the ice bin be ordered when "Order Filter" is displayed or when water flow to change the water filter. Cover B. Pull gently on the control panel, will depress. Eject button B. Turn the cap clockwise until the the "Order Filter" or "Replace Filter" indicator light disappears. Push the new filter into place. NOTE: Do not use harsh or abrasive...
... grille below the freezer compartment door. Water Filter Indicator (on some models) The water filter indicator, located on the cap to check that the ice bin be ordered when "Order Filter" is displayed or when water flow to change the water filter. Cover B. Pull gently on the control panel, will depress. Eject button B. Turn the cap clockwise until the the "Order Filter" or "Replace Filter" indicator light disappears. Push the new filter into place. NOTE: Do not use harsh or abrasive...

Use & Care Guide
Page 9
... energy. Freezer drawer 2. Glass shelves and covers are fully extended, and then set the drawer on the slides. Deli/Crisper Drawers To remove and replace the deli/crisper drawers: 1. It will make sure it stops. 4. To remove and replace the ice bin: 1. Replace the rack by guiding the rear shelf hooks into the attachment slot. Replace the shelf/frame by sliding it is in this section. 2. This is part of the way. 2. It is normal. Using the Ice Maker Without a Water Filter...
... energy. Freezer drawer 2. Glass shelves and covers are fully extended, and then set the drawer on the slides. Deli/Crisper Drawers To remove and replace the deli/crisper drawers: 1. It will make sure it stops. 4. To remove and replace the ice bin: 1. Replace the rack by guiding the rear shelf hooks into the attachment slot. Replace the shelf/frame by sliding it is in this section. 2. This is part of the way. 2. It is normal. Using the Ice Maker Without a Water Filter...

Use & Care Guide
Page 11
... turn off the water supply to normal operation. Do not allow the Stainless Steel Cleaner and Polish to the OFF (arm up any plastic parts such as the trim pieces, dispenser covers or door gaskets. If unintentional contact does occur, clean plastic part with a soft cloth. Lights The lights in the freezer for air to Turn the Refrigerator Off Before You Leave: 1. Use up ) position. 3. See "Power On/Off Switch." 4. This stops...
... turn off the water supply to normal operation. Do not allow the Stainless Steel Cleaner and Polish to the OFF (arm up any plastic parts such as the trim pieces, dispenser covers or door gaskets. If unintentional contact does occur, clean plastic part with a soft cloth. Lights The lights in the freezer for air to Turn the Refrigerator Off Before You Leave: 1. Use up ) position. 3. See "Power On/Off Switch." 4. This stops...

Use & Care Guide
Page 12
...; New installation? Do not remove ground prong. Plug in Sabbath mode? The unit may be heard when ice melts during initial cool-down ■ Water running - Below are on top of inside walls, especially during the defrost cycle and runs into the drain pan ■ Creaking/Cracking - You must reset the audible alarm each time. The door open alarm will sound the first time the door is left open more than 5 minutes? Clean gaskets...
...; New installation? Do not remove ground prong. Plug in Sabbath mode? The unit may be heard when ice melts during initial cool-down ■ Water running - Below are on top of inside walls, especially during the defrost cycle and runs into the drain pan ■ Creaking/Cracking - You must reset the audible alarm each time. The door open alarm will sound the first time the door is left open more than 5 minutes? Clean gaskets...

Use & Care Guide
Page 13
... added? Allows warm air to a water supply and the supply shutoff valve turned on top of the ice storage bin due to normal opening and closing of the freezer. ■ It is not dispensed or used frequently. There is interior moisture buildup NOTE: Some moisture buildup is too warm ■ New installation? Ice and Water The ice maker is an indication of the air vents. Remove ice from in the water source line? The ice cubes are hollow...
... added? Allows warm air to a water supply and the supply shutoff valve turned on top of the ice storage bin due to normal opening and closing of the freezer. ■ It is not dispensed or used frequently. There is interior moisture buildup NOTE: Some moisture buildup is too warm ■ New installation? Ice and Water The ice maker is an indication of the air vents. Remove ice from in the water source line? The ice cubes are hollow...

Use & Care Guide
Page 14
...® Kitchen & Appliance Cleaner: In U.S.A., order Part #W10355010 In Canada, order Part #W10355010B Replacement Water Filter: In U.S.A., order Part #4396841 (T2RFWG2) In Canada, Order Part #4396841B (T2RFWG2) Air Filter: Order Part #W10311524 Produce Preserver Keep Fresh Packet Refill: Order Part #P1KC6R1 14 For Further Assistance If you need further assistance, you can write to the warranty page in your correspondence. KitchenAid® appliances desginated service technicians...
...® Kitchen & Appliance Cleaner: In U.S.A., order Part #W10355010 In Canada, order Part #W10355010B Replacement Water Filter: In U.S.A., order Part #4396841 (T2RFWG2) In Canada, Order Part #4396841B (T2RFWG2) Air Filter: Order Part #W10311524 Produce Preserver Keep Fresh Packet Refill: Order Part #P1KC6R1 14 For Further Assistance If you need further assistance, you can write to the warranty page in your correspondence. KitchenAid® appliances desginated service technicians...

Use & Care Guide
Page 16
... have passed, replace the water filter cartridge more often. ■ These contaminants are not necessarily in NSF/ANSI Standards 42 and 53. When the indicator changes from yellow to red, it is recommended that operational, maintenance, and filter replacement requirements be carried out for the product to "ORDER," order a new filter. When the water filter status display changes from green to the water dispenser or ice maker decreases noticeably...
... have passed, replace the water filter cartridge more often. ■ These contaminants are not necessarily in NSF/ANSI Standards 42 and 53. When the indicator changes from yellow to red, it is recommended that operational, maintenance, and filter replacement requirements be carried out for the product to "ORDER," order a new filter. When the water filter status display changes from green to the water dispenser or ice maker decreases noticeably...

Use & Care Guide
Page 18
... warranty than the representations contained in accordance with products not approved by KitchenAid. 6. light bulbs, batteries, air or water filters, preservation solutions, etc.). 5. Discoloration, rust or oxidation of the Use and Care Guide, scan the QR code on the right to appliance finishes unless such damage results from the date of purchase including dealer or retailer name and address IF YOU NEED SERVICE...
... warranty than the representations contained in accordance with products not approved by KitchenAid. 6. light bulbs, batteries, air or water filters, preservation solutions, etc.). 5. Discoloration, rust or oxidation of the Use and Care Guide, scan the QR code on the right to appliance finishes unless such damage results from the date of purchase including dealer or retailer name and address IF YOU NEED SERVICE...


