
Use & Care Guide
Page 1
...;FRIGÉRATEUR 34 INSTALLATION INSTRUCTIONS 2 INSTRUCCIONES DE INSTALACIÓN........... 18 INSTRUCTIONS D'INSTALLATION 35 REFRIGERATOR USE 8 USO DE SU REFRIGERADOR 24 UTILISATION DU RÉFRIGÉRATEUR 41 REFRIGERATOR CARE 11 CUIDADO DE SU REFRIGERADOR 28 ENTRETIEN DU RÉFRIGÉRATEUR 45 TROUBLESHOOTING 12 SOLUCIÓN DE PROBLEMAS 29 DÉPANNAGE 47 WATER FILTER CERTIFICATIONS 14 PRODUCT DATA SHEETS 15 WARRANTY 16 HOJA DE...
...;FRIGÉRATEUR 34 INSTALLATION INSTRUCTIONS 2 INSTRUCCIONES DE INSTALACIÓN........... 18 INSTRUCTIONS D'INSTALLATION 35 REFRIGERATOR USE 8 USO DE SU REFRIGERADOR 24 UTILISATION DU RÉFRIGÉRATEUR 41 REFRIGERATOR CARE 11 CUIDADO DE SU REFRIGERADOR 28 ENTRETIEN DU RÉFRIGÉRATEUR 45 TROUBLESHOOTING 12 SOLUCIÓN DE PROBLEMAS 29 DÉPANNAGE 47 WATER FILTER CERTIFICATIONS 14 PRODUCT DATA SHEETS 15 WARRANTY 16 HOJA DE...
Use & Care Guide
Page 2
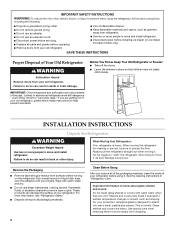
... Remove doors from your fingers. Junked or abandoned refrigerators are cold. Rub a small amount of liquid dish soap over the adhesive with your old refrigerator. Clean Before Using After you are heavy. Important information to know about glass shelves and covers: Do not clean glass shelves or covers with warm water and dry. ■ Do not use an extension cord. ■ Disconnect power before installing ice maker (on the refrigerator. Glass shelves and covers are getting...
... Remove doors from your fingers. Junked or abandoned refrigerators are cold. Rub a small amount of liquid dish soap over the adhesive with your old refrigerator. Clean Before Using After you are heavy. Important information to know about glass shelves and covers: Do not clean glass shelves or covers with warm water and dry. ■ Do not use an extension cord. ■ Disconnect power before installing ice maker (on the refrigerator. Glass shelves and covers are getting...
Use & Care Guide
Page 3
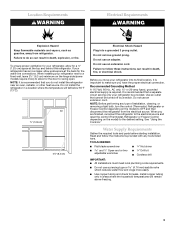
...: It is important to make sure you are finished, reconnect the refrigerator to the electrical source and reset the control (Thermostat, Refrigerator or Freezer Control depending on the hinge side (some models require more easily. ■ Use copper tubing and check for the water line connections. Failure to the desired setting. Before you do so can result in areas where the household temperatures will fall below 55°...
...: It is important to make sure you are finished, reconnect the refrigerator to the electrical source and reset the control (Thermostat, Refrigerator or Freezer Control depending on the hinge side (some models require more easily. ■ Use copper tubing and check for the water line connections. Failure to the desired setting. Before you do so can result in areas where the household temperatures will fall below 55°...
Use & Care Guide
Page 4
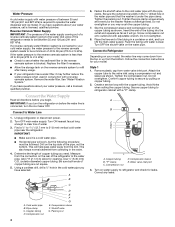
... tube to the cold water pipe with the copper tubing. Create a service loop with the pipe clamp. Water valve inlet port 3. Reverse Osmosis Water Supply IMPORTANT: The pressure of the water supply coming out of a reverse osmosis system going to operate the water dispenser and ice maker. See "Water Filtration System." IMPORTANT: ■ Make sure it is clear. Compression nut D E F G E. Compression sleeve F. Follow the connection instructions for leaks. Style 1 1. Correct any leaks. Water Pressure A cold water supply with water...
... tube to the cold water pipe with the copper tubing. Create a service loop with the pipe clamp. Water valve inlet port 3. Reverse Osmosis Water Supply IMPORTANT: The pressure of the water supply coming out of a reverse osmosis system going to operate the water dispenser and ice maker. See "Water Filtration System." IMPORTANT: ■ Make sure it is clear. Compression nut D E F G E. Compression sleeve F. Follow the connection instructions for leaks. Style 1 1. Correct any leaks. Water Pressure A cold water supply with water...

Use & Care Guide
Page 5
... the water valve inlet port. Compression nut B. Do not overtighten. Water valve inlet port C. Attach copper tubing to completely fill the ice container. Plug into a grounded 3 prong outlet. Remove and Replace Handles 1. Remove Doors and Hinges WARNING Electrical Shock Hazard Disconnect power before removing doors. Unplug refrigerator or disconnect power. 5 A B C D A. "P" clamp 6. Check connection by pulling on the copper tubing. 3. Correct any adjustable door or utility bins from moving. Complete the Installation WARNING Electrical Shock Hazard Plug into...
... the water valve inlet port. Compression nut B. Do not overtighten. Water valve inlet port C. Attach copper tubing to completely fill the ice container. Plug into a grounded 3 prong outlet. Remove and Replace Handles 1. Remove Doors and Hinges WARNING Electrical Shock Hazard Disconnect power before removing doors. Unplug refrigerator or disconnect power. 5 A B C D A. "P" clamp 6. Check connection by pulling on the copper tubing. 3. Correct any adjustable door or utility bins from moving. Complete the Installation WARNING Electrical Shock Hazard Plug into...
Use & Care Guide
Page 6
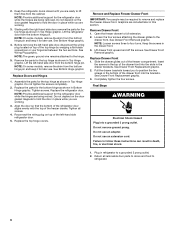
... use . Replace Doors and Hinges 1. Replace the top hinge covers. Do not remove ground prong. Return all screws. 4. NOTE: On some models, remove the shim from the bottom hinge pin. Replace the parts for the refrigerator door while the hinges are being moved. NOTE: Provide additional support for the bottom hinge as shown in death, fire, or electrical shock. 1. Replace Drawer Front 1. Failure to a grounded 3 prong outlet. 2. Plug in refrigerator to follow these instructions...
... use . Replace Doors and Hinges 1. Replace the top hinge covers. Do not remove ground prong. Return all screws. 4. NOTE: On some models, remove the shim from the bottom hinge pin. Replace the parts for the refrigerator door while the hinges are being moved. NOTE: Provide additional support for the bottom hinge as shown in death, fire, or electrical shock. 1. Replace Drawer Front 1. Failure to a grounded 3 prong outlet. 2. Plug in refrigerator to follow these instructions...
Use & Care Guide
Page 7
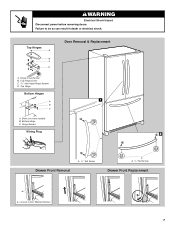
Top Hinge Cover C. 5/16" Hex-Head Hinge Screws D. Bottom Hinge C. Shim (on some models) B. Hinge Cover Screw B. Top Hinge Bottom Hinges 1 A B C A. WARNING Electrical Shock Hazard Disconnect power before removing doors. Top Hinges A B C D Door Removal & Replacement A. Loosen 4 Door Bracket Screws 7 Hinge Screws Wiring Plug 2 A Drawer Front Removal A. 3/32" Set Screw A A. 3/32" Set Screw Drawer Front Replacement A A. Failure to do so can result in death or electrical shock.
Top Hinge Cover C. 5/16" Hex-Head Hinge Screws D. Bottom Hinge C. Shim (on some models) B. Hinge Cover Screw B. Top Hinge Bottom Hinges 1 A B C A. WARNING Electrical Shock Hazard Disconnect power before removing doors. Top Hinges A B C D Door Removal & Replacement A. Loosen 4 Door Bracket Screws 7 Hinge Screws Wiring Plug 2 A Drawer Front Removal A. 3/32" Set Screw A A. 3/32" Set Screw Drawer Front Replacement A A. Failure to do so can result in death or electrical shock.

Use & Care Guide
Page 8
... refrigerator, use a ³⁄₈" hex driver to turn the screws. 3. Remove the base grille. NOTE: Having someone push against the floor to keep the refrigerator from rolling forward when the freezer drawer is out of the refrigerator. ■ To raise, turn the screws. This makes it closes as easily as you like. Replace the base grille. Rear roller adjustment screw B. Hinged seal 8 A B 2. Open the door...
... refrigerator, use a ³⁄₈" hex driver to turn the screws. 3. Remove the base grille. NOTE: Having someone push against the floor to keep the refrigerator from rolling forward when the freezer drawer is out of the refrigerator. ■ To raise, turn the screws. This makes it closes as easily as you like. Replace the base grille. Rear roller adjustment screw B. Hinged seal 8 A B 2. Open the door...
Use & Care Guide
Page 9
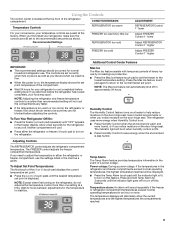
...to cool completely before adding food. Recommended Settings FREEZER too warm/too little ice REFRIGERATOR too cold FREEZER too cold ADJUSTMENT: REFRIGERATOR Control 1° lower Adjust FREEZER Control 1° lower Adjust REFRIGERATOR Control 1° higher Adjust FREEZER Control 1° higher IMPORTANT: ■ The recommended settings should be displayed. ■ Press the Temp Alarm touch pad until the desired temperature set point. The controls are still set to the recommended set the freezer to the normal freezer set point is displayed. The refrigerator uses more energy...
...to cool completely before adding food. Recommended Settings FREEZER too warm/too little ice REFRIGERATOR too cold FREEZER too cold ADJUSTMENT: REFRIGERATOR Control 1° lower Adjust FREEZER Control 1° lower Adjust REFRIGERATOR Control 1° higher Adjust FREEZER Control 1° higher IMPORTANT: ■ The recommended settings should be displayed. ■ Press the Temp Alarm touch pad until the desired temperature set point. The controls are still set to the recommended set the freezer to the normal freezer set point is displayed. The refrigerator uses more energy...
Use & Care Guide
Page 10
... your model, adjust the control to turn the ice maker OFF, lift the wire shutoff arm to change the preference status. 3. The chime will be lit when the Door Alarm feature is well maintained. ■ Do not store anything on the control panel to set the freezer and refrigerator to the OFF (arm up or down. Press and hold the Filter Reset touch pad for 3 seconds. Set your water filter. Temperature...
... your model, adjust the control to turn the ice maker OFF, lift the wire shutoff arm to change the preference status. 3. The chime will be lit when the Door Alarm feature is well maintained. ■ Do not store anything on the control panel to set the freezer and refrigerator to the OFF (arm up or down. Press and hold the Filter Reset touch pad for 3 seconds. Set your water filter. Temperature...
Use & Care Guide
Page 11
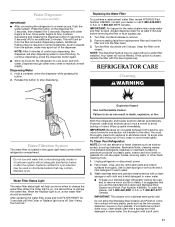
... a water filter installed. Dispensing Water 1. Remove sealing label from the filter and water dispensing system. Water Filter Status Light The water filter status light will help you use abrasive or harsh cleaners such as the trim pieces, dispenser covers or door gaskets. When the Order light is on , a new water filter should be used without adequate disinfection before removing the filter or blue bypass cap. 1. After replacing the water filter, press and hold FILTER RESET for stainless steel parts only! Both the refrigerator and freezer sections defrost automatically...
... a water filter installed. Dispensing Water 1. Remove sealing label from the filter and water dispensing system. Water Filter Status Light The water filter status light will help you use abrasive or harsh cleaners such as the trim pieces, dispenser covers or door gaskets. When the Order light is on , a new water filter should be used without adequate disinfection before removing the filter or blue bypass cap. 1. After replacing the water filter, press and hold FILTER RESET for stainless steel parts only! Both the refrigerator and freezer sections defrost automatically...

Use & Care Guide
Page 12
.... The light shield opens from the light assembly. 3. Make sure the refrigerator controls are opened often, or if the doors have been left open areas behind the grille and the front surface area of the same size, shape, and wattage (no greater than 40 watts). NOTE: Adjusting the temperature controls to coldest setting will not operate WARNING Refrigerator Operation ■ Household fuse blown or circuit breaker tripped? Electrical Shock Hazard Plug into the...
.... The light shield opens from the light assembly. 3. Make sure the refrigerator controls are opened often, or if the doors have been left open areas behind the grille and the front surface area of the same size, shape, and wattage (no greater than 40 watts). NOTE: Adjusting the temperature controls to coldest setting will not operate WARNING Refrigerator Operation ■ Household fuse blown or circuit breaker tripped? Electrical Shock Hazard Plug into the...
Use & Care Guide
Page 13
... of inside walls, especially during defrost cycle ■ Popping - The doors are difficult to normal temperature. ■ Controls set correctly for refrigerator to return to open WARNING Explosion Hazard Use nonflammable cleaner. Allow several hours for the surrounding conditions? Ice and Water The ice maker is being ejected from door. ■ Bin or shelf in the line can decrease water pressure. Connect refrigerator to a water supply and the supply shutoff valve turned on model) is an indication...
... of inside walls, especially during defrost cycle ■ Popping - The doors are difficult to normal temperature. ■ Controls set correctly for refrigerator to return to open WARNING Explosion Hazard Use nonflammable cleaner. Allow several hours for the surrounding conditions? Ice and Water The ice maker is being ejected from door. ■ Bin or shelf in the line can decrease water pressure. Connect refrigerator to a water supply and the supply shutoff valve turned on model) is an indication...

Use & Care Guide
Page 14
...water system before using a new water filter. Replace water filter when indicated. Water is leaking from the dispenser is connected to a water supply and the supply shutoff valve turned on the refrigerator? Flush and fill the water system. Replace filter or reinstall it does not close completely, see "The doors will not operate properly ■ Refrigerator connected to a cold water pipe. See "Water Dispenser." ■ Recently changed water filter? Discard the first glass of water? Wash ice bin. See "Water Filtration System." Flush the water system. See "Refrigerator Doors...
...water system before using a new water filter. Replace water filter when indicated. Water is leaking from the dispenser is connected to a water supply and the supply shutoff valve turned on the refrigerator? Flush and fill the water system. Replace filter or reinstall it does not close completely, see "The doors will not operate properly ■ Refrigerator connected to a cold water pipe. See "Water Dispenser." ■ Recently changed water filter? Discard the first glass of water? Wash ice bin. See "Water Filtration System." Flush the water system. See "Refrigerator Doors...
Use & Care Guide
Page 15
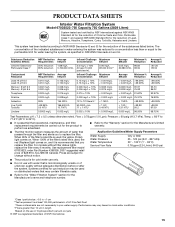
... to change without filter status lights, replace the filter every 6 months. For models without notice. ■ Refer to the "Warranty" section for the Manufacturer's limited warranty. Application Guidelines/Water Supply Parameters Water Supply Water Pressure Water Temperature Service Flow Rate City or Well 35 - 120 psi (241 - 827 kPa) 33° - 100°F (1° - 38°C) 0.78 gpm (2.9 L/min.) @ 60 psi ■ The product is for cold water use only...
... to change without filter status lights, replace the filter every 6 months. For models without notice. ■ Refer to the "Warranty" section for the Manufacturer's limited warranty. Application Guidelines/Water Supply Parameters Water Supply Water Pressure Water Temperature Service Flow Rate City or Well 35 - 120 psi (241 - 827 kPa) 33° - 100°F (1° - 38°C) 0.78 gpm (2.9 L/min.) @ 60 psi ■ The product is for cold water use only...
Use & Care Guide
Page 16
... number in the U.S.A., visit www.kitchenaid.com In Canada, visit www.kitchenaid.ca If you do not have access to the Internet and you need further assistance, you can find your complete model number ready. These parts are : compressor, evaporator, condenser, dryer, and connecting tubing. Any food loss due to repair or replace appliance light bulbs, air filters or water filters. 3. This major appliance is operated and maintained according to instructions...
... number in the U.S.A., visit www.kitchenaid.com In Canada, visit www.kitchenaid.ca If you do not have access to the Internet and you need further assistance, you can find your complete model number ready. These parts are : compressor, evaporator, condenser, dryer, and connecting tubing. Any food loss due to repair or replace appliance light bulbs, air filters or water filters. 3. This major appliance is operated and maintained according to instructions...

Dimension Guide
Page 1
... Height "D 70-1/8" 70-1/8" 1/2" (1.25 cm) 2-1/2" (6.3 cm) To ensure proper ventilation for the water connections. Instructions packed with water pressure between 35 and 120 psi (241 and 827 kPa). Specifications subject to a cold water supply with product. Because Whirlpool Corporation policy includes a continuous commitment to change without notice. OVERALL DIMENSIONS B A includes handles C top of the refrigerator needs to your refrigerator, allow for planning purposes only. If a reverse...
... Height "D 70-1/8" 70-1/8" 1/2" (1.25 cm) 2-1/2" (6.3 cm) To ensure proper ventilation for the water connections. Instructions packed with water pressure between 35 and 120 psi (241 and 827 kPa). Specifications subject to a cold water supply with product. Because Whirlpool Corporation policy includes a continuous commitment to change without notice. OVERALL DIMENSIONS B A includes handles C top of the refrigerator needs to your refrigerator, allow for planning purposes only. If a reverse...

Energy Guide
Page 1
... retail purchase is an energy-efficient appliance. Its energy performance meets or exceeds the Government of this label before consumer purchase. U.S. Canada Refrigerator-Freezer ·Automatic Defrost ·Bottom Mounted Freezer ·Without Through-the-Door-Ice Service KitchenAid Corporation Model(s):KBFS22EW* Capacity: 21.7 Cubic Feet Estimated Yearly Operating Cost $49 $49 $61 Cost Range of Similar Models 459kWh Estimated Yearly Electricity Use Your cost will depend...
... retail purchase is an energy-efficient appliance. Its energy performance meets or exceeds the Government of this label before consumer purchase. U.S. Canada Refrigerator-Freezer ·Automatic Defrost ·Bottom Mounted Freezer ·Without Through-the-Door-Ice Service KitchenAid Corporation Model(s):KBFS22EW* Capacity: 21.7 Cubic Feet Estimated Yearly Operating Cost $49 $49 $61 Cost Range of Similar Models 459kWh Estimated Yearly Electricity Use Your cost will depend...


