Use & Care Guide
Page 3
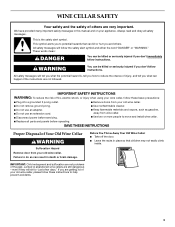
.... IMPORTANT: Child entrapment and suffocation are getting rid of fire, electric shock, or injury when using your old wine cellar. ■ Do not remove ground prong. ■ Use nonflammable cleaner. ■ Do not use an adapter. ■ Do not use an extension cord. ■ Disconnect power before operating. If you don't immediately follow instructions. This is , tell you how to...
.... IMPORTANT: Child entrapment and suffocation are getting rid of fire, electric shock, or injury when using your old wine cellar. ■ Do not remove ground prong. ■ Use nonflammable cleaner. ■ Do not use an adapter. ■ Do not use an extension cord. ■ Disconnect power before operating. If you don't immediately follow instructions. This is , tell you how to...
Use & Care Guide
Page 4
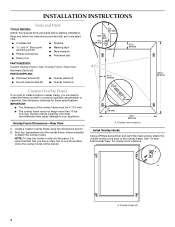
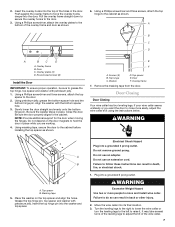
...A. Overlay hooks (4) 4 INSTALLATION INSTRUCTIONS Tools and Parts TOOLS NEEDED: Gather the required tools and parts before starting installation. IMPORTANT: ■ The thickness of the overlay frame. Overlay Frame Dimensions-Rear View 1. Rout four depressions into the panel, it ... ■ Petroleum jelly PARTS NEEDED: Custom Overlay Frame-See "Overlay Frame-Rear View." Overlay hook locations Install Overlay Hooks Using a Phillips screwdriver and eight flat-head screws, attach the overlay hooks to attach the overlay hooks. Hardware (Optional) PARTS SUPPLIED: ■ Flat-head...
...A. Overlay hooks (4) 4 INSTALLATION INSTRUCTIONS Tools and Parts TOOLS NEEDED: Gather the required tools and parts before starting installation. IMPORTANT: ■ The thickness of the overlay frame. Overlay Frame Dimensions-Rear View 1. Rout four depressions into the panel, it ... ■ Petroleum jelly PARTS NEEDED: Custom Overlay Frame-See "Overlay Frame-Rear View." Overlay hook locations Install Overlay Hooks Using a Phillips screwdriver and eight flat-head screws, attach the overlay hooks to attach the overlay hooks. Hardware (Optional) PARTS SUPPLIED: ■ Flat-head...
Use & Care Guide
Page 5
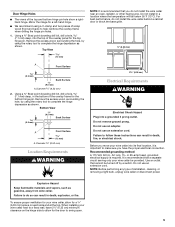
... installing your wine cellar be turned off by a switch. For best performance, do not install the wine cellar near an oven, radiator, or other heat source. Door Hinge Holes ■ The views of scrap wood (front and back) to help reinforce the overlay frame when drilling the hinge pin holes. 1. or 20-amp fused, grounded electrical supply is important to swing open...
... installing your wine cellar be turned off by a switch. For best performance, do not install the wine cellar near an oven, radiator, or other heat source. Door Hinge Holes ■ The views of scrap wood (front and back) to help reinforce the overlay frame when drilling the hinge pin holes. 1. or 20-amp fused, grounded electrical supply is important to swing open...

Use & Care Guide
Page 6
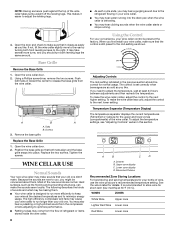
... more information, see "Custom Overlay Frame" for the removal or addition of your wine cellar. Rub a small amount of the door up, pulling straight out to remove tape or glue. A B C D E A. Top hinge C. Remove the three screws from surfaces before using it. See the cleaning instructions in back or other injury. Be sure to set aside the top hinge, top spacer and...
... more information, see "Custom Overlay Frame" for the removal or addition of your wine cellar. Rub a small amount of the door up, pulling straight out to remove tape or glue. A B C D E A. Top hinge C. Remove the three screws from surfaces before using it. See the cleaning instructions in back or other injury. Be sure to set aside the top hinge, top spacer and...
Use & Care Guide
Page 7
.... 1. Round-head screws (8) Install the Door IMPORTANT: To ensure proper operation, be sure to the door. 3. Washer D. Top spacer B. Grease the top hinge pin, top spacer and washer with the bottom spacer hole. 3. Electrical Shock Hazard Plug into its final location. 3. WARNING Excessive Weight Hazard Use two or more easily, adjust the wine cellar's tilt using the instructions below. Move the wine...
.... 1. Round-head screws (8) Install the Door IMPORTANT: To ensure proper operation, be sure to the door. 3. Washer D. Top spacer B. Grease the top hinge pin, top spacer and washer with the bottom spacer hole. 3. Electrical Shock Hazard Plug into its final location. 3. WARNING Excessive Weight Hazard Use two or more easily, adjust the wine cellar's tilt using the instructions below. Move the wine...
Use & Care Guide
Page 8
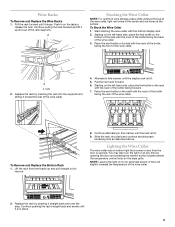
... water running into place. Dimmer Upper Lower F A B C D A. Replace the two screws. Position the base grille so that the control is defrosting. ■ You may hear a gurgling sound due to adjust the leveling legs. 4. When you may hear clicking sounds when the wine cellar starts or stops running. The high efficiency compressor and fans may take several more to the rear by turning...
... water running into place. Dimmer Upper Lower F A B C D A. Replace the two screws. Position the base grille so that the control is defrosting. ■ You may hear a gurgling sound due to adjust the leveling legs. 4. When you may hear clicking sounds when the wine cellar starts or stops running. The high efficiency compressor and fans may take several more to the rear by turning...
Use & Care Guide
Page 9
... Racks To Remove and Replace the Wine Racks 1. Pull the rack forward until the display rack is opened. Start stocking the wine cellar with the neck of the bottle facing the front of the bottle facing forward. 7. Place the next bottle on any time by opening the door and pressing the exterior switch located beside the temperature control knob on...
... Racks To Remove and Replace the Wine Racks 1. Pull the rack forward until the display rack is opened. Start stocking the wine cellar with the neck of the bottle facing the front of the bottle facing forward. 7. Place the next bottle on any time by opening the door and pressing the exterior switch located beside the temperature control knob on...
Use & Care Guide
Page 10
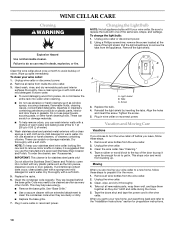
... refer to the "Installation Instructions" section for air to get to your wine cellar to a new home, follow these steps to do not immerse the entire rack into contact with a soft cloth. This stops odor and mold from inside the wine cellar. 3. Clean, wipe, and dry it for stainless steel parts only! WINE CELLAR CARE Cleaning WARNING Explosion Hazard Use nonflammable cleaner. Failure...
... refer to the "Installation Instructions" section for air to get to your wine cellar to a new home, follow these steps to do not immerse the entire rack into contact with a soft cloth. This stops odor and mold from inside the wine cellar. 3. Clean, wipe, and dry it for stainless steel parts only! WINE CELLAR CARE Cleaning WARNING Explosion Hazard Use nonflammable cleaner. Failure...
Use & Care Guide
Page 11
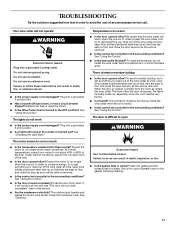
... to get everything you need out of an unnecessary service call. See "Changing the Light Bulb." See "Using the Control." The door is difficult to find , and close the door as soon as the wine is removed. ■ Is the control set correctly for moisture to 80% of the time. ■ Is the door opened , humidity from the room air enters the wine cellar. See "Cleaning." Clean the...
... to get everything you need out of an unnecessary service call. See "Changing the Light Bulb." See "Using the Control." The door is difficult to find , and close the door as soon as the wine is removed. ■ Is the control set correctly for moisture to 80% of the time. ■ Is the door opened , humidity from the room air enters the wine cellar. See "Cleaning." Clean the...
Use & Care Guide
Page 12
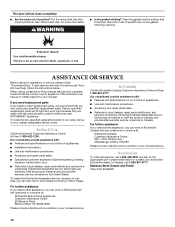
... you still need further assistance, you only use factory specified replacement parts. Failure to fulfill the product warranty and provide afterwarranty service, anywhere in your telephone directory Yellow Pages. When calling, please know the purchase date and the complete model and serial number of paraffin wax on the gasket following cleaning. KitchenAid designated service technicians are made with : ■ Features and specifications on our...
... you still need further assistance, you only use factory specified replacement parts. Failure to fulfill the product warranty and provide afterwarranty service, anywhere in your telephone directory Yellow Pages. When calling, please know the purchase date and the complete model and serial number of paraffin wax on the gasket following cleaning. KitchenAid designated service technicians are made with : ■ Features and specifications on our...

Use & Care Guide
Page 13
... model/serial numbers that vary from state to state or province to province. You must be found by checking the "Assistance or Service" section or by a KitchenAid designated service company. Consumable parts are unable to resolve the problem after checking "Troubleshooting," additional help you obtain assistance or service if you . Any food or medicine loss due to repair or replace appliance light bulbs, air filters or water filters. Replacement parts...
... model/serial numbers that vary from state to state or province to province. You must be found by checking the "Assistance or Service" section or by a KitchenAid designated service company. Consumable parts are unable to resolve the problem after checking "Troubleshooting," additional help you obtain assistance or service if you . Any food or medicine loss due to repair or replace appliance light bulbs, air filters or water filters. Replacement parts...

Dimension Guide
Page 1
..., radiator, or other heat source. OVERALL DIMENSIONS top hinge 23-5/8" overall depth without notice. Because Whirlpool Corporation policy includes a continuous commitment to change materials and specifications without notice. Instructions packed with leveling legs extended 1" 23-5/8" width To ensure proper ventilation for the door to swing open. Do not install in a location where the temperature will fall below 55°F (13°...
..., radiator, or other heat source. OVERALL DIMENSIONS top hinge 23-5/8" overall depth without notice. Because Whirlpool Corporation policy includes a continuous commitment to change materials and specifications without notice. Instructions packed with leveling legs extended 1" 23-5/8" width To ensure proper ventilation for the door to swing open. Do not install in a location where the temperature will fall below 55°F (13°...
Warranty Information
Page 1
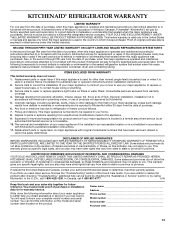
... Phone number Model number Serial number Purchase date 13 This warranty gives you specific legal rights, and you ever need repair service, first see the "Troubleshooting" section of original purchase date is operated and maintained according to instructions attached to or furnished with the product, KitchenAid brand of God, improper installation, installation not in a manner that existed when this major appliance was purchased. Proof of the Use & Care Guide...
... Phone number Model number Serial number Purchase date 13 This warranty gives you specific legal rights, and you ever need repair service, first see the "Troubleshooting" section of original purchase date is operated and maintained according to instructions attached to or furnished with the product, KitchenAid brand of God, improper installation, installation not in a manner that existed when this major appliance was purchased. Proof of the Use & Care Guide...


