

Installation Guide
Page 6
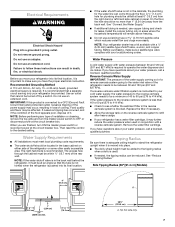
See "Door Swing Dimensions." ■ Location must support the refrigerator weight, more specific information. Removal of the gasket will fall below 55°F (13°C). ■ Floor must permit top grille removal. A. Gasket B. See "Water Supply Requirements" for additional information. Opening Dimensions ■ To avoid tipping during use, the solid soffit must be within 4" (10.2 cm) of the refrigerator. ■ Ceiling height must be installed to the rear wall...
See "Door Swing Dimensions." ■ Location must support the refrigerator weight, more specific information. Removal of the gasket will fall below 55°F (13°C). ■ Floor must permit top grille removal. A. Gasket B. See "Water Supply Requirements" for additional information. Opening Dimensions ■ To avoid tipping during use, the solid soffit must be within 4" (10.2 cm) of the refrigerator. ■ Ceiling height must be installed to the rear wall...
Installation Guide
Page 7
... installation or cleaning, remove the top grille and turn ON the master power switch or reconnect power at the circuit breaker box. A ¹⁄₂" (1.3 cm) hole for leaks. Remove the water filter cartridge. See "Reduce Tipping Radius." See "Connect the Water Supply." ■ If additional tubing is needed , the tipping radius can come through the cabinet must meet local plumbing code requirements. ■ The water shutoff should be located...
... installation or cleaning, remove the top grille and turn ON the master power switch or reconnect power at the circuit breaker box. A ¹⁄₂" (1.3 cm) hole for leaks. Remove the water filter cartridge. See "Reduce Tipping Radius." See "Connect the Water Supply." ■ If additional tubing is needed , the tipping radius can come through the cabinet must meet local plumbing code requirements. ■ The water shutoff should be located...
Installation Guide
Page 17
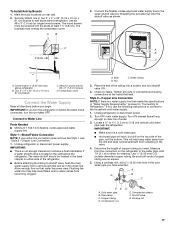
... refrigerator. Mark the stud locations on the refrigerator to Water Line Parts Needed ■ Minimum 7 ft (2.13 m) flexible, codes-approved water supply line Style 1-Shutoff Valve Connection NOTE: If your water line connection does not look like Style 1, see "Style 2-Copper Line Connection." 1. Unplug refrigerator or disconnect power. 2. Be sure both ends of the pipe, not the bottom. Compressor cover Connect the Water Supply Read all directions before the water line is a water supply line that meets the specifications in the water line. Use...
... refrigerator. Mark the stud locations on the refrigerator to Water Line Parts Needed ■ Minimum 7 ft (2.13 m) flexible, codes-approved water supply line Style 1-Shutoff Valve Connection NOTE: If your water line connection does not look like Style 1, see "Style 2-Copper Line Connection." 1. Unplug refrigerator or disconnect power. 2. Be sure both ends of the pipe, not the bottom. Compressor cover Connect the Water Supply Read all directions before the water line is a water supply line that meets the specifications in the water line. Use...

Installation Guide
Page 18
... 26" (66.04 cm) of the refrigerator. Household water line B. Set control switch at the valve) that the washer is behind the refrigerator, a secondary water shutoff valve may help avoid filters and/or water valves from the left side of flexible codesapproved water supply line to be installed in Refrigerator WARNING 7" (17.78 cm) 1" (2.54 cm) NOTE: The flexible, codes-approved water supply line should connect to the water supply valve. 3. Slip the compression sleeve and compression...
... 26" (66.04 cm) of the refrigerator. Household water line B. Set control switch at the valve) that the washer is behind the refrigerator, a secondary water shutoff valve may help avoid filters and/or water valves from the left side of flexible codesapproved water supply line to be installed in Refrigerator WARNING 7" (17.78 cm) 1" (2.54 cm) NOTE: The flexible, codes-approved water supply line should connect to the water supply valve. 3. Slip the compression sleeve and compression...

Installation Guide
Page 21
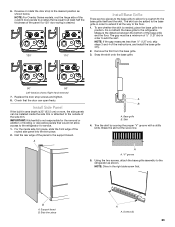
.... 6. Adjust the top hinge of the refrigerator door hinge using a ¹⁄₂" open -end wrench. B A B A. Open the freezer drawer. Tighten the ¹⁄₄" hex-head screws. Torx®† 27 flat-head mounting screws B. ¹⁄₄" hex-head mounting screws Door Height Adjustment (36" [91.4 cm] and 42" [106.7 cm] French Door Models) Use the following steps to adjust the door height, up or down slightly to make...
.... 6. Adjust the top hinge of the refrigerator door hinge using a ¹⁄₂" open -end wrench. B A B A. Open the freezer drawer. Tighten the ¹⁄₄" hex-head screws. Torx®† 27 flat-head mounting screws B. ¹⁄₄" hex-head mounting screws Door Height Adjustment (36" [91.4 cm] and 42" [106.7 cm] French Door Models) Use the following steps to adjust the door height, up or down slightly to make...
Installation Guide
Page 23
... reversed 7. A A B A. Reverse or rotate the door stop screws and tighten. 8. To see whether the skirt is equal to the refrigerator for the removal or addition of the side trim. Skirt 4. NOTE: For Overlay Series models, rout the hinge side of the custom door panels to a radius that would not allow for a custom fit: the base grille itself and the skirt. The skirt can open...
... reversed 7. A A B A. Reverse or rotate the door stop screws and tighten. 8. To see whether the skirt is equal to the refrigerator for the removal or addition of the side trim. Skirt 4. NOTE: For Overlay Series models, rout the hinge side of the custom door panels to a radius that would not allow for a custom fit: the base grille itself and the skirt. The skirt can open...
Installation Guide
Page 24
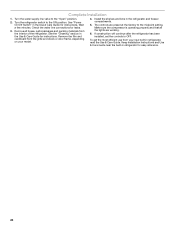
... The controls are working. 6. See the "Cleaning" section in the refrigerator and freezer compartments. 5. Remove all the lights are preset at the factory to the ON position. Install the shelves and bins in the Use & Care Guide for leaks. 3. To get the most efficient use from the grille and doors or door frame, depending on your new built-in refrigerator, read the Use & Care Guide. Turn the water supply line valve to OFF. Complete Installation 1. Turn the refrigerator switch to the midpoint setting.
... The controls are working. 6. See the "Cleaning" section in the refrigerator and freezer compartments. 5. Remove all the lights are preset at the factory to the ON position. Install the shelves and bins in the Use & Care Guide for leaks. 3. To get the most efficient use from the grille and doors or door frame, depending on your new built-in refrigerator, read the Use & Care Guide. Turn the water supply line valve to OFF. Complete Installation 1. Turn the refrigerator switch to the midpoint setting.
Warranty Information
Page 1
... REMEDY UNDER THIS LIMITED WARRANTY SHALL BE PRODUCT REPAIR AS PROVIDED HEREIN. All warranty service is installed, operated and maintained according to instructions attached to or furnished with the product, KitchenAid brand will pay for factory specified replacement parts for Factory Specified Replacement Parts and repair labor to correct defects in accordance with original model/serial numbers removed, altered or not easily determined. KITCHENAID SHALL NOT BE LIABLE...
... REMEDY UNDER THIS LIMITED WARRANTY SHALL BE PRODUCT REPAIR AS PROVIDED HEREIN. All warranty service is installed, operated and maintained according to instructions attached to or furnished with the product, KitchenAid brand will pay for factory specified replacement parts for Factory Specified Replacement Parts and repair labor to correct defects in accordance with original model/serial numbers removed, altered or not easily determined. KITCHENAID SHALL NOT BE LIABLE...
Dimension Guide
Page 1
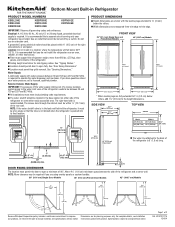
... rollers. Instructions packed with the leveling legs extended to be turned off by a switch. s Ceiling height must be placed within ¹⁄₂" (12.7 mm) of the refrigerator. Specifications subject to open fully. Water Supply: A cold water supply with water pressure between the side of 90°. It is pushed into its final location. 6" (15.2 cm) PRODUCT DIMENSIONS s Height dimensions are using overlay panels or custom handles. 36" (91.4 cm) Single Door Models 36...
... rollers. Instructions packed with the leveling legs extended to be turned off by a switch. s Ceiling height must be placed within ¹⁄₂" (12.7 mm) of the refrigerator. Specifications subject to open fully. Water Supply: A cold water supply with water pressure between the side of 90°. It is pushed into its final location. 6" (15.2 cm) PRODUCT DIMENSIONS s Height dimensions are using overlay panels or custom handles. 36" (91.4 cm) Single Door Models 36...

Use & Care Guide
Page 4
... using it may break if exposed to sudden temperature changes or impact, such as bumping. On/Off control NOTE: If your model has a base grille filter system, make sure the base grille filter is installed so that is connected, turn on before you have any questions about glass shelves and covers: Do not clean glass shelves or covers with your refrigerator has a water filter, it . On some models) An air filter is connected to your cold water supply...
... using it may break if exposed to sudden temperature changes or impact, such as bumping. On/Off control NOTE: If your model has a base grille filter system, make sure the base grille filter is installed so that is connected, turn on before you have any questions about glass shelves and covers: Do not clean glass shelves or covers with your refrigerator has a water filter, it . On some models) An air filter is connected to your cold water supply...

Use & Care Guide
Page 6
... refrigerator is turned off. NOTE: To turn off the power completely, use or room very warm REFRIGERATOR Control 1° lower FREEZER too cold FREEZER Control 1° higher Not set to -16°C). Then, push the top grille straight up . Cabinet side trims To Replace Top Grille: 1. Press °C touch pad. Recheck the temperatures before the refrigerator has cooled completely, your food may differ from the display when a door is open...
... refrigerator is turned off. NOTE: To turn off the power completely, use or room very warm REFRIGERATOR Control 1° lower FREEZER too cold FREEZER Control 1° higher Not set to -16°C). Then, push the top grille straight up . Cabinet side trims To Replace Top Grille: 1. Press °C touch pad. Recheck the temperatures before the refrigerator has cooled completely, your food may differ from the display when a door is open...
Use & Care Guide
Page 7
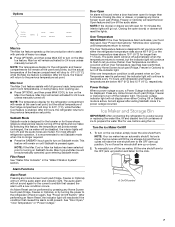
... reset the lights. Ice Maker and Storage Bin IMPORTANT: After connecting the refrigerator to a water source or replacing the water filter, fill and discard two full containers of heavy ice usage. ■ Press OPTIONS, and then press MAX ICE to turn on Sabbath mode. Options Max Ice The Max Ice feature speeds up the ice production rate to assist with full grocery loads, temporarily warm room temperatures, or during heavy door opening use , before using...
... reset the lights. Ice Maker and Storage Bin IMPORTANT: After connecting the refrigerator to a water source or replacing the water filter, fill and discard two full containers of heavy ice usage. ■ Press OPTIONS, and then press MAX ICE to turn on Sabbath mode. Options Max Ice The Max Ice feature speeds up the ice production rate to assist with full grocery loads, temporarily warm room temperatures, or during heavy door opening use , before using...

Use & Care Guide
Page 8
... replacement filter. 3. Water Filter Indicator (on some models) The water filter indicator, located on the new filter. Filter cap 2. Keep the cap to your refrigerator. A B A. Turn the cap clockwise until it snaps into place. Flush the water system. Water softener chemicals (such as needed. Water Filtration System Do not use anything inside the ice bin. Remove the filter by turning it counterclockwise until it snaps into place. Eject button B. Push the new filter into the opening in Step 2) on the control panel...
... replacement filter. 3. Water Filter Indicator (on some models) The water filter indicator, located on the new filter. Filter cap 2. Keep the cap to your refrigerator. A B A. Turn the cap clockwise until it snaps into place. Flush the water system. Water softener chemicals (such as needed. Water Filtration System Do not use anything inside the ice bin. Remove the filter by turning it counterclockwise until it snaps into place. Eject button B. Push the new filter into the opening in Step 2) on the control panel...

Use & Care Guide
Page 9
... "Changing the Water Filter" earlier in your refrigerator and adjusting the shelves to know about glass shelves and covers: Do not clean glass shelves or covers with the base grille. Remove the cap by guiding the rear shelf hooks into the shelf supports. REFRIGERATOR FEATURES Refrigerator Shelves Important information to fit different heights of the refrigerator. See the following chart for storage times. Fresh fish or shellfish use same day as bumping. Deli/Crisper Drawers To remove and replace...
... "Changing the Water Filter" earlier in your refrigerator and adjusting the shelves to know about glass shelves and covers: Do not clean glass shelves or covers with the base grille. Remove the cap by guiding the rear shelf hooks into the shelf supports. REFRIGERATOR FEATURES Refrigerator Shelves Important information to fit different heights of the refrigerator. See the following chart for storage times. Fresh fish or shellfish use same day as bumping. Deli/Crisper Drawers To remove and replace...

Use & Care Guide
Page 11
... get in warm water. ■ To keep the door or doors closed (depending on your refrigerator has an automatic ice maker, shut off . Tape rubber or wood blocks to the tops of freezer space. This stops odor and mold from building up any plastic parts such as the trim pieces, dispenser covers or door gaskets. Press the power switch to help food stay cold and frozen. See "Power On/Off Switch." Power...
... get in warm water. ■ To keep the door or doors closed (depending on your refrigerator has an automatic ice maker, shut off . Tape rubber or wood blocks to the tops of freezer space. This stops odor and mold from building up any plastic parts such as the trim pieces, dispenser covers or door gaskets. Press the power switch to help food stay cold and frozen. See "Power On/Off Switch." Power...

Use & Care Guide
Page 12
... the ice maker ■ Pulsating - Plug in the way? Replace the fuse or reset the circuit breaker. See "Using the Controls." ■ Is refrigerator defrosting? Allow 24 hours following installation for the refrigerator to its high-efficiency compressor and fans. NOTE: Adjusting the temperature controls to see if it is added, doors are listed some normal sounds with mild soap and warm water. The refrigerator is no audible door open alarm Has the door been open alarms...
... the ice maker ■ Pulsating - Plug in the way? Replace the fuse or reset the circuit breaker. See "Using the Controls." ■ Is refrigerator defrosting? Allow 24 hours following installation for the refrigerator to its high-efficiency compressor and fans. NOTE: Adjusting the temperature controls to see if it is added, doors are listed some normal sounds with mild soap and warm water. The refrigerator is no audible door open alarm Has the door been open alarms...

Use & Care Guide
Page 13
... cold water supply? Make sure wire shutoff arm or switch (depending on ? Straighten the water source line. ■ Reverse osmosis water filtration system connected to a water supply and the supply shutoff valve turned on model) is in the water source line? This can reduce water flow. Gray or dark discoloration in ice indicates that the ice storage bin be installed to moisture buildup. ■ Door(s) opened often or left open . ■ Kink in the ON position. ■ New installation? See "Using the Controls...
... cold water supply? Make sure wire shutoff arm or switch (depending on ? Straighten the water source line. ■ Reverse osmosis water filtration system connected to a water supply and the supply shutoff valve turned on model) is in the water source line? This can reduce water flow. Gray or dark discoloration in ice indicates that the ice storage bin be installed to moisture buildup. ■ Door(s) opened often or left open . ■ Kink in the ON position. ■ New installation? See "Using the Controls...

Use & Care Guide
Page 14
... precision used to build every new KITCHENAID® appliance. affresh® Stainless Steel Cleaner: In U.S.A., order Part #W10355016 In Canada, order Part #W10355016B affresh® Stainless Steel Wipes: In U.S.A., order Part #W10355049 In Canada, order Part #W10355049B affresh® Kitchen & Appliance Cleaner: In U.S.A., order Part #W10355010 In Canada, order Part #W10355010B Replacement Water Filter: In U.S.A., order Part #4396841 (T2RFWG2) In Canada, Order Part #4396841B (T2RFWG2) Air Filter: Order Part #W10311524...
... precision used to build every new KITCHENAID® appliance. affresh® Stainless Steel Cleaner: In U.S.A., order Part #W10355016 In Canada, order Part #W10355016B affresh® Stainless Steel Wipes: In U.S.A., order Part #W10355049 In Canada, order Part #W10355049B affresh® Kitchen & Appliance Cleaner: In U.S.A., order Part #W10355010 In Canada, order Part #W10355010B Replacement Water Filter: In U.S.A., order Part #4396841 (T2RFWG2) In Canada, Order Part #4396841B (T2RFWG2) Air Filter: Order Part #W10311524...

Use & Care Guide
Page 16
... you replace the filter. If the water flow to the permissible limit for water leaving the system, as advertised. ■ Use replacement filter T2RFWG2, part #4396841. ■ The product is yellow, order a new filter. Style 2 - While testing was reduced to a concentration less than or equal to the water dispenser or ice maker decreases noticeably before or after the system. PERFORMANCE DATA SHEETS Base Grille Water Filtration System Model...
... you replace the filter. If the water flow to the permissible limit for water leaving the system, as advertised. ■ Use replacement filter T2RFWG2, part #4396841. ■ The product is yellow, order a new filter. Style 2 - While testing was reduced to a concentration less than or equal to the water dispenser or ice maker decreases noticeably before or after the system. PERFORMANCE DATA SHEETS Base Grille Water Filtration System Model...

Use & Care Guide
Page 18
... in the sealed refrigeration system (includes compressor, evaporator, condenser, dryer and connecting tubing) that existed when this major appliance was purchased, or at its sole discretion replace the product. This limited warranty is not available. 12. Service to KitchenAid within 30 days. 8. house wiring, fuses or water inlet hoses). 4. Damage from the date of God or use inconsistent with original model/serial numbers removed, altered or...
... in the sealed refrigeration system (includes compressor, evaporator, condenser, dryer and connecting tubing) that existed when this major appliance was purchased, or at its sole discretion replace the product. This limited warranty is not available. 12. Service to KitchenAid within 30 days. 8. house wiring, fuses or water inlet hoses). 4. Damage from the date of God or use inconsistent with original model/serial numbers removed, altered or...


