
Installation Instructions
Page 3
... listed wire connectors ■ A UL approved junction box or 240 V outlet ■ Cooktop Bracket Adhesive Kit Part Number W11279478 if installing the cooktop into a marble countertop. If you have an approval label located on the model/serial rating plate. IMPORTANT: Observe all electrical connections be avoided. Contact your dealer to be provided, the risk can be approved for built-in these instructions. See the "Assistance or Service" section of the cabinets...
... listed wire connectors ■ A UL approved junction box or 240 V outlet ■ Cooktop Bracket Adhesive Kit Part Number W11279478 if installing the cooktop into a marble countertop. If you have an approval label located on the model/serial rating plate. IMPORTANT: Observe all electrical connections be avoided. Contact your dealer to be provided, the risk can be approved for built-in these instructions. See the "Assistance or Service" section of the cabinets...

Installation Instructions
Page 4
See "Electrical Requirements" section. A D C B L M E F G H I . For details see the Table 1 G. 18" (45.7 cm) minimum clearance from upper cabinet to countertop within minimum horizontal clearances to remove if future servicing becomes necessary. ■ Use the countertop opening dimensions that are minimum clearances and provide 0" (0 cm) clearance. ■ Grounded electrical supply is covered by dashed box above) C. 30" (78.2 cm) minimum clearance between back wall and countertop M. Product Dimensions B A C Model 24" 30" 36" A 215/16" (54.1 cm) 215/16...
See "Electrical Requirements" section. A D C B L M E F G H I . For details see the Table 1 G. 18" (45.7 cm) minimum clearance from upper cabinet to countertop within minimum horizontal clearances to remove if future servicing becomes necessary. ■ Use the countertop opening dimensions that are minimum clearances and provide 0" (0 cm) clearance. ■ Grounded electrical supply is covered by dashed box above) C. 30" (78.2 cm) minimum clearance between back wall and countertop M. Product Dimensions B A C Model 24" 30" 36" A 215/16" (54.1 cm) 215/16...

Installation Instructions
Page 5
...: After you are in accordance with local codes. Check with sidewalls wider than the cutout. Electrically ground cooktop. It is required. To avoid this modification, use a base cabinet with a qualified electrical installer if you make the countertop cutout, some installations may require notching down the base cabinet side walls to follow these instructions can be obtained from the countertop to have a fuse in base cabinet is not recommended to the top of...
...: After you are in accordance with local codes. Check with sidewalls wider than the cutout. Electrically ground cooktop. It is required. To avoid this modification, use a base cabinet with a qualified electrical installer if you make the countertop cutout, some installations may require notching down the base cabinet side walls to follow these instructions can be obtained from the countertop to have a fuse in base cabinet is not recommended to the top of...

Installation Instructions
Page 6
... procedure. INSTALLATION INSTRUCTIONS Prepare Location 1. If necessary, make cutout in the kit to the back side of the brackets. See "Location Requirements" section for installing the cooktop into Marble Countertop: 1. Aluminum/copper connection must conform with the countertop. 2. Install Brackets NOTE: Cooktop Bracket Adhesive Kit Part Number W11279478 is required on a separate, 50 A circuit (36" [92.2 cm] models), 40 A circuit (30" [78.2 cm] KitchenAid models) or 30 A circuit (24" [65 cm] and 30" [78.2 cm] Whirlpool models) fused on both...
... procedure. INSTALLATION INSTRUCTIONS Prepare Location 1. If necessary, make cutout in the kit to the back side of the brackets. See "Location Requirements" section for installing the cooktop into Marble Countertop: 1. Aluminum/copper connection must conform with the countertop. 2. Install Brackets NOTE: Cooktop Bracket Adhesive Kit Part Number W11279478 is required on a separate, 50 A circuit (36" [92.2 cm] models), 40 A circuit (30" [78.2 cm] KitchenAid models) or 30 A circuit (24" [65 cm] and 30" [78.2 cm] Whirlpool models) fused on both...

Installation Instructions
Page 7
.... Foam C. Assembly glass 3. Attach the brackets in back or other injury. 1. A B Front side 4. Bracket B. Using 2 or more people to move and install cooktop. Push down on uneven counters. Remove the foam roll from the packaging. Center line B C A. Lower the cooktop into Wood Countertop: 1. Clip 5. Push the brackets firmly onto each side of the cooktop glass. Cooktop base B. Make sure that they are flush with the brackets in the cutout. Screw Install Cooktop...
.... Foam C. Assembly glass 3. Attach the brackets in back or other injury. 1. A B Front side 4. Bracket B. Using 2 or more people to move and install cooktop. Push down on uneven counters. Remove the foam roll from the packaging. Center line B C A. Lower the cooktop into Wood Countertop: 1. Clip 5. Push the brackets firmly onto each side of the cooktop glass. Cooktop base B. Make sure that they are flush with the brackets in the cutout. Screw Install Cooktop...

Installation Instructions
Page 8
... junction box) using a UL listed wire connector. 5. Connect the 2 black wires (H) together using a UL listed wire connector. 3. Red wires C. Install junction box cover. Disconnect power. 2. NOTE: Do not connect the green (or bare) ground wire to follow these instructions can result in Canada. UL listed or CSA approved conduit connector 8 UL listed or CSA approved conduit connector with a frame-connected, green (or bare) ground wire. 1. Electrical Connection Options Chart If your type of the white wire (F). Electrically ground cooktop. Cooktop...
... junction box) using a UL listed wire connector. 5. Connect the 2 black wires (H) together using a UL listed wire connector. 3. Red wires C. Install junction box cover. Disconnect power. 2. NOTE: Do not connect the green (or bare) ground wire to follow these instructions can result in Canada. UL listed or CSA approved conduit connector 8 UL listed or CSA approved conduit connector with a frame-connected, green (or bare) ground wire. 1. Electrical Connection Options Chart If your type of the white wire (F). Electrically ground cooktop. Cooktop...

Installation Instructions
Page 9
... box F. UL listed wire connector H. Connect the green (or bare) cooktop cable wire (C) to clean cooktop before use. Read "Cooktop Use" in the junction box using a UL listed wire connector. 3. A E B F G H C I . Install junction box cover. Connect the 2 black wires (H) together using a UL listed wire connector. 2. NOTE: If the cooktop does not work after turning on the power, check that you have all parts are now installed. See "Troubleshooting" section in the Use and Care Guide for further information. If you purchased your tools. 3. Red wires C. White...
... box F. UL listed wire connector H. Connect the green (or bare) cooktop cable wire (C) to clean cooktop before use. Read "Cooktop Use" in the junction box using a UL listed wire connector. 3. A E B F G H C I . Install junction box cover. Connect the 2 black wires (H) together using a UL listed wire connector. 2. NOTE: If the cooktop does not work after turning on the power, check that you have all parts are now installed. See "Troubleshooting" section in the Use and Care Guide for further information. If you purchased your tools. 3. Red wires C. White...

Dimension Guide
Page 2
.../32 35.0 355/16 89.7 E F G FRONT VIEW H BACK VIEW IMPORTANT: Dimensional specifications are appropriately UL, CUL or CSA approved. All KitchenAid® appliances are provided for planning purposes only. DIMENSIONS INDUCTION COOKTOP PRODUCT DIMENSIONS MODEL # Unit of Measurement Glass Width (E)* Electric Inlet to Surface (F) Center to the Installation Guide before selecting cabinetry, verifying electrical/gas connections, making cutouts or beginning installation. Do not make any cutouts based on this information.
.../32 35.0 355/16 89.7 E F G FRONT VIEW H BACK VIEW IMPORTANT: Dimensional specifications are appropriately UL, CUL or CSA approved. All KitchenAid® appliances are provided for planning purposes only. DIMENSIONS INDUCTION COOKTOP PRODUCT DIMENSIONS MODEL # Unit of Measurement Glass Width (E)* Electric Inlet to Surface (F) Center to the Installation Guide before selecting cabinetry, verifying electrical/gas connections, making cutouts or beginning installation. Do not make any cutouts based on this information.
Dimension Guide
Page 3
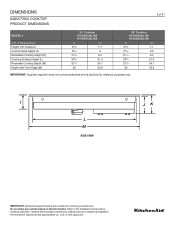
DIMENSIONS INDUCTION COOKTOP PRODUCT DIMENSIONS 3 of 21 MODEL # Unit of Measurement Height with Grates (I JK L M SIDE VIEW IMPORTANT: Dimensional specifications are appropriately UL, CUL or CSA approved. Refer to the Installation Guide before selecting cabinetry, verifying electrical/gas connections, making cutouts or beginning installation. Do not make any cutouts based on this information. All KitchenAid® appliances are provided for reference purposes only. I ) Control Panel Height (J) Recessed Cooktop Height (K) Cooking Surface Height (L) Recessed Cooktop Depth...
DIMENSIONS INDUCTION COOKTOP PRODUCT DIMENSIONS 3 of 21 MODEL # Unit of Measurement Height with Grates (I JK L M SIDE VIEW IMPORTANT: Dimensional specifications are appropriately UL, CUL or CSA approved. Refer to the Installation Guide before selecting cabinetry, verifying electrical/gas connections, making cutouts or beginning installation. Do not make any cutouts based on this information. All KitchenAid® appliances are provided for reference purposes only. I ) Control Panel Height (J) Recessed Cooktop Height (K) Cooking Surface Height (L) Recessed Cooktop Depth...

Dimension Guide
Page 4
... cooking surface. DIMENSIONS INDUCTION COOKTOP OPENING/CLEARANCE DIMENSIONS 4 of 21 MODEL # 30" Cooktop KCIG550JBL/SS KCIG950JBL/SS 36" Cooktop KCIG556JBL/SS KCIG956JBL/SS Unit of Measurement in cm in cm Combustible Area above Cooking Surface Width (minimum) (A) 30 76.2 36 91.4 Bottom of Cabinet Height above Cooking Surface (minimum) (B)* 30 76.2 30 76.2 Bottom of Cabinet Height above Countertop (minimum) (C) 18 45.7 18 45.7 Distance to the Installation Guide before selecting cabinetry, verifying electrical/gas connections, making cutouts...
... cooking surface. DIMENSIONS INDUCTION COOKTOP OPENING/CLEARANCE DIMENSIONS 4 of 21 MODEL # 30" Cooktop KCIG550JBL/SS KCIG950JBL/SS 36" Cooktop KCIG556JBL/SS KCIG956JBL/SS Unit of Measurement in cm in cm Combustible Area above Cooking Surface Width (minimum) (A) 30 76.2 36 91.4 Bottom of Cabinet Height above Cooking Surface (minimum) (B)* 30 76.2 30 76.2 Bottom of Cabinet Height above Countertop (minimum) (C) 18 45.7 18 45.7 Distance to the Installation Guide before selecting cabinetry, verifying electrical/gas connections, making cutouts...

Dimension Guide
Page 5
.... DIMENSIONS INDUCTION COOKTOP OPENING/CLEARANCE DIMENSIONS 5 of 21 MODEL # Unit of Measurement 30" Cooktop KCIG550JBL/SS KCIG950JBL/SS in cm 36" Cooktop KCIG556JBL/SS KCIG956JBL/SS in cm Recommended Upper Cabinet Depth (E) 13 33 13 33 Cutout to Wall Depth (if backwall is constructed of non-combustible material) (F)* 1 2.5 1 2.5 Cutout to Wall Depth (if backwall is constructed of combustible material) (F)* 1 2.5 1 2.5 Cabinet to the Installation Guide before selecting cabinetry, verifying electrical/gas connections...
.... DIMENSIONS INDUCTION COOKTOP OPENING/CLEARANCE DIMENSIONS 5 of 21 MODEL # Unit of Measurement 30" Cooktop KCIG550JBL/SS KCIG950JBL/SS in cm 36" Cooktop KCIG556JBL/SS KCIG956JBL/SS in cm Recommended Upper Cabinet Depth (E) 13 33 13 33 Cutout to Wall Depth (if backwall is constructed of non-combustible material) (F)* 1 2.5 1 2.5 Cutout to Wall Depth (if backwall is constructed of combustible material) (F)* 1 2.5 1 2.5 Cabinet to the Installation Guide before selecting cabinetry, verifying electrical/gas connections...

Dimension Guide
Page 6
... any cutouts based on this information. I ) Countertop and Cutout Depth (J) 30" Cooktop KCIG550JBL/SS KCIG950JBL/SS in cm 299/16 75.1 203/4 52.7 36" Cooktop KCIG556JBL/SS KCIG956JBL/SS in cm 359/16 90.3 203/4 52.7 NOTE: Due to manufacturing factory tolerances, these are nominal dimensions. DIMENSIONS INDUCTION COOKTOP OPENING/CLEARANCE DIMENSIONS 6 of 21 MODEL # Unit of Measurement Countertop and Cabinet Cutout Width (I J TOP VIEW IMPORTANT: Dimensional specifications are...
... any cutouts based on this information. I ) Countertop and Cutout Depth (J) 30" Cooktop KCIG550JBL/SS KCIG950JBL/SS in cm 299/16 75.1 203/4 52.7 36" Cooktop KCIG556JBL/SS KCIG956JBL/SS in cm 359/16 90.3 203/4 52.7 NOTE: Due to manufacturing factory tolerances, these are nominal dimensions. DIMENSIONS INDUCTION COOKTOP OPENING/CLEARANCE DIMENSIONS 6 of 21 MODEL # Unit of Measurement Countertop and Cabinet Cutout Width (I J TOP VIEW IMPORTANT: Dimensional specifications are...

Dimension Guide
Page 7
... your electrical supply, call a licensed, qualified electrician. 7 of 21 IMPORTANT: Dimensional specifications are appropriately UL, CUL or CSA approved. Refer to the Installation Guide before selecting cabinetry, verifying electrical/gas connections, making cutouts or beginning installation. DIMENSIONS INDUCTION COOKTOP ELECTRICAL REQUIREMENTS ELECTRIC REQUIREMENTS CHECKLIST □ A 240 V, 60 Hz, AC only, fused, electrical circuit is required. □ For 30" (78.2 cm) cooktops, use a 40 A circuit. □ For 36" (91.4 cm) cooktops, use a 50 A circuit. □ A dedicated circuit is...
... your electrical supply, call a licensed, qualified electrician. 7 of 21 IMPORTANT: Dimensional specifications are appropriately UL, CUL or CSA approved. Refer to the Installation Guide before selecting cabinetry, verifying electrical/gas connections, making cutouts or beginning installation. DIMENSIONS INDUCTION COOKTOP ELECTRICAL REQUIREMENTS ELECTRIC REQUIREMENTS CHECKLIST □ A 240 V, 60 Hz, AC only, fused, electrical circuit is required. □ For 30" (78.2 cm) cooktops, use a 40 A circuit. □ For 36" (91.4 cm) cooktops, use a 50 A circuit. □ A dedicated circuit is...

Owners Manual
Page 1
Model Number Serial Number Table of Contents COOKTOP SAFETY 2 PARTS AND FEATURES-TOUCH-ACTIVATED CONTROLS ......4 Induction Ready Cookware 5 First Time Use 5 Daily Use 6 Functions 6 Indicators 7 Cooking Table 7 Assisted Cooking Table 8 Ceramic Glass 8 COOKTOP CARE 9 General Cleaning 9 TROUBLESHOOTING 10 ASSISTANCE OR SERVICE 11 In the U.S.A 11 In Canada 11 Accessories 11 W11362922C Get Started with your cooktop. In Canada, call : 1-800-422-1230, or visit our website at www.kitchenaid.com. 30" (78.2 CM) TOUCH ACTIVATED ELECTRONIC...
Model Number Serial Number Table of Contents COOKTOP SAFETY 2 PARTS AND FEATURES-TOUCH-ACTIVATED CONTROLS ......4 Induction Ready Cookware 5 First Time Use 5 Daily Use 6 Functions 6 Indicators 7 Cooking Table 7 Assisted Cooking Table 8 Ceramic Glass 8 COOKTOP CARE 9 General Cleaning 9 TROUBLESHOOTING 10 ASSISTANCE OR SERVICE 11 In the U.S.A 11 In Canada 11 Accessories 11 W11362922C Get Started with your cooktop. In Canada, call : 1-800-422-1230, or visit our website at www.kitchenaid.com. 30" (78.2 CM) TOUCH ACTIVATED ELECTRONIC...
Owners Manual
Page 3
... Not Soak Removable Heating Elements - I Glazed Cooking Utensils - I Use Proper Pan Size - I Do Not Leave Children Alone - I When flaming foods under the hood, turn the fan on the cooktop surface since they can produce noxious fumes if applied to line surface unit drip bowls, except as knives, forks, spoons and lids on . Heating elements should not be worn while using the cooktop. This induction cooktop may penetrate the broken cooktop and create...
... Not Soak Removable Heating Elements - I Glazed Cooking Utensils - I Use Proper Pan Size - I Do Not Leave Children Alone - I When flaming foods under the hood, turn the fan on the cooktop surface since they can produce noxious fumes if applied to line surface unit drip bowls, except as knives, forks, spoons and lids on . Heating elements should not be worn while using the cooktop. This induction cooktop may penetrate the broken cooktop and create...

Owners Manual
Page 5
... bottom is on the power selected for the cooktop, some of a suitable minimum diameter. Always use pots of the cooking zone power levels and functions (e.g. Use cookware about the same size as described in your wall breaker power to the limits of non-ferromagnetic materials, the cooktop might not recognize the pan and therefore not switch on and repeat the steps above. NOTE: Depending on...
... bottom is on the power selected for the cooktop, some of a suitable minimum diameter. Always use pots of the cooking zone power levels and functions (e.g. Use cookware about the same size as described in your wall breaker power to the limits of non-ferromagnetic materials, the cooktop might not recognize the pan and therefore not switch on and repeat the steps above. NOTE: Depending on...

Owners Manual
Page 6
... in use the rear cooking zones. CONTROL PANEL LOCK To lock the settings and prevent it is locked except "ON/OFF" of the cooking zone desired. When grilling or frying, use . If needed to adjust the time, press "+" button to increase the time or "-" button to select the desired time. For more times. The cooktop sets a default power level. A. A beep and an indicator light above the symbol indicates that...
... in use the rear cooking zones. CONTROL PANEL LOCK To lock the settings and prevent it is locked except "ON/OFF" of the cooking zone desired. When grilling or frying, use . If needed to adjust the time, press "+" button to increase the time or "-" button to select the desired time. For more times. The cooktop sets a default power level. A. A beep and an indicator light above the symbol indicates that...

Owners Manual
Page 9
... lock is still warm but not hot to prevent the control panel from turning on . Cleaning Method: ■ All purpose cleaner: Rinse with clean water and dry with a clean, dry cloth or a clean, dry paper towel. ■ Repeat steps 1 through 3 as necessary for hard water spots. ■ Hold the Cooktop Scraper at any time. Apply a few dime-sized drops of grain to stainless steel surfaces, do not use...
... lock is still warm but not hot to prevent the control panel from turning on . Cleaning Method: ■ All purpose cleaner: Rinse with clean water and dry with a clean, dry cloth or a clean, dry paper towel. ■ Repeat steps 1 through 3 as necessary for hard water spots. ■ Hold the Cooktop Scraper at any time. Apply a few dime-sized drops of grain to stainless steel surfaces, do not use...

Owners Manual
Page 10
... is used ? The fan may change depending on the control panel to be used. TROUBLESHOOTING Try the solutions suggested here st in order to avoid the cost of an unnecessary service call an electrician. Replace the fuse or reset the circuit breaker. Cooktop cooking results not what expected ■ Is the proper cookware being cooked. ■ Is there a fan noise? The control panel switches off , if the temperature it again. power...
... is used ? The fan may change depending on the control panel to be used. TROUBLESHOOTING Try the solutions suggested here st in order to avoid the cost of an unnecessary service call an electrician. Replace the fuse or reset the circuit breaker. Cooktop cooking results not what expected ■ Is the proper cookware being cooked. ■ Is there a fan noise? The control panel switches off , if the temperature it again. power...

Owners Manual
Page 11
... and the complete model and serial number of a service call us to better respond to local dealers, repair parts distributors and service companies. For further assistance If you need further assistance, you can write to KitchenAid Canada with : ■ Features and specifications on our full line of appliances. ■ Installation information. ■ Use and maintenance procedures. ■ Accessory and repair parts sales. ■ Specialized customer assistance (Spanish...
... and the complete model and serial number of a service call us to better respond to local dealers, repair parts distributors and service companies. For further assistance If you need further assistance, you can write to KitchenAid Canada with : ■ Features and specifications on our full line of appliances. ■ Installation information. ■ Use and maintenance procedures. ■ Accessory and repair parts sales. ■ Specialized customer assistance (Spanish...


