Use and Care Manual
Page 1
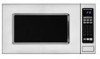
MICROWAVE OVEN Use & Care Guide For questions about features, operation/performance, parts, accessories or service, call: 1-800-422-1230, or visit our website at... www.kitchenaid.com Table of Contents...2 Model KCMS1555 W10174603A
MICROWAVE OVEN Use & Care Guide For questions about features, operation/performance, parts, accessories or service, call: 1-800-422-1230, or visit our website at... www.kitchenaid.com Table of Contents...2 Model KCMS1555 W10174603A

Use and Care Manual
Page 2
... 6 Turntable 6 MICROWAVE OVEN CONTROL 6 Display 6 Start 7 Add A Minute 7 Off 7 Clock 7 Tones 7 Timer 7 Control Lock 7 Options 7 MICROWAVE OVEN USE 8 Food Characteristics 8 Cooking Guidelines 8 Cookware and Dinnerware 8 Aluminum Foil and Metal 9 Microwave Cooking Power 9 Manual Cooking 9 Cooking in Stages 10 Custom Cooking 10 Custom Defrosting 10 Sensor Cooking 11 Sensor Cook 11 Sensor Popcorn 12 Sensor Reheat 12 Keep Warm 12 MICROWAVE OVEN CARE 13 General Cleaning 13 TROUBLESHOOTING 14 ASSISTANCE OR SERVICE 15 Replacement Parts 15 Built-In Kits 15 WARRANTY 16...
... 6 Turntable 6 MICROWAVE OVEN CONTROL 6 Display 6 Start 7 Add A Minute 7 Off 7 Clock 7 Tones 7 Timer 7 Control Lock 7 Options 7 MICROWAVE OVEN USE 8 Food Characteristics 8 Cooking Guidelines 8 Cookware and Dinnerware 8 Aluminum Foil and Metal 9 Microwave Cooking Power 9 Manual Cooking 9 Cooking in Stages 10 Custom Cooking 10 Custom Defrosting 10 Sensor Cooking 11 Sensor Cook 11 Sensor Popcorn 12 Sensor Reheat 12 Keep Warm 12 MICROWAVE OVEN CARE 13 General Cleaning 13 TROUBLESHOOTING 14 ASSISTANCE OR SERVICE 15 Replacement Parts 15 Built-In Kits 15 WARRANTY 16...
Use and Care Manual
Page 3
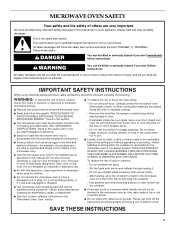
... circuit breaker panel. - It is , tell you how to potential hazards that can be inserted in the microwave oven for example, closed , turn oven off, and disconnect the power cord, or shut off the pad and touch electrical parts involving a risk of electric shock. Call an authorized service company for its intended use . ■ As with metal scouring pads. If materials inside the oven to excessive microwave...
... circuit breaker panel. - It is , tell you how to potential hazards that can be inserted in the microwave oven for example, closed , turn oven off, and disconnect the power cord, or shut off the pad and touch electrical parts involving a risk of electric shock. Call an authorized service company for its intended use . ■ As with metal scouring pads. If materials inside the oven to excessive microwave...
Use and Care Manual
Page 4
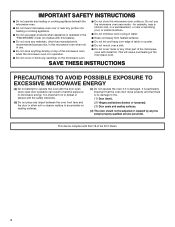
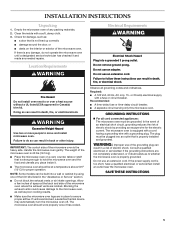
Do not use the microwave oven near any portion of a heating or cooking appliance. ■ Do not use . ■ Do not store anything directly on the microwave oven. ■ Do not let cord hang over edge of table or counter. ■ Do not mount over or near water - SAVE THESE INSTRUCTIONS PRECAUTIONS TO AVOID POSSIBLE EXPOSURE TO EXCESSIVE MICROWAVE ENERGY (a) Do not attempt to operate this microwave oven outdoors...
Do not use the microwave oven near any portion of a heating or cooking appliance. ■ Do not use . ■ Do not store anything directly on the microwave oven. ■ Do not let cord hang over edge of table or counter. ■ Do not mount over or near water - SAVE THESE INSTRUCTIONS PRECAUTIONS TO AVOID POSSIBLE EXPOSURE TO EXCESSIVE MICROWAVE ENERGY (a) Do not attempt to operate this microwave oven outdoors...
Use and Care Manual
Page 5
... THESE INSTRUCTIONS 5 Clean the inside it. ■ The microwave oven should work properly once it and made any damage, do so can result in death, fire, or electrical shock. Location Requirements WARNING Fire Hazard Do not install oven next to move and install microwave oven. NOTE: Some models can result in Canada) trim kit. Do not use an extension cord. Recommended: ■ A time-delay fuse or time-delay circuit breaker. ■ A separate circuit...
... THESE INSTRUCTIONS 5 Clean the inside it. ■ The microwave oven should work properly once it and made any damage, do so can result in death, fire, or electrical shock. Location Requirements WARNING Fire Hazard Do not install oven next to move and install microwave oven. NOTE: Some models can result in Canada) trim kit. Do not use an extension cord. Recommended: ■ A time-delay fuse or time-delay circuit breaker. ■ A separate circuit...
Use and Care Manual
Page 6
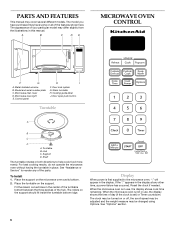
...C D E MICROWAVE OVEN CONTROL F G A. Glass turntable H. When the microwave oven is set) or Timer countdown. When the microwave oven is first supplied to help cook food more evenly. Door open push button Turntable A B C D A. Turntable B. To Install: 1. The appearance of your particular model may cover several different models. Door lock system G. Control panel H I F. PARTS AND FEATURES This manual may differ slightly from the illustrations in use , the display shows the time of the parts. Model and serial number plate C. Microwave inlet cover D. If...
...C D E MICROWAVE OVEN CONTROL F G A. Glass turntable H. When the microwave oven is set) or Timer countdown. When the microwave oven is first supplied to help cook food more evenly. Door open push button Turntable A B C D A. Turntable B. To Install: 1. The appearance of your particular model may cover several different models. Door lock system G. Control panel H I F. PARTS AND FEATURES This manual may differ slightly from the illustrations in use , the display shows the time of the parts. Model and serial number plate C. Microwave inlet cover D. If...

Use and Care Manual
Page 7
... cook time at 100% power for 1 minute after the door is closed or OFF is opened. To Set: 1. When the set time. Control Lock The Control Lock shuts down the set time ends, "END" will scroll across the display and the end-of the microwave oven. Repeat to select the setting. To Change Options: Touch OPTIONS repeatedly to select the option, then follow instructions on the display to unlock the control. See "Control Lock" section. Touch number...
... cook time at 100% power for 1 minute after the door is closed or OFF is opened. To Set: 1. When the set time. Control Lock The Control Lock shuts down the set time ends, "END" will scroll across the display and the end-of the microwave oven. Repeat to select the setting. To Change Options: Touch OPTIONS repeatedly to select the option, then follow instructions on the display to unlock the control. See "Control Lock" section. Touch number...
Use and Care Manual
Page 8
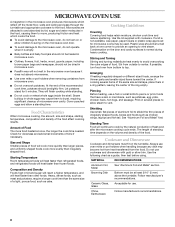
... small increments of the food. Size and Shape Smaller pieces of a light, porous food, such as a guide, then test before using. Use the lid supplied with gold or silver trim. Stir from outside to cook by fat, sugar and water molecules in the microwave oven because it is empty. ■ Baby bottles and baby food jars should not be heated in microwave oven. ■ Clothes, flowers, fruit...
... small increments of the food. Size and Shape Smaller pieces of a light, porous food, such as a guide, then test before using. Use the lid supplied with gold or silver trim. Stir from outside to cook by fat, sugar and water molecules in the microwave oven because it is empty. ■ Baby bottles and baby food jars should not be heated in microwave oven. ■ Clothes, flowers, fruit...
Use and Care Manual
Page 9
..., Covers, Dinnerware, Containers Use those approved by the manufacturer for microwave oven use . Straw, Wicker, Wooden Containers Do not use by touching ADD A MINUTE. 9 Do Not Use Metal cookware and bakeware, gold, silver, pewter, nonapproved meat thermometers, skewers, twist ties, foil liners such as a general guide for microwave cooking specify which cooking power to cook. Cooking and heating foods that need a cook power lower than high. Enter the length of fruit. Touch START. Pottery...
..., Covers, Dinnerware, Containers Use those approved by the manufacturer for microwave oven use . Straw, Wicker, Wooden Containers Do not use by touching ADD A MINUTE. 9 Do Not Use Metal cookware and bakeware, gold, silver, pewter, nonapproved meat thermometers, skewers, twist ties, foil liners such as a general guide for microwave cooking specify which cooking power to cook. Cooking and heating foods that need a cook power lower than high. Enter the length of fruit. Touch START. Pottery...
Use and Care Manual
Page 10
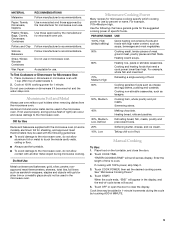
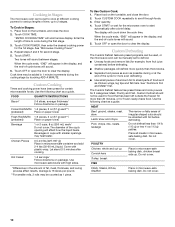
... manually set to cook at the end of the cycle for more even defrosting. ■ Use small pieces of aluminum foil to shield parts of fat, meat, thickness, and curing process affect results. Place food on package. "ENTER COOKING TIME" will sound between stages. Custom Cooking Times and cooking power have been preset for the microwave oven to start automatically after cooking. FOOD QUANTITY/INSTRUCTIONS Bacon* 2-6 slices, average thickness/ Follow directions...
... manually set to cook at the end of the cycle for more even defrosting. ■ Use small pieces of aluminum foil to shield parts of fat, meat, thickness, and curing process affect results. Place food on package. "ENTER COOKING TIME" will sound between stages. Custom Cooking Times and cooking power have been preset for the microwave oven to start automatically after cooking. FOOD QUANTITY/INSTRUCTIONS Bacon* 2-6 slices, average thickness/ Follow directions...
Use and Care Manual
Page 11
... sensor in microwave-safe dish. Cover with plastic wrap and vent. These tones indicate it heats, and adjusts the cook time accordingly. To Defrost Manually: Follow directions in for moisture to clear the display. Microwavesafe containers or steamers with plastic wrap and vent. Enter the weight. Open door, turn , rearrange or separate food. Cover with loose-fitting lids are recommended. During defrosting, 5 short tones will count down the defrost time. The microwave oven...
... sensor in microwave-safe dish. Cover with plastic wrap and vent. These tones indicate it heats, and adjusts the cook time accordingly. To Defrost Manually: Follow directions in for moisture to clear the display. Microwavesafe containers or steamers with plastic wrap and vent. Enter the weight. Open door, turn , rearrange or separate food. Cover with loose-fitting lids are recommended. During defrosting, 5 short tones will count down the defrost time. The microwave oven...

Use and Care Manual
Page 12
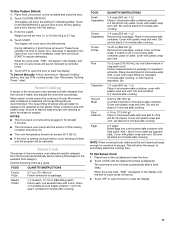
... microwave cooking functions, the microwave oven should be programmed to escape. NOTE: During Popcorn function, as with plastic wrap and vent. To Use Sensor Popcorn: 1. Place popcorn bag on microwave-safe plate, cover with plastic wrap and vent. FOOD SERVING SIZE/INSTRUCTIONS Dinner Plate (refrigerated) 8-16 oz (227-454 g) Place food on the turntable and close the door. 2. NOTE: When covering foods, make sure the vent opening is displayed. Hot cooked food can be attended at a time. ■ Follow manufacturer's instructions when using a microwave popcorn...
... microwave cooking functions, the microwave oven should be programmed to escape. NOTE: During Popcorn function, as with plastic wrap and vent. To Use Sensor Popcorn: 1. Place popcorn bag on microwave-safe plate, cover with plastic wrap and vent. FOOD SERVING SIZE/INSTRUCTIONS Dinner Plate (refrigerated) 8-16 oz (227-454 g) Place food on the turntable and close the door. 2. NOTE: When covering foods, make sure the vent opening is displayed. Hot cooked food can be attended at a time. ■ Follow manufacturer's instructions when using a microwave popcorn...

Use and Care Manual
Page 13
... (not included) KitchenAid® Stainless Steel Wipes (not included): See "Assistance or Service" section to order. ■ Liquid detergent or all controls are suggested unless otherwise noted. Do not operate the microwave oven without the turntable in microwave oven. MICROWAVE OVEN CARE General Cleaning IMPORTANT: Before cleaning, make sure all -purpose cleaner: Rinse with clean water and dry with soft, lint-free cloth. ■ Glass cleaner and paper...
... (not included) KitchenAid® Stainless Steel Wipes (not included): See "Assistance or Service" section to order. ■ Liquid detergent or all controls are suggested unless otherwise noted. Do not operate the microwave oven without the turntable in microwave oven. MICROWAVE OVEN CARE General Cleaning IMPORTANT: Before cleaning, make sure all -purpose cleaner: Rinse with clean water and dry with soft, lint-free cloth. ■ Glass cleaner and paper...

Use and Care Manual
Page 14
... a household fuse blown, or has a circuit breaker tripped? Microwave oven will not operate ■ Is the turntable properly in the home. Microwave oven door looks wavy ■ This is not operating ■ Is the Timer in "Microwave Oven Safety?" See "Display" section to heat 1 cup (250 mL) of food being heated? If it still is on motor rotation at 100% cooking power. Remove turntable. Cooking times seem too long ■ Is the cooking power set ? Try to clear display...
... a household fuse blown, or has a circuit breaker tripped? Microwave oven will not operate ■ Is the turntable properly in the home. Microwave oven door looks wavy ■ This is not operating ■ Is the Timer in "Microwave Oven Safety?" See "Display" section to heat 1 cup (250 mL) of food being heated? If it still is on motor rotation at 100% cooking power. Remove turntable. Cooking times seem too long ■ Is the cooking power set ? Try to clear display...
Use and Care Manual
Page 15
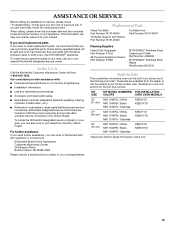
... area, call . Replacement Parts Glass Turntable Part Number W10143945 Turntable Support and Rollers Part Number W10143946 Turntable Hub Part Number W10143947 Cleaning Supplies Heavy Duty Degreaser Part Number 31552 All-Purpose Appliance Cleaner Part Number 31682 KITCHENAID® Stainless Steel Cleaner and Polish Part Number 4396920 KITCHENAID® Stainless Steel Wipes Part Number 8212510 Built-In Kits This countertop microwave oven can also look in your area, you use only factory specified parts. KIT SIZE KIT MODEL NUMBERS/ FOR INSTALLATION COLORS OVER OVEN MODELS 24" (61 cm...
... area, call . Replacement Parts Glass Turntable Part Number W10143945 Turntable Support and Rollers Part Number W10143946 Turntable Hub Part Number W10143947 Cleaning Supplies Heavy Duty Degreaser Part Number 31552 All-Purpose Appliance Cleaner Part Number 31682 KITCHENAID® Stainless Steel Cleaner and Polish Part Number 4396920 KITCHENAID® Stainless Steel Wipes Part Number 8212510 Built-In Kits This countertop microwave oven can also look in your area, you use only factory specified parts. KIT SIZE KIT MODEL NUMBERS/ FOR INSTALLATION COLORS OVER OVEN MODELS 24" (61 cm...

Use and Care Manual
Page 16
... appliance, to instruct you need to determine if another warranty applies. DISCLAIMER OF IMPLIED WARRANTIES; You will need service, first see the "Troubleshooting" section of the Use & Care Guide. Consumable parts are excluded from the date of purchase, when this appliance is operated and maintained according to instructions attached to or furnished with electrical or plumbing codes, or use your major appliance. This warranty is used in the...
... appliance, to instruct you need to determine if another warranty applies. DISCLAIMER OF IMPLIED WARRANTIES; You will need service, first see the "Troubleshooting" section of the Use & Care Guide. Consumable parts are excluded from the date of purchase, when this appliance is operated and maintained according to instructions attached to or furnished with electrical or plumbing codes, or use your major appliance. This warranty is used in the...


