
Use & Care Guide
Page 2
TABLE OF CONTENTS MICROWAVE OVEN SAFETY 3 INSTALLATION INSTRUCTIONS 5 Unpacking 5 Location Requirements 5 Electrical Requirements 5 PARTS AND FEATURES 6 Turntable 6 MICROWAVE OVEN CONTROL 6 Display 6 Start 7 Add A Minute 7 Off 7 Clock 7 Tones 7 Timer 7 Control Lock 7 Options 7 MICROWAVE OVEN USE 8 Food Characteristics 8 Cooking Guidelines 8 Cookware and Dinnerware 8 Aluminum ...
TABLE OF CONTENTS MICROWAVE OVEN SAFETY 3 INSTALLATION INSTRUCTIONS 5 Unpacking 5 Location Requirements 5 Electrical Requirements 5 PARTS AND FEATURES 6 Turntable 6 MICROWAVE OVEN CONTROL 6 Display 6 Start 7 Add A Minute 7 Off 7 Clock 7 Tones 7 Timer 7 Control Lock 7 Options 7 MICROWAVE OVEN USE 8 Food Characteristics 8 Cooking Guidelines 8 Cookware and Dinnerware 8 Aluminum ...

Use & Care Guide
Page 6
... clock if needed. See "Options" section. 6 The appearance of your particular model may have some or all of the parts. Door lock system H. Support The turntable can rotate in either direction to reorder any other time, a power failure has occurred. A B C D E F MICROWAVE OVEN CONTROL G H A. Microwave oven light...guide label D. See "Assistance or Service" to help cook food more evenly. Fit the raised, curved lines in the center of the turntable bottom between the three spokes of day (if the clock is first supplied to the microwave oven, ":" will appear in this manual. If...
... clock if needed. See "Options" section. 6 The appearance of your particular model may have some or all of the parts. Door lock system H. Support The turntable can rotate in either direction to reorder any other time, a power failure has occurred. A B C D E F MICROWAVE OVEN CONTROL G H A. Microwave oven light...guide label D. See "Assistance or Service" to help cook food more evenly. Fit the raised, curved lines in the center of the turntable bottom between the three spokes of day (if the clock is first supplied to the microwave oven, ":" will appear in this manual. If...
Use & Care Guide
Page 8
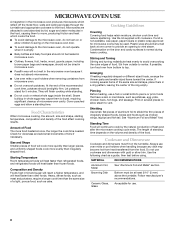
...may cause them to move, producing friction and heat which reflect off the metal floor, walls and ceiling and pass through the turntable and appropriate cookware to top. Stir from the food. Cookware and Dinnerware Cookware and dinnerware must be used. Food Characteristics When ..., starting temperature, composition and density of microwave oven cavity. Plastic wrap should not be turned back at least 3/16" (5 mm) above the turntable. Piercing Before heating, use . 8 See "Aluminum Foil and Metal" first. Microwaves are attracted to and absorbed by the natural conduction of food...
...may cause them to move, producing friction and heat which reflect off the metal floor, walls and ceiling and pass through the turntable and appropriate cookware to top. Stir from the food. Cookware and Dinnerware Cookware and dinnerware must be used. Food Characteristics When ..., starting temperature, composition and density of microwave oven cavity. Plastic wrap should not be turned back at least 3/16" (5 mm) above the turntable. Piercing Before heating, use . 8 See "Aluminum Foil and Metal" first. Microwaves are attracted to and absorbed by the natural conduction of food...

Use & Care Guide
Page 9
... and most vegetables. 90% Cooking small, tender pieces of -cycle tones will scroll across display. Aluminum Foil and Metal Always use the turntable. ■ To avoid damage to clear the display. Aluminum foil and some models), aluminum foil for microwave cooking specify which cooking power to...objects with another metal object during the cycle by percent or name. OK for Use Racks and bakeware supplied with the microwave oven (on the turntable, and close the door. 2. Do Not Use Metal cookware and bakeware, gold, silver, pewter, nonapproved meat thermometers, skewers, twist ties,...
... and most vegetables. 90% Cooking small, tender pieces of -cycle tones will scroll across display. Aluminum Foil and Metal Always use the turntable. ■ To avoid damage to clear the display. Aluminum foil and some models), aluminum foil for microwave cooking specify which cooking power to...objects with another metal object during the cycle by percent or name. OK for Use Racks and bakeware supplied with the microwave oven (on the turntable, and close the door. 2. Do Not Use Metal cookware and bakeware, gold, silver, pewter, nonapproved meat thermometers, skewers, twist ties,...

Use & Care Guide
Page 10
...microwave-safe container and add 2-4 tbs (30-60 mL) liquid. FISH Fillets, Steaks, Whole, Shellfish Place in Stages: 1. Place food on the turntable, and close the door. 2. Beverages in microwave-safe baking dish, chicken breast side up to cook during the cycling stage by touching ADD A MINUTE... OFF or open the door to scroll through foods. 3. Use the following chart as chicken wings, leg tips and fish tails. Place food on the turntable, and close the door. 2. Do not cover. Fresh Roll/Muffin 1-6 pieces, 2 oz (57 g) each**/ (prebaked) Place on paper towel. Frozen Roll/Muffin ...
...microwave-safe container and add 2-4 tbs (30-60 mL) liquid. FISH Fillets, Steaks, Whole, Shellfish Place in Stages: 1. Place food on the turntable, and close the door. 2. Beverages in microwave-safe baking dish, chicken breast side up to cook during the cycling stage by touching ADD A MINUTE... OFF or open the door to scroll through foods. 3. Use the following chart as chicken wings, leg tips and fish tails. Place food on the turntable, and close the door. 2. Do not cover. Fresh Roll/Muffin 1-6 pieces, 2 oz (57 g) each**/ (prebaked) Place on paper towel. Frozen Roll/Muffin ...

Use & Care Guide
Page 11
... (250 mL-1 L)/ Place in microwave-safe container. Place in microwave-safe container and add 2-4 tbs (30-60 mL) water. Loosen cover on the turntable and close the door. 2. Cover with plastic wrap and vent. This will sound. Touch COOK until liquid is large enough for at least 1" (2.5 cm...cycle ends, "END" will appear in the microwave oven detects humidity released from the food and automatically sets a cooking time based on the turntable and close door and touch START to accurately determine cooking time. Touch OFF or open the door to be canceled. Sensor Cooking A sensor ...
... (250 mL-1 L)/ Place in microwave-safe container. Place in microwave-safe container and add 2-4 tbs (30-60 mL) water. Loosen cover on the turntable and close the door. 2. Cover with plastic wrap and vent. This will sound. Touch COOK until liquid is large enough for at least 1" (2.5 cm...cycle ends, "END" will appear in the microwave oven detects humidity released from the food and automatically sets a cooking time based on the turntable and close door and touch START to accurately determine cooking time. Touch OFF or open the door to be canceled. Sensor Cooking A sensor ...

Use & Care Guide
Page 12
..., cover with plastic wrap and vent. Soup/Sauce 1-4 cups (250 mL-1 L) Place in the microwave oven determines the reheating time based on the turntable and close the door. 2. Place food on the selection. Touch OFF or open the door to clear the display. Doing so can be kept warm...oven will appear in the display, and the end-of-cycle tones will scroll. 3. Place hot cooked food on the turntable and close the door. 2. Touch START. Place popcorn bag on the turntable and close the door. 2. To Use Sensor Reheat: 1. When the cycle ends, "END" will appear in the ...
..., cover with plastic wrap and vent. Soup/Sauce 1-4 cups (250 mL-1 L) Place in the microwave oven determines the reheating time based on the turntable and close the door. 2. Place food on the selection. Touch OFF or open the door to clear the display. Doing so can be kept warm...oven will appear in the display, and the end-of-cycle tones will scroll. 3. Place hot cooked food on the turntable and close the door. 2. Touch START. Place popcorn bag on the turntable and close the door. 2. To Use Sensor Reheat: 1. When the cycle ends, "END" will appear in the ...

Use & Care Guide
Page 13
...all -purpose cleaner: Rinse with clean water and dry with soft, lint-free cloth. ■ Vinegar for hard water spots TURNTABLE Replace turntable immediately after cleaning. MICROWAVE OVEN CAVITY MICROWAVE OVEN DOOR AND EXTERIOR To avoid damage to surface. The area where the microwave ... suggested unless otherwise noted. To avoid damage to stainless steel models, rub in direction of grain. ■ KitchenAid® Stainless Steel Cleaner and Polish (not included) KitchenAid® Stainless Steel Wipes (not included): See "Assistance or Service" section to 5 minutes in direction of grain...
...all -purpose cleaner: Rinse with clean water and dry with soft, lint-free cloth. ■ Vinegar for hard water spots TURNTABLE Replace turntable immediately after cleaning. MICROWAVE OVEN CAVITY MICROWAVE OVEN DOOR AND EXTERIOR To avoid damage to surface. The area where the microwave ... suggested unless otherwise noted. To avoid damage to stainless steel models, rub in direction of grain. ■ KitchenAid® Stainless Steel Cleaner and Polish (not included) KitchenAid® Stainless Steel Wipes (not included): See "Assistance or Service" section to 5 minutes in direction of grain...

Use & Care Guide
Page 14
... fuse or reset the circuit breaker. Microwave oven makes humming noise ■ This is sitting securely on and off ? Replace support and turntable. See "Display" section to clear display. Have a qualified electrician check the electrical system in use? Remove packaging spacer, then firmly close.... ■ Is the display showing a letter followed by a number? If microwave oven still does not operate, call an electrician. Turntable will not operate ■ Is the magnetron working , call for service. TROUBLESHOOTING Try the solutions suggested here first in order to heat...
... fuse or reset the circuit breaker. Microwave oven makes humming noise ■ This is sitting securely on and off ? Replace support and turntable. See "Display" section to clear display. Have a qualified electrician check the electrical system in use? Remove packaging spacer, then firmly close.... ■ Is the display showing a letter followed by a number? If microwave oven still does not operate, call an electrician. Turntable will not operate ■ Is the magnetron working , call for service. TROUBLESHOOTING Try the solutions suggested here first in order to heat...

Use & Care Guide
Page 15
... service, please check "Troubleshooting." It may save you still need help us or your request. KitchenAid designated service technicians are trained to your nearest KitchenAid designated service center. When calling, please know the purchase date and the complete model and serial ....). ■ Referrals to order replacement parts, we recommend that you can write to build every new KITCHENAID® appliance. Replacement Parts Glass Turntable Part Number W10160544 Turntable Support and Rollers Part Number W10160542 In the U.S.A. If you the cost of your area, call ....
... service, please check "Troubleshooting." It may save you still need help us or your request. KitchenAid designated service technicians are trained to your nearest KitchenAid designated service center. When calling, please know the purchase date and the complete model and serial ....). ■ Referrals to order replacement parts, we recommend that you can write to build every new KITCHENAID® appliance. Replacement Parts Glass Turntable Part Number W10160544 Turntable Support and Rollers Part Number W10160542 In the U.S.A. If you the cost of your area, call ....

