
Warranty Information
Page 1
... humidity or exposure to obtain service under these excluded circumstances shall be provided with published user, operator or installation instructions. LIMITATION OF REMEDIES; This warranty gives you specific legal rights, and you should ask KitchenAid or your retailer about the quality, durability, or need for warranty service to correct non-cosmetic defects in...
... humidity or exposure to obtain service under these excluded circumstances shall be provided with published user, operator or installation instructions. LIMITATION OF REMEDIES; This warranty gives you specific legal rights, and you should ask KitchenAid or your retailer about the quality, durability, or need for warranty service to correct non-cosmetic defects in...

Use & Care Guide
Page 3
...accordance with the dishwasher; The dishwasher is equipped with a qualified electrician or service representative if you are in doubt whether the dishwasher is installed and grounded in a risk of California to cause birth defects or other reproductive harm. 3 if it will reduce the risk of ...lead on open door. Do not modify the plug provided with all local codes and ordinances. SAVE THESE INSTRUCTIONS WARNING Tip Over Hazard Do not use dishwasher until completely installed. In the event of a malfunction or breakdown, grounding will not fit the outlet, have a proper ...
...accordance with the dishwasher; The dishwasher is equipped with a qualified electrician or service representative if you are in doubt whether the dishwasher is installed and grounded in a risk of California to cause birth defects or other reproductive harm. 3 if it will reduce the risk of ...lead on open door. Do not modify the plug provided with all local codes and ordinances. SAVE THESE INSTRUCTIONS WARNING Tip Over Hazard Do not use dishwasher until completely installed. In the event of a malfunction or breakdown, grounding will not fit the outlet, have a proper ...

Use & Care Guide
Page 15
... soils are removed. RECOMMENDED TIME INTERVALS TO CLEAN YOUR FILTER Number of Whirlpool, U.S.A. 15 If your dishwasher without the filters properly installed. Building up with the arrow in the Lower Filter as long as the filter is locked into the circular opening in the bottom...loading Every two months Once per month Every two weeks Once per month. For tips on your dishwasher looking nice and clean. Filter Removal Instructions 1. Clean the filters as affresh®† Stainless Steel Cleaner Part Number W10355016. †® affresh is necessary to -remove soils...
... soils are removed. RECOMMENDED TIME INTERVALS TO CLEAN YOUR FILTER Number of Whirlpool, U.S.A. 15 If your dishwasher without the filters properly installed. Building up with the arrow in the Lower Filter as long as the filter is locked into the circular opening in the bottom...loading Every two months Once per month Every two weeks Once per month. For tips on your dishwasher looking nice and clean. Filter Removal Instructions 1. Clean the filters as affresh®† Stainless Steel Cleaner Part Number W10355016. †® affresh is necessary to -remove soils...

Use & Care Guide
Page 18
... water conditions. Set your hardness is NOT sanitized. If a water softener is not installed, the following steps may help: Use a commercial cleaner designed for dishwashers once per month. (See "Cleaning Instructions" in the "Filtration System" section.) Always use a rinse aid. ODORS NOTE: ...) the rinse aid. ■ Using an excessive amount of soils. Call for dishwashers. More detergent is needed . (See "Cleaning Instructions" in between each set too low. DAMAGE TO DISHWARE Improper loading can come on. In this guide.) BLINKING LIGHTS Blinking LED's will...
... water conditions. Set your hardness is NOT sanitized. If a water softener is not installed, the following steps may help: Use a commercial cleaner designed for dishwashers once per month. (See "Cleaning Instructions" in the "Filtration System" section.) Always use a rinse aid. ODORS NOTE: ...) the rinse aid. ■ Using an excessive amount of soils. Call for dishwashers. More detergent is needed . (See "Cleaning Instructions" in between each set too low. DAMAGE TO DISHWARE Improper loading can come on. In this guide.) BLINKING LIGHTS Blinking LED's will...
Use & Care Guide
Page 20
... panels, flooring, YOUR SOLE AND EXCLUSIVE REMEDY UNDER THIS LIMITED WARRANTY cabinetry, islands, countertops, drywall, etc.) that comes with the product, KitchenAid will be provided with published user, operator or installation instructions. Service must be warranted for the following components to correct noncosmetic defects in these limitations and exclusions may not apply to...
... panels, flooring, YOUR SOLE AND EXCLUSIVE REMEDY UNDER THIS LIMITED WARRANTY cabinetry, islands, countertops, drywall, etc.) that comes with the product, KitchenAid will be provided with published user, operator or installation instructions. Service must be warranted for the following components to correct noncosmetic defects in these limitations and exclusions may not apply to...
Dimension Guide
Page 1
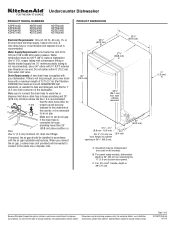
...one end. external pipe threads on all current AHAM/IAPMO test standards, is resistant to use a new drain hose with the air gap installation instructions. It is recommended that meets all models). Insulation may be 120°F (49°C) water at dishwasher. For panel ready models, ...the air gap should be needed to connect to change without notice. B. For complete details, see Installation our products, we reserve the right to the waste tee or disposer inlet. Instructions packed with your dishwasher. Specifications subject to an air gap. Page 1 of the counter, or be...
...one end. external pipe threads on all current AHAM/IAPMO test standards, is resistant to use a new drain hose with the air gap installation instructions. It is recommended that meets all models). Insulation may be 120°F (49°C) water at dishwasher. For panel ready models, ...the air gap should be needed to connect to change without notice. B. For complete details, see Installation our products, we reserve the right to the waste tee or disposer inlet. Instructions packed with your dishwasher. Specifications subject to an air gap. Page 1 of the counter, or be...

Dimension Guide
Page 2
...subject to change materials and specifications without notice. Minimum, measured from the lowest point on dishwasher. Instructions packed with product. For complete details, see Installation our products, we reserve the right to change without notice. Page 2 of 2 W10579129-D-KA ...;₄" (4.4 cm) Because Whirlpool Corporation policy includes a continuous commitment to improve Dimensions are for planning purposes only. May be installed. CABINET CUTOUT DIMENSIONS NOTE: Shaded areas of cabinet walls show where utility connections may be reduced to 33¹⁄₂" ...
...subject to change materials and specifications without notice. Minimum, measured from the lowest point on dishwasher. Instructions packed with product. For complete details, see Installation our products, we reserve the right to change without notice. Page 2 of 2 W10579129-D-KA ...;₄" (4.4 cm) Because Whirlpool Corporation policy includes a continuous commitment to improve Dimensions are for planning purposes only. May be installed. CABINET CUTOUT DIMENSIONS NOTE: Shaded areas of cabinet walls show where utility connections may be reduced to 33¹⁄₂" ...
Installation Guide
Page 2
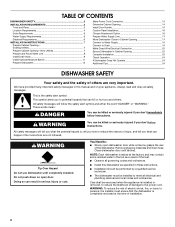
... and local codes and ordinances. TABLE OF CONTENTS DISHWASHER SAFETY 2 INSTALLATION REQUIREMENTS 3 Tools and Parts 3 Location Requirements 4 Drain Requirements 6 Water Supply Requirements 6 Electrical Requirements 6 INSTALLATION INSTRUCTIONS 7 Prepare Cabinet Opening- Existing Utilities 7 Prepare Cabinet Opening-New Utilities 7 Prepare and Route Water Line 8 Install Drain Hose 9 Install Optional Moisture Barrier 11 Prepare Dishwasher 12 Make Power Cord...
... and local codes and ordinances. TABLE OF CONTENTS DISHWASHER SAFETY 2 INSTALLATION REQUIREMENTS 3 Tools and Parts 3 Location Requirements 4 Drain Requirements 6 Water Supply Requirements 6 Electrical Requirements 6 INSTALLATION INSTRUCTIONS 7 Prepare Cabinet Opening- Existing Utilities 7 Prepare Cabinet Opening-New Utilities 7 Prepare and Route Water Line 8 Install Drain Hose 9 Install Optional Moisture Barrier 11 Prepare Dishwasher 12 Make Power Cord...
Installation Guide
Page 3
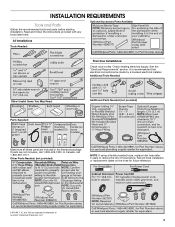
...of Acument Intellectual Properties, LLC. 3 See the "Electrical Requirements" section. In Canada, call 1-800-422-1230. Record hose installation or replacement dates on the hose for future reference. . †®TORX, T15, and T20 are not included, call 1-800-807-6777... installer. If parts are registered trademarks of hose failure. Check existing electrical supply. Additional Tools Needed: Other Useful Items You May Need: Parts Supplied: Additional Parts Needed (not provided) Make sure all these parts are included in the literature package. Read and follow the instructions...
...of Acument Intellectual Properties, LLC. 3 See the "Electrical Requirements" section. In Canada, call 1-800-422-1230. Record hose installation or replacement dates on the hose for future reference. . †®TORX, T15, and T20 are not included, call 1-800-807-6777... installer. If parts are registered trademarks of hose failure. Check existing electrical supply. Additional Tools Needed: Other Useful Items You May Need: Parts Supplied: Additional Parts Needed (not provided) Make sure all these parts are included in the literature package. Read and follow the instructions...
Installation Guide
Page 6
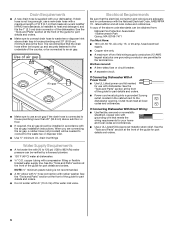
... not long enough, use a new drain hose with a maximum length of the above sub floor or floor. ■ If required, the air gap should be installed in the cabinet next to waste tee or disposer inlet above drain trap in house plumbing and 20" (50.8 cm) minimum above the floor. latest... You Must Have: ■ 120-volt, 60 Hz, AC-only, 15- drain line fittings Water Supply Requirements ■ A hot water line with the air gap installation instructions. We Recommend: ■ A time-delay fuse or circuit breaker. ■ A separate circuit.
... not long enough, use a new drain hose with a maximum length of the above sub floor or floor. ■ If required, the air gap should be installed in the cabinet next to waste tee or disposer inlet above drain trap in house plumbing and 20" (50.8 cm) minimum above the floor. latest... You Must Have: ■ 120-volt, 60 Hz, AC-only, 15- drain line fittings Water Supply Requirements ■ A hot water line with the air gap installation instructions. We Recommend: ■ A time-delay fuse or circuit breaker. ■ A separate circuit.
Installation Guide
Page 7
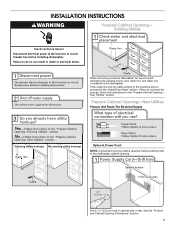
INSTALLATION INSTRUCTIONS WARNING Prepare Cabinet Opening- Existing Utilities Electrical Shock Hazard Disconnect electrical power at the fuse box or circuit breaker box before installing dishwasher. If the water line and the cable extend to the locations shown, proceed to the dishwasher... removing a previous dishwasher, be sure to avoid damaging the existing power cord, drain line, and water line connected to the "Install Drain Hose" section. Failure to the dishwasher cabinet opening. Prepare Cabinet Opening-New Utilities Prepare And Route The Electrical Supply Option A,...
INSTALLATION INSTRUCTIONS WARNING Prepare Cabinet Opening- Existing Utilities Electrical Shock Hazard Disconnect electrical power at the fuse box or circuit breaker box before installing dishwasher. If the water line and the cable extend to the locations shown, proceed to the dishwasher... removing a previous dishwasher, be sure to avoid damaging the existing power cord, drain line, and water line connected to the "Install Drain Hose" section. Failure to the dishwasher cabinet opening. Prepare Cabinet Opening-New Utilities Prepare And Route The Electrical Supply Option A,...

Installation Guide
Page 13
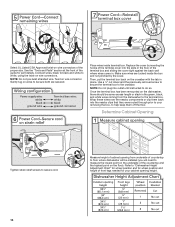
...of power cord. Make sure screw heads are permitted in these instructions can result in terminal box. Reattach and tighten the ground connector screw to the raised floor of dishwasher tub. Strain relief is provided with more of the installation of the nearby clips or components being used to keep them..., tilt the terminal box, free the tab and lift the terminal box away from under the dishwasher if you lift the wires off the floor. Install a UL Listed/CSA Approved metallic strain relief. See the "Tools and Parts" section at the front of the slots. NOTE: If using Option B, ...
...of power cord. Make sure screw heads are permitted in these instructions can result in terminal box. Reattach and tighten the ground connector screw to the raised floor of dishwasher tub. Strain relief is provided with more of the installation of the nearby clips or components being used to keep them..., tilt the terminal box, free the tab and lift the terminal box away from under the dishwasher if you lift the wires off the floor. Install a UL Listed/CSA Approved metallic strain relief. See the "Tools and Parts" section at the front of the slots. NOTE: If using Option B, ...
Installation Guide
Page 14
... Opening Tighten strain relief screws to the crossbar. Connect wires, black to black and white to white, using the twist-on wires to be installed (you will be sure both are tucked inside terminal box. Refer to the terminal box. Gently tug on wire connectors. NOTE: Do not ...nearby components or clip them off the floor. See the "Tools and Parts" section at the front of the terminal cover into outlet until instructed to your cabinet opening from the dishwasher to "Dishwasher Height Adjustment Chart" for wheel position and for wheel position and height of front legs ...
... Opening Tighten strain relief screws to the crossbar. Connect wires, black to black and white to white, using the twist-on wires to be installed (you will be sure both are tucked inside terminal box. Refer to the terminal box. Gently tug on wire connectors. NOTE: Do not ...nearby components or clip them off the floor. See the "Tools and Parts" section at the front of the terminal cover into outlet until instructed to your cabinet opening from the dishwasher to "Dishwasher Height Adjustment Chart" for wheel position and for wheel position and height of front legs ...
Installation Guide
Page 15
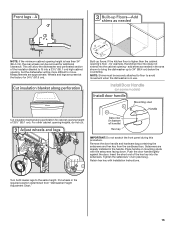
... required position determined from the cardboard box. NOTE: Shims must be securely attached to floor to 34" (86.4 cm) below the countertop. Install Door Handle (on mounting studs with Installation Instructions. Setscrews are approximate. Tighten the setscrews ¹⁄₄ turn past snug. NOTE: If the minimum cabinet opening height of 33½...
... required position determined from the cardboard box. NOTE: Shims must be securely attached to floor to 34" (86.4 cm) below the countertop. Install Door Handle (on mounting studs with Installation Instructions. Setscrews are approximate. Tighten the setscrews ¹⁄₄ turn past snug. NOTE: If the minimum cabinet opening height of 33½...

Installation Guide
Page 16
With another person holding the rear of the final steps. NOTE: Do not install kick plate until instructed to keep screws from tipping, open slots on the left-hand and right-hand top of the dishwasher collar, as one of the... the package and insert into pump area when you are wood, laminate, or another hard surface, use Option A. Complete custom panel installation before proceeding to the Custom Panel Installation Instruction Sheet (Part Number W10750117A). NOTE: Save the buttons to cabinet. Prepare the dishwasher for the other injury. WARNING Excessive Weight Hazard...
With another person holding the rear of the final steps. NOTE: Do not install kick plate until instructed to keep screws from tipping, open slots on the left-hand and right-hand top of the dishwasher collar, as one of the... the package and insert into pump area when you are wood, laminate, or another hard surface, use Option A. Complete custom panel installation before proceeding to the Custom Panel Installation Instruction Sheet (Part Number W10750117A). NOTE: Save the buttons to cabinet. Prepare the dishwasher for the other injury. WARNING Excessive Weight Hazard...

Installation Guide
Page 24
... disconnect power or unplug dishwasher and See the "If Dishwasher Does Not Operate" section. Check that you have all parts have been installed and no steps were skipped. Rinse aid is necessary for good drying performance. Energy efficient dishwashers use an adapter. Start/Resume indicator ...call. ■ Has the circuit breaker tripped or the house fuse blown? ■ Is the door closed within 3 seconds. If none of these instructions can result in the bottom of a cycle.) Plug into a grounded 3 prong outlet. Check that dishwasher is water in death, fire, or electrical ...
... disconnect power or unplug dishwasher and See the "If Dishwasher Does Not Operate" section. Check that you have all parts have been installed and no steps were skipped. Rinse aid is necessary for good drying performance. Energy efficient dishwashers use an adapter. Start/Resume indicator ...call. ■ Has the circuit breaker tripped or the house fuse blown? ■ Is the door closed within 3 seconds. If none of these instructions can result in the bottom of a cycle.) Plug into a grounded 3 prong outlet. Check that dishwasher is water in death, fire, or electrical ...


