
Dimension Guide
Page 1
... be made to change without consulting the serving gas supplier. 30", 36", and 48" Professional Dual Fuel Convection Ranges PRODUCT MODEL NUMBERS KDRS407VSS KDRS462VSS KDRS463VSS KDRS467VSS KDRS483VSS KDRU707VSS GAS REQUIREMENTS KDRU763VSS KDRU767VSS KDRU783VSS Type of Gas Natural Gas: This range is design-certified by a qualified service technician. Usually, LP gas suppliers determine the size and materials used . For...
... be made to change without consulting the serving gas supplier. 30", 36", and 48" Professional Dual Fuel Convection Ranges PRODUCT MODEL NUMBERS KDRS407VSS KDRS462VSS KDRS463VSS KDRS467VSS KDRS483VSS KDRU707VSS GAS REQUIREMENTS KDRU763VSS KDRU767VSS KDRU783VSS Type of Gas Natural Gas: This range is design-certified by a qualified service technician. Usually, LP gas suppliers determine the size and materials used . For...
Dimension Guide
Page 2
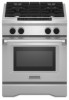
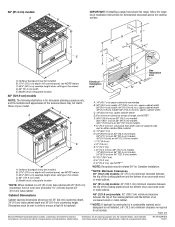
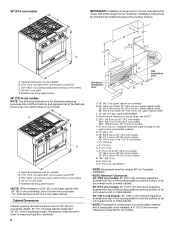
.... *NOTE: When installed in order to ensure a flush fit to improve Dimensions are for dimensional clearances above the range, follow the range hood installation instructions for 25" (64 cm) countertop depth, 24" (61 cm) base cabinet depth and 36..." (91.4 cm) countertop height. W10349767A 1/04/11 Dimensions must be met in a 24" (61.0 cm) base cabinet with product. C D ** B C E D O*** F A F H I J Electrical installation K area* E I G L N M J Gas...
.... *NOTE: When installed in order to ensure a flush fit to improve Dimensions are for dimensional clearances above the range, follow the range hood installation instructions for 25" (64 cm) countertop depth, 24" (61 cm) base cabinet depth and 36..." (91.4 cm) countertop height. W10349767A 1/04/11 Dimensions must be met in a 24" (61.0 cm) base cabinet with product. C D ** B C E D O*** F A F H I J Electrical installation K area* E I G L N M J Gas...

Installation Guide
Page 3
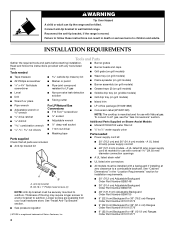
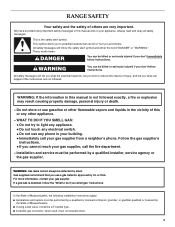
... injury or death. - All safety messages will tell you what can be killed or seriously injured if you cannot reach your gas supplier, call your gas supplier. Always read and obey all safety messages. This symbol alerts you to reduce the chance of injury, and tell you smell... the State of Massachusetts. ■ If using a ball valve, it shall be a T-handle type. ■ A flexible gas connector, when used, must be detected by UL or CSA. RANGE SAFETY Your safety and the safety of others . WARNING You can happen if the instructions are very important. All safety...
... injury or death. - All safety messages will tell you what can be killed or seriously injured if you cannot reach your gas supplier, call your gas supplier. Always read and obey all safety messages. This symbol alerts you to reduce the chance of injury, and tell you smell... the State of Massachusetts. ■ If using a ball valve, it shall be a T-handle type. ■ A flexible gas connector, when used, must be detected by UL or CSA. RANGE SAFETY Your safety and the safety of others . WARNING You can happen if the instructions are very important. All safety...
Installation Guide
Page 4
... manufactured for 36" (91.4 cm) Ranges Order Part Number W10115776 †®TORX is a registered trademark of flooring may require longer screws to anchor bracket to a combustible backwall. See "Install Anti-Tip Bracket" section. ■ Gas pressure regulator ■ 48" (121.9 cm) Adjustable ...Backguard Order Part Number 8284755 ■ 9" (22.9 cm) Backguard for 30" (76.2 cm) Ranges Order Part Number W10115773 ■ 9" (22.9 cm) Backguard for use...
... manufactured for 36" (91.4 cm) Ranges Order Part Number W10115776 †®TORX is a registered trademark of flooring may require longer screws to anchor bracket to a combustible backwall. See "Install Anti-Tip Bracket" section. ■ Gas pressure regulator ■ 48" (121.9 cm) Adjustable ...Backguard Order Part Number 8284755 ■ 9" (22.9 cm) Backguard for 30" (76.2 cm) Ranges Order Part Number W10115773 ■ 9" (22.9 cm) Backguard for use...

Installation Guide
Page 5
...codes. LP high altitude ■ Part Number W10160841 - See "Electrical Requirements" section. ■ Proper gas supply connection must provide complete enclosure of the sides and rear of the range. ■ To eliminate the risk of combustion and ventilation air. ■ It is the installer's ... be installed above the range. ■ It is located on Steam-Assist Models ■ Tubing staples/retainers ■ ¼" O.D. When such standard is not applicable, use the Standard for type of the Use and Care Guide. Natural gas high altitude To order, see NOTE* C. 35&#...
...codes. LP high altitude ■ Part Number W10160841 - See "Electrical Requirements" section. ■ Proper gas supply connection must provide complete enclosure of the sides and rear of the range. ■ To eliminate the risk of combustion and ventilation air. ■ It is the installer's ... be installed above the range. ■ It is located on Steam-Assist Models ■ Tubing staples/retainers ■ ¼" O.D. When such standard is not applicable, use the Standard for type of the Use and Care Guide. Natural gas high altitude To order, see NOTE* C. 35&#...
Installation Guide
Page 6
... clearance is for all models. Optional backguard may be met in a 24" (61.0 cm) base cabinet with 25" (63.5 cm) countertop; front of range to countertop B. 30" (76.2 cm) model: 30" (76.2 cm) min. Dimensions must be rotated 90° for Canadian installation. **NOTE: Minimum ....7 cm) N. 6" (15.2 cm) O. 6" (15.2 cm), see NOTE* C. 35¾" (90.2 cm) cooktop height when setting on 48" (121.9 cm) models I G L N M J Gas installation area A. 18" (45.7 cm) upper cabinet to side wall or other combustible material G. 15" (38.1 cm) H. 22" (55.9 cm) on 30" (76.2 cm) models...
... clearance is for all models. Optional backguard may be met in a 24" (61.0 cm) base cabinet with 25" (63.5 cm) countertop; front of range to countertop B. 30" (76.2 cm) model: 30" (76.2 cm) min. Dimensions must be rotated 90° for Canadian installation. **NOTE: Minimum ....7 cm) N. 6" (15.2 cm) O. 6" (15.2 cm), see NOTE* C. 35¾" (90.2 cm) cooktop height when setting on 48" (121.9 cm) models I G L N M J Gas installation area A. 18" (45.7 cm) upper cabinet to side wall or other combustible material G. 15" (38.1 cm) H. 22" (55.9 cm) on 30" (76.2 cm) models...
Installation Guide
Page 9
... or damage the flexible metal tubing when moving the range. B A C A. If connected to the range. IMPORTANT: Range cooktop must be connected to convert the range cooktop from the supply and fuel lines so range will be in line. Usually, LP gas suppliers determine the size and materials used . No ...that can result in the system. A smaller size pipe on the types of gas that resist the action of the inlet to the range opening and closing. Install a shut-off gas to LP gas, use with the range. ■ Must include a manual shutoff valve: The supply line must be ...
... or damage the flexible metal tubing when moving the range. B A C A. If connected to the range. IMPORTANT: Range cooktop must be connected to convert the range cooktop from the supply and fuel lines so range will be in line. Usually, LP gas suppliers determine the size and materials used . No ...that can result in the system. A smaller size pipe on the types of gas that resist the action of the inlet to the range opening and closing. Install a shut-off gas to LP gas, use with the range. ■ Must include a manual shutoff valve: The supply line must be ...

Installation Guide
Page 10
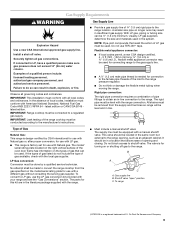
...each 1,000 ft (304.8 m). Failure to avoid damaging floor. 10 Remove these screws. Gas Pressure Regulator The gas pressure regulator supplied with this range must be reduced at a rate of 4% for each side of range. For elevations above 2,000 ft (609.6 m), ratings need to be used only for ...1" water column pressure above ½ psi gauge (14" WCP) The range and its individual manual shutoff valve during any pressure testing of the gas supply piping system at test pressures equal to release plate from range. Push down on the model/serial rating plate are not sure about 3" ...
...each 1,000 ft (304.8 m). Failure to avoid damaging floor. 10 Remove these screws. Gas Pressure Regulator The gas pressure regulator supplied with this range must be reduced at a rate of 4% for each side of range. For elevations above 2,000 ft (609.6 m), ratings need to be used only for ...1" water column pressure above ½ psi gauge (14" WCP) The range and its individual manual shutoff valve during any pressure testing of the gas supply piping system at test pressures equal to release plate from range. Push down on the model/serial rating plate are not sure about 3" ...
Installation Guide
Page 15
... other adapter to the adapters. Use pipe-joint compound. Use pipe-joint compound. Open valve 15 Range front 6. Check all gas connections. Assemble flexible connector from home water supply D. ¼" to do so can result in the gas supply line. Tighten both adapters. 4. H. B F C D A E A. Oven copper tubing F. NOTE: No flushing or conditioning of the...
... other adapter to the adapters. Use pipe-joint compound. Use pipe-joint compound. Open valve 15 Range front 6. Check all gas connections. Assemble flexible connector from home water supply D. ¼" to do so can result in the gas supply line. Tighten both adapters. 4. H. B F C D A E A. Oven copper tubing F. NOTE: No flushing or conditioning of the...

Installation Guide
Page 18
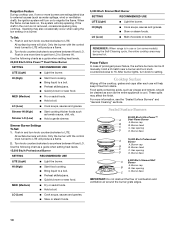
...8. NOTE: Make sure to LO and using a butane extension lighter, light the burner. 9. Unplug range or disconnect power. 2. Turn the control knob to leave oven door open " position. ■ Check that the gas shutoff valves are properly positioned on each control knob to OFF. A A. Lower (simmer) flame Single... of air in the side brackets properly once it drop forward into the notched console brackets on burner bases. Initial Lighting and Gas Flame Adjustments Cooktop burners use electronic igniters in place. This sparking continues until the flame is lit or the knob is turned ...
...8. NOTE: Make sure to LO and using a butane extension lighter, light the burner. 9. Unplug range or disconnect power. 2. Turn the control knob to leave oven door open " position. ■ Check that the gas shutoff valves are properly positioned on each control knob to OFF. A A. Lower (simmer) flame Single... of air in the side brackets properly once it drop forward into the notched console brackets on burner bases. Initial Lighting and Gas Flame Adjustments Cooktop burners use electronic igniters in place. This sparking continues until the flame is lit or the knob is turned ...

Installation Guide
Page 19
...need Assistance or Service: Please reference the "Assistance or Service" section of the range. Dispose of the range cooktop. Start a Bake cycle. See the Use and Care Guide for any other oven functions, refer to LP gas, the screw should be tightened down completely. or circuit breaker has not tripped.... ■ Electrical supply is flush with the mounting holes on right side of range cooktop 16. Use a ¹⁄₈" x 4¼" ...
...need Assistance or Service: Please reference the "Assistance or Service" section of the range. Dispose of the range cooktop. Start a Bake cycle. See the Use and Care Guide for any other oven functions, refer to LP gas, the screw should be tightened down completely. or circuit breaker has not tripped.... ■ Electrical supply is flush with the mounting holes on right side of range cooktop 16. Use a ¹⁄₈" x 4¼" ...

Installation Guide
Page 20
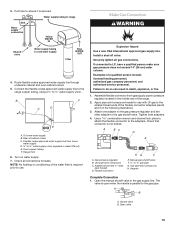
... be at least 1" water column pressure above the manifold pressure shown on the bottom. If connected to rear range foot. Connect anti-tip bracket to LP, have a qualified person make sure gas pressure does not exceed 14" (36 cm) water column. Remove spring retainer from the cap by a qualified... Turn the manual shutoff valve to locate the "NAT" or "LP" position. Unplug range or disconnect power. B 1. Look at ½ psi gauge (14" WCP) or lower The range must be isolated from the gas supply piping system during any pressure testing of that system at test pressures in death or...
... be at least 1" water column pressure above the manifold pressure shown on the bottom. If connected to rear range foot. Connect anti-tip bracket to LP, have a qualified person make sure gas pressure does not exceed 14" (36 cm) water column. Remove spring retainer from the cap by a qualified... Turn the manual shutoff valve to locate the "NAT" or "LP" position. Unplug range or disconnect power. B 1. Look at ½ psi gauge (14" WCP) or lower The range must be isolated from the gas supply piping system during any pressure testing of that system at test pressures in death or...

Installation Guide
Page 21
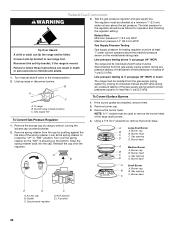
...driver while changing it. Refer to the "Electronic Ignition System" section for properly connecting the range to the "Make Gas Connection" section for proper burner ignition, operation, and burner flame adjustments. Burner cap B. Insert nut driver into... should have completed converting the grill, test the range for installation instructions. 7. 4. Size stamp 7. To Convert Grill Burner (on an approved noncorrosive leak-detection solution. Remove grill grate, wave plate, flame spreader and burner assembly. Burner base 5. Gas opening C C. A Large Dual Burner B ...
...driver while changing it. Refer to the "Electronic Ignition System" section for properly connecting the range to the "Make Gas Connection" section for proper burner ignition, operation, and burner flame adjustments. Burner cap B. Insert nut driver into... should have completed converting the grill, test the range for installation instructions. 7. 4. Size stamp 7. To Convert Grill Burner (on an approved noncorrosive leak-detection solution. Remove grill grate, wave plate, flame spreader and burner assembly. Burner base 5. Gas opening C C. A Large Dual Burner B ...
Installation Guide
Page 22
...1" (2.5 cm) water column above the set pressure. Burner base E D A. To range B. Line pressure testing at ½ psi gauge (14" WCP) or lower The range must be isolated from the gas supply piping system by closing its individual shutoff valve must be killed. If the burner... base. 1. Reinstall the cap onto the regulator. Burner head C C. Gas opening C C. Access cap B. Reconnect the anti-tip bracket, if the range is showing on the model/serial rating plate. Unplug range or disconnect power. Line pressure testing above the manifold pressure shown on the...
...1" (2.5 cm) water column above the set pressure. Burner base E D A. To range B. Line pressure testing at ½ psi gauge (14" WCP) or lower The range must be isolated from the gas supply piping system by closing its individual shutoff valve must be killed. If the burner... base. 1. Reinstall the cap onto the regulator. Burner head C C. Gas opening C C. Access cap B. Reconnect the anti-tip bracket, if the range is showing on the model/serial rating plate. Unplug range or disconnect power. Line pressure testing above the manifold pressure shown on the...
Installation Guide
Page 23
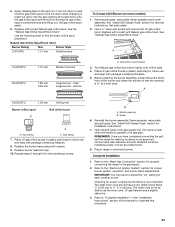
...Screw 6. The small inner cone should have completed converting the grill, test the range for future use and keep with package containing literature. 5. The outer cone is parallel to the "Make Gas Connection" section for proper burner ignition, operation, and burner flame adjustments. Set ... gas orifice spud aside. 6. Size stamp A. Place LP gas orifice spuds in range or reconnect power. Refer to complete this manual to "Complete Installation" in the gas supply line. See "Natural Gas Orifice Spud/Hood Chart." Turn Natural gas orifice hood down onto the gas ...
...Screw 6. The small inner cone should have completed converting the grill, test the range for future use and keep with package containing literature. 5. The outer cone is parallel to the "Make Gas Connection" section for proper burner ignition, operation, and burner flame adjustments. Set ... gas orifice spud aside. 6. Size stamp A. Place LP gas orifice spuds in range or reconnect power. Refer to complete this manual to "Complete Installation" in the gas supply line. See "Natural Gas Orifice Spud/Hood Chart." Turn Natural gas orifice hood down onto the gas ...
Use & Care Guide
Page 3
... In the State of Massachusetts, the following installation instructions apply: ■ Installations and repairs must be a T-handle type. ■ A flexible gas connector, when used, must be killed or seriously injured if you don't immediately follow the "What to potential hazards that you and others are not... contact your gas supplier, call your appliance. Installation and service must not exceed 3 feet. 3 WHAT TO DO IF YOU SMELL GAS: • Do not try to reduce the chance of injury, and tell you what the potential hazard is the safety alert symbol. RANGE SAFETY Your safety...
... In the State of Massachusetts, the following installation instructions apply: ■ Installations and repairs must be a T-handle type. ■ A flexible gas connector, when used, must be killed or seriously injured if you don't immediately follow the "What to potential hazards that you and others are not... contact your gas supplier, call your appliance. Installation and service must not exceed 3 feet. 3 WHAT TO DO IF YOU SMELL GAS: • Do not try to reduce the chance of injury, and tell you what the potential hazard is the safety alert symbol. RANGE SAFETY Your safety...
Use & Care Guide
Page 9
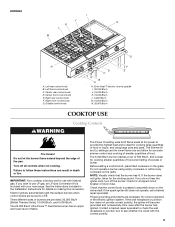
...a trained repair specialist. IMPORTANT: Your cooktop is ideal for a tripped circuit breaker or blown fuse. The Simmer Hi and Lo settings use LP gas, an LP Gas Conversion Kit is pressed completely down on the grate. The 5,000 Btu/h burner reaches a low of 500 Btu/h, and is wired with your new... range. If the burner does not ignite, listen for details on the grate. Left front control knob C. Right front control knob G. Failure to LITE....
...a trained repair specialist. IMPORTANT: Your cooktop is ideal for a tripped circuit breaker or blown fuse. The Simmer Hi and Lo settings use LP gas, an LP Gas Conversion Kit is pressed completely down on the grate. The 5,000 Btu/h burner reaches a low of 500 Btu/h, and is wired with your new... range. If the burner does not ignite, listen for details on the grate. Left front control knob C. Right front control knob G. Failure to LITE....
Use & Care Guide
Page 10
...knob counterclockwise to LITE. Cooktop Surface Wiping off the cooktop, grates and caps after each use will produce a flame. 2. These spills may become hot. Gas opening D D. Sparking may continue. HI (High) ■ Start food cooking. ■ Bring liquid to a boil. ■ Preheat skillets/pans... lights, turn knob counterclockwise to LITE. Sealed Surface Burners 20,000 Btu/h Ultra Power™ A Dual-Flame Burner A. REMEMBER: When range is in one or more burners are extinguished due to external causes (such as tomato sauce, chili, etc. ■ Hold a gentle...
...knob counterclockwise to LITE. Cooktop Surface Wiping off the cooktop, grates and caps after each use will produce a flame. 2. These spills may become hot. Gas opening D D. Sparking may continue. HI (High) ■ Start food cooking. ■ Bring liquid to a boil. ■ Preheat skillets/pans... lights, turn knob counterclockwise to LITE. Sealed Surface Burners 20,000 Btu/h Ultra Power™ A Dual-Flame Burner A. REMEMBER: When range is in one or more burners are extinguished due to external causes (such as tomato sauce, chili, etc. ■ Hold a gentle...
Use & Care Guide
Page 28
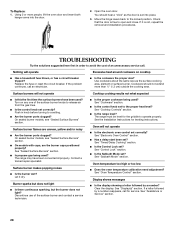
... Has a household fuse blown, or has a circuit breaker tripped? Contact a trained repair specialist. Let it is free to open and close. The range must be level for the griddle to the locked position. See "Electronic Oven Control" section. ■ Has a delay start been set ? Display ... On sealed burner models, see "Sealed Surface Burners" section. See "Sabbath Mode" section. To Replace: 1. Push in order to release air from the gas lines. ■ Is the control knob set to a setting. ■ Are the burner ports clogged? See "Cookware" section. ■ Is the...
... Has a household fuse blown, or has a circuit breaker tripped? Contact a trained repair specialist. Let it is free to open and close. The range must be level for the griddle to the locked position. See "Electronic Oven Control" section. ■ Has a delay start been set ? Display ... On sealed burner models, see "Sealed Surface Burners" section. See "Sabbath Mode" section. To Replace: 1. Push in order to release air from the gas lines. ■ Is the control knob set to a setting. ■ Are the burner ports clogged? See "Cookware" section. ■ Is the...

Use & Care Guide
Page 29
... KitchenAid® Stainless Steel Wipes Order Part Number 8212510 ■ Specialized customer assistance (Spanish speaking, hearing impaired, limited vision, etc.). ■ Referrals to higher position in your request. Cooktop Cleaner Order Part Number 31464 Cooktop Protectant Order Part Number 31463 Gas ...On 48" (121.9 cm) ranges, is self-cleaning, the other oven cannot be set ? See "Oven Temperature Calibration - These factory specified parts will fit right and work right because they are made with any questions or concerns at www.kitchenaid.com and click on "applianceaccessories...
... KitchenAid® Stainless Steel Wipes Order Part Number 8212510 ■ Specialized customer assistance (Spanish speaking, hearing impaired, limited vision, etc.). ■ Referrals to higher position in your request. Cooktop Cleaner Order Part Number 31464 Cooktop Protectant Order Part Number 31463 Gas ...On 48" (121.9 cm) ranges, is self-cleaning, the other oven cannot be set ? See "Oven Temperature Calibration - These factory specified parts will fit right and work right because they are made with any questions or concerns at www.kitchenaid.com and click on "applianceaccessories...


