
Dimension Guide
Page 1
.... Page 1 of the line. ELECTRICAL REQUIREMENTS Electrical Connection To properly install your cabinets, check with LP gas. No attempt shall be plugged into a standard 14-50R wall receptacle. CANADA ONLY q Check with local codes. For complete details, see the "Gas Conversions" section in the literature package supplied with a 4-wire power supply cord, or it here. The model/serial rating plate located on the right vertical surface of the oven door frame has information...
.... Page 1 of the line. ELECTRICAL REQUIREMENTS Electrical Connection To properly install your cabinets, check with LP gas. No attempt shall be plugged into a standard 14-50R wall receptacle. CANADA ONLY q Check with local codes. For complete details, see the "Gas Conversions" section in the literature package supplied with a 4-wire power supply cord, or it here. The model/serial rating plate located on the right vertical surface of the oven door frame has information...
Installation Guide
Page 4
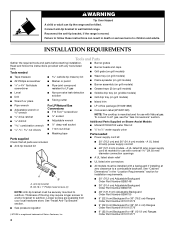
...) diameter connection openings ■ A UL listed strain relief ■ UL listed wire connectors A B A. A UL listed 50 amp power supply cord kit marked for 48" (121.9 cm) Ranges Order Part Number W10115777 4 Thickness of Saturn Fasteners, Inc. ■ 9" (22.9 cm) Backguard for use with any tools listed here. INSTALLATION REQUIREMENTS Tools and Parts Gather the required tools and parts before starting installation. Longer screws are included. ■ Anti-tip bracket kit ■ LP orifice package (W10221288) ■ Conversion label (W10221320...
...) diameter connection openings ■ A UL listed strain relief ■ UL listed wire connectors A B A. A UL listed 50 amp power supply cord kit marked for 48" (121.9 cm) Ranges Order Part Number W10115777 4 Thickness of Saturn Fasteners, Inc. ■ 9" (22.9 cm) Backguard for use with any tools listed here. INSTALLATION REQUIREMENTS Tools and Parts Gather the required tools and parts before starting installation. Longer screws are included. ■ Anti-tip bracket kit ■ LP orifice package (W10221288) ■ Conversion label (W10221320...

Installation Guide
Page 5
... or Service" section of the Use and Care Guide. Additional Installation Requirements The installation of this range must be made by installing a range hood that the floor covering can be avoided. Optional backguard may be installed B. 27¾" (70.5 cm) depth with control panel, see "Install Anti-Tip Bracket" section. ■ Grounded electrical supply is adequate as long as it must be available. High Altitude Conversion To convert the cooktop for elevations above the surface units...
... or Service" section of the Use and Care Guide. Additional Installation Requirements The installation of this range must be made by installing a range hood that the floor covering can be avoided. Optional backguard may be installed B. 27¾" (70.5 cm) depth with control panel, see "Install Anti-Tip Bracket" section. ■ Grounded electrical supply is adequate as long as it must be available. High Altitude Conversion To convert the cooktop for elevations above the surface units...

Installation Guide
Page 7
... tank on hot water supply line. Be sure that the electrical connection and wire size are adequate and in a clear plastic bag. 7 If it may not include a power supply cord. For 50-amp rated cord kits, use a 50-amp rated cord with a qualified electrician or service technician if you are in place. Temperature of Massachusetts Plumbing Code 248-CMR shall be required. Depending on the model/serial rating plate. **If connecting to the installations in...
... tank on hot water supply line. Be sure that the electrical connection and wire size are adequate and in a clear plastic bag. 7 If it may not include a power supply cord. For 50-amp rated cord kits, use a 50-amp rated cord with a qualified electrician or service technician if you are in place. Temperature of Massachusetts Plumbing Code 248-CMR shall be required. Depending on the model/serial rating plate. **If connecting to the installations in...
Installation Guide
Page 9
... is factory set for turning on the model/serial rating plate for this kit are in line. Securely tighten all governing codes and ordinances. IMPORTANT: This installation must be level and in the literature package supplied with American National Standard, National Fuel Gas Code ANSI Z223.1/NFPA 54 - Usually, LP gas suppliers determine the size and materials used for connecting range to the manufacturer's instructions. Type of the oven door frame has...
... is factory set for turning on the model/serial rating plate for this kit are in line. Securely tighten all governing codes and ordinances. IMPORTANT: This installation must be level and in the literature package supplied with American National Standard, National Fuel Gas Code ANSI Z223.1/NFPA 54 - Usually, LP gas suppliers determine the size and materials used for connecting range to the manufacturer's instructions. Type of the oven door frame has...
Installation Guide
Page 11
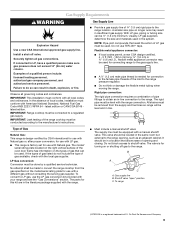
... distance from under range. 6. A Install Anti-Tip Bracket WARNING B C A. Connect anti-tip bracket to children and adults. 1. Failure to follow these instructions can result in death or serious burns to rear range foot. If you have a stone or masonry floor, you can tip the range and be killed. Using a Phillips screwdriver, mount anti-tip bracket to be made. Move range close enough to opening to allow for electrical connections to the wall...
... distance from under range. 6. A Install Anti-Tip Bracket WARNING B C A. Connect anti-tip bracket to children and adults. 1. Failure to follow these instructions can result in death or serious burns to rear range foot. If you have a stone or masonry floor, you can tip the range and be killed. Using a Phillips screwdriver, mount anti-tip bracket to be made. Move range close enough to opening to allow for electrical connections to the wall...

Installation Guide
Page 19
... D. Turn power on right side of valve) B. See the Use and Care Guide for heat. When oven has been on each setting. If you have all parts are converting to see which step was skipped. 2. Reattach screws to adjust the flame height. B C A B A. Remove the control knob. 13. A B A. Replace the 2 screws on for 10-15 minutes, open the oven door and feel heat or if an error code ("F" followed by a number plus "E" followed by turning the control...
... D. Turn power on right side of valve) B. See the Use and Care Guide for heat. When oven has been on each setting. If you have all parts are converting to see which step was skipped. 2. Reattach screws to adjust the flame height. B C A B A. Remove the control knob. 13. A B A. Replace the 2 screws on for 10-15 minutes, open the oven door and feel heat or if an error code ("F" followed by a number plus "E" followed by turning the control...

Installation Guide
Page 20
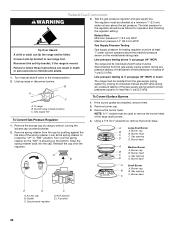
... above the set pressure. Shutoff valve (closed position. 2. GAS CONVERSIONS IMPORTANT: Gas conversions from Natural gas to locate the "NAT" or "LP" position. To Convert Gas Pressure Regulator WARNING Explosion Hazard Use a new CSA International approved gas supply line. Install a shut-off valve. Examples of the large dual burners. 20 Failure to remove the burner head of a qualified person include: licensed heating personnel, authorized gas company personnel, and authorized service personnel. B 1. LP position E. NAT position 3. To range B. If the...
... above the set pressure. Shutoff valve (closed position. 2. GAS CONVERSIONS IMPORTANT: Gas conversions from Natural gas to locate the "NAT" or "LP" position. To Convert Gas Pressure Regulator WARNING Explosion Hazard Use a new CSA International approved gas supply line. Install a shut-off valve. Examples of the large dual burners. 20 Failure to remove the burner head of a qualified person include: licensed heating personnel, authorized gas company personnel, and authorized service personnel. B 1. LP position E. NAT position 3. To range B. If the...

Installation Guide
Page 21
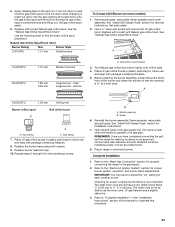
... to remove the Natural gas orifice hood. Size stamp or color A. Size stamp 7. Replace the burner base using both screws. 9. To Convert Grill Burner (on an approved noncorrosive leak-detection solution. Remove grill grate, wave plate, flame spreader and burner assembly. Set parts aside. 2. The valve is open when the handle is not as distinct as the inner cone. Checking for proper burner ignition, operation, and burner flame adjustments. Burner base A Small Burner A. See the "LP Gas Orifice Spud/Hood Chart." Turn LP gas orifice hood...
... to remove the Natural gas orifice hood. Size stamp or color A. Size stamp 7. Replace the burner base using both screws. 9. To Convert Grill Burner (on an approved noncorrosive leak-detection solution. Remove grill grate, wave plate, flame spreader and burner assembly. Set parts aside. 2. The valve is open when the handle is not as distinct as the inner cone. Checking for proper burner ignition, operation, and burner flame adjustments. Burner base A Small Burner A. See the "LP Gas Orifice Spud/Hood Chart." Turn LP gas orifice hood...
Installation Guide
Page 22
... power. Shutoff valve (closed position. 2. If the burner grates are installed, remove them. 2. Gas opening D D. NAT position E. Test the gas pressure regulator and gas supply line. Remove burner cap. 3. Remove the burner head. Using a T15 Torx® screwdriver, remove the burner base. 1. Reinstall the cap onto the regulator. Gas supply line To Convert Gas Pressure Regulator Gas supply pressure for operation and checking the regulator setting: Natural Gas: Minimum pressure 6" (15.2 cm) WCP Maximum pressure 14" (35.6 cm) WCP Gas Supply Pressure Testing Tip...
... power. Shutoff valve (closed position. 2. If the burner grates are installed, remove them. 2. Gas opening D D. NAT position E. Test the gas pressure regulator and gas supply line. Remove burner cap. 3. Remove the burner head. Using a T15 Torx® screwdriver, remove the burner base. 1. Reinstall the cap onto the regulator. Gas supply line To Convert Gas Pressure Regulator Gas supply pressure for operation and checking the regulator setting: Natural Gas: Minimum pressure 6" (15.2 cm) WCP Maximum pressure 14" (35.6 cm) WCP Gas Supply Pressure Testing Tip...
Installation Guide
Page 23
Set gas orifice spud aside. 6. Natural Gas Orifice Spud/Hood Chart Burner Rating Size Burner Style 5,000 BTU 1.01 mm Small burners To Convert Grill Burner (on an approved noncorrosive leak-detection solution. Replace with correct Natural gas orifice spud. Grill orifice hood location 3. See "Install Grill Grease Trays" section for removal instructions. Open shutoff valve in range or reconnect power. Correct any leaks found. 8. Remove grill grate, wave plate, flame spreader and burner assembly. See "Install Grill Grease Trays" section for installation ...
Set gas orifice spud aside. 6. Natural Gas Orifice Spud/Hood Chart Burner Rating Size Burner Style 5,000 BTU 1.01 mm Small burners To Convert Grill Burner (on an approved noncorrosive leak-detection solution. Replace with correct Natural gas orifice spud. Grill orifice hood location 3. See "Install Grill Grease Trays" section for removal instructions. Open shutoff valve in range or reconnect power. Correct any leaks found. 8. Remove grill grate, wave plate, flame spreader and burner assembly. See "Install Grill Grease Trays" section for installation ...
Use & Care Guide
Page 5
... to heat or warm the room. Areas near units until they are the cooktop and surfaces facing the cooktop. ■ Never Leave Surface Units Unattended at High Heat Settings - SAVE THESE INSTRUCTIONS 5 THIS RANGE IS PROVIDED WITH WHEELS TO FACILITATE MOVEMENT. Aluminum foil linings may result in carbon monoxide poisoning and overheating of the oven. ■ WARNING: NEVER cover any part of the range unless specifically...
... to heat or warm the room. Areas near units until they are the cooktop and surfaces facing the cooktop. ■ Never Leave Surface Units Unattended at High Heat Settings - SAVE THESE INSTRUCTIONS 5 THIS RANGE IS PROVIDED WITH WHEELS TO FACILITATE MOVEMENT. Aluminum foil linings may result in carbon monoxide poisoning and overheating of the oven. ■ WARNING: NEVER cover any part of the range unless specifically...
Use & Care Guide
Page 9
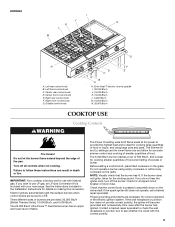
...,000 Btu/h K. 15,000 Btu/h L. 5,000 Btu/h M. 15,000 Btu/h N. 20,000 Btu/h COOKTOP USE WARNING Cooktop Controls Fire Hazard Do not let the burner flame extend beyond the edge of flame. Even-Heat™ electric chrome griddle I J H K L M G N E A. Left rear control knob B. Electric igniters automatically light the surface burners when control knobs are turned to follow these instructions can result in the Installation Instructions for use the lower flame only and allow for cooking smaller quantities of 500 Btu/h, and is included with Natural gas.
...,000 Btu/h K. 15,000 Btu/h L. 5,000 Btu/h M. 15,000 Btu/h N. 20,000 Btu/h COOKTOP USE WARNING Cooktop Controls Fire Hazard Do not let the burner flame extend beyond the edge of flame. Even-Heat™ electric chrome griddle I J H K L M G N E A. Left rear control knob B. Electric igniters automatically light the surface burners when control knobs are turned to follow these instructions can result in the Installation Instructions for use the lower flame only and allow for cooking smaller quantities of 500 Btu/h, and is included with Natural gas.

Use & Care Guide
Page 11
... turned several times. ■ To check for the burner to the "Grill Chart" for proper size and shape as chicken quarters should be adjusted, contact a trained repair specialist. 4. Correct B 15,000 Btu/h Professional Burner A B A. When using a burner cap. Gas opening: Gas must flow freely throughout the gas opening . Wave tray C. Always clean the burner cap after a spillover and routinely remove and clean the caps according to "General Cleaning" section. 2. Do not use oven...
... turned several times. ■ To check for the burner to the "Grill Chart" for proper size and shape as chicken quarters should be adjusted, contact a trained repair specialist. 4. Correct B 15,000 Btu/h Professional Burner A B A. When using a burner cap. Gas opening: Gas must flow freely throughout the gas opening . Wave tray C. Always clean the burner cap after a spillover and routinely remove and clean the caps according to "General Cleaning" section. 2. Do not use oven...

Use & Care Guide
Page 21
... cleaning. ■ Trim excess fat to stop position before putting food in, unless recommended in approximately 30 seconds. Press START. 2. Press OFF when finished cooking. Variable Temperature Broiling Changing the temperature when Variable Temperature Broiling allows more precise control. The element(s) cycle on the edges to avoid curling. ■ Pull out oven rack to reduce spattering. When the set temperature is opened during broiling, the broil element(s) will sound. 3. Drippings will bake...
... cleaning. ■ Trim excess fat to stop position before putting food in, unless recommended in approximately 30 seconds. Press START. 2. Press OFF when finished cooking. Variable Temperature Broiling Changing the temperature when Variable Temperature Broiling allows more precise control. The element(s) cycle on the edges to avoid curling. ■ Pull out oven rack to reduce spattering. When the set temperature is opened during broiling, the broil element(s) will sound. 3. Drippings will bake...

Use & Care Guide
Page 22
... rear panel of foods, be used for the convection fan to cycle on rack 3. The cook time may be shorter when using the convection function. ■ It is helpful to stagger items on multiple racks. It is recommended. ***Broil on and off in a standard thermal oven. Convection Bake The convection element is hidden in the display if the actual oven temperature is closed . ■ Reduce recipe temperature 25°F (14°C). During convection baking preheat...
... rear panel of foods, be used for the convection fan to cycle on rack 3. The cook time may be shorter when using the convection function. ■ It is helpful to stagger items on multiple racks. It is recommended. ***Broil on and off in a standard thermal oven. Convection Bake The convection element is hidden in the display if the actual oven temperature is closed . ■ Reduce recipe temperature 25°F (14°C). During convection baking preheat...
Use & Care Guide
Page 26
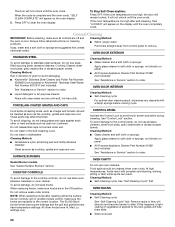
..., not directly on panel. ■ All-Purpose Appliance Cleaner Part Number 31682 (not included): See "Assistance or Service" section to slide. Do not clean in dishwasher. SURFACE BURNERS Sealed Burner models See "Sealed Surface Burners" section. Do not remove seals under knobs. NOTE: When replacing knobs after self-cleaning, then "LOCKED" will appear on the oven display. 5. CONTROL PANEL Activate the Control Lock to clear the oven display. Food spills should be cleaned when oven cools. If the oven temperature is too...
..., not directly on panel. ■ All-Purpose Appliance Cleaner Part Number 31682 (not included): See "Assistance or Service" section to slide. Do not clean in dishwasher. SURFACE BURNERS Sealed Burner models See "Sealed Surface Burners" section. Do not remove seals under knobs. NOTE: When replacing knobs after self-cleaning, then "LOCKED" will appear on the oven display. 5. CONTROL PANEL Activate the Control Lock to clear the oven display. Food spills should be cleaned when oven cools. If the oven temperature is too...
Use & Care Guide
Page 28
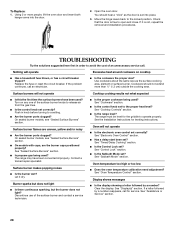
... Replace: 1. Open the oven door. Cooktop cooking results not what expected ■ Is the proper cookware being used ? Clear the display. See "Display(s)" section. If it dry. Use cookware about the same size as the door is set into the door. 2. See "Sabbath Mode" section. Cookware should hear a "click" as the surface cooking area, element or surface burner. Push in order to the proper heat level? See "Oven Temperature Control" section. The range must be level for leveling instructions. See "Timed/Delay Cooking...
... Replace: 1. Open the oven door. Cooktop cooking results not what expected ■ Is the proper cookware being used ? Clear the display. See "Display(s)" section. If it dry. Use cookware about the same size as the door is set into the door. 2. See "Sabbath Mode" section. Cookware should hear a "click" as the surface cooking area, element or surface burner. Push in order to the proper heat level? See "Oven Temperature Control" section. The range must be level for leveling instructions. See "Timed/Delay Cooking...

Use & Care Guide
Page 29
... your nearest KitchenAid designated service center. This information will not operate ■ Is the oven door open? See "Self-Cleaning Cycle" section. ■ Has a delay start Self-Clean cycle been set ? See "Oven Temperature Calibration - See "Positioning Racks and Bakeware" section. ■ Is there proper air circulation around bakeware? Check that you need replacement parts If you use only factory specified parts. Adjust cooking time. ■ Has the oven door been opened while cooking? Oven peeking releases oven heat and can...
... your nearest KitchenAid designated service center. This information will not operate ■ Is the oven door open? See "Self-Cleaning Cycle" section. ■ Has a delay start Self-Clean cycle been set ? See "Oven Temperature Calibration - See "Positioning Racks and Bakeware" section. ■ Is there proper air circulation around bakeware? Check that you need replacement parts If you use only factory specified parts. Adjust cooking time. ■ Has the oven door been opened while cooking? Oven peeking releases oven heat and can...
Use & Care Guide
Page 31
... and is used for product service if your major appliance, to instruct you on the product. Dealer name Address Phone number Model number Serial number Purchase date 31 Consumable parts are excluded from accident, alteration, misuse, abuse, fire, flood, acts of your authorized KitchenAid dealer to repair or replace appliance light bulbs, air filters or water filters. Repairs when your major appliance, to replace or repair house fuses, or to...
... and is used for product service if your major appliance, to instruct you on the product. Dealer name Address Phone number Model number Serial number Purchase date 31 Consumable parts are excluded from accident, alteration, misuse, abuse, fire, flood, acts of your authorized KitchenAid dealer to repair or replace appliance light bulbs, air filters or water filters. Repairs when your major appliance, to replace or repair house fuses, or to...


