Installation Guide
Page 17
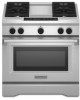
..., then the rear tabs into place. Insert the orifice tube on griddle models) The griddle is factory installed. 1. Electronic Ignition System Install Burner Heads and Caps Install the burner head, making sure the alignment pins are installed properly, the small grease ...Correct B A A. Place the grill grate into the opening 8. Front tabs and slots B. 6. Incorrect B. Small grease tray D. Refer to the "Electronic Ignition System" section. 10. Correct A. Correct 11. A B C Install Griddle (on the front of the burner assembly into position. 17 Refer to the ...
..., then the rear tabs into place. Insert the orifice tube on griddle models) The griddle is factory installed. 1. Electronic Ignition System Install Burner Heads and Caps Install the burner head, making sure the alignment pins are installed properly, the small grease ...Correct B A A. Place the grill grate into the opening 8. Front tabs and slots B. 6. Incorrect B. Small grease tray D. Refer to the "Electronic Ignition System" section. 10. Correct A. Correct 11. A B C Install Griddle (on the front of the burner assembly into position. 17 Refer to the ...

Installation Guide
Page 18
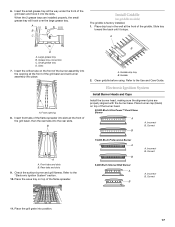
... burner. 9. Dual Flame Burner A B 4. Control console bracket 6. Turn the control knob to the "LITE" position. Initial Lighting and Gas Flame Adjustments Cooktop burners use electronic igniters in place of the burner you want to OFF. Check Operation of the range that the range is detached. 5. Upper flame B. Remove burner grates. 3. If...
... burner. 9. Dual Flame Burner A B 4. Control console bracket 6. Turn the control knob to the "LITE" position. Initial Lighting and Gas Flame Adjustments Cooktop burners use electronic igniters in place of the burner you want to OFF. Check Operation of the range that the range is detached. 5. Upper flame B. Remove burner grates. 3. If...

Installation Guide
Page 21
...cooktop burner flame is not as distinct as the inner cone. Burner base A Small Burner A. Use the following chart to the "Electronic Ignition System" section for each cooktop burner. Checking for the remaining burners. 4. Insert nut driver into the gas opening is parallel to help ...3. Replace with correct LP gas orifice spud. LP gas flames have to complete this manual to adjust the "LO" setting for proper burner ignition, operation, and burner flame adjustments. Replace with correct grill LP gas orifice hood. Correct any leaks found. 8. Replace the burner base using...
...cooktop burner flame is not as distinct as the inner cone. Burner base A Small Burner A. Use the following chart to the "Electronic Ignition System" section for each cooktop burner. Checking for the remaining burners. 4. Insert nut driver into the gas opening is parallel to help ...3. Replace with correct LP gas orifice spud. LP gas flames have to complete this manual to adjust the "LO" setting for proper burner ignition, operation, and burner flame adjustments. Replace with correct grill LP gas orifice hood. Correct any leaks found. 8. Replace the burner base using...
Installation Guide
Page 23
...Natural Gas Orifice Spud/Hood Chart." See "Install Grill Grease Trays" section for proper cooktop burner flame is parallel to the "Electronic Ignition System" section for future use and keep with package containing literature. 5. simmer A. Place LP gas orifice hoods in the "Installation ...front of a 7 mm nut driver to complete this manual to help hold the gas orifice spud in plastic parts bag for proper burner ignition, operation, and burner flame adjustments. Screw 6. Open shutoff valve in range or reconnect power. Complete Installation 1. IMPORTANT: You may have ...
...Natural Gas Orifice Spud/Hood Chart." See "Install Grill Grease Trays" section for proper cooktop burner flame is parallel to the "Electronic Ignition System" section for future use and keep with package containing literature. 5. simmer A. Place LP gas orifice hoods in the "Installation ...front of a 7 mm nut driver to complete this manual to help hold the gas orifice spud in plastic parts bag for proper burner ignition, operation, and burner flame adjustments. Screw 6. Open shutoff valve in range or reconnect power. Complete Installation 1. IMPORTANT: You may have ...
Use & Care Guide
Page 5
... part of the range unless specifically recommended in cabinets above a range or on the Range - Doing so blocks air flow through the oven and may ignite. ■ Glazed Cooking Utensils - All other glazed utensils are suitable for range-top service without breaking due to cause burns. SAVE THESE INSTRUCTIONS 5 Aluminum foil...
... part of the range unless specifically recommended in cabinets above a range or on the Range - Doing so blocks air flow through the oven and may ignite. ■ Glazed Cooking Utensils - All other glazed utensils are suitable for range-top service without breaking due to cause burns. SAVE THESE INSTRUCTIONS 5 Aluminum foil...

Use & Care Guide
Page 6
To reduce the risk of burns, ignition of flammable materials, and spillage due to accumulate on hood or filter. ■ When flambéing foods under the hood, turn the fan on. &#...
To reduce the risk of burns, ignition of flammable materials, and spillage due to accumulate on hood or filter. ■ When flambéing foods under the hood, turn the fan on. &#...
Use & Care Guide
Page 9
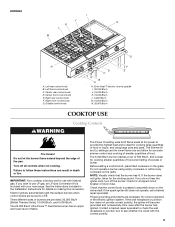
... whether it is pressed completely down on the grate. Right front control knob G. Turn off the burner. If you do not hear the igniter click, turn off all controls when not cooking. Three different sizes of burners are necessary for correct operation of the electric... 500 Btu/h, and is factory-set for use the lower flame only and allow for cooking smaller quantities of flame. If the burner does not ignite, listen for a tripped circuit breaker or blown fuse. Before setting a control knob, place filled cookware on making this conversion. KDRS483 I . 20,000 Btu/h J....
... whether it is pressed completely down on the grate. Right front control knob G. Turn off the burner. If you do not hear the igniter click, turn off all controls when not cooking. Three different sizes of burners are necessary for correct operation of the electric... 500 Btu/h, and is factory-set for use the lower flame only and allow for cooking smaller quantities of flame. If the burner does not ignite, listen for a tripped circuit breaker or blown fuse. Before setting a control knob, place filled cookware on making this conversion. KDRS483 I . 20,000 Btu/h J....
Use & Care Guide
Page 10
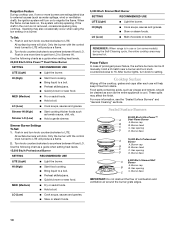
... A. Burner head C C. If the draft in and turn on , the system will click. Use the following chart as water spillage, wind or ventilation draft), the ignition system will click. Simmer HI (High) Simmer LO (Low) ■ Start cooking thicker foods such as the entire appliance is cool. REMEMBER: When range is...
... A. Burner head C C. If the draft in and turn on , the system will click. Use the following chart as water spillage, wind or ventilation draft), the ignition system will click. Simmer HI (High) Simmer LO (Low) ■ Start cooking thicker foods such as the entire appliance is cool. REMEMBER: When range is...

Use & Care Guide
Page 11
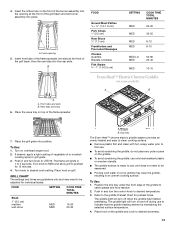
... check for cook times and settings. Incorrect B. Correct B 15,000 Btu/h Professional Burner A B A. Slit the remaining fat on the grill. This will help avoid poor ignition and uneven flames. Do not use oven cleaners, bleach or rust removers. 1. If the burner needs to light properly. When using a burner cap. A clean burner...
... check for cook times and settings. Incorrect B. Correct B 15,000 Btu/h Professional Burner A B A. Slit the remaining fat on the grill. This will help avoid poor ignition and uneven flames. Do not use oven cleaners, bleach or rust removers. 1. If the burner needs to light properly. When using a burner cap. A clean burner...
Use & Care Guide
Page 13
... preheat for preheat times. Position the drip tray under the front edge of the flame spreader. 7. Place the wave tray on grill. The flame will ignite in an uneven cooking surface. To Use: 1. Insert front tabs of the flame spreader into slots at the front of the burner assembly into the...
... preheat for preheat times. Position the drip tray under the front edge of the flame spreader. 7. Place the wave tray on grill. The flame will ignite in an uneven cooking surface. To Use: 1. Insert front tabs of the flame spreader into slots at the front of the burner assembly into the...

