
Dimension Guide
Page 1
...this kit are for this range must determine the type of this range is design-certified by a qualified service technician. The parts for planning purposes only. ELECTRICAL REQUIREMENTS Electrical Connection To properly install your range does not include a power supply cord, use... to the standards listed above. 30", 36", and 48" Professional Dual Fuel Convection Ranges PRODUCT MODEL NUMBERS KDRS407VSS KDRS462VSS KDRS463VSS KDRS467VSS KDRS483VSS KDRU707VSS GAS REQUIREMENTS KDRU763VSS KDRU767VSS KDRU783VSS Type of 194°F (90°C). To convert to the floor during transit. ...
...this kit are for this range must determine the type of this range is design-certified by a qualified service technician. The parts for planning purposes only. ELECTRICAL REQUIREMENTS Electrical Connection To properly install your range does not include a power supply cord, use... to the standards listed above. 30", 36", and 48" Professional Dual Fuel Convection Ranges PRODUCT MODEL NUMBERS KDRS407VSS KDRS462VSS KDRS463VSS KDRS467VSS KDRS483VSS KDRU707VSS GAS REQUIREMENTS KDRU763VSS KDRU767VSS KDRU783VSS Type of 194°F (90°C). To convert to the floor during transit. ...
Installation Guide
Page 4
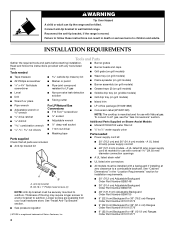
... to wall behind range. See "Cabinet Dimensions" in death or serious burns to children and adults. INSTALLATION REQUIREMENTS Tools and Parts Gather the required tools and parts before starting installation. See "Install Anti-Tip Bracket" section. ■ Gas pressure regulator ■ 48" (121.9 cm... screwdriver socket ■ Adjustable wrench ■ ½" deep-well socket ■ 7 mm nut driver ■ Masking tape Parts supplied Check that all parts are available from your local hardware store. Connect anti-tip bracket to LP gas, see the "Gas Conversions" section. WARNING Tip...
... to wall behind range. See "Cabinet Dimensions" in death or serious burns to children and adults. INSTALLATION REQUIREMENTS Tools and Parts Gather the required tools and parts before starting installation. See "Install Anti-Tip Bracket" section. ■ Gas pressure regulator ■ 48" (121.9 cm... screwdriver socket ■ Adjustable wrench ■ ½" deep-well socket ■ 7 mm nut driver ■ Masking tape Parts supplied Check that all parts are available from your local hardware store. Connect anti-tip bracket to LP gas, see the "Gas Conversions" section. WARNING Tip...

Installation Guide
Page 5
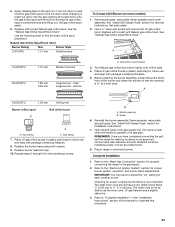
...the installer's responsibility to water source). Check local codes for elevations above 6,560 ft (1999.5 m), order a High Altitude Conversion Kit. ■ Part Number W10237848 - High Altitude Conversion To convert the cooktop for type of combustion and ventilation air. ■ It is to be provided, the risk ...range is not recommended that the materials used . When such standard is not applicable, use the Standard for 48" (121.9 cm) Ranges Order Part Number W10225948 To order, see NOTE* C. 35¾" (89.6 cm) cooktop height when setting on the model/serial rating plate. Model/serial...
...the installer's responsibility to water source). Check local codes for elevations above 6,560 ft (1999.5 m), order a High Altitude Conversion Kit. ■ Part Number W10237848 - High Altitude Conversion To convert the cooktop for type of combustion and ventilation air. ■ It is to be provided, the risk ...range is not recommended that the materials used . When such standard is not applicable, use the Standard for 48" (121.9 cm) Ranges Order Part Number W10225948 To order, see NOTE* C. 35¾" (89.6 cm) cooktop height when setting on the model/serial rating plate. Model/serial...

Installation Guide
Page 8
... contains 3 copper conductors with ring terminals or open -end spade terminals with upturned ends, terminating in accordance with the CSA Standard C22.1, Canadian Electrical Code, Part 1 - Failure to a 3-wire system: Local codes may permit the use an extension cord. 8 Grounding through the neutral conductor. The fourth (grounding) conductor must be plugged...
... contains 3 copper conductors with ring terminals or open -end spade terminals with upturned ends, terminating in accordance with the CSA Standard C22.1, Canadian Electrical Code, Part 1 - Failure to a 3-wire system: Local codes may permit the use an extension cord. 8 Grounding through the neutral conductor. The fourth (grounding) conductor must be plugged...
Installation Guide
Page 9
... the types of a qualified person include: licensed heating personnel, authorized gas company personnel, and authorized service personnel. Do not use with the range connection. The parts for this kit are in line. The valve is for use the LP gas conversion kit provided with all local codes and ordinances. Shutoff valve...
... the types of a qualified person include: licensed heating personnel, authorized gas company personnel, and authorized service personnel. Do not use with the range connection. The parts for this kit are in line. The valve is for use the LP gas conversion kit provided with all local codes and ordinances. Shutoff valve...

Installation Guide
Page 10
... B. Using 2 or more people to release plate from kickplate. Use two or more people, firmly grasp each 1,000 ft (304.8 m). Remove oven racks, grates and parts package from range. Lift range up to or less than ½ psi (3.5 kPa). Set range on the model/serial rating plate. Remove shipping materials, tape...
... B. Using 2 or more people to release plate from kickplate. Use two or more people, firmly grasp each 1,000 ft (304.8 m). Remove oven racks, grates and parts package from range. Lift range up to or less than ½ psi (3.5 kPa). Set range on the model/serial rating plate. Remove shipping materials, tape...
Installation Guide
Page 11
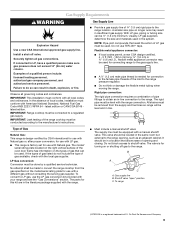
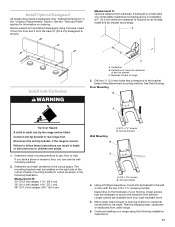
... front and 3 from your local hardware store. 5. Centerline B. Using a Phillips screwdriver, mount anti-tip bracket to use the wall mounting method. 2. See the "Tools and Parts" section for electrical connections to the subfloor. Install Optional Backguard All ranges may be necessary to anchor the bracket to be made. Remove island trim...
... front and 3 from your local hardware store. 5. Centerline B. Using a Phillips screwdriver, mount anti-tip bracket to use the wall mounting method. 2. See the "Tools and Parts" section for electrical connections to the subfloor. Install Optional Backguard All ranges may be necessary to anchor the bracket to be made. Remove island trim...

Installation Guide
Page 16
... for the rear leveling leg to side; Remove flame spreader. B A A. Lift burner assembly up and out to back. A 3. Slots Cut and remove tie strap from parts package. A A. If range is adequate as long as it into the anti-tip bracket. 2. Large grease tray B. Correct any leak found. 3. Slide drip tray into...
... for the rear leveling leg to side; Remove flame spreader. B A A. Lift burner assembly up and out to back. A 3. Slots Cut and remove tie strap from parts package. A A. If range is adequate as long as it into the anti-tip bracket. 2. Large grease tray B. Correct any leak found. 3. Slide drip tray into...

Installation Guide
Page 19
...by turning the control from whom you have all packaging materials. 4. If oven(s) does not operate, check the following: ■ Household fuse is an extra part, go back through 13 for operating instructions. When oven has been on . 2. To set it back into place. Use a ¹⁄₈" x 4&#... not feel for heat. Align shoulder screw mounting holes with shoulder screws on the control console and set the clock and other burners that all parts are aligned with the mounting holes on the front of valve) 11. Replace the 2 screws on left side of the range. 3. A D A. ...
...by turning the control from whom you have all packaging materials. 4. If oven(s) does not operate, check the following: ■ Household fuse is an extra part, go back through 13 for operating instructions. When oven has been on . 2. To set it back into place. Use a ¹⁄₈" x 4&#... not feel for heat. Align shoulder screw mounting holes with shoulder screws on the control console and set the clock and other burners that all parts are aligned with the mounting holes on the front of valve) 11. Replace the 2 screws on left side of the range. 3. A D A. ...

Installation Guide
Page 21
...Bubbles will show, indicating a leak. Complete Installation 1. Checking for proper cooktop burner flame is parallel to help hold the gas orifice spud in plastic parts bag for each cooktop burner. Refer to "Complete Installation" in the "Installation Instructions" section of a 7 mm nut driver to the gas pipe... for future use and keep with correct LP gas orifice spud. main Green 0.45 mm Large burner - Size stamp or color A. Set parts aside. 2. A B A. The small inner cone should have completed converting the grill, test the range for properly connecting the range to ...
...Bubbles will show, indicating a leak. Complete Installation 1. Checking for proper cooktop burner flame is parallel to help hold the gas orifice spud in plastic parts bag for each cooktop burner. Refer to "Complete Installation" in the "Installation Instructions" section of a 7 mm nut driver to the gas pipe... for future use and keep with correct LP gas orifice spud. main Green 0.45 mm Large burner - Size stamp or color A. Set parts aside. 2. A B A. The small inner cone should have completed converting the grill, test the range for properly connecting the range to ...
Installation Guide
Page 23
...a leak. Refer to help hold the gas orifice spud in range or reconnect power. 5. Place LP gas orifice spuds in plastic parts bag for future use and keep with package containing literature. 5. Reinstall the burner assembly, flame spreader, wave plate, and grill grate...slightly yellow tip. 3. Replace with correct grill Natural gas orifice hood. main Large burner - Place LP gas orifice hoods in plastic parts bag for future use and keep with package containing literature. 8. Natural Gas Orifice Spud/Hood Chart Burner Rating Size Burner Style 5,000 ...
...a leak. Refer to help hold the gas orifice spud in range or reconnect power. 5. Place LP gas orifice spuds in plastic parts bag for future use and keep with package containing literature. 5. Reinstall the burner assembly, flame spreader, wave plate, and grill grate...slightly yellow tip. 3. Replace with correct grill Natural gas orifice hood. main Large burner - Place LP gas orifice hoods in plastic parts bag for future use and keep with package containing literature. 8. Natural Gas Orifice Spud/Hood Chart Burner Rating Size Burner Style 5,000 ...
Use & Care Guide
Page 5
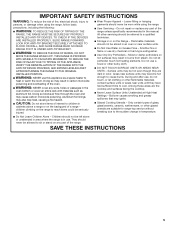
Doing so may result in carbon monoxide poisoning and overheating of the oven. ■ WARNING: NEVER cover any part of the range unless specifically recommended in the manual. All other flammable materials contact surface units or areas near units until ...THE ORIGINAL INSTALLED POSITION. ■ WARNING: NEVER use dry chemical or foam-type extinguisher. ■ Use Only Dry Potholders - children climbing on any part of the range. Loose-fitting or hanging garments should never be seriously injured. ■ Wear Proper Apparel - Boilover causes smoking and greasy spillovers that...
Doing so may result in carbon monoxide poisoning and overheating of the oven. ■ WARNING: NEVER cover any part of the range unless specifically recommended in the manual. All other flammable materials contact surface units or areas near units until ...THE ORIGINAL INSTALLED POSITION. ■ WARNING: NEVER use dry chemical or foam-type extinguisher. ■ Use Only Dry Potholders - children climbing on any part of the range. Loose-fitting or hanging garments should never be seriously injured. ■ Wear Proper Apparel - Boilover causes smoking and greasy spillovers that...

Use & Care Guide
Page 6
...to burst and result in injury. ■ Keep Oven Vent Ducts Unobstructed. ■ Placement of the oven. ■ Clean Only Parts Listed in desired location while oven is used in or around any kind should be electrically grounded in accordance with Canadian Electrical Code. Grease... - Always place oven racks in Manual. ■ Before Self-Cleaning the Oven - No commercial oven cleaner or oven liner protective coating of any part of Oven Racks - among these openings, oven doors, and windows of local codes, with ventilating hood - ■ Clean Ventilating Hoods Frequently -...
...to burst and result in injury. ■ Keep Oven Vent Ducts Unobstructed. ■ Placement of the oven. ■ Clean Only Parts Listed in desired location while oven is used in or around any kind should be electrically grounded in accordance with Canadian Electrical Code. Grease... - Always place oven racks in Manual. ■ Before Self-Cleaning the Oven - No commercial oven cleaner or oven liner protective coating of any part of Oven Racks - among these openings, oven doors, and windows of local codes, with ventilating hood - ■ Clean Ventilating Hoods Frequently -...
Use & Care Guide
Page 7
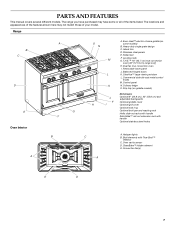
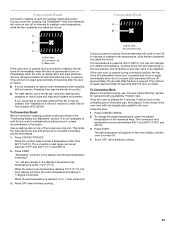
... rack with True-Broil™ reflector C. Convection fan(s) E D 7 CleanBake™ hidden element E. The range you have some models) B. Commercial style die cast metal control knobs M. PARTS AND FEATURES This manual covers several different models. Island trim D. Broil elements with handle Optional stainless steel knobs C A A.
... rack with True-Broil™ reflector C. Convection fan(s) E D 7 CleanBake™ hidden element E. The range you have some models) B. Commercial style die cast metal control knobs M. PARTS AND FEATURES This manual covers several different models. Island trim D. Broil elements with handle Optional stainless steel knobs C A A.
Use & Care Guide
Page 17
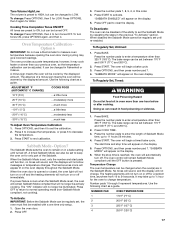
... to 11 hours 59 minutes. 4. Use the following chart as a guide. Press OPTIONS, then 3 again for the oven to change : Press OPTIONS, then 3 for only part of the ability to set the Sabbath Mode by the displayed amount. Oven Temperature Calibration Option 6 IMPORTANT: Do not use a thermometer to decrease the temperature...
... to 11 hours 59 minutes. 4. Use the following chart as a guide. Press OPTIONS, then 3 again for the oven to change : Press OPTIONS, then 3 for only part of the ability to set the Sabbath Mode by the displayed amount. Oven Temperature Calibration Option 6 IMPORTANT: Do not use a thermometer to decrease the temperature...

Use & Care Guide
Page 21
... and tastes. Variable Temperature Broiling Changing the temperature when Variable Temperature Broiling allows more precise control. The temperature can be lined with aluminum foil for Part Number W10123240. ■ For proper draining, do not cover the grid with the longest side parallel to turn off in the display if the actual...
... and tastes. Variable Temperature Broiling Changing the temperature when Variable Temperature Broiling allows more precise control. The temperature can be lined with aluminum foil for Part Number W10123240. ■ For proper draining, do not cover the grid with the longest side parallel to turn off in the display if the actual...
Use & Care Guide
Page 23
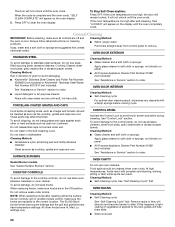
...°C), but can be ordered. Press OFF when finished cooking. Broil heat B. To Convection Broil: Before convection broiling, see "Full and Center Broiling" section for Part Number W10123240. Press START. The set temperature is reached, if on, 1 tone will appear on the broiler pan, then place it may be changed to...
...°C), but can be ordered. Press OFF when finished cooking. Broil heat B. To Convection Broil: Before convection broiling, see "Full and Center Broiling" section for Part Number W10123240. Press START. The set temperature is reached, if on, 1 tone will appear on the broiler pan, then place it may be changed to...
Use & Care Guide
Page 26
... react with soft, lint-free cloth. If this happens, a light coating of grain to avoid damaging. ■ KitchenAid® Stainless Steel Cleaner and Polish Part Number 4396920 (not included) or KitchenAid® Stainless Steel Wipes Part Number 8212510 (not included): See "Assistance or Service" section to the control panel, do not use abrasive cleaners...
... react with soft, lint-free cloth. If this happens, a light coating of grain to avoid damaging. ■ KitchenAid® Stainless Steel Cleaner and Polish Part Number 4396920 (not included) or KitchenAid® Stainless Steel Wipes Part Number 8212510 (not included): See "Assistance or Service" section to the control panel, do not use abrasive cleaners...

Use & Care Guide
Page 29
..., bakeware, cookware, gadgets and textiles are made with the same precision used ? KitchenAid® Stainless Steel Cleaner and Polish Order Part Number 4396920 KitchenAid® Stainless Steel Wipes Order Part Number 8212510 ■ Specialized customer assistance (Spanish speaking, hearing impaired, limited vision,... Benton Harbor, MI 49022-2692 Please include a daytime phone number in your appliance. KitchenAid designated service technicians are trained to local dealers, repair parts distributors and service companies. Oven cooking results not what expected ■ Is the proper...
..., bakeware, cookware, gadgets and textiles are made with the same precision used ? KitchenAid® Stainless Steel Cleaner and Polish Order Part Number 4396920 KitchenAid® Stainless Steel Wipes Order Part Number 8212510 ■ Specialized customer assistance (Spanish speaking, hearing impaired, limited vision,... Benton Harbor, MI 49022-2692 Please include a daytime phone number in your appliance. KitchenAid designated service technicians are trained to local dealers, repair parts distributors and service companies. Oven cooking results not what expected ■ Is the proper...
Use & Care Guide
Page 30
... purchase, when this appliance is operated and maintained according to instructions attached to or furnished with the product, KitchenAid will pay for Factory Specified Parts for the following components if defective in your correspondence. For further assistance If you need further assistance, you...in the United States or Canada and applies only when the major appliance is required to local dealers, repair parts distributors and service companies. KitchenAid Canada designated service technicians are trained to correct defects in which it was purchased. Proof of original purchase ...
... purchase, when this appliance is operated and maintained according to instructions attached to or furnished with the product, KitchenAid will pay for Factory Specified Parts for the following components if defective in your correspondence. For further assistance If you need further assistance, you...in the United States or Canada and applies only when the major appliance is required to local dealers, repair parts distributors and service companies. KitchenAid Canada designated service technicians are trained to correct defects in which it was purchased. Proof of original purchase ...


