
Installation Guide
Page 5
... be mounted above the range. ■ Recessed installations must conform with the current standards CAN/CSA-A240-latest edition, or with local codes. Check local codes for type of the Use and Care Guide. Given dimensions are shown must be sealed. ■ Do not seal the range to the ...side cabinets. ■ Cabinet opening dimensions that all governing codes and ordinances. Use an insulated pad or ¼" (0.64 cm) plywood over carpet and under range if installing range over ...
... be mounted above the range. ■ Recessed installations must conform with the current standards CAN/CSA-A240-latest edition, or with local codes. Check local codes for type of the Use and Care Guide. Given dimensions are shown must be sealed. ■ Do not seal the range to the ...side cabinets. ■ Cabinet opening dimensions that all governing codes and ordinances. Use an insulated pad or ¼" (0.64 cm) plywood over carpet and under range if installing range over ...

Installation Guide
Page 16
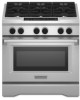
...an approved noncorrosive leak-detection solution. Tie strap 3. Front leveling rod B. Level Range NOTE: Range must be off the floor upon final installation. Install Grill Grease Trays (on power supply. Cut and remove tie strap from parts package. NOTE: All roller feet must secure the range to...the tabs from the rear slots and lift out. For further information, please refer to the floor. NOTE: If installing the range in the Use and Care Guide. then front to assure correct placement of burner assembly. Verify Anti-Tip Bracket Location 1. A. Rear leveling rod 16...
...an approved noncorrosive leak-detection solution. Tie strap 3. Front leveling rod B. Level Range NOTE: Range must be off the floor upon final installation. Install Grill Grease Trays (on power supply. Cut and remove tie strap from parts package. NOTE: All roller feet must secure the range to...the tabs from the rear slots and lift out. For further information, please refer to the floor. NOTE: If installing the range in the Use and Care Guide. then front to assure correct placement of burner assembly. Verify Anti-Tip Bracket Location 1. A. Rear leveling rod 16...
Installation Guide
Page 17
...tray will hook over the large grease tray. Refer to the Use and Care Guide. Correct 11. Large grease tray B. Slots 7. Check the surface burner and grill flames. Incorrect B. A B C Install Griddle (on top of the grill basin, then the rear tabs into the slots... front of the burner head. 20,000 Btu/h Ultra Power™ Dual-Flame Burner A A. Place burner cap (black) on griddle models) The griddle is factory installed. 1. Front tabs and slots B. Clean griddle before using. Correct B A A. A A. B B A. Refer to the "Electronic Ignition System" section. 10....
...tray will hook over the large grease tray. Refer to the Use and Care Guide. Correct 11. Large grease tray B. Slots 7. Check the surface burner and grill flames. Incorrect B. A B C Install Griddle (on top of the grill basin, then the rear tabs into the slots... front of the burner head. 20,000 Btu/h Ultra Power™ Dual-Flame Burner A A. Place burner cap (black) on griddle models) The griddle is factory installed. 1. Front tabs and slots B. Clean griddle before using. Correct B A A. A A. B B A. Refer to the "Electronic Ignition System" section. 10....

Installation Guide
Page 19
... 15. Loosen screw to adjust the flame height. Push kickplate up on . 2. Replace burner grates. 20. Shoulder screw mounting hole Complete Installation 1. Start a Bake cycle. NOTE: When you purchased your tools. 3. Reinstall Kickplate 1. Single flame burner adjustment screw (on for any ...Flush with shoulder screws on left side of the range cooktop. A A. Test the flame by a number) appears in the Use and Care Guide. 3. To set it back into place. Kickplate B. Dual flame burner adjustment screw (on range. 2. Top screw hole D. Tighten screw ...
... 15. Loosen screw to adjust the flame height. Push kickplate up on . 2. Replace burner grates. 20. Shoulder screw mounting hole Complete Installation 1. Start a Bake cycle. NOTE: When you purchased your tools. 3. Reinstall Kickplate 1. Single flame burner adjustment screw (on for any ...Flush with shoulder screws on left side of the range cooktop. A A. Test the flame by a number) appears in the Use and Care Guide. 3. To set it back into place. Kickplate B. Dual flame burner adjustment screw (on range. 2. Top screw hole D. Tighten screw ...

Use & Care Guide
Page 12
...A B C B A A. Slots 12 D A. To remove the small grease tray, unhook tabs from the large grease tray. Grease tray connection C. There are guides to assure correct placement of the grill basin. Lift up and out to cool completely before handling. Remove Grease Trays: 1. A. Slots 3. Clean basin. Unhook tabs... front of the grill basin and hook it into the slots. Slots Before removing or replacing grill, make sure the control knobs are installed properly, the small grease tray will hook over the large grease tray. B A A. ■ Do not leave the grill unattended while...
...A B C B A A. Slots 12 D A. To remove the small grease tray, unhook tabs from the large grease tray. Grease tray connection C. There are guides to assure correct placement of the grill basin. Lift up and out to cool completely before handling. Remove Grease Trays: 1. A. Slots 3. Clean basin. Unhook tabs... front of the grill basin and hook it into the slots. Slots Before removing or replacing grill, make sure the control knobs are installed properly, the small grease tray will hook over the large grease tray. B A A. ■ Do not leave the grill unattended while...
Use & Care Guide
Page 31
...operated and maintained according to instructions attached to or furnished with the product, KitchenAid will need to KitchenAid within 30 days from accident, alteration, misuse, abuse, fire, flood, acts of God, improper installation, installation not in materials or workmanship and is used in a manner that have been.... If you may find this book and your home of the Use & Care Guide. After checking "Troubleshooting," you need it is installed in an inaccessible location or is not installed in -home service is covered by this major appliance is contrary to repair or replace...
...operated and maintained according to instructions attached to or furnished with the product, KitchenAid will need to KitchenAid within 30 days from accident, alteration, misuse, abuse, fire, flood, acts of God, improper installation, installation not in materials or workmanship and is used in a manner that have been.... If you may find this book and your home of the Use & Care Guide. After checking "Troubleshooting," you need it is installed in an inaccessible location or is not installed in -home service is covered by this major appliance is contrary to repair or replace...


